概要
Google Compute Engine(Google Cloud Platform上の仮想マシン)のインスタンスは、Google Cloud Platformのコンソールから作成・削除できますが、この記事ではTerraformを使ってインスタンスの作成と削除をします。
Terraformのインストール (Linux)
私はArch Linuxを使っており、Arch Linuxには[community]に、terraformパッケージがあるようです。ですが、このterraformパッケージをインストールして実行してみたところ、バージョンが古いといわれました。
❯ terraform --version
Terraform v0.9.9

Your version of Terraform is out of date! The latest version
is 0.9.11. You can update by downloading from www.terraform.io
仕方ないので、Terraformのウェブサイトからバイナリディストリビューションをダウンロードします。ダウンロードしたzipファイルを展開して、実行ファイル(terraform)を/usr/local/binなどPATHの通っているディレクトリにコピーすればインストールは終わりです。
GCPのcredentialsのダウンロード
TerraformからGCPのサービスを操作するには、Google Cloudプロバイダを設定する必要があります。このプロバイダの設定として、ドキュメントに次の通りの例が挙げられています。
// Configure the Google Cloud provider
provider "google" {
  credentials = "${file("account.json")}"
  project     = "my-gce-project"
  region      = "us-central1"
}

// Create a new instance
resource "google_compute_instance" "default" {
  # ...
}
ここで、credentialsについてはドキュメントに次の通りに説明されています。
credentials - (Optional) Contents of the JSON file used to describe your account credentials, downloaded from Google Cloud Console. More details on retrieving this file are below. Credentials may be blank if you are running Terraform from a GCE instance with a properly-configured Compute Engine Service Account.
つまり、GCEのインスタンスからTerraformを実行する場合はcredentialsの欄を空白にできる場合があるようですが、今回は(GCP上にない)ローカルのコンピュータからTerraformを実行しますので、credentialsのファイルをダウンロードしなければなりません。
ドキュメントの手順に従って、credentialsファイルをダウンロードします。
- GCPのコンソールを開き、API ManagerのCredentialsを選択する。
- Create credentialsからService account keyを選択。
- Service accountとしてCompute Engine default service accountを選択、Key typeはJSON(デフォルト)として、Create。
- ダウンロードしたファイルをTerraformのプロジェクトと同じディレクトリにコピー。
インスタンスの作成
Credentialsをダウンロードしたら、次の内容の設定ファイルでTerraformからGCEのインスタンスを作成することができます。
provider "google" {
  credentials = "${file("account.json")}"
  project     = "myproject-123456"
  region      = "asia-northeast1-a"
}

resource "google_compute_instance" "default" {
  name         = "terraform"
  machine_type = "f1-micro"
  zone         = "asia-northeast1-a"

  tags = []

  disk {
    image = "debian-cloud/debian-8"
  }

  network_interface {
    network = "default"
  }

  service_account {
    scopes = ["userinfo-email", "compute-ro", "storage-ro"]
  }
}
ここで、account.jsonは先ほどダウンロードしたcredentialsファイルの名前、projectはGCPのプロジェクトIDです。
terraform planでプランの確認(次のような出力が返されます)、
Refreshing Terraform state in-memory prior to plan...
The refreshed state will be used to calculate this plan, but will not be
persisted to local or remote state storage.

The Terraform execution plan has been generated and is shown below.
Resources are shown in alphabetical order for quick scanning. Green resources
will be created (or destroyed and then created if an existing resource
exists), yellow resources are being changed in-place, and red resources
will be destroyed. Cyan entries are data sources to be read.

Note: You didn't specify an "-out" parameter to save this plan, so when
"apply" is called, Terraform can't guarantee this is what will execute.

+ google_compute_instance.default
    can_ip_forward:                      "false"
    create_timeout:                      "4"
    disk.#:                              "1"
    disk.0.auto_delete:                  "true"
    disk.0.disk_encryption_key_sha256:   "<computed>"
    disk.0.image:                        "debian-cloud/debian-8"
    machine_type:                        "f1-micro"
    metadata_fingerprint:                "<computed>"
    name:                                "terraform"
    network_interface.#:                 "1"
    network_interface.0.address:         "<computed>"
    network_interface.0.name:            "<computed>"
    network_interface.0.network:         "default"
    self_link:                           "<computed>"
    service_account.#:                   "1"
    service_account.0.email:             "<computed>"
    service_account.0.scopes.#:          "3"
    service_account.0.scopes.1632638332: "https://www.googleapis.com/auth/devstorage.read_only"
    service_account.0.scopes.2428168921: "https://www.googleapis.com/auth/userinfo.email"
    service_account.0.scopes.2862113455: "https://www.googleapis.com/auth/compute.readonly"
    tags_fingerprint:                    "<computed>"
    zone:                                "asia-northeast1-a"
terraform applyでプランの適用(実行)をします:
google_compute_instance.default: Creating...
  can_ip_forward:                      "" => "false"
  create_timeout:                      "" => "4"
  disk.#:                              "" => "1"
  disk.0.auto_delete:                  "" => "true"
  disk.0.disk_encryption_key_sha256:   "" => "<computed>"
  disk.0.image:                        "" => "debian-cloud/debian-8"
  machine_type:                        "" => "f1-micro"
  metadata_fingerprint:                "" => "<computed>"
  name:                                "" => "terraform"
  network_interface.#:                 "" => "1"
  network_interface.0.address:         "" => "<computed>"
  network_interface.0.name:            "" => "<computed>"
  network_interface.0.network:         "" => "default"
  self_link:                           "" => "<computed>"
  service_account.#:                   "" => "1"
  service_account.0.email:             "" => "<computed>"
  service_account.0.scopes.#:          "" => "3"
  service_account.0.scopes.1632638332: "" => "https://www.googleapis.com/auth/devstorage.read_only"
  service_account.0.scopes.2428168921: "" => "https://www.googleapis.com/auth/userinfo.email"
  service_account.0.scopes.2862113455: "" => "https://www.googleapis.com/auth/compute.readonly"
  tags_fingerprint:                    "" => "<computed>"
  zone:                                "" => "asia-northeast1-a"
google_compute_instance.default: Still creating... (10s elapsed)
google_compute_instance.default: Creation complete (ID: terraform)

Apply complete! Resources: 1 added, 0 changed, 0 destroyed.

The state of your infrastructure has been saved to the path
below. This state is required to modify and destroy your
infrastructure, so keep it safe. To inspect the complete state
use the `terraform show` command.

State path:
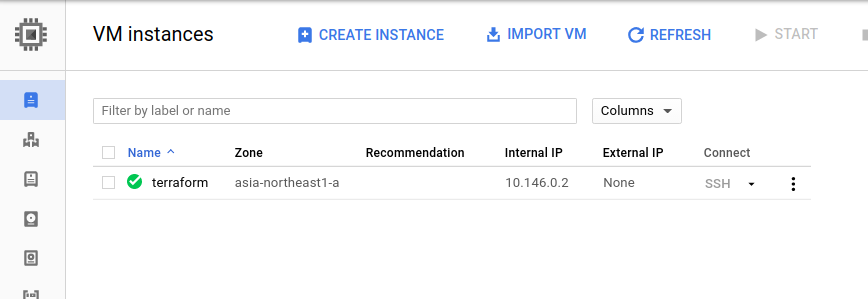
GCPのコンソールで確認したところ、確かにGCEのVMインスタンスが作成されていました。
インスタンスの削除(破壊)
Terraformで作成したインスタンスをTerraformで削除することもできます。
まずterraform plan -destroyで破壊プランの確認をします:
Refreshing Terraform state in-memory prior to plan...
The refreshed state will be used to calculate this plan, but will not be
persisted to local or remote state storage.

google_compute_instance.default: Refreshing state... (ID: terraform)
The Terraform execution plan has been generated and is shown below.
Resources are shown in alphabetical order for quick scanning. Green resources
will be created (or destroyed and then created if an existing resource
exists), yellow resources are being changed in-place, and red resources
will be destroyed. Cyan entries are data sources to be read.

Note: You didn't specify an "-out" parameter to save this plan, so when
"apply" is called, Terraform can't guarantee this is what will execute.

- google_compute_instance.default


Plan: 0 to add, 0 to change, 1 to destroy.
terraform destroyで実行します:
Do you really want to destroy?
  Terraform will delete all your managed infrastructure.
  There is no undo. Only 'yes' will be accepted to confirm.

  Enter a value: yes

google_compute_instance.default: Refreshing state... (ID: terraform)
google_compute_instance.default: Destroying... (ID: terraform)
google_compute_instance.default: Still destroying... (ID: terraform, 10s elapsed)
google_compute_instance.default: Still destroying... (ID: terraform, 20s elapsed)
google_compute_instance.default: Destruction complete

Destroy complete! Resources: 1 destroyed.
まとめ
今回はGCP上にVMのインスタンスを1個作成しただけというごく初歩的な内容でしたが、この応用で、より複雑なインフラをTerraformを使って構築することができます。Terraformのような設定ファイルベースのツールを使ってインフラを構築する(Infrastructure as Code)ことで、インフラの構成をバージョン管理したり、同じ構成のインフラを繰り返し作成・破壊することが容易になります。