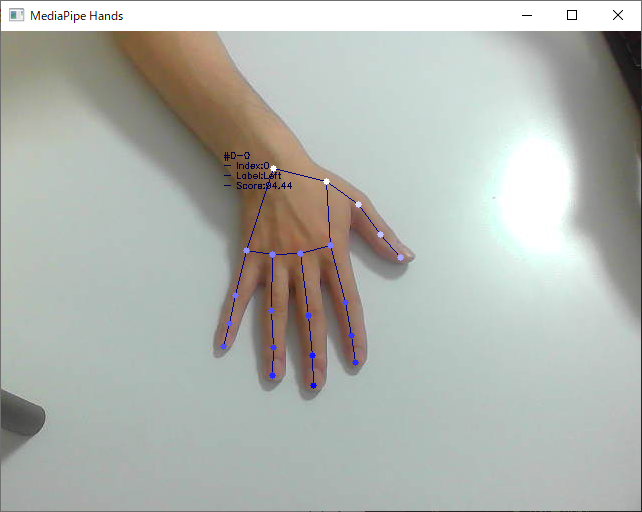
MediaPipe Handsを使うとカメラ画像から簡単に手の位置形状が検出できるっぽいのでやってみた。
短いコードで動かしてみたいなら、公式のサンプルコードのほうが短いのでそちらを参照。
動作環境
- Windows10
- Python : 3.8.10
- opencv-python : 4.5.2.54
- mediapipe : 0.8.6
ソースコード
公式サンプルコードでは、mediapipe.solutions.drawing_utilsのdraw_landmarksを使って画像の情報を追加しているけど、
実際に検出結果を使って何かをしたくなったら、どういう情報が帰ってきているか詳しく知らないと使えないので、
自前で検出結果を表示してみました。
やっていることとしては、
- ランドマーク間の繋がりをlineで表示
- ランドマークをcircleで表示(Z値 奥行によって色変化)
- 検出情報をテキストで表示(手首付近に表示)
import cv2
import mediapipe as mp

# landmarkの繋がり表示用
landmark_line_ids = [
    (0, 1), (1, 5), (5, 9), (9, 13), (13, 17), (17, 0),  # 掌
    (1, 2), (2, 3), (3, 4),         # 親指
    (5, 6), (6, 7), (7, 8),         # 人差し指
    (9, 10), (10, 11), (11, 12),    # 中指
    (13, 14), (14, 15), (15, 16),   # 薬指
    (17, 18), (18, 19), (19, 20),   # 小指
]

mp_hands = mp.solutions.hands
hands = mp_hands.Hands(
    max_num_hands=2,                # 最大検出数
    min_detection_confidence=0.7,   # 検出信頼度
    min_tracking_confidence=0.7     # 追跡信頼度
)

cap = cv2.VideoCapture(0)   # カメラのID指定
if cap.isOpened():
    while True:
        # カメラから画像取得
        success, img = cap.read()
        if not success:
            continue
        img = cv2.flip(img, 1)          # 画像を左右反転
        img_h, img_w, _ = img.shape     # サイズ取得

        # 検出処理の実行
        results = hands.process(cv2.cvtColor(img, cv2.COLOR_BGR2RGB))
        if results.multi_hand_landmarks:
            # 検出した手の数分繰り返し
            for h_id, hand_landmarks in enumerate(results.multi_hand_landmarks):

                # landmarkの繋がりをlineで表示
                for line_id in landmark_line_ids:
                    # 1点目座標取得
                    lm = hand_landmarks.landmark[line_id[0]]
                    lm_pos1 = (int(lm.x * img_w), int(lm.y * img_h))
                    # 2点目座標取得
                    lm = hand_landmarks.landmark[line_id[1]]
                    lm_pos2 = (int(lm.x * img_w), int(lm.y * img_h))
                    # line描画
                    cv2.line(img, lm_pos1, lm_pos2, (128, 0, 0), 1)

                # landmarkをcircleで表示
                z_list = [lm.z for lm in hand_landmarks.landmark]
                z_min = min(z_list)
                z_max = max(z_list)
                for lm in hand_landmarks.landmark:
                    lm_pos = (int(lm.x * img_w), int(lm.y * img_h))
                    lm_z = int((lm.z - z_min) / (z_max - z_min) * 255)
                    cv2.circle(img, lm_pos, 3, (255, lm_z, lm_z), -1)

                # 検出情報をテキスト出力
                # - テキスト情報を作成
                hand_texts = []
                for c_id, hand_class in enumerate(results.multi_handedness[h_id].classification):
                    hand_texts.append("#%d-%d" % (h_id, c_id))
                    hand_texts.append("- Index:%d" % (hand_class.index))
                    hand_texts.append("- Label:%s" % (hand_class.label))
                    hand_texts.append("- Score:%3.2f" % (hand_class.score * 100))
                # - テキスト表示に必要な座標など準備
                lm = hand_landmarks.landmark[0]
                lm_x = int(lm.x * img_w) - 50
                lm_y = int(lm.y * img_h) - 10
                lm_c = (64, 0, 0)
                font = cv2.FONT_HERSHEY_SIMPLEX
                # - テキスト出力
                for cnt, text in enumerate(hand_texts):
                    cv2.putText(img, text, (lm_x, lm_y + 10 * cnt), font, 0.3, lm_c, 1)

        # 画像の表示
        cv2.imshow("MediaPipe Hands", img)
        key = cv2.waitKey(1) & 0xFF
        if key == ord('q') or key == ord('Q') or key == 0x1b:
            break

cap.release()
実行画面
補足情報
Handsの検出結果mediapipe.python.solution_base.SolutionOutputsとしては以下
-
multi_hand_landmarks[N].landmark[HandLandmark].x: float- ランドマークのX軸の位置
- 0.0~1.0 の数値 ※実際には元画像から見切れる位置の場合は、範囲外の値が来ることあり
- 正規化されているので画像上のpixel座標に変換するなら、元画像の横幅を乗算する必要あり
-
multi_hand_landmarks[N].landmark[HandLandmark].y: float- ランドマークのY軸の位置
- 0.0~1.0 の数値 ※実際には元画像から見切れる位置の場合は、範囲外の値が来ることあり
- 正規化されているので画像上のpixel座標に変換するなら、元画像の縦幅を乗算する必要あり
-
multi_hand_landmarks[N].landmark[HandLandmark].z: float- ランドマークのZ軸の位置
- 手首のランドマーク
HandLandmarkの位置を0とした数値 - 手前方向がマイナス値、奥方向がプラス値
- 正規化されておらず数値の範囲は未定義。
-
multi_handedness[N].classification[M].index: int- 検出した手ごとに降られたIndex値
- 追尾中は同じ値が割り振られ続けているように見える
-
multi_handedness[N].classification[M].label: str- 検出した手が右手
Rightか左手Left、どちらの手として検出されたかが文字列で格納される - 画像を反転して入力してたりする場合などは、自分で上記値を読み替えて使う必要あり
- 検出した手が右手
-
multi_handedness[N].classification[M].score: float- 検出スコア
- 0.0~1.0 の数値
-
HandLandmark: 0~21 のenum値。手のランドマーク - 上記の
N部分は、検出した手の件数
残念ながら、X軸、Y軸、Z軸のスケールがそれぞれ異なるので、どういった形状の手として認識したかを3D空間上で表現したい場合には、
何かしらひと手間加える必要がありそうです。
