C/C++の関数一覧や変数一覧を拾いたい。
でも自分でコンパイラの字句解析・構文解析を行うのはしんどい。
そんなときに、ClangならのAST(抽象構文木)を取得できて、
さらにPythonで簡単に利用できるようにPython bindingが用意されているので使ってみました。
ただ、Windows環境下で使うにはいろいろとセットアップが必要だったので以下にまとめます。
※Linux環境や Cygwin環境下で使えば簡単にセットアップはできるけど、環境的にWindows側でやりたかったので…
確認環境・ツール
使用するツール
- Windows 10 (64bit)
- Build Tools for Visual Studio 2019
- LLVM 11.0.0 (64bit)
- Python 3.9.0 (64bit)
セットアップ手順
Build Tools for Visual Studio 2019のインストール
LLVMのPre-Built版は、msvcのインクルードファイルやライブラリなどを参照してビルドを行うため、Build Tools for Visual Studioのインストールを行う。
- Installer のダウンロード
- Microsoft Visual Studioのダウンロードページにアクセス
- Visual Stduio 2019のツール をクリックして展開
- 「Build Tools for Visual Studio 2019」のダウンロードをクリックしてタウンロードする
- インストール
- Installerを起動
- 「ワークロード」からC++ Build Toolsにチェックを入れて、インストールをクリック
LLVM のインストール
ClangはLLVMの一部としてリリースされているため、LLMVをインストールします。
- Installer のダウンロード
- LLVMのDownload Page へアクセス
- 任意のVersionの Pre-Built Binaries: の Windows (64-bit) をクリックしてダウンロード
- インストール
- Installerを起動
- 次へをクリック
- ライセンス契約書で同意するをクリック
- Install Optionsで、Add LLVM to the system PATH for all PATHを選択して、次へをクリック
- インストール先の画面でインストール先が
C:\Program Files\LLVMであることを確認して、次へ - スタートメニューフォルダの選択画面で特に変更せずに インストールをクリック
- インストール完了したら 完了をクリック
Pythonのインストール
※細かいVersionやインストール時の設定は個人の好みで好きに変更して問題ないかと
- Installer のダウンロード
- Pythonの公式HP へアクセス
- Downloads をクリックしてダウンロードページへ
- 任意のReleaseVersionのDownloadリンクをクリック (こちらでは、Python 3.9.0を選択)
- Windows x86-64 executable installerをクリックしてダウンロード
- インストール
- Installerを起動
- Add Python 3.9 to PATH にチェックを入れて、 Customize installationをクリック
- Optinal Featuersの画面では特に変更せず(すべてチェック入り)に、 Nextをクリック
- Advanced Optionsの画面で、Install for all users にチェックを入れて、Installをクリック
- インストール先パスを個人ユーザ側ではなく、
C:\Program Files\Python39にしたかったので…
- インストール先パスを個人ユーザ側ではなく、
- インストール完了まで待って、Closeをクリック
Clang Python bindingのインストール
- pipにて Clang Python binding を取得する
- コマンドプロンプトで
pip install clangを実行する
- コマンドプロンプトで
- インストール後の確認
- コマンドプロンプトで
pythonと入力してインタラクティブモードへ -
import clangと入力して何もエラーが出なければOK - Ctrl+Z で、インタラクティブモードから抜ける
- コマンドプロンプトで
実際にClang Python bindingを使ってみる
C/C++コードの準備
ASTの出力確認用なのでかなり適当なコード
includeしていると、include先のファイルも解析してしまい、結果が見難くなるので、それすらないコードを準備
sample.c
int a = 2;
int b = 10;

int functionA(int x)
{
	return a * x + b;
}
Pythonコードを作成
clang_ast_test.py
import platform
import clang.cindex

# Clangのライブラリパス設定
if (platform.system()=='Windows'):
    clang.cindex.Config.set_library_path(r'C:\Program Files\LLVM\bin')

# ノードを再帰的に出力する関数
def dump_node(cursor, indent):
    print("%s[KIND:%s] { extent: { File:%s, start:{ l:%d, c:%d }, end {l:%d, c:%d } } , spelling:%s, type:{ kind:%s, spelling:%s } }" % (
            '  ' * indent,
            cursor.kind.name,
            cursor.extent.start.file,
            cursor.extent.start.line,
            cursor.extent.start.column,
            cursor.extent.end.line,
            cursor.extent.end.column,
            cursor.spelling,
            cursor.type.kind.name,
            cursor.type.spelling
            ))
    # 子ノードを表示
    for child in cursor.get_children():
        dump_node(child, indent + 1)


# Clangを使ってソースコードを構文解析
file_path = 'sample.c'
index = clang.cindex.Index.create()
translation_unit = index.parse(file_path)

# 構文解析のエラー表示
for diag in translation_unit.diagnostics:
    print(diag)

# 構文解析結果を表示
dump_node(translation_unit.cursor, 0)
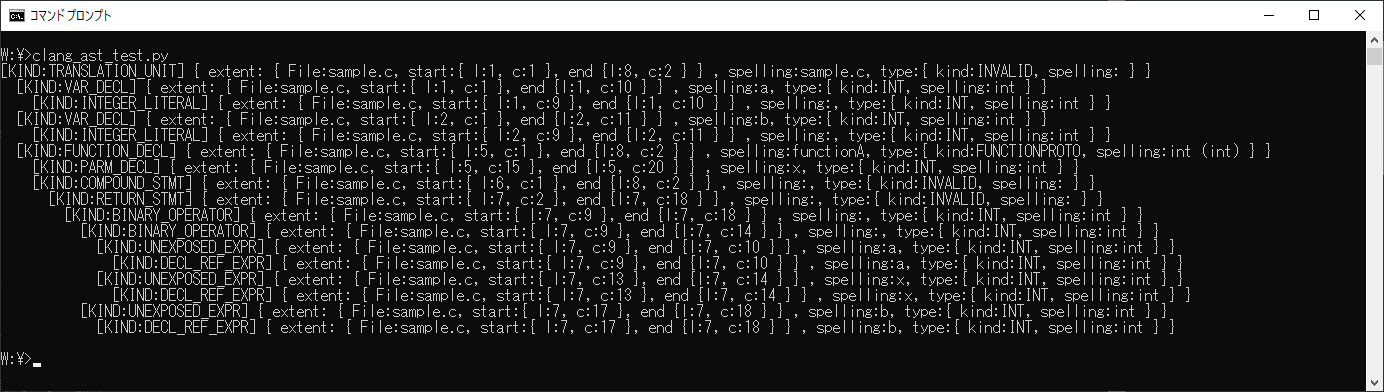
Pythonコードの実行結果
作ったPythonコードを実行したらこんな感じで出力。
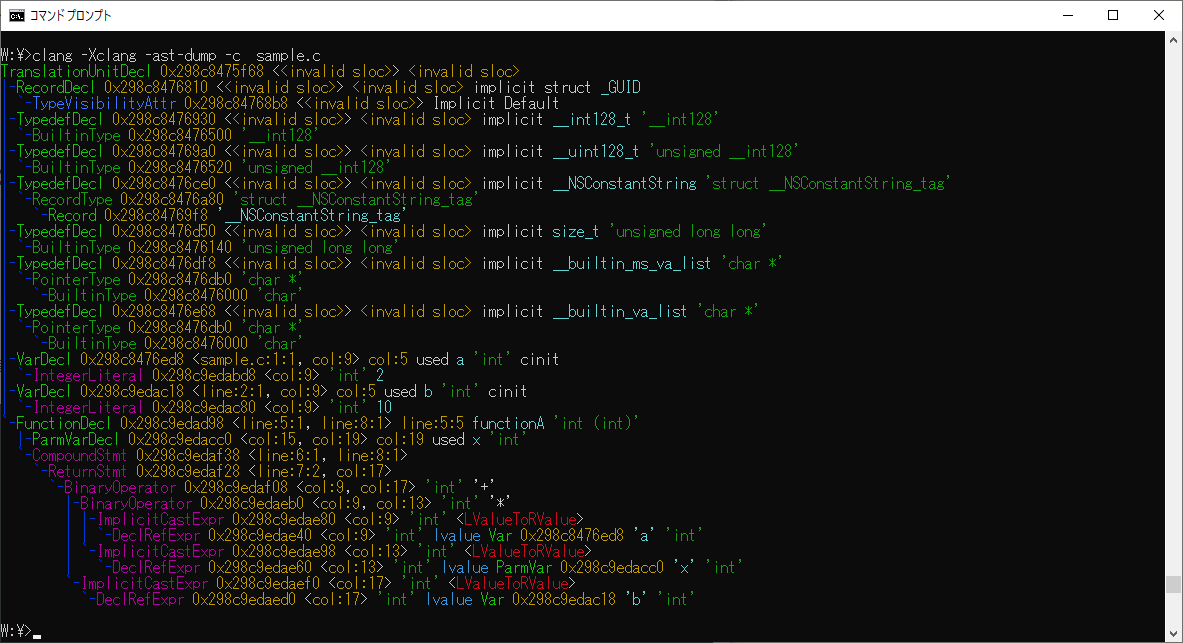
補足:Clangのコマンドラインでast-dumpの結果を見てみる
コマンドプロンプトで clang -Xclang -ast-dump -c <ソースコードファイル名> と実行でastのツリーが確認できる。