Japanese version of the article is also available
TL;DR
Making Augmented Reality app easily with Scenekit + Vuforia
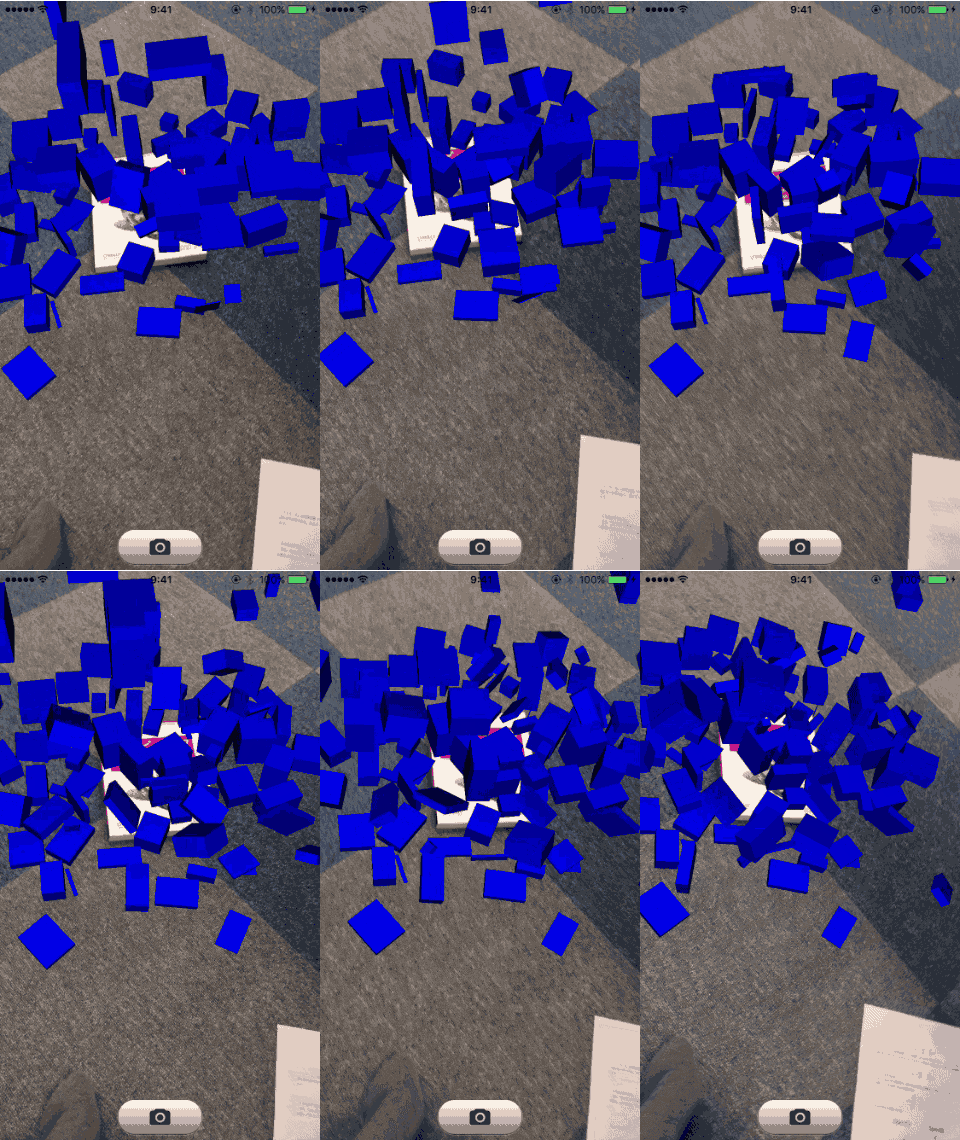
(See here for full movie)
Augmented Reality (AR) app are usualy made with OpenGL or Unity. However it's difficult to create complex 3D scene such as scene with physics simulation and so on. With SceneKit, you can create your own AR app with complex scene easily and it can be embedded in usual app using UIKit.
SceneKit
SceneKit is a high-level 3D graphics framework that helps you create 3D animated scenes and effects in your apps. It incorporates a physics engine, a particle generator, and easy ways to script the actions of 3D objects so you can describe your scene in terms of its content — geometry, materials, lights, and cameras — then animate it by describing changes to those objects.
SceneKit is a 3D framework which allows you to create something like 3D video games. It was only for Mac but since iOS8 you can use it in iOS. Add SCNView as subview to your view and add models, lights, camera to SCNView's SCNScene property, The 3D scene is automatically drawn by the framework. It's really easy. And also it provides a way to combine the scene with OpenGL or Metal. So let's take advangtage of that and add SceneKit object over the video camera input from Vuforia.
Vuforia
Vuforiais a mobile vision platform for AR developed by Qualcomm and now it was acquired by PTC. Vuforia provides AR library for iOS, Android and Unity and you can use all fundamental features without a fee (with watermark shown only once a day) Details are here。
The SDK is provided as a static library (.a) so you can't use Swift. How sad.
Bulid samples and run.
-
Visit Vuforia Developer Portal, then register and login.
-
Download SDK and Sample projects.
-
Move the sample project to
samplesdirectory in SDK. (official really short description are here). -
Issue Licence Key which will be used in the app at LicenceManager.
-
Open
SampleApplicationSession.mmin the sample and replace withQCAR::setInitParameters(mQCARInitFalgs, *Your License Key*). (Thanks to the detailed explanation in [Log] Xcode + vuforiaでARアプリを動かしてみる - しめ鯖日記 In Japanese). -
Build the target with real device (If build a target with iOS Simulator, it fails).
-
Voilà! Now you can try the sample app at your own iPhone. There are many samples in the app:
- Image Targets - AR with pictures already registered in the Vuforia cloud. It enables highly precise tracking by image processing in the cloud.
- Cylinder Targets, Multi Targets - Use cylinder or cuboid as a marker. Even solid objects can be used as a marker.
- User Defined Targets - Users can take a picture includes planar object and Use that as a marker. It's awesome! From now on, let's integrate SceneKit into User Defined Targets sample.
AR principles
Theory
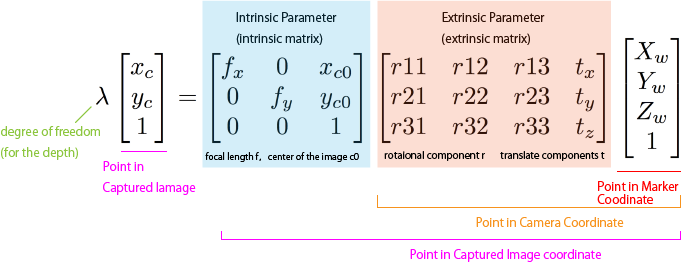
The AR in this context means reconstructing the marker's relative 3D position towards a camera from the 2D image which taken by the camera. The process is:
- Convert Marker Coordinate (World Coordinate; its origin is a maker's position. 3D.) to Camera Coordinate(its origin is camera's position. 3D), which means get the marker's relative position seen by the camera.
- Convert Camera Coordinate (3D) to final 2D coordinate.
This process can be represented as a formula (using homogeneous coordinates):
Intrinsic parameter matrix (intrinsic matrix)
Intrinsic parameter matrix represents the camera's information such as focal length and center coordinate of the image. It's peculiar to the camera. So your iPhone 6s and my iPhone6s has same intrinsic parameter matrix. Vuforia has a bunch of cameras' intrinsic matrix.
If intrinsic matrix isn't right, drawn virtual objects and image from camera's perspective does not match and result in weird looking.
If you interested in calculate intrinsic matrix of unknown camera, look up Zhang's method, which is implemented in OpenCV, too.
Extrinsic parameter matrix (extrinsic matrix)
Extrinsic parameter matrix represents 3-dimentional rotation and translation. With extrinsic matrix, we can convert a coordinate of the object in Marker Coordinate to Camera Coordinate.
Extrinsic matrix differs by how user hold his/her camera or where marker located so we have to calculate every frame. Vuforia is really good at that. very precise.
Theoretically, extrinsic parameter matrix can be obtained by solving PnP(Perspective n-Point Problem), which is implemented in OpenCV, too.
Implementation
In reality, you don't have to do the matrix calculation every frame and leave that to the 3D library. For example, Using OpenGL, set perspective projection matrix using intrinsic matrix and model view matrix using extrins matrix, OpenGL reproduces the relation between the marker and the camera. Samples in Vuforia uses OpenGL and be implemented in this way.
This process is located at renderFrameQCAR method in UserDefinedTargetsEAGLView.mm
The process obtaining model view matrix from extrinsic parameter which caluclated by Vuforia is:
QCAR::Matrix44F modelViewMatrix = QCAR::Tool::convertPose2GLMatrix(result->getPose());`
And obtaining perspective projection matrix from intrinsic matrix is:
&vapp.projectionMatrix.data[0]
vapp is a instance of ApplicationSession. And rest of the codes are OpenGL mumbo jumbo.
AR with SceneKit!
Finally, let's draw 3D objects in renderFrameQCAR with SceneKit instead of OpenGL.
Add properties
First, add Scenekit.framework to the project.
To draw Scenekit's objects into Vuforia's OpenGL context which draws camera input, We can use SCNRenderer. So add it as property to UserDefinedTargetsEAGLView.h.
# import <SceneKit/SceneKit.h> // Import SceneKit

@interface UserDefinedTargetsEAGLView : UIView <UIGLViewProtocol, GLResourceHandler>

// so much codes...

@property (nonatomic, strong) SCNRenderer *renderer; // renderer
@property (nonatomic, strong) SCNNode *cameraNode; // node which holds camera
@property (nonatomic, assign) CFAbsoluteTime startTime; // elapsed time in 3D scene
And add datasouce which holds SCNScene (An object which represents scene drawn in SceneKit).
@protocol UserDefinedTargetsEAGLViewSceneSource <NSObject>

- (SCNScene *)sceneForEAGLView:(UIView *)view;

@end

@property (weak, nonatomic) id<UserDefinedTargetsEAGLViewSceneSource> sceneSource;
About SCNScene, there are a bunch of the resources on the Internet. So play around with it.
One thing, Scenekit's objects size should be 10~100 so it fits Vuforia's extrinsic parameter scale.
Initiate SCNRenderer
- (void)setupRenderer {
    self.renderer = [SCNRenderer rendererWithContext:context options:nil];
    self.renderer.autoenablesDefaultLighting = YES;
    self.renderer.playing = YES;

    if (self.sceneSource != nil) {
        self.renderer.scene = [self.sceneSource sceneForEAGLView:self];

        SCNCamera *camera = [SCNCamera camera];
        self.cameraNode = [SCNNode node];
        self.cameraNode.camera = camera;
        [self.renderer.scene.rootNode addChildNode:self.cameraNode];
        self.renderer.pointOfView = self.cameraNode;
    }

}
Call this method after UserDefinedTargetsEAGLView's - (id)initWithFrame:appSession:. The method is for initiate SCNRenderer and set OpenGL context which is created in the sample and add camera to the scene.
The rest is setting intrinsic matrix and extrinsic matrix to the camera. But. Here's a problem. The extrinsic matrix given by Vuforia converts object's coordinate to camera coordinate. In OpenGL, you can use it directly as a model view matrix. But SceneKit does not expose such matrix. So we have to caluclate the camera's position and rotation with respect to the marker. I really tried hard to work it out... and it turns out really simple solution. Just caluclate inverse matrix of the extrinsic matrix and set it to SCNCamera's transform property. That's it.
Caution: OpenGL and Scenekit matrix's are column-major. You have to be careful about that when you work with element of the matrix.
// Converts Vuforia matrix to SceneKit matrix
- (SCNMatrix4)SCNMatrix4FromQCARMatrix44:(QCAR::Matrix44F)matrix {
    GLKMatrix4 glkMatrix;

    for(int i=0; i<16; i++) {
        glkMatrix.m[i] = matrix.data[i];
    }

    return SCNMatrix4FromGLKMatrix4(glkMatrix);

}

// Calculate inverse matrix and assign it to cameraNode
- (void)setCameraMatrix:(QCAR::Matrix44F)matrix {
    SCNMatrix4 extrinsic = [self SCNMatrix4FromQCARMatrix44:matrix];
    SCNMatrix4 inverted = SCNMatrix4Invert(extrinsic); // inverse matrix!
    self.cameraNode.transform = inverted; // assign it to the camera node's transform property.
}
Then set up perspective projection matrix from the intrinsic matrix.
- (void)setProjectionMatrix:(QCAR::Matrix44F)matrix {
    self.cameraNode.camera.projectionTransform = [self SCNMatrix4FromQCARMatrix44:matrix];
}
Finally, lets call these methods in rendeFrameQCAR and render the scene. lets replace renderFrameQCAR like below:
// *** QCAR will call this method periodically on a background thread ***
- (void)renderFrameQCAR
{
    [self setFramebuffer];

    // Clear colour and depth buffers
    glClear(GL_COLOR_BUFFER_BIT | GL_DEPTH_BUFFER_BIT);

    // Render video background and retrieve tracking state
    QCAR::State state = QCAR::Renderer::getInstance().begin();
    QCAR::Renderer::getInstance().drawVideoBackground();

    glEnable(GL_DEPTH_TEST);
    // We must detect if background reflection is active and adjust the culling direction.
    // If the reflection is active, this means the pose matrix has been reflected as well,
    // therefore standard counter clockwise face culling will result in "inside out" models.
    glEnable(GL_CULL_FACE);
    glCullFace(GL_BACK);
    if(QCAR::Renderer::getInstance().getVideoBackgroundConfig().mReflection == QCAR::VIDEO_BACKGROUND_REFLECTION_ON)
        glFrontFace(GL_CW);  //Front camera
    else
        glFrontFace(GL_CCW);   //Back camera

    // Render the RefFree UI elements depending on the current state
    refFreeFrame->render();

    [self setProjectionMatrix:vapp.projectionMatrix]; // Actually you don't have to call that every frame. Because projection matrix does not change.


    for (int i = 0; i < state.getNumTrackableResults(); ++i) {
        // Get the trackable
        const QCAR::TrackableResult* result = state.getTrackableResult(i);
        //const QCAR::Trackable& trackable = result->getTrackable();
        QCAR::Matrix44F modelViewMatrix = QCAR::Tool::convertPose2GLMatrix(result->getPose()); // Obtain model view matrix

        ApplicationUtils::translatePoseMatrix(0.0f, 0.0f, kObjectScale, &modelViewMatrix.data[0]);
        ApplicationUtils::scalePoseMatrix(kObjectScale, kObjectScale, kObjectScale, &modelViewMatrix.data[0]);

        [self setCameraMatrix:modelViewMatrix]; // SCNCameraにセット
        [self.renderer renderAtTime:CFAbsoluteTimeGetCurrent() - self.startTime]; // Render objects into OpenGL context

        ApplicationUtils::checkGlError("EAGLView renderFrameQCAR");
    }

    glDisable(GL_DEPTH_TEST);
    glDisable(GL_CULL_FACE);

    QCAR::Renderer::getInstance().end();
    [self presentFramebuffer];

}
Voilà! With SceneKit, you cand do so much things, lighting, materials, physics simulation, user interaction...
Response to user tap
SCNRenderer conforms to SCNSceneRenderer protocol so to get user touch, you can use hitTest:options method. Give touch position as CGPoint to it, it returns SCNNode which corresponds to the point. But be careful, origin of coordinate system in OpenGL is at bottom left and in Retina display, the size of Viewports is doubled. so when you use UITapGestureRecognizer or something like that, you have to double x and y and subtract y from Viewports height, and then pass the point to hitTest:options.
References
藤本 雄一郎, 青砥 隆仁, 浦西 友樹, 大倉 史生, 小枝 正直, 中島 悠太, 山本 豪志朗, OpenCV3プログラミングブック

