Auto Layoutでレイアウトを組んでいると、またによくわからないワーニングに遭遇したり、意図しないレイアウトになってしまうことがあります。ここではそんなときに役立つメソッド/プロパティを紹介しようと思います。
constraints
あるviewに対して付いている制約を取得することができます。「とりあえずよくわかんない」「ワーニング出てないけどなんかおかしい」時に使ってみると良いかもです。
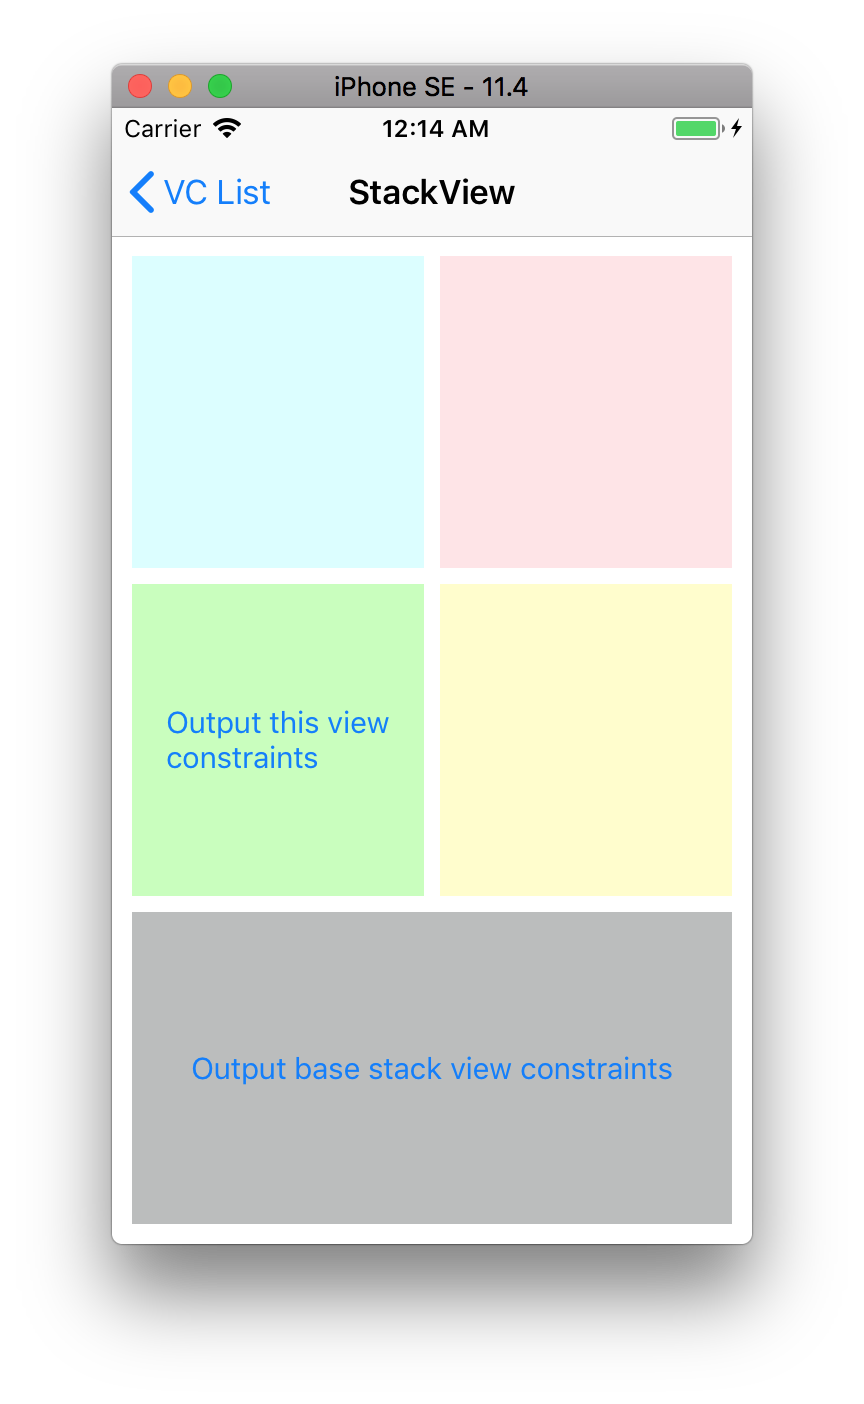
例えば次の画面の一番下のstack viewに対して実行したとします。


出てくる結果は以下の通りです。
▿ 7 elements
  - 0 : <NSLayoutConstraint:0x60c00028eec0 'UISV-alignment' UIStackView:0x7fcdaee23110.bottom == UITextView:0x7fcdaf839000'Lorem ipsum dolor sit er ...'.bottom   (active)>
  - 1 : <NSLayoutConstraint:0x60c00028ef60 'UISV-alignment' UIStackView:0x7fcdaee23110.top == UITextView:0x7fcdaf839000'Lorem ipsum dolor sit er ...'.top   (active)>
  - 2 : <NSLayoutConstraint:0x60c00028ed30 'UISV-canvas-connection' UIStackView:0x7fcdaee20550.leading == UIStackView:0x7fcdaee23110.leading   (active)>
  - 3 : <NSLayoutConstraint:0x60c00028ee20 'UISV-canvas-connection' UIStackView:0x7fcdaee20550.top == UIStackView:0x7fcdaee23110.top   (active)>
  - 4 : <NSLayoutConstraint:0x60c00028ee70 'UISV-canvas-connection' V:[UIStackView:0x7fcdaee23110]-(0)-|   (active, names: '|':UIStackView:0x7fcdaee20550 )>
  - 5 : <NSLayoutConstraint:0x60c00028f140 'UISV-canvas-connection' H:[UIStackView:0x7fcdaee23110]-(0)-|   (active, names: '|':UIStackView:0x7fcdaee20550 )>
  - 6 : <_UISystemBaselineConstraint:0x60c0002a07e0 'UISV-spacing-hidden' H:[UIStackView:0x7fcdaee23110]-(NSLayoutAnchorConstraintSpace(4)@50)-[UITextView:0x7fcdaf839000'Lorem ipsum dolor sit er ...'] priority:50   (active)>
constraintsAffectingLayout(for:)
あるviewに対して付いている制約を、軸を指定して取得することができます。返される制約の中には、明示的にそのviewが含まれている制約だけでなく、暗黙的にそのviewに影響を与えるものも含んでいます。逆に、影響を与える全ての制約が取得できる保証はありません。
例えば次の画面の緑色のviewに対して水平方向の制約を出力するよう指定したとします。
出てくる結果は以下の通りです。方向は一定ですが、明示的に指定した制約ではないっぽいものも多く含まれていることがわかります。
<NSLayoutConstraint:0x60400009fef0 UIStackView:0x7fcdaee20550.leading == UILayoutGuide:0x6040001b0760'UIViewSafeAreaLayoutGuide'.leading + 10   (active)>
<NSLayoutConstraint:0x60400009dec0 UILayoutGuide:0x6040001b0760'UIViewSafeAreaLayoutGuide'.trailing == UIStackView:0x7fcdaee20550.trailing + 10   (active)>
<NSLayoutConstraint:0x60c00028ec40 'UISV-alignment' UIStackView:0x7fcdaee04ac0.leading == UIStackView:0x7fcdaee23fc0.leading   (active)>
<NSLayoutConstraint:0x60c00028ece0 'UISV-alignment' UIStackView:0x7fcdaee04ac0.trailing == UIStackView:0x7fcdaee23fc0.trailing   (active)>
<NSLayoutConstraint:0x60c00028e5b0 'UISV-canvas-connection' UIStackView:0x7fcdaee23fc0.leading == UIView:0x7fcdaee241d0.leading   (active)>
<NSLayoutConstraint:0x60c00028eb50 'UISV-canvas-connection' UIStackView:0x7fcdaee23110.leading == UIStackView:0x7fcdaee04ac0.leading   (active)>
<NSLayoutConstraint:0x60c00028ed30 'UISV-canvas-connection' UIStackView:0x7fcdaee20550.leading == UIStackView:0x7fcdaee23110.leading   (active)>
<NSLayoutConstraint:0x60c00028e650 'UISV-canvas-connection' H:[UIView:0x7fcdaee1ef20]-(0)-|   (active, names: '|':UIStackView:0x7fcdaee23fc0 )>
<NSLayoutConstraint:0x60c00028ebf0 'UISV-canvas-connection' H:[UIStackView:0x7fcdaee04ac0]-(0)-|   (active, names: '|':UIStackView:0x7fcdaee23110 )>
<NSLayoutConstraint:0x60c00028f140 'UISV-canvas-connection' H:[UIStackView:0x7fcdaee23110]-(0)-|   (active, names: '|':UIStackView:0x7fcdaee20550 )>
<NSLayoutConstraint:0x60c00028e6a0 'UISV-fill-equally' UIView:0x7fcdaee1ef20.width == UIView:0x7fcdaee241d0.width   (active)>
<_UISystemBaselineConstraint:0x60c0000beba0 'UISV-spacing' H:[UIView:0x7fcdaee241d0]-(NSLayoutAnchorConstraintSpace(8))-[UIView:0x7fcdaee1ef20]   (active)>
<NSAutoresizingMaskLayoutConstraint:0x60c00028f050 h=-&- v=-&- 'UIView-Encapsulated-Layout-Left' UIView:0x7fcdaef1c530.minX == 0   (active, names: '|':UIViewControllerWrapperView:0x7fcdaee19460 )>
<NSLayoutConstraint:0x60c00028efb0 'UIView-Encapsulated-Layout-Width'    (active)>
<NSLayoutConstraint:0x60400009dbf0 'UIViewSafeAreaLayoutGuide-left' H:|-(0)-[UILayoutGuide:0x6040001b0760'UIViewSafeAreaLayoutGuide'](LTR)   (active, names: '|':UIView:0x7fcdaef1c530 )>
<NSLayoutConstraint:0x604000280f50 'UIViewSafeAreaLayoutGuide-right' H:[UILayoutGuide:0x6040001b0760'UIViewSafeAreaLayoutGuide']-(0)-|(LTR)   (active, names: '|':UIView:0x7fcdaef1c530 )>
debugQuickLookObject
ブレークポイントで止めてクイックルックボタンをタップされた時に呼ばれるメソッドです。デバッグ時にオブジェクト変数の現在の状態をポップアップ表示でグラフィカルに表示することができます。詳しくはこちらの記事に書いたので興味あればご参照ください。
_ivarDescription
該当のオブジェクトが持つインスタンス(ivar)とその値を表示することができるやつで、Objective-Cのプライベートメソッド(※後述)です。インスタンスの生成、所有の時点で間違っているなどの理由で今までのメソッドでレイアウト情報を確認してもうまく解明できない場合などに使います。
ある画面で以下のコマンドを実行してみます。
(lldb)po [[[[UIWindow keyWindow] rootViewController] view] _ivarDescription]
出てくる結果は以下の通りです。あまりにも長いので省略しています。
(lldb) po [[[[UIWindow keyWindow] rootViewController] view] _ivarDescription]
<UILayoutContainerView: 0x7fdae9109800>:
in UILayoutContainerView:
	_setNeedsLayoutDisabledCount (long): 0
	_shadowView (UIView*): nil
	_layoutContainerViewFlags (struct ?): {
          …(略)…
	}
	_usesInnerShadow (BOOL): NO
	_usesRoundedCorners (BOOL): NO
	_delegate (<UILayoutContainerViewDelegate>*): <UINavigationController: 0x7fdae980c800>
in UIView:
	_constraintsExceptingSubviewAutoresizingConstraints (NSMutableArray*): <__NSArrayM: 0x60c000248f40>
	_cachedTraitCollection (UITraitCollection*): <UITraitCollection: 0x60c0002e1980>
	_layer (CALayer*): <CALayer: 0x6000000341e0>
	_layerRetained (CALayer*): nil
	_enabledGestures (int): 0
	_gestureRecognizers (NSMutableArray*): <__NSArrayM: 0x60c0002415c0>
        …(略)…
recursiveDescription
該当のviewの最終的なレイアウトのフレームと階層情報を再帰的(=recursive)に表示してくれるやつで、Objective-Cのプライベートメソッド(※)です。ここにはAuto Layout情報は入っていません。追加したはずのviewが表示されていない、なんか変なところに表示されている、などの場合に使うと良いです。
例えば次の画面の緑のviewに適用したとします。
(lldb)po ((UIView *)0x7fbfa9d211d0).recursiveDescription
// Object Inspectorで緑のviewのアドレスを調べてコマンドに入れています。
出てくる結果は以下の通りです。viewの階層、一部のプロパティが把握できます。
<UIView: 0x7fbfa9d211d0; frame = (0 0; 146 156); autoresize = RM+BM; layer = <CALayer: 0x60000022e340>>
   | <UIButton: 0x7fbfa9d08bd0; frame = (17 54; 112 48); opaque = NO; autoresize = RM+BM; layer = <CALayer: 0x60000022c920>>
   |    | <UIButtonLabel: 0x7fbfa9c1dd90; frame = (0 6; 112 36); text = 'Output this view
constrai...'; opaque = NO; userInteractionEnabled = NO; layer = <_UILabelLayer: 0x60c00009f7c0>>
※ちなみにコード内でprintすると、some("<UIView:…")となって改行も\nで表されて見にくいです。
_autolayoutTrace
viewの階層情報とそのレイアウトが制約定義によって実行されているかどうかを表示できるやつで、Objective-Cのプライベートメソッド(※)です。曖昧なレイアウト周辺に何が起こっているのかを把握しやすくて良いです。
例えば次の画面のself.viewに適用したとします。
※オレンジのviewはStoryboard上で配置したview、グレーのviewはコードで配置したviewです。
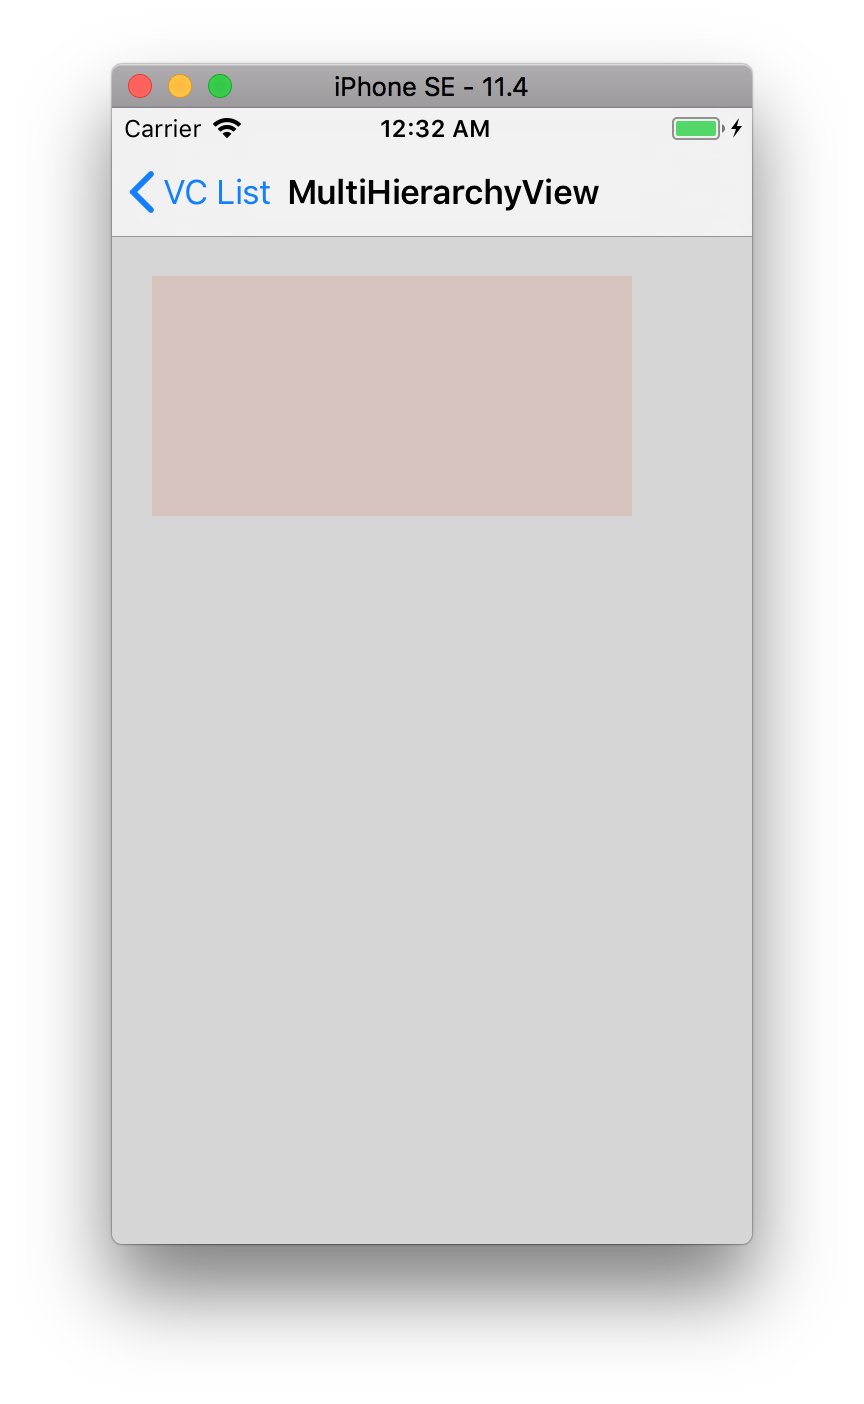
(lldb)po ((UIView *)0x7faeafe25fc0)._autolayoutTrace
// Object Inspectorでself.viewのアドレスを調べてコマンドに入れています。
出てくる結果は以下の通りです。viewの階層、一部のプロパティ、レイアウト情報が把握できます。
UIWindow:0x7faeafc15aa0
|   UILayoutContainerView:0x7faeafc17570
|   |   UINavigationTransitionView:0x7faeafd11e30
|   |   |   UIViewControllerWrapperView:0x7faeafc1b380
|   |   |   |   •UIView:0x7faeafe25fc0
|   |   |   |   |   *<UILayoutGuide: 0x6000001bf480 - "UIViewSafeAreaLayoutGuide", layoutFrame = {{0, 64}, {320, 504}}, owningView = <UIView: 0x7faeafe25fc0; frame = (0 0; 320 568); autoresize = W+H; layer = <CALayer: 0x60000002bac0>>>
|   |   |   |   |   *UIView:0x7faeafe261b0
|   |   |   |   |   UIView:0x7faeafe103d0
|   |   •UINavigationBar:0x7faeafc08b90
|   |   |   _UIBarBackground:0x7faeafc095e0
|   |   |   |   UIImageView:0x7faeafc09ea0
|   |   |   |   UIVisualEffectView:0x7faeafc0a0d0
|   |   |   |   |   _UIVisualEffectBackdropView:0x7faeafd0aa20
|   |   |   |   |   _UIVisualEffectSubview:0x7faeafd0ba80
|   |   |   _UINavigationBarLargeTitleView:0x7faeafc0b5c0'MultiHierarchyView'
|   |   |   |   UILabel:0x7faeafe29390
|   |   |   •_UINavigationBarContentView:0x7faeafc0ad70'MultiHierarchyView'
|   |   |   |   *<UILayoutGuide: 0x6080003a8ce0 - "UIViewLayoutMarginsGuide", layoutFrame = {{16, 0}, {288, 44}}, owningView = <_UINavigationBarContentView: 0x7faeafc0ad70; frame = (0 0; 320 44); clipsToBounds = YES; layer = <CALayer: 0x60800002a6a0>>>
|   |   |   |   *<UILayoutGuide: 0x6000001bf560 - "BackButtonGuide(0x7faeafe263a0)", layoutFrame = {{0, 0}, {81.5, 44}}, owningView = <_UINavigationBarContentView: 0x7faeafc0ad70; frame = (0 0; 320 44); clipsToBounds = YES; layer = <CALayer: 0x60800002a6a0>>>
|   |   |   |   *<UILayoutGuide: 0x6000001bf640 - "LeadingBarGuide(0x7faeafe263a0)", layoutFrame = {{87.5, 0}, {0, 44}}, owningView = <_UINavigationBarContentView: 0x7faeafc0ad70; frame = (0 0; 320 44); clipsToBounds = YES; layer = <CALayer: 0x60800002a6a0>>>
|   |   |   |   *<UILayoutGuide: 0x6000001bf720 - "TitleView(0x7faeafe263a0)", layoutFrame = {{87.5, 0}, {224.5, 44}}, owningView = <_UINavigationBarContentView: 0x7faeafc0ad70; frame = (0 0; 320 44); clipsToBounds = YES; layer = <CALayer: 0x60800002a6a0>>>
|   |   |   |   *<UILayoutGuide: 0x6000001bf800 - "TrailingBarGuide(0x7faeafe263a0)", layoutFrame = {{312, 0}, {0, 44}}, owningView = <_UINavigationBarContentView: 0x7faeafc0ad70; frame = (0 0; 320 44); clipsToBounds = YES; layer = <CALayer: 0x60800002a6a0>>>
|   |   |   |   *_UIButtonBarButton:0x7faeafe2a2a0
|   |   |   |   |   *<UILayoutGuide: 0x6040007ad3c0 - "UIViewLayoutMarginsGuide", layoutFrame = {{0, 16}, {81.5, 12}}, owningView = <_UIButtonBarButton: 0x7faeafe2a2a0; frame = (0 0; 81.5 44); layer = <CALayer: 0x60000002f180>>>
|   |   |   |   |   *_UIModernBarButton:0x7faeb2104920
|   |   |   |   |   |   *UIImageView:0x7faeafd0e6b0- AMBIGUOUS LAYOUT for UIImageView:0x7faeafd0e6b0.minX{id: 390}, UIImageView:0x7faeafd0e6b0.minY{id: 392}
|   |   |   |   |   +_UIBackButtonContainerView:0x7faeafd0c2d0
|   |   |   |   |   |   *_UIModernBarButton:0x7faeb21026f0'VC List'
|   |   |   |   |   |   |   *UIButtonLabel:0x7faeb2103dd0'VC List'
|   |   |   |   *UILabel:0x7faeafe29fc0'MultiHierarchyView'
|   |   |   +_UINavigationBarModernPromptView:0x7faeafc121f0
|   |   |   |   *UILabel:0x7faeafc12830
|   |   UIToolbar:0x7faeafe38ac0

Legend:
	* - is laid out with auto layout
	+ - is laid out manually, but is represented in the layout engine because translatesAutoresizingMaskIntoConstraints = YES
	• - layout engine host
_printHierarchy
viewの階層情報ではなく、view controllerの階層情報を表示することができるやつで、Objective-Cのプライベートメソッド(※)です。
例えば右の画面のときにコマンドを叩いたとします(左TopTableViewControllerが起動時の画面で、右MultiHierarchyViewControllerがセルをタップして遷移した画面です)。
(lldb) po [[[UIWindow keyWindow] rootViewController] _printHierarchy]
// Object Inspectorでself.viewのアドレスを調べてコマンドに入れています。
出てくる結果は以下の通りです。
<UINavigationController 0x7faeb0847e00>, state: appeared, view: <UILayoutContainerView 0x7faeafc17570>
   | <AutoLayoutDebugSample.TopTableViewController 0x7faeafd0a010>, state: disappeared, view: <UITableView 0x7faeb0023600> not in the window
   | <AutoLayoutDebugSample.MultiHierarchyViewController 0x7faeb21025e0>, state: appeared, view: <UIView 0x7faeafd15210>
ちなみに|であればchild view controllersで、+であればモーダルらしいです。
hasAmbiguousLayout
制約によって位置が一意になっていないときにtrueを返すやつです。ただし、Storyboard上で明らかにエラーが出ているときは、一意でないときでもfalseを返してくることがあります。
これを単独で使うと、1つのviewに対しての曖昧さだけしか調べることができないので、サブビューまで再帰的に調べるメソッドを作ると便利です。
func hasAmbiguity() -> Bool {
    var hasAmbiguity = false

    #if DEBUG
    if self.hasAmbiguousLayout {
        print("description:::::::::::::: \(self.description)")
        hasAmbiguity = true
    }

    // サブビューまで再帰的に調べる
    for view in self.subviews {
        if view.hasAmbiguity() {
            hasAmbiguity = true
        }
    }
    #endif
    return hasAmbiguity
}
出力されるログの一例はこのようなものです。AMBIGUOUS LAYOUTという表記があるところが怪しい箇所になります。
View has an ambiguous layout. See "Auto Layout Guide: Ambiguous Layouts" for help debugging. Displaying synopsis from invoking -[UIView _autolayoutTrace] to provide additional detail.

*coverView:0x7fd5f1517910- AMBIGUOUS LAYOUT for coverView.minX{id: 125}, coverView.minY{id: 122}, coverView.Width{id: 128}, coverView.Height{id: 131}

Legend:
	* - is laid out with auto layout
	+ - is laid out manually, but is represented in the layout engine because translatesAutoresizingMaskIntoConstraints = YES
	• - layout engine host
description:::::::::::::: <AutoLayoutDebugSample.CoverView: 0x7fd5f1517910; frame = (0 0; 0 0); animations = { opacity=<CABasicAnimation: 0x600000233100>; }; layer = <CALayer: 0x600000231c00>>
hasAmbiguousLayoutを扱うときに注意しないといけないことがいくつかあります。ドキュメントにも書いてある注意点は以下の通りです。
- 全ての曖昧なレイアウトを検知できるわけではない
加えて、私が検証をしている中で想定通りの動きにならなかったケースは以下の通りです。
- コードでAuto Layout(NSLayoutAnchor)を使ったときに、不足している制約がなさそうなのにtrueが返ってきた
- あるviewを、最初はframe(0, 0, 0, 0)にするけど後から
translatesAutoresizingMaskIntoConstraintsをfalseにしてAuto Layoutを適用するときでもtrueが返ってきた
なので私の中ではわりと扱いづらいなと思ってしまいました。もしかしたら何かをミスってるかもしれませんが。
想定通りに動くなら、主要なviewに対して日常的にhasAmbiguousLayoutを用いたテストを回しておくと良いと思います。
XCTAssert(self.hasAmbiguity(), "Ambiguous Layout!")
exerciseAmbiguityInLayout
曖昧な制約を持つviewのframeを、制約を満たす範囲でランダムに変更してくれるやつです。hasAmbiguousLayoutがtrueのときにこのメソッドを使うのが良さそうです。
こちらも再帰的に実行する仕組みを作っておくと便利です。
func exerciseAmbiguityInLayoutRepeatedly(recursive: Bool) {
    #if DEBUG
    // 1回だとわかりにくいので複数回実行
    if self.hasAmbiguousLayout {
        Timer.scheduledTimer(timeInterval: 1.0, target: self, selector: #selector(UIView.exerciseAmbiguityInLayout), userInfo: nil, repeats: true)
    }

    // 再帰的に実行
    if recursive {
        for view in subviews {
            view.exerciseAmbiguityInLayoutRepeatedly(recursive: recursive)
        }
    }
    #endif
}
補足:Objective-Cのプライベートメソッドの扱い
Objective-Cにはレイアウトをデバッグするのに便利なメソッドがあります。しかしそれをSwiftから使うには再定義とブリッジが必要になります。
再定義をするにはこのようなヘッダーファイルを用意する必要があります。
# import <UIKit/UIKit.h>

@interface NSObject()
- (NSString *)_ivarDescription;
@end

@interface UIView()
- (NSString *)recursiveDescription;
- (NSString *)_autolayoutTrace;
@end

@interface UIViewController()
- (NSString *)_printHierarchy;
@end
そして↑このファイルをBridging-Headerで読み込み…
# import "Hoge.h"
Build SettingsでSwift Compiler – Code Generation の Objective-C Bridging Headerを探し、パスを設定します。これでSwift側からもこれらのプライベートメソッドが使えることになります。
これらのメソッドは便利なのですが、リリースビルドに含めるとリジェクトされる可能性があるので注意が必要です。