Firebaseエミュレータとは
FirebaseにはFirestoreやFunctionsなど、いろいろなサービスがあります。これらを使って開発していると、デプロイしないと挙動を確認できなかったり、発見したバグ修正のため再デプロイしないといけないことがあります。
そんなときに使えるのが、ローカル環境で各サービスを実行できるFirebaseエミュレータです。
対象
- Firebaseのコードを書ける方を対象
- Firebase JavaScript SDK ver.9を対象。ver.8とはエミュレタへつなぐためのコードが若干異なります。(公式ドキュメント参照)
有効化
エミュレータは、ローカルでFirebaseプロジェクトを作るときに有効化できます。
# Firebase CLIをインストール
$ npm install -g firebase-tools

# Firebaseプロジェクトを作成
$ mkdir hogehoge
$ cd hogehoge
$ firebase init

# 説明に必要な部分のみ抜粋しています

# 有効化する機能を尋ねられたら、"Emulators"を選択する
? Which Firebase features do you want to set up for this directory? Press Space to select features, then Enter to confir
m your choices.
 ◉ Hosting: Configure files for Firebase Hosting and (optionally) set up GitHub Action deploys
 ◯ Hosting: Set up GitHub Action deploys
 ◯ Storage: Configure a security rules file for Cloud Storage
❯◉ Emulators: Set up local emulators for Firebase products  // <============== これを選択
 ◯ Remote Config: Configure a template file for Remote Config
 ◯ Realtime Database: Configure a security rules file for Realtime Database and (optionally) provision default instance
 ◉ Firestore: Configure security rules and indexes files for Firestore
(Move up and down to reveal more choices)


# どのサービスについてエミュレータを使うか尋ねられたら、必要なものを選択
=== Emulators Setup
? Which Firebase emulators do you want to set up? Press Space to select emulators, then Enter to confirm your choices.
 ◉ Authentication Emulator
 ◉ Functions Emulator
 ◉ Firestore Emulator
 ◯ Database Emulator
❯◉ Hosting Emulator
 ◯ Pub/Sub Emulator
 ◯ Storage Emulator

# エミュレータが使うポート番号などを設定する。デフォルト設定でよいので、Enterキーを押していけばよい
=== Emulators Setup
? Which Firebase emulators do you want to set up? Press Space to select emulators, then Enter to confirm your choices. A
uthentication Emulator, Functions Emulator, Firestore Emulator, Hosting Emulator
? Which port do you want to use for the auth emulator? 9099
? Which port do you want to use for the functions emulator? 5001
? Which port do you want to use for the firestore emulator? 8080
? Which port do you want to use for the hosting emulator? 5000
? Would you like to enable the Emulator UI? Yes
? Which port do you want to use for the Emulator UI (leave empty to use any available port)?
? Would you like to download the emulators now? Yes
i  firestore: downloading cloud-firestore-emulator-v1.13.1.jar...
使い方
エミュレータを有効化できたら、実際に使ってみます。
エミュレータを使う際はFirebaseを初期化するときにコードの追加が必要ですが、ロジック部分はそのまま使えます。また、ログやFireStoreのルール判定結果などを確認できる画面もあり便利です。
以降のコードは、Nuxt(ver.2)、TypeScript(一部、JavaScript)で説明します。
エミュレータを使うために必要なコード
エミュレータを使うには、Firebaseを初期化するときにアプリをエミュレータにつなぐための設定が必要です。
import { initializeApp, getApp } from 'firebase/app'
import { getFirestore, connectFirestoreEmulator } from 'firebase/firestore'
import { getFunctions, connectFunctionsEmulator } from 'firebase/functions'
import { getAuth, connectAuthEmulator } from 'firebase/auth'

const firebaseConfig = {
//  ...
}

initializeApp(firebaseConfig)
// ローカルで実行中の場合は、エミュレータを使う
const isEmulating = window.location.hostname === 'localhost'
if (isEmulating) {
  const auth = getAuth()
  connectAuthEmulator(auth, 'http://localhost:9099')
  const functions = getFunctions(getApp())
  connectFunctionsEmulator(functions, 'localhost', 5001)
  const db = getFirestore()
  connectFirestoreEmulator(db, 'localhost', 8080)
}
エミュレータを起動する
エミュレータは以下のコマンドで起動できます。管理画面ではデータやログを確認可能です。
# エミュレータを起動する
$ firebase emulators:start


# 以下のような画面が表示されれば、正常に起動できています(有効化したサービスの有無により違いあり)
┌─────────────────────────────────────────────────────────────┐
│ ✔  All emulators ready! It is now safe to connect your app. │
│ i  View Emulator UI at http://127.0.0.1:4000                │
└─────────────────────────────────────────────────────────────┘

┌────────────────┬────────────────┬─────────────────────────────────┐
│ Emulator       │ Host:Port      │ View in Emulator UI             │
├────────────────┼────────────────┼─────────────────────────────────┤
│ Authentication │ 127.0.0.1:9099 │ http://127.0.0.1:4000/auth      │
├────────────────┼────────────────┼─────────────────────────────────┤
│ Functions      │ 127.0.0.1:5001 │ http://127.0.0.1:4000/functions │
├────────────────┼────────────────┼─────────────────────────────────┤
│ Firestore      │ 127.0.0.1:8080 │ http://127.0.0.1:4000/firestore │
├────────────────┼────────────────┼─────────────────────────────────┤
│ Hosting        │ 127.0.0.1:5000 │ n/a                             │
└────────────────┴────────────────┴─────────────────────────────────┘
上に表示されたURL(http://127.0.0.1:4000)から管理画面をブラウザで開くことができます。

エミュレータを使う
Firebaseの各サービスを使うコードを実行し、エミュレータの画面から確認します。
認証(Authentication)
エミュレータ内でアカウントを作成し、サインアップやログインを試すことができます。
コード
<script lang="ts">
import Vue from 'vue'
import {
  getAuth,
  createUserWithEmailAndPassword,
  signInWithEmailAndPassword,
} from 'firebase/auth'

export default Vue.extend({
  methods: {
    // サインアップ
    async signUp() {
      const auth = getAuth()
      try {
        await createUserWithEmailAndPassword(auth, this.email, this.password)
      } catch {
        console.error('失敗しました')
      }
    },
    // ログイン
    async login() {
      const auth = getAuth()
      try {
        await signInWithEmailAndPassword(auth, this.email, this.password)
      } catch {
        console.error('失敗しました')
      }
    },
  },
})
</script>
サインアップを実行すると、エミュレータの管理画面でユーザーが登録されたことを確認できます。
DB(Firestore)
エミュレータ内でデータの登録、読取、変更、削除が可能です。
import { collection, getDocs, getFirestore } from 'firebase/firestore'
export default Vue.extend({
  methods: {
    async notRequireAuth() {
      try {
        const querySnapshot = await getDocs(collection(db, 'public'))
        querySnapshot.forEach((doc) => {
          console.log(`${doc.id} => ${JSON.stringify(doc.data())}`)
        })
      } catch {
        console.error('失敗しました')
      }
    },
  },
})
エミュレータ内のデータを読み取ることができます。
Firestoreのルール
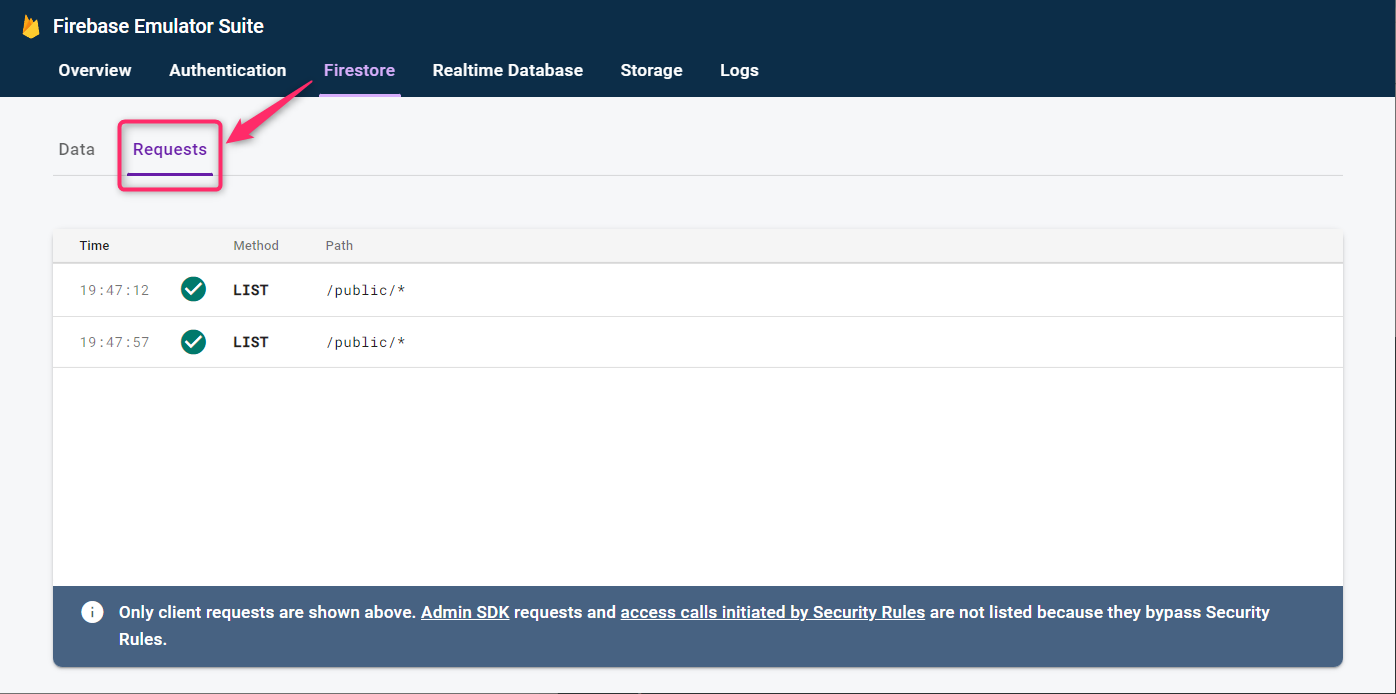
Firestoreではデータの読取り、変更に制限を加えることができます。この制限は「ルール」として設定でき、エミュレータでは各リクエストについて、ルールでの許可/拒否、その理由を確認することもできます。
Firestoreエミュレータ管理画面の「Requests」タブに表示されます。
// Firestoreのルール
rules_version = '2';
service cloud.firestore {
  match /databases/{database}/documents {
    match /{document=**} {
      allow read, write: if request.auth != null;   // データへのアクセスには認証が必要
    }
  }
}
import { collection, getDocs, getFirestore } from 'firebase/firestore'
async requireAuth() {
  try {
    // ログインせずにFirestoreのデータ読取りを試みる
    const querySnapshot = await getDocs(collection(db, 'private'))
    querySnapshot.forEach((doc) => {
      console.log(`${doc.id} => ${doc.data()}`)
    })
  } catch {
    console.error('失敗しました')
  }
},
ログインせずにFirestoreのデータを読み取ろうとしましたが、ルールにより失敗しました。エミュレータでは、失敗したことが記録され、どのルールに引っかかったのかも表示されます。
クエリなどリクエストの詳細も確認できます。
まとめ
Firebaseエミュレータでは、ローカル環境で認証やFirestore、Functionsの機能を確認できます。Firestoreではルールの判定結果も確認でき、何度もデプロイする手間を省けます。
便利なのでぜひ使ってみてください。