初めに
レシピ投稿サイトを作成中の初学者です。
自分の記録のために書いてますが、どなたかの参考にもなれたのなら幸いです。
前提
コメントモデルは作成されているものとして進めていきます。
コメントモデルのカラムは以下のように設定しました。
  create_table "comments", force: :cascade do |t|
    t.text "body"
    t.datetime "created_at", null: false
    t.datetime "updated_at", null: false
    t.integer "recipe_id"
    t.integer "user_id"
    t.integer "parent_id"
    t.integer "reply_to_id"
  end
後にこのカラムの意味は解説します。
モデルにアソシエーションの追加
userモデルとrecipeモデルに関連づけます
class Recipe < ApplicationRecord
  has_many :comments, dependent: :destroy
end
class User < ApplicationRecord
  has_many :comments, dependent: :destroy
end
class Comment < ApplicationRecord
  belongs_to :recipe
  belongs_to :user
  belongs_to :parent, class_name: 'Comment', optional: true
  has_many :replies, class_name: 'Comment', foreign_key: :parent_id, dependent: :destroy
  belongs_to :myreply, class_name: 'Comment', foreign_key: :reply_to_id, optional: true
end
Commentモデルは返信機能にちなんだモデル設計となっています。
説明します。
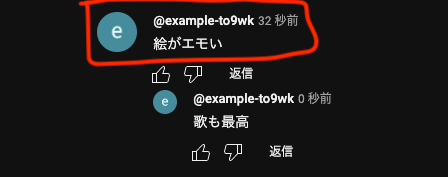
belongs_to :parent, class_name: 'Comment', optional: true
これは返信先のコメントのみを格納するための関連名です。
youtubeで言うところのこの部分ですね。
次行きます。
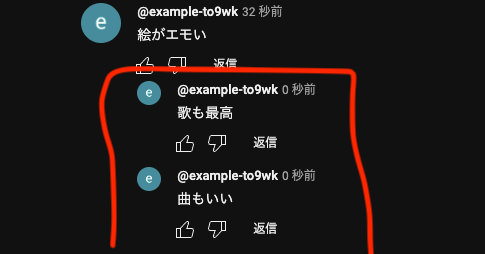
has_many :replies, class_name: 'Comment', foreign_key: :parent_id, dependent:
これは返信コメントを返信先ごとにまとめたものですね。
youtubeで言うところのこのコメントたちです。
foreign_key: :parent_id
を目印に仕分けをしています。
次行きます。
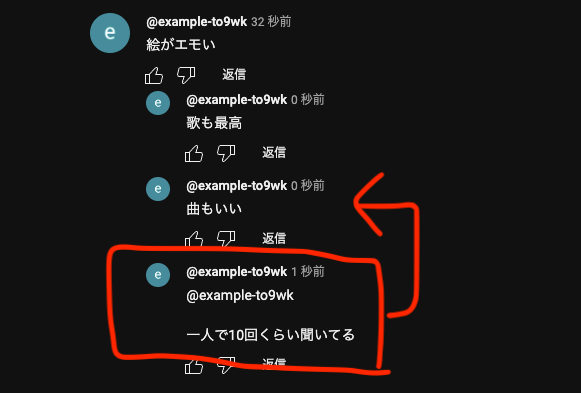
belongs_to :myreply, class_name: 'Comment', foreign_key: :reply_to_id, optional: true
これは返信コメントに対して返信するコメントを格納しています。
youtubeで言うところのこの赤枠部分です。
少し自分で書いていても混乱してきました笑
まあこれらの関連名に格納していくことでコメントが誰に返信しているかわかるようになっています。
ルーティングの設定
Rails.application.routes.draw do
  resources :recipes do
    resources :comments, only: [:create, :destroy, :update]
  end
end
コメントのルーティングはレシピにネストされた形で描きます。
これでレシピ一つ、一つに対して、コメントが個々に割り振られるようになりました。
Commentsコントローラの作成
class CommentsController < ApplicationController
  before_action :set_recipe

  def create
    comment = @recipe.comments.build(comment_params)
    if comment.save
    end
  end

  private

  def comment_params
    params.require(:comment).permit(:body, :parent_id, :reply_to_id)
  end

  def set_recipe
    @recipe = Recipe.find(params[:recipe_id])
  end
end
今回はコメントの作成部分に焦点を当てて解説します。
まずset_recipeです。これはURLから受け取ったidを使ってレシピを検索し,@recipeに設定しています。
before_actionで全てのアクションが実行される前に設定させています。
次にコメントの作成部分である、createアクションです。
@comment = @recipe.comments.build(comment_params)
このコードでコメントのインスタンスを作っています。
インスタンスはかんたんにいうと変数みたいなものです。
この変数(インスタンス)にコメントの中身が入れられ、
if comment.save
で保存されます。
viewで使う変数
次はviewに渡す変数を決めます。
以下のように設定してください。
def show
  @recipe = Recipe.includes(:steps).find(params[:id])
  @comments = @recipe.comments.includes(:user, replies: [:user, {myreply: :user}]).order(created_at: :desc)
  @comment = @recipe.comments.new
  @replies = Comment.includes(:user).where.not(reply_to_id: nil)
  @parent_comments = @comments.where(parent_id:nil)
end
順に解説していきます。
@recipe = Recipe.includes(:steps).find(params[:id])
これはレシピ詳細画面で見ているレシピを取得しています。URLに書かれたidのレシピですね。
N+1問題が起きないようにincludes(:steps)でレシピの手順のモデルごとクエリを発行しています。まあ今回関係ないので省略ですね。
@comments = @recipe.comments.includes(:user, replies: [:user, {myreply: :user}]).order(created_at: :desc)
これはレシピに付属するコメントを全て取得しています。
includes(:user, replies: [:user, {myreply: :user}])は先ほど同様N+1問題避けです。
order(created_at: :desc)はコメントを新しい順にするためのものです。
@comment = @recipe.comments.new
これはコメントを作成する際に新しくインスタンス(変数)を作らないといけないので書きました。
view側でも設定できますが、自分はshowアクションに書いておきました。
@replies = Comment.includes(:user).where.not(reply_to_id: nil)
これは返信先が親コメントだけへの返信コメントをクエリで取得した変数です。
これですね。
view
続いてコメントをレンダリングするhtmlの中身についてです。
このように書きます。
  - @parent_comments.each do |comment|
    = render partial: 'shared/comment/comment_body', locals: {recipe: @recipe, comment: comment }

    - comment.replies.each do | reply |
      = render partial: 'shared/comment/comment_reply', locals: { recipe: @recipe, comment: comment, replycomment: reply }
解説します。
- @parent_comments.each do |comment|
これは先ほど格納した親コメントを一つずつ取り出すコードです。
そして
= render partial: 'shared/comment/comment_body', locals: {recipe: @recipe, comment: comment }
に取り出したcommentを渡すことで親コメントを表示させることができます。
そしてその親コメントを取り出した状態でまたeach文を回します。
- comment.replies.each do | reply |
これはその親コメントに存在する返信コメント達でeach文を回しています。
そして取り出したその返信コメントを
= render partial: 'shared/comment/comment_reply', locals: { recipe: @recipe, comment: comment, replycomment: reply }
に渡して返信コメント画面に表示させます。
これは返信コメントであれば全て表示されます。
返信先への返信コメントもまとめて表示です。
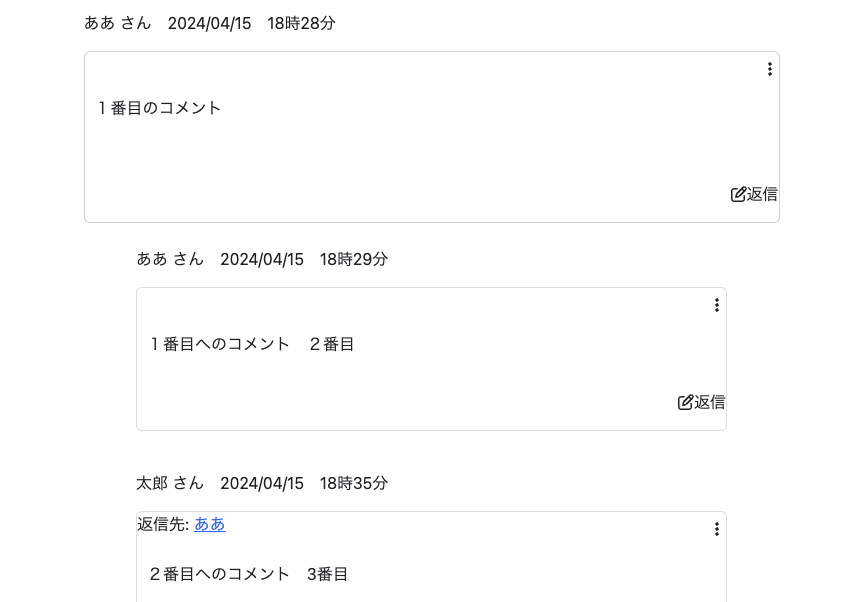
親コメントのviewはこのようになってます。
.container.w-95.pt-3
  p #{comment.user.name} さん #{comment.created_at.strftime('%Y/%m/%d %H時%M分')}
親コメントは返信コメントに比べてカードが大きめです。
視覚的にわかりやすくしました。
返信コメントは
.container.w-75.pt-3
  -if replycomment.myreply.present?
    p 返信先: #{link_to replycomment.myreply.user.name,user_path(replycomment.myreply.user)}
  = replycomment.body
返信コメントはカード小さめです。
また
p 返信先: #{link_to replycomment.myreply.user.name,user_path(replycomment.myreply.user)}
は返信コメントの中でも返信先を持つものだけ表示される返信先への名前ですね。
これで返信への返信を表現しています。
formのview
コメント入力フォームはこのようになってます。
= form_with model: [recipe, Comment.new], url: recipe_comments_path(recipe), local: true, html: { class: "unique-form-class" } do |f|
  .row_margin
    = f.text_field :body, placeholder: 'コメントを入力してください', class: 'form-control'
  = f.submit 'コメントを作成する'
親コメントが持つ返信フォームはこのようになっています。
= form_with model: [@recipe, Comment.new], method: :post, id: "replyFormTemplate", local: true do |f|
  .row_margin
    p 返信先 #{comment.user.name}
    = f.text_field :body, placeholder: '返信を入力してください', class: 'form-control'
    = f.hidden_field :parent_id, value: comment.id, id: "parent_id"
    = f.hidden_field :id
  .text-end
    = f.submit '返信する', class: 'btn btn-warning text-white'
返信コメントが持つ返信フォームはこのようになっています。
= form_with model: [recipe, @comment], id: "replyFormTemplate", local: true, html: { class: "unique-form-class" } do |f|
  .row_margin id = "aaa"
    /# 返信コメント主名前を表示
    p 返信先 #{replycomment.user.name}
    = f.text_field :body, placeholder: '返信を入力してください', class: 'form-control'
    = f.hidden_field :parent_id, value: comment.id, id: "parent_id"
    = f.hidden_field :reply_to_id, value: replycomment.id, id: "reply_to_id"
  .text-end
    = f.submit '返信する', class: 'btn btn-warning text-white'
違いは以下のようになってます。
親コメント
parent_id なし
reply_to_id なし
親コメントへの返信
parent_id あり
reply_to_id なし
返信コメントへの返信
parent_id あり
reply_to_id あり
これらの要素でコメントの状態を表しています。
以上で完成です。
完成系はこのような形です。


