この記事では金融時系列データの予測モデルを構築するためにWF法(ウォークフォワード)を実践してみる内容です。
以下のPythonコードを参考にしています。
ここで扱うデータセットについて
データセットは以下の記事で作成した特徴量のような形式を想定しています。
具体的には、ティッカーコードと日付のマルチインデックスで形成されたデータです。
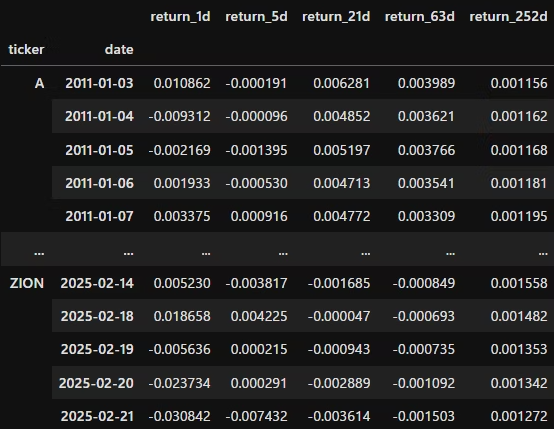
各列は特徴量+ターゲット(目的変数)となっています。
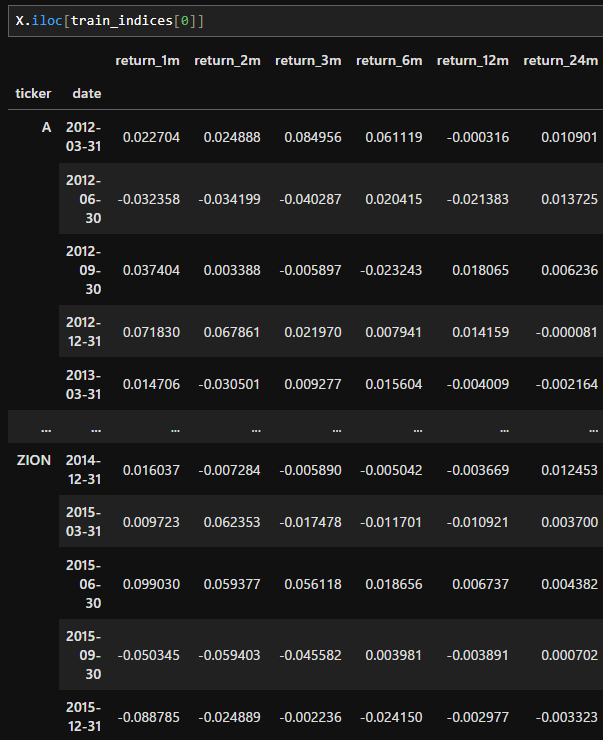
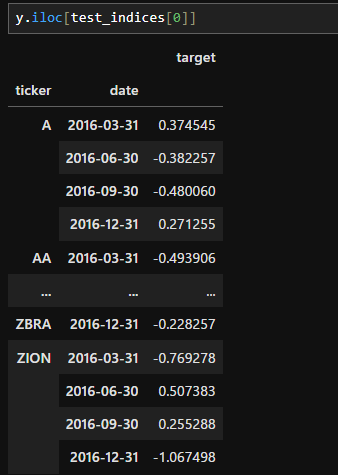
ここから教師データ配列yと特徴量行列Xを抽出するには、下記のようなコードを実行します。
y = dataset.filter(like='target')
X = dataset.drop(y.columns, axis=1)
Xとyを抽出できたら、これを学習データとテストデータに分割する必要があります。今回はここでWF法を実行していきます。
WF法
WF法の準備として以下を定義します。
class MultipleTimeSeriesCV:
    """
    Generates train-test splits for time series data with a MultiIndex (symbol, date).
    - Respects time order (no leakage)
    - Supports purge period via lookahead
    """

    def __init__(self,
                 n_splits=3,
                 train_period_length=126,
                 test_period_length=21,
                 lookahead=0,
                 shuffle=False):
        self.n_splits = n_splits
        self.train_length = train_period_length
        self.test_length = test_period_length
        self.lookahead = lookahead
        self.shuffle = shuffle

    def split(self, X, y=None, groups=None):
        unique_dates = X.index.get_level_values('date').unique().sort_values()
        total_period = self.train_length + self.lookahead + self.test_length
        max_start = len(unique_dates) - total_period

        for i in range(self.n_splits):
            split_start = i * self.test_length
            train_start = split_start
            train_end = train_start + self.train_length
            test_start = train_end + self.lookahead
            test_end = test_start + self.test_length

            if test_end > len(unique_dates):
                break  # 範囲外を防止

            train_dates = unique_dates[train_start:train_end]
            test_dates = unique_dates[test_start:test_end]

            train_idx = X.index.get_level_values('date').isin(train_dates)
            test_idx = X.index.get_level_values('date').isin(test_dates)

            train_idx = np.where(train_idx)[0]
            test_idx = np.where(test_idx)[0]

            if self.shuffle:
                np.random.shuffle(train_idx)

            yield train_idx, test_idx

    def get_n_splits(self, X=None, y=None, groups=None):
        return self.n_splits
これはGithubで掲載されていたコードに少し修正を加えたものです。(エラーが出るので一部修正しました。)
| パラメータ名 | 型 | 意味 |
|---|---|---|
| n_splits | int | 分割回数(fold数) 交差検証を何回行うか(=何組の train/test を作るか) |
| train_period_length | int | 訓練期間の長さ(営業日などの期間) 1回の学習に使うデータの期間(例:126 = 半年) |
| test_period_length | int | テスト期間の長さ その分だけ未来のデータを検証に使う(例:21 = 1か月) |
| lookahead | int | 先読み除去期間(purge) 未来の情報が学習データに入り込むのを防ぐためのブランク期間 |
| shuffle | bool | 学習データをシャッフルするか 時系列回帰などでは通常 False(時系列を保つため) |
実行するには各種設定を入力します。
YEAR = 252

train_period_length = 63
test_period_length = 10
n_splits = int(3 * YEAR/test_period_length)
lookahead =1

cv = MultipleTimeSeriesCV(n_splits=n_splits,
                          test_period_length=test_period_length,
                          lookahead=lookahead,
                          train_period_length=train_period_length)
cvを実行したら訓練データとテストデータが想定した通りに(WF法に則って)データセットを分割できているかを確認します。
# 分割期間の確認用
for train_idx, test_idx in cv.split(X=dataset):
    train = dataset.iloc[train_idx]
    test = dataset.iloc[test_idx]

    train_dates = train.index.get_level_values('date')
    test_dates = test.index.get_level_values('date')

    df = pd.concat([train.reset_index(), test.reset_index()])
    n = len(df)
    assert n == len(df.drop_duplicates()), "Train and test sets overlap!"

    print(
        train.groupby(level='ticker').size().value_counts().index[0],
        train_dates.min().date(), train_dates.max().date(),
        test.groupby(level='ticker').size().value_counts().index[0],
        test_dates.min().date(), test_dates.max().date()
    )
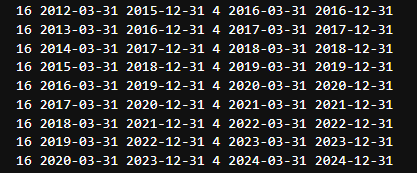
コードを実行すると分割された期間が表示されるので、これを目で追って不自然な箇所がないかを確認していきます。
問題がなければ実際にXとyを分割します。
# 各分割のインデックスを格納するリストを用意
train_indices = []
test_indices = []

# 分割ごとにインデックスを保存
for train_idx, test_idx in cv.split(X):
    train_indices.append(train_idx)
    test_indices.append(test_idx)
これで完了したので、あとは必要に応じて対象期間を呼び出すことになります。