1.はじめに
Raspberry Pi OSをBullseyeに変えたら、OpenCV(が要求するライブラリ)のインストールができなくてこまったりしたので、BullseyeでTFLite動かすための緊急避難的な覚書。ちなみにBusterならこちらやこちらで動く(はず)。
OSのバージョンはこちら。
$ lsb_release -a
No LSB modules are available.
Distributor ID:	Raspbian
Description:	Raspbian GNU/Linux 11 (bullseye)
Release:	11
Codename:	bullseye
2.OpenCVインストール
OpenCV(opencv-python)自体はpipでインストールできるのですが、依存ライブラリのうちlibqt4関連がBullseyeに対応してないっぽいのでインポートできません。ちょっとずるですが、OAK-DのDepthAI動作環境をインストールするとOpenCVも一緒にインストールしてくれるのでこれを流用したらいいじゃない、ってことで
$ git clone https://github.com/luxonis/depthai.git
$ cd depthai
$ python3 install_requirements.py
$ python
Python 3.9.2 (default, Mar 12 2021, 04:06:34)
[GCC 10.2.1 20210110] on linux
Type "help", "copyright", "credits" or "license" for more information.
>>> import cv2
>>> cv2.__version__
'4.5.5'
>>>
importできました。versionは4.5.5、最新ですね。
3.TFLiteのインストール
https://www.tensorflow.org/lite/guide/python#install_tensorflow_lite_for_python
こちらもBusterを推奨していますが、公式の方法でruntimeを入れてみます。
$ pip3 install --extra-index-url https://google-coral.github.io/py-repo/ tflite_runtime
インストールはできましたのでインポートしてみます。
$ python
Python 3.9.2 (default, Mar 12 2021, 04:06:34)
[GCC 10.2.1 20210110] on linux
Type "help", "copyright", "credits" or "license" for more information.
>>> import cv2
>>> import tflite_runtime.interpreter as tflite
>>>
importもできましたね。
4.動作確認
TFLiteの動作確認はPINTO神さまのリポジトリが簡単なのでお借りします。
$ git clone https://github.com/PINTO0309/TensorflowLite-bin
$ cd TensorflowLite-bin
$ python3 mobilenetv2ssd.py
time: 0.08984041213989258
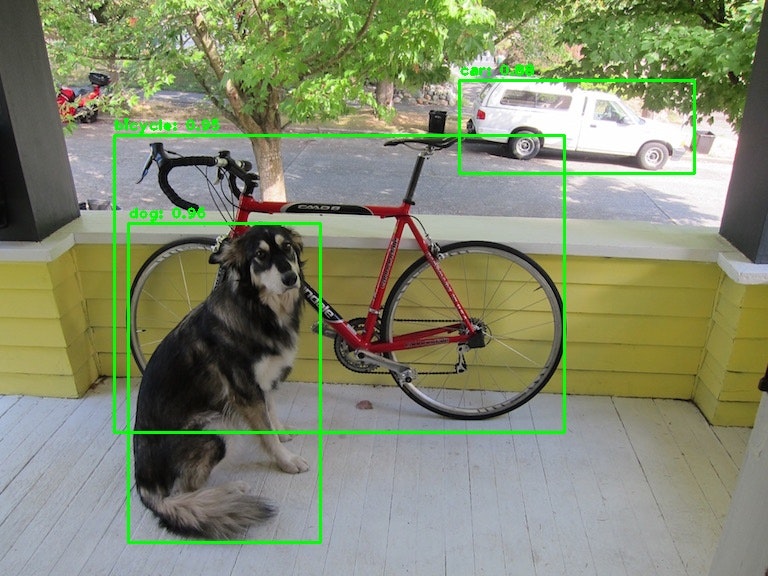
[[(128, 223), (320, 542), 0.96484375, 'dog'], [(114, 135), (564, 432), 0.953125, 'bicycle'], [(459, 80), (694, 173), 0.87890625, 'car']]
coordinates: (128, 223) (320, 542). class: "dog". confidence: 0.96
coordinates: (114, 135) (564, 432). class: "bicycle". confidence: 0.95
coordinates: (459, 80) (694, 173). class: "car". confidence: 0.88
無事動きましたね。同じフォルダにできているresult.jpgに認識後の画像も生成されています。
5.動作確認2 USBカメラ入出力
import cv2
import time
capture = cv2.VideoCapture(0)

if capture.isOpened() is False:
    raise IOError

start_time = time.time()

while(True):
    try:
        ret, frame = capture.read()
        if ret is False:
            raise IOError

        elapsed_time = time.time() - start_time
        start_time = time.time()
        cv2.putText(frame,
             "Elapsed Time : " + '{:.1f}'.format(elapsed_time * 1000) + "ms" + " / " + '{:.1f}'.format(1 / elapsed_time) + "fps" ,
             (10, 30), cv2.FONT_HERSHEY_SIMPLEX, 1.0, (0, 255, 0), 2,
             cv2.LINE_AA)

        cv2.imshow('frame',frame)
        cv2.waitKey(1)

    except KeyboardInterrupt:
        # 終わるときは CTRL + C を押す
        break

capture.release()
以前やった単眼震度推定も動きました。