音楽制作用DAWのプラグイン仕様VST3についてインターネットのヤホーで調べました。今回はタブで切り替わるGUIを定義する方法の説明です。
この記事はVST3プラグインを書く人向けの内容です。
はじめに
VSTGUIにはCTabView1というクラスがありタブビューを実現できます。
一方で、uidescというXML形式でGUIを定義するわりと新しい機能があり、このXML形式はCTabViewに対応していません。
ソースコードにCTabViewの生成処理を記述すれば従来通り表示できますが、できればXMLでタブビューを定義したいのでその方法について調べてみました。
公式情報
このあたりはドキュメントには明記されていません。githubにあるSDKのソースを見ると、こんなコメントがありました。2
/*
	UIDescription todo:
		- CTabView support (skipped, UIViewSwitchContainer is the replacement)
*/
つまり、CTabView対応はUIViewSwitchContainerで同じことができるから未実装だと。
なるほど、ということでUIViewSwitchContainerの使い方について調べてみました。
UIViewSwitchContainer
UIViewSwitchContainerも公式リファレンスでは情報がスッカスカです。3 4
ネットを検索してもこの辺を調べて情報公開しているページや掲示板は日本語・英語ともになさそうです。
サンプルのuidescファイルが唯一のヒントです。5
実装方法
それでは実装について。
まずは選択されているタブを表すパラメータをEditControllerに追加します。kSelectedTabが選択されているタブの値を持つパラメータのIDです。今回はタブ数を4としているのでこのパラメータは0~3の値を持ちます。
# define kSelectedTab 100
# define NumberOfTab  4
# define DefaultTab   0

tresult PLUGIN_API MyEditController::initialize (FUnknown* context)
{
	// 略

	// Here you could register some parameters
	parameters.addParameter(STR16("SelectedTab"), nullptr, NumberOfTab - 1, DefaultTab,
		ParameterInfo::kCanAutomate, kSelectedTab);

	// 略
}
uidescファイルの記述について説明します。
まず、一番親となるビューをtemplateで定義します。
次にタブ代わりのCSegmentButtonを定義しますが、設定パラメータが多くてちょっと大変です。
control-tagは先ほど定義したパラメータIDとひもづけます。
続いてタブの表示名、位置とサイズ、枠の色と太さ、角丸指定。
CSegmentButtonは背景色をカラーコードで指定することができず、必ずグラデーション名で指定します。
最後にテキストの位置と色の指定となります。
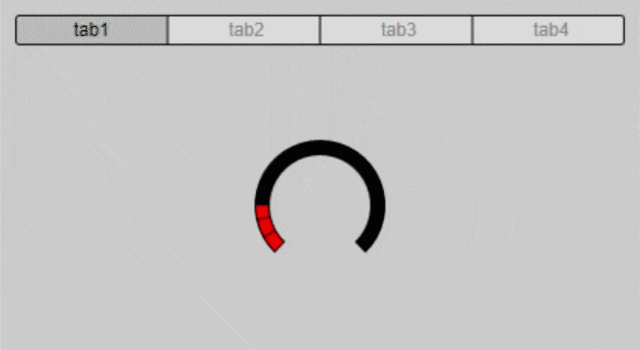
  <template background-color="#CCCCCC" name="view" origin="0, 0" size="420, 250">
    <view class="CSegmentButton" control-tag="SelectedTab"
      segment-names="tab1,tab2,tab3,tab4"
      origin="10, 10" size="400, 20" style="horizontal"
      frame-color="#000000" frame-width="1" round-radius="2"
      gradient="Button" gradient-highlighted="HighlightedButton"
      text-alignment="center" text-color="#888888" text-color-highlighted="#000000"
    />
ボタン背景のグラデーションは別の場所にこんな風に定義します。今回は単色にしたかったのでグラデーションの開始色と終了色は同じにしてあります。
  <gradients>
    <gradient name="Button">
      <color-stop rgba="#DDDDDDFF" start="0"/>
      <color-stop rgba="#DDDDDDFF" start="1"/>
    </gradient>
    <gradient name="HighlightedButton">
      <color-stop rgba="#BBBBBBFF" start="0"/>
      <color-stop rgba="#BBBBBBFF" start="1"/>
    </gradient>
  </gradients>
次にタブで切り替わるエリアの指定です。
UIViewSwitchContainerクラスを指定して、切り替わるタブのtemplate名をtemplate-namesで指定します。カンマの前後に空白は入れないでください。
選択されているタブtemplate-switch-controlは、先ほど定義したパラメータIDとひもづけます。
ここまででひとつめのtemplateを閉じます。
    <view class="UIViewSwitchContainer"
      template-names="tab1,tab2,tab3,tab4"
      template-switch-control="SelectedTab"
      transparent="true"
      origin="10, 35" size="400, 200"
    />
  </template>
次に、切り替えられる各タブの内容の定義です。
UIViewSwitchContainerのところで指定した名前と一致するように、必要な分だけtemplateを定義します。
今回はUIViewSwitchContainerも各タブもtransparent="true"として背景色を透明にしました。
  <template name="tab1" transparent="true" origin="0, 0" size="400, 200">
    <view class="CKnob" control-tag="Param1" origin="150, 50" size="100, 100" />
  </template>

  <template name="tab2" transparent="true" origin="0, 0" size="400, 200">
    <view class="CKnob" control-tag="Param2" origin="150, 50" size="100, 100" />
  </template>

  <template name="tab3" transparent="true" origin="0, 0" size="400, 200">
    <view class="CKnob" control-tag="Param3" origin="150, 50" size="100, 100" />
  </template>

  <template name="tab4" transparent="true" origin="0, 0" size="400, 200">
    <view class="CKnob" control-tag="Param4" origin="150, 50" size="100, 100" />
  </template>
これで、主要な箇所の説明は終わりです。最終的なgui.uidescファイルは以下のようになります。
<?xml version="1.0" encoding="UTF-8"?>
<vstgui-ui-description version="1">

  <template background-color="#CCCCCC" name="view" origin="0, 0" size="420, 250">
    <view class="CSegmentButton" control-tag="SelectedTab"
      segment-names="tab1,tab2,tab3,tab4"
      origin="10, 10" size="400, 20" style="horizontal"
      frame-color="#000000" frame-width="1" round-radius="2"
      gradient="Button" gradient-highlighted="HighlightedButton"
      text-alignment="center" text-color="#888888" text-color-highlighted="#000000"
    />
    <view class="UIViewSwitchContainer"
      template-names="tab1,tab2,tab3,tab4"
      template-switch-control="SelectedTab"
      transparent="true"
      origin="10, 35" size="400, 200"
    />
  </template>

  <template name="tab1" transparent="true" origin="0, 0" size="400, 200">
    <view class="CKnob" control-tag="Param1" origin="150, 50" size="100, 100" />
  </template>

  <template name="tab2" transparent="true" origin="0, 0" size="400, 200">
    <view class="CKnob" control-tag="Param2" origin="150, 50" size="100, 100" />
  </template>

  <template name="tab3" transparent="true" origin="0, 0" size="400, 200">
    <view class="CKnob" control-tag="Param3" origin="150, 50" size="100, 100" />
  </template>

  <template name="tab4" transparent="true" origin="0, 0" size="400, 200">
    <view class="CKnob" control-tag="Param4" origin="150, 50" size="100, 100" />
  </template>

  <control-tags>
    <control-tag name="SelectedTab"  tag="100"/>
    <control-tag name="Param1"  tag="200"/>
    <control-tag name="Param2"  tag="300"/>
    <control-tag name="Param3"  tag="400"/>
    <control-tag name="Param4"  tag="500"/>
  </control-tags>

  <gradients>
    <gradient name="Button">
      <color-stop rgba="#DDDDDDFF" start="0"/>
      <color-stop rgba="#DDDDDDFF" start="1"/>
    </gradient>
    <gradient name="HighlightedButton">
      <color-stop rgba="#BBBBBBFF" start="0"/>
      <color-stop rgba="#BBBBBBFF" start="1"/>
    </gradient>
  </gradients>

  <fonts>
  </fonts>
  <colors>
  </colors>
  <bitmaps>
  </bitmaps>
</vstgui-ui-description>
-
https://steinbergmedia.github.io/vst3_doc/vstgui/html/class_v_s_t_g_u_i_1_1_c_tab_view.html ↩
-
https://github.com/steinbergmedia/vstgui/blob/develop/vstgui/uidescription/xmluidescdoc.h ↩
-
https://steinbergmedia.github.io/vst3_doc/vstgui/html/class_v_s_t_g_u_i_1_1_u_i_view_switch_container.html ↩
-
https://steinbergmedia.github.io/vst3_doc/vstgui/html/uidescription_attributes.html#uiviewswitchcontainer ↩
-
https://github.com/steinbergmedia/vstgui/blob/develop/vstgui/tests/uidescription%20vst3/resource/myEditor.uidesc ↩