はじめに
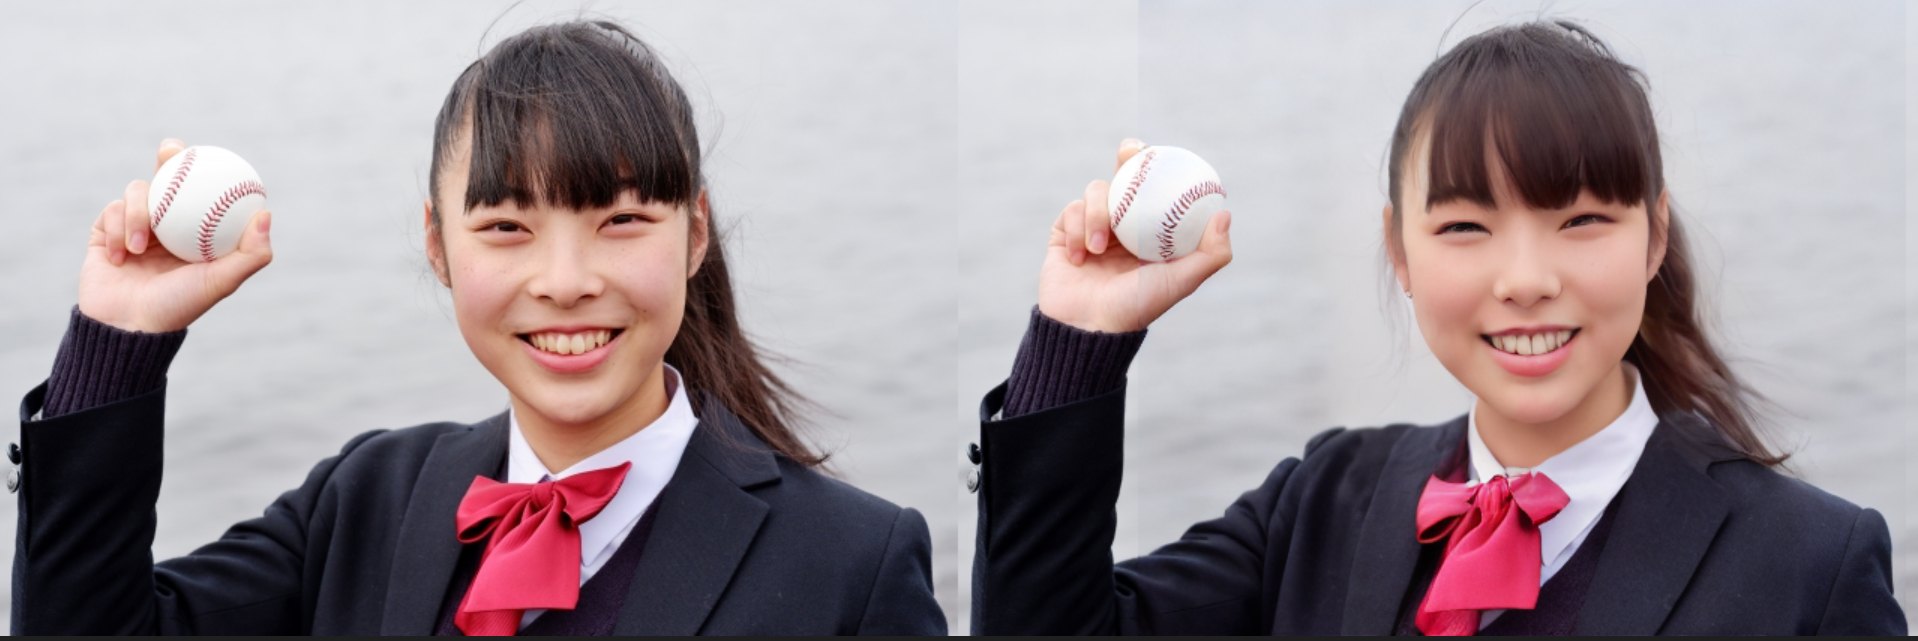
Stable Diffsion2とDiffusersライブラリを使って、プリクラのように顔写真を少し盛る手順を作ってみました。
単純に写真全体をスタイル変換すると不要な部分も書き換わってしまうし、顔部分をInpaintingで書き換えると全くの別人になってしまうので、みんな大好きCivitaiのモデルとimg2imgで顔をスタイル変換しつつ、Inpaintingで変換していない部分とギャップになる部分を補完描画してます。
写真はphotoACさんの物を使わせて頂きました。
検証環境
- OS: Windwos 11 Pro
- CPU: 13th Gen Intel(R) Core(TM) i9-13900K 3.00 GHz
- Memory: 64GB
- GPU: NVIDIA GeForce RTX4090(VRAM24GB)
必要なソフトウェアのインストール
詳細な手順メモってなかったので後で確認して追記します。
とりあえず最新のDiffusersライブラリが動く環境ができれば大丈夫です。
AI関連のライブラリは依存関係で環境が壊れる事が多いので、Windowsで環境作る場合は下記で作って置くと環境再構築し易くて良い感じです。
- Ubuntu22 on WSL2 ※WindowsのGeForce Driver入れるとWSL2でも使える
- WSL2用CUDA Toolkit
- cuDNN ※Ubuntu22内でインストール
- pyenv
- anaconda
- pytorch ※CUDA12使う場合はソースからコンパイルする
- diffusers[torch]
- face_recognition
- VSCode + Jypyterプラグイン ※WSL2からcode起動してJpyterプラグイン入れる
以降の手順は、VSCodeのJypterプラグインで実行してます。
好きなモデルをDiffusersライブラリで使えるように変換
Diffusers標準のモデルを使っても良いですが、Civitaiのモデルを使いたい場合はsafetensorsからDiffusersで使える形式に変換する必要があります。
変換スクリプトを公開されている方がいますので、ありがたく使わせて頂きましょう。
変換したモデルは任意のディレクトリに置いておきます。
face_recognitionによる顔部分の検出
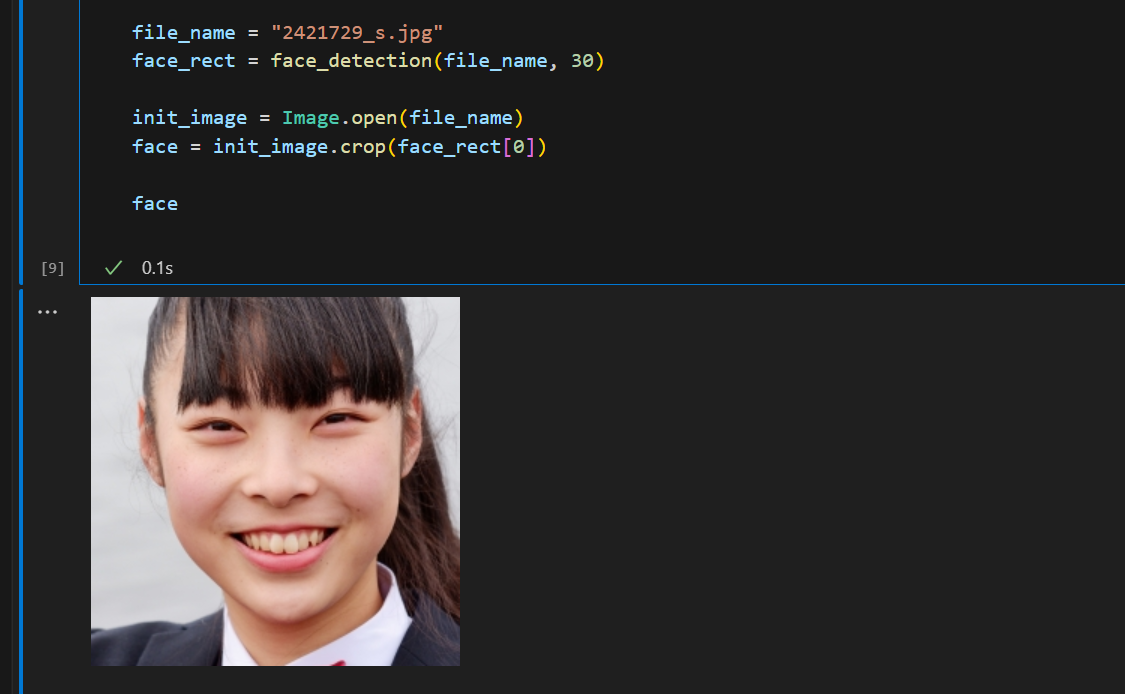
まずface_recognitionライブラリを使って顔部分の画像を切り出します。
face_recognitionで検知した領域のままだと、モデルで変換するときに顔として認識しない場合がありますので、頭頂部から首辺りまでが切り出されるように範囲を広げると良いです。
またモデルには512x512のサイズで渡す事になるので、正方形にしておきます。
※2421729_s.jpgはphotoACさんから入手した顔写真です
import face_recognition
from PIL import Image

FACE_RECOGNITION_MODEL = "hog"

def face_detection(file_name, offset=0):
    num_img = face_recognition.load_image_file(file_name)

    #顔部分を検出
    face_locs = face_recognition.face_locations(num_img, number_of_times_to_upsample=1, model=FACE_RECOGNITION_MODEL)

    face_rects = []

    #検出に失敗したら空の配列を返す
    if(len(face_locs) == 0):
        return face_rects

    #範囲が狭いとモデルが顔を認識できない事があるため、検出範囲の矩形をoffset分広げる。
    for face_loc in face_locs :
        top, right, bottom, left  = face_loc
        top -= offset
        right += offset
        bottom += offset
        left -= offset

        #検出範囲を正方形にする
        w = right - left
        h = bottom - top
        if w > h:
            bottom += w-h
        else:
            right += h-w

        face_rects.append((left,top,right,bottom))

    return face_rects

#顔画像を切り出して表示
file_name = "2421729_s.jpg"
face_rect = face_detection(file_name, 30)

init_image = Image.open(file_name)
face = init_image.crop(face_rect[0])
face
顔部分のスタイル変換
好きなモデルを利用して、切り出した顔部分の画像をスタイル変換します。ここではCivitaiのBulueberryMixを使わせて頂きました。STYLE_MODEL_IDに変換したモデルを格納したディレクトリを指定します。
顔画像は512x512のサイズに調整してからモデルに渡します。
プロンプト、ネガティブプロンプトはネットの英知から拝借しましたが、みなさまの好きなプロンプトを入力してください。
またguidance_scale、strengthパラメータででどの程度元画像を活かすかを調整できます。
import torch
from diffusers import StableDiffusionImg2ImgPipeline
from PIL import Image

DEVICE = 'cuda'
REVISION = 'fp16'
TORCH_DTYPE = torch.float16
STYLE_MODEL_ID = "../model/blueberrymix_10"

def style_change(img, prompt, n_prompt, guidance_scale=9.5, strength=0.4):
    pipe = StableDiffusionImg2ImgPipeline.from_pretrained(STYLE_MODEL_ID, revision=REVISION, torch_dtype=TORCH_DTYPE)
    if pipe.safety_checker is not None:
        pipe.safety_checker = lambda images, **kwargs: (images, False)
    pipe = pipe.to(DEVICE)

    generator = torch.Generator(DEVICE).manual_seed(99)
    with torch.autocast(DEVICE):
        new_img = pipe(prompt, negative_prompt=n_prompt, image=img, guidance_scale=guidance_scale, strength=strength, generator=generator).images[0]

    return new_img

prompt = "masterpiece, high quality, very_high_resolution, large_filesize, full color, an extremely cute face, woman, symmetrical, HDR, real, realistic"
n_prompt = "lowres, bad anatomy, text, error, extra digit, fewer digits, cropped, worst quality, low quality, normal quality, jpeg artifacts, signature, watermark, username, blurry, artist name, malformation"

new_face = style_change(face.resize((512, 512)), prompt, n_prompt, guidance_scale=9.5, strength=0.3)

new_face

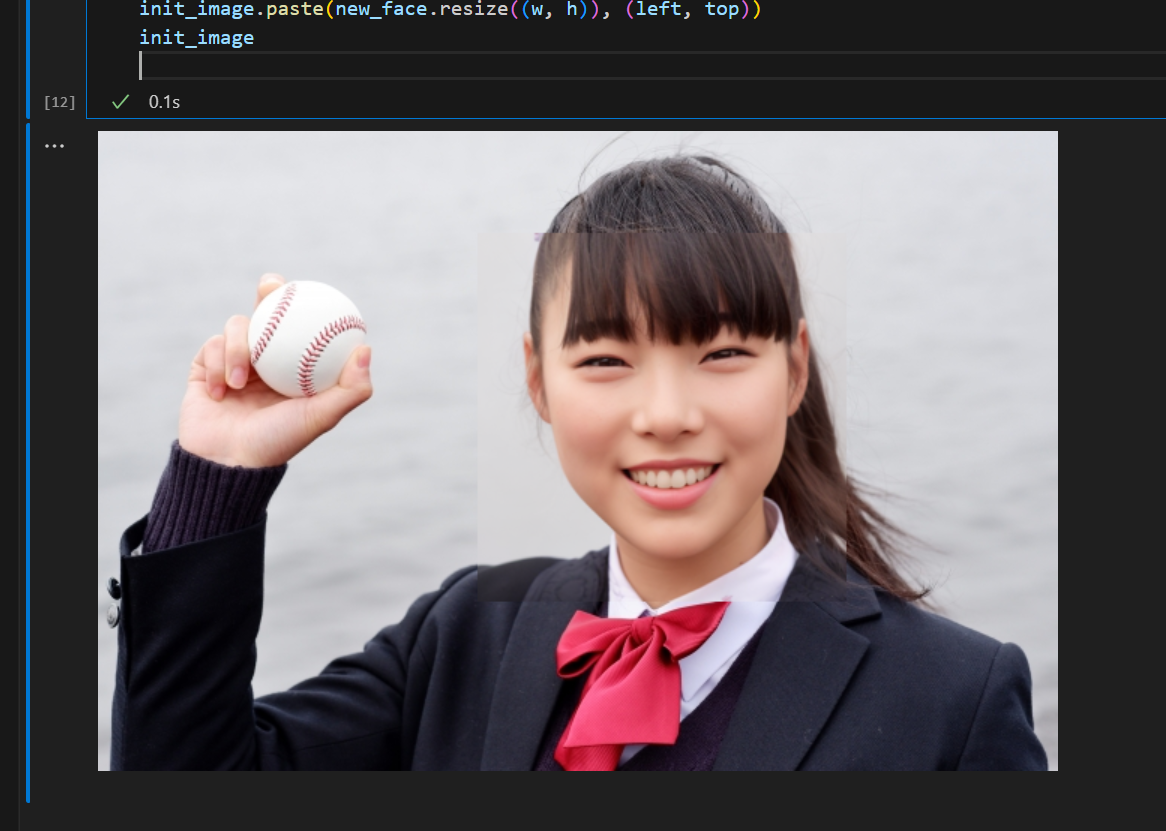
元画像にスタイル変換した画像を張り付け
元の画像にスタイル変換した顔画像を張り付けます。写真によってはこの時点でもそれなりに使えますが、多くの場合エッジ部分が不自然になっちゃいます。
#元の画像にスタイルチェンジした顔画像を貼り付け
#この時点だとエッジ部分が不自然
left, top, right, bottom = face_rect[0]
w = right - left
h = bottom - top

init_image.paste(new_face.resize((w, h)), (left, top))
init_image
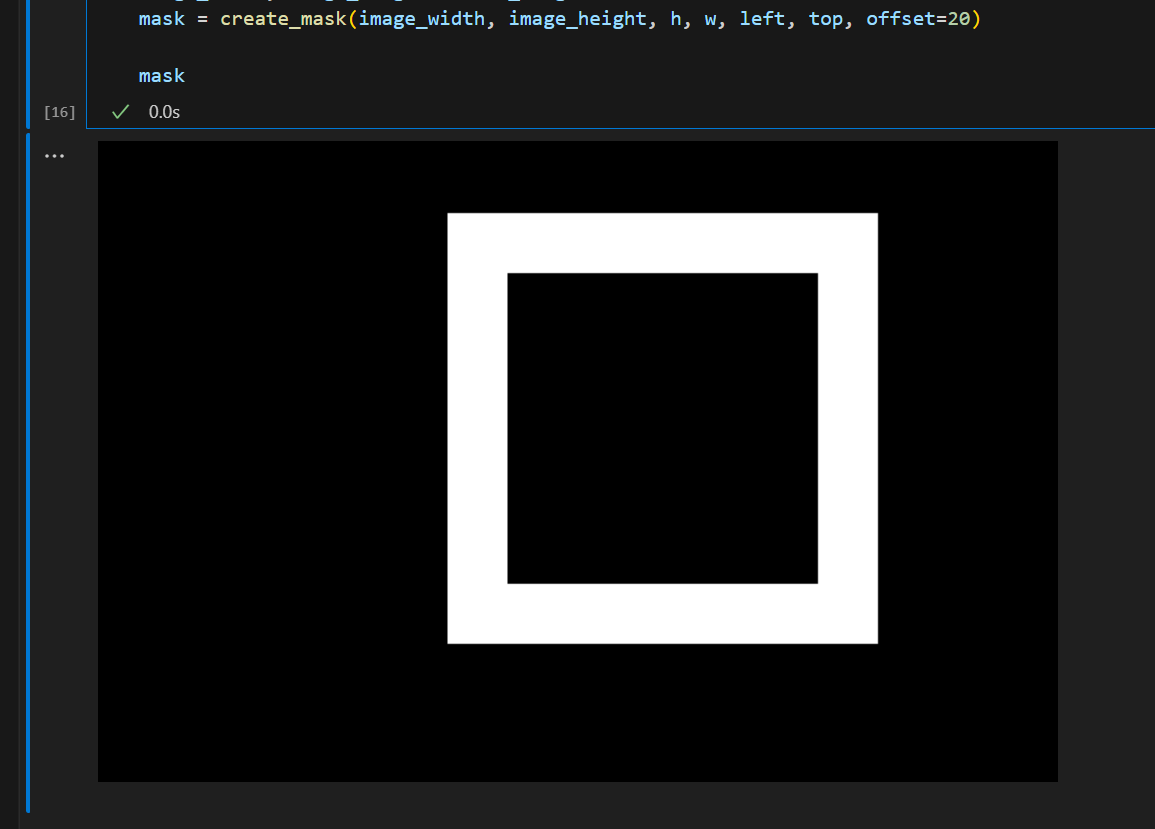
エッジ部分を補完するためのマスクを作成
先ほど検出した顔の位置情報を利用して、エッジ部分だけInpaintingするためにマスク画像を作成します。
マスクの白い部分がInpaintingで書き換えられる領域になります。
ちなみにこの部分のプログラムはChatGPT4さんが9割作ってくれました。
def create_mask(image_width, image_height, rect_width, rect_height, rect_x, rect_y, offset=0):
    # 真っ黒の画像を作成
    image = Image.new('RGB', (image_width, image_height), 'black')

    # 矩形を描くためのドローイングオブジェクトを作成
    draw = ImageDraw.Draw(image)

    # offset分大きい真っ白の矩形を描く
    draw.rectangle([rect_x-offset, rect_y-offset, rect_x+rect_width+offset, rect_y+rect_height+offset], fill='white')

    # offset分小さい真っ黒の矩形を描く
    draw.rectangle([rect_x+offset, rect_y+offset, rect_x+rect_width-offset, rect_y+rect_height-offset], fill='black')

    return image


#エッジ部分をインペインティングでボカすためのマスクを作成
image_width, image_height = init_image.size
mask = create_mask(image_width, image_height, h, w, left, top, offset=20)

mask
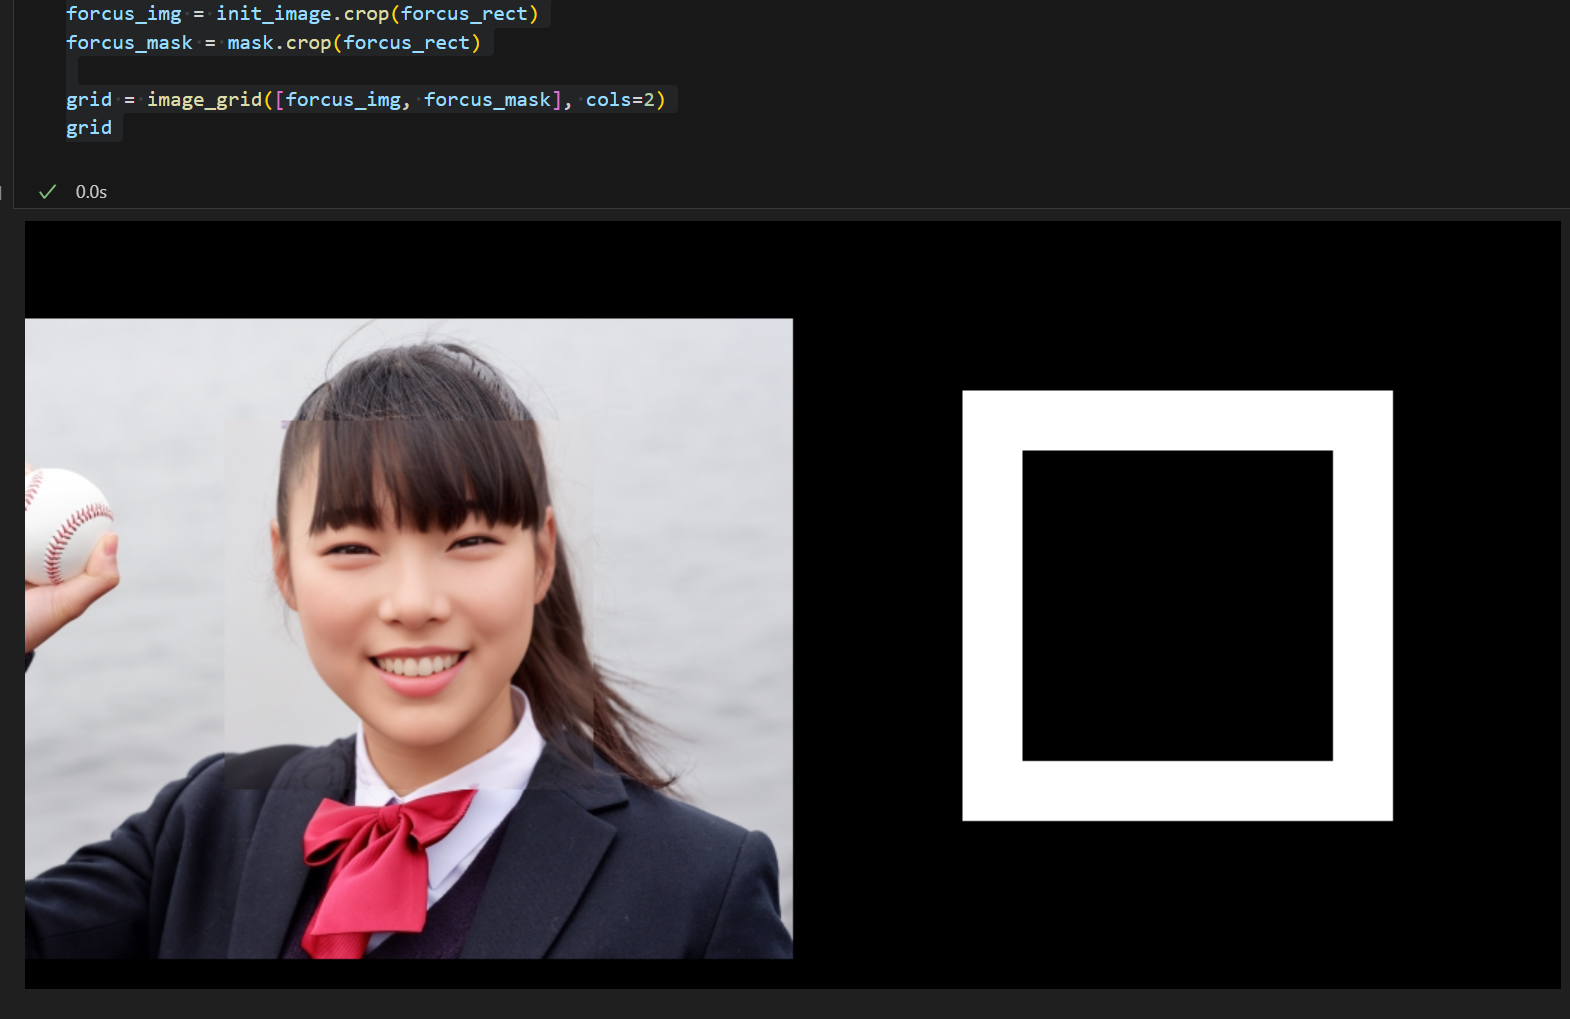
顔周辺の512x512ピクセルの領域を切り出す
Inpaintingのモデルも入力は512x512のサイズにする必要があるので、画像とマスクの両方について顔周辺の領域を切り出します。
顔画像部分が512x512を超える場合は縮小&変換&アップスケール等の対応が別途必要です。
※image_gridという関数は画像を並べて表示するために使ってます。後で全体のソースを記載します。
#元画像とマスクの顔周辺512x512ピクセル分を切り出す
woffset = int((512 - w) /2)
hoffset = int((512 - h) /2)
forcus_rect = (left-woffset, top-woffset, right+woffset, bottom+hoffset)
forcus_img = init_image.crop(forcus_rect)
forcus_mask = mask.crop(forcus_rect)

grid = image_grid([forcus_img, forcus_mask], cols=2)
grid
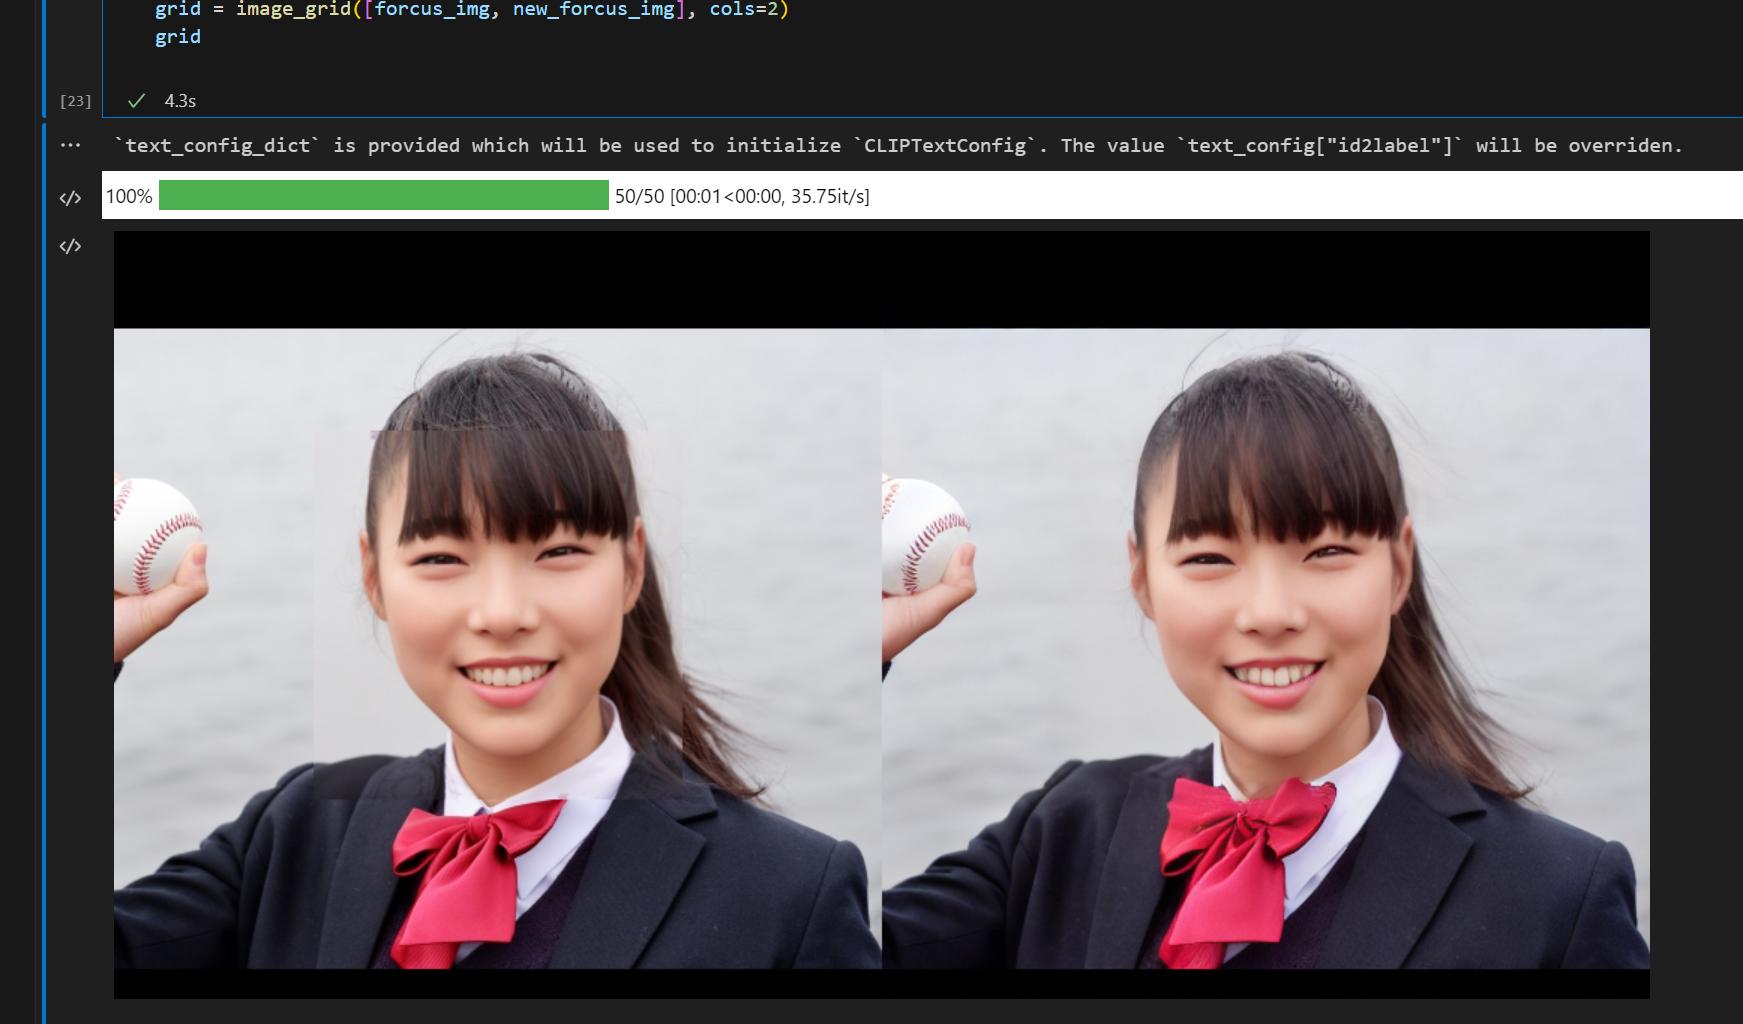
Inpaintingでマスク部分を補完描画
先ほどの切り出した画像とマスクを使って、inpaintingモデルでマスク部分を補完描画します。
エッジ部分の不自然さが和らぎます。
import torch
from diffusers import StableDiffusionInpaintPipeline

DEVICE = 'cuda'
TORCH_DTYPE = torch.float16
INPAINTING_MODEL_ID = "runwayml/stable-diffusion-inpainting"

def inpainting(init_image, mask_image):

    pipe = StableDiffusionInpaintPipeline.from_pretrained(
        INPAINTING_MODEL_ID, torch_dtype=TORCH_DTYPE
    )
    if pipe.safety_checker is not None:
        pipe.safety_checker = lambda images, **kwargs: (images, False)
    pipe = pipe.to(DEVICE)

    prompt = ""
    image = pipe(prompt=prompt, image=init_image, mask_image=mask_image).images[0]

    return image


new_forcus_img = inpainting(forcus_img, forcus_mask)
grid = image_grid([forcus_img, new_forcus_img], cols=2)
grid
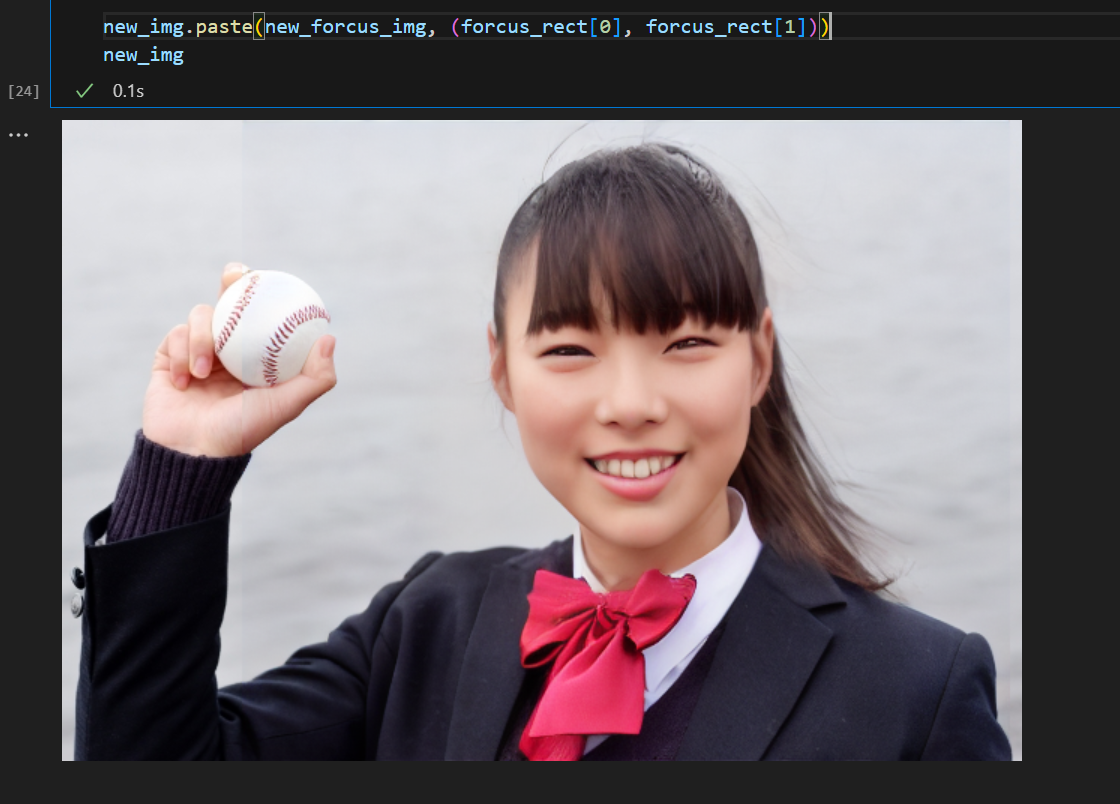
元画像に張り付ける
元画像にInpaintingした画像を張り付けて完成!
・・・と思いきや、Inpaintingすると描画対象外の部分も若干色合いが変わってしまうようです。
ボールの辺りとか張り付けた境界の色味が変わって不自然になっちゃってます。
ノイズ除去とか修正方法はありそうですが、ゴールデンウィーク終わってしまったので今回はココまで。
new_img.paste(new_forcus_img, (forcus_rect[0], forcus_rect[1]))
new_img
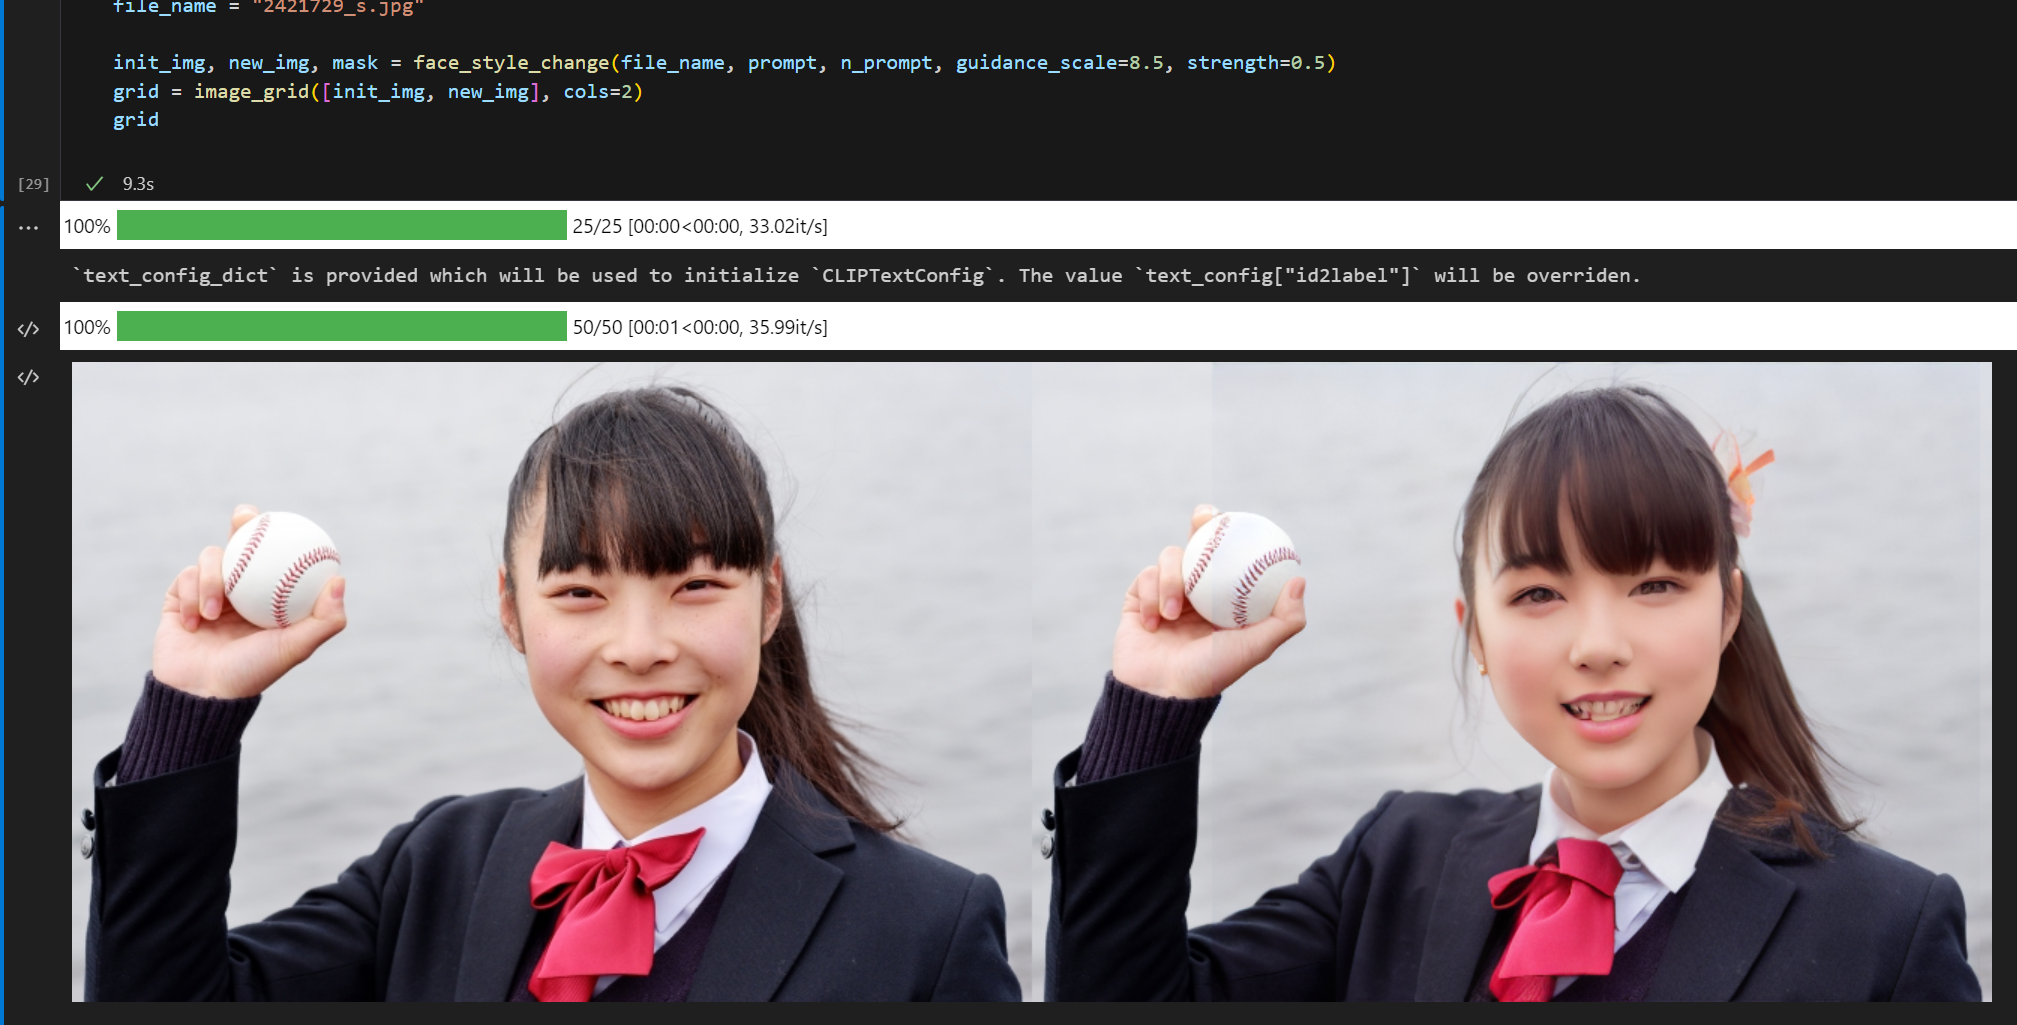
まとめ
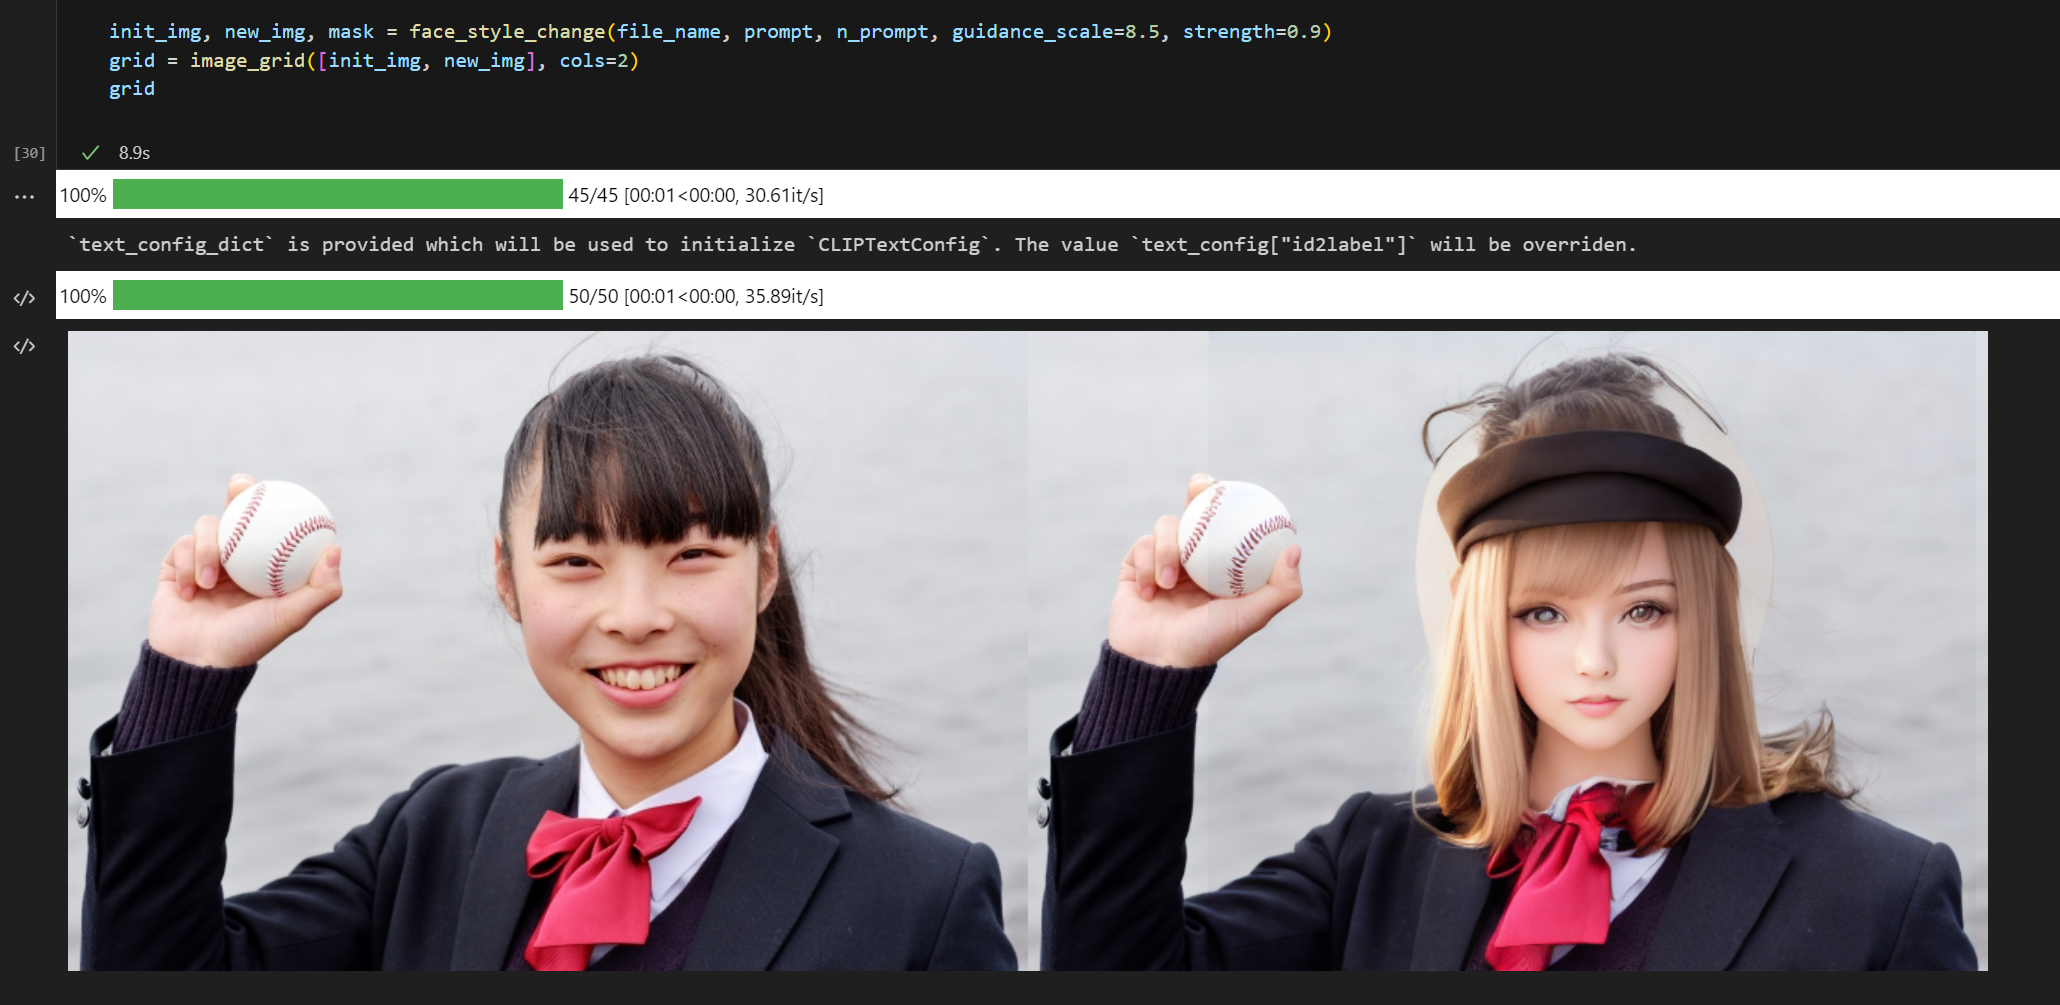
ちょっと長くなりますが上記の流れを全て関数化し、face_style_change関数に纏めました。
また変換の途中で顔部分を切り出して512x512にresizeしてますが、画像が小さすぎると破綻してしまいます。そのような場合は、Stable Diffutionのアップスケールモデルで拡大するとうまく行く場合があります。参考までにupscale関数として記載してます。
upscaled_face = upscale(face, prompt="face")
#upscaled_face = face.resize((512, 512))
import face_recognition
import torch
from diffusers import StableDiffusionUpscalePipeline
from diffusers import StableDiffusionImg2ImgPipeline
from diffusers import StableDiffusionInpaintPipeline
from PIL import Image
from PIL import ImageFont
from PIL import ImageDraw

DEVICE = 'cuda'
REVISION = 'fp16'
TORCH_DTYPE = torch.float16
FACE_RECOGNITION_MODEL_ID = "hog"
UPSCALE_MODEL_ID = "stabilityai/stable-diffusion-x4-upscaler"
STYLE_MODEL_ID = "../model/blueberrymix_10"

def image_grid(imgs, rows=1, cols=1,index=False):
    """
    画像をグリッド表示 ※Diffusers公式のColabのソースを参考に作りました
    indexをTrueにした場合、画像の右上にインデックス番号を表示
    """
    assert len(imgs) == rows*cols

    w, h = imgs[0].size
    grid = Image.new('RGB', size=(cols*w, rows*h))
    draw = ImageDraw.Draw(grid)
    font = ImageFont.load_default()

    for i, img in enumerate(imgs):
        box=(i%cols*w, i//cols*h)
        grid.paste(img, box=box)
        if index:
            draw.text(box,str(i),(255,255,255),font=font)

    return grid

def upscale(img, prompt):
    """
    画像を512x512ピクセルにアップスケール
    """
    pipe = StableDiffusionUpscalePipeline.from_pretrained(
        UPSCALE_MODEL_ID, revision=REVISION, torch_dtype=TORCH_DTYPE
    )
    if pipe.safety_checker is not None:
        pipe.safety_checker = lambda images, **kwargs: (images, False)
    pipe = pipe.to(DEVICE)

    low_res_img = img.convert("RGB")
    low_res_img = low_res_img.resize((128, 128))

    new_img = pipe(prompt=prompt, image=low_res_img).images[0]
    return new_img

def face_detection(file_name, offset=20):
    num_img = face_recognition.load_image_file(file_name)

    #顔部分を検出
    face_locs = face_recognition.face_locations(num_img, number_of_times_to_upsample=1, model=FACE_RECOGNITION_MODEL_ID)

    face_rects = []

    #検出に失敗したら空の配列を返す
    if(len(face_locs) == 0):
        return face_rects

    #範囲が狭いとモデルが顔を認識できない時があるため、検出範囲の矩形をoffset分広げる。
    for face_loc in face_locs :
        top, right, bottom, left  = face_loc
        top -= offset
        right += offset
        bottom += offset
        left -= offset

        #検出範囲を正方形にする
        w = right - left
        h = bottom - top
        if w > h:
            bottom += w-h
        else:
            right += h-w

        face_rects.append((left,top,right,bottom))

    return face_rects

def style_change(img, prompt, n_prompt, guidance_scale=9.5, strength=0.4):
    pipe = StableDiffusionImg2ImgPipeline.from_pretrained(STYLE_MODEL_ID, revision=REVISION, torch_dtype=TORCH_DTYPE)
    if pipe.safety_checker is not None:
        pipe.safety_checker = lambda images, **kwargs: (images, False)
    pipe = pipe.to(DEVICE)

    generator = torch.Generator(DEVICE).manual_seed(99)
    with torch.autocast(DEVICE):
        new_img = pipe(prompt, negative_prompt=n_prompt, image=img, guidance_scale=guidance_scale, strength=strength, generator=generator).images[0]


    return new_img

def create_mask(image_width, image_height, rect_width, rect_height, rect_x, rect_y, offset=10):
    # 真っ黒の画像を作成
    image = Image.new('RGB', (image_width, image_height), 'black')

    # 矩形を描くためのドローイングオブジェクトを作成
    draw = ImageDraw.Draw(image)

    # offset分大きい真っ白の矩形を描く
    draw.rectangle([rect_x-offset, rect_y-offset, rect_x+rect_width+offset, rect_y+rect_height+offset], fill='white')

    # offset分小さい真っ黒の矩形を描く
    draw.rectangle([rect_x+offset, rect_y+offset, rect_x+rect_width-offset, rect_y+rect_height-offset], fill='black')

    return image

def inpainting(init_image, mask_image):

    pipe = StableDiffusionInpaintPipeline.from_pretrained(
        "runwayml/stable-diffusion-inpainting", torch_dtype=torch.float16
    )
    if pipe.safety_checker is not None:
        pipe.safety_checker = lambda images, **kwargs: (images, False)
    pipe = pipe.to(DEVICE)

    prompt = "Around the human face"
    image = pipe(prompt=prompt, image=init_image, mask_image=mask_image).images[0]

    return image

def face_style_change(file_name, prompt, n_prompt, guidance_scale=9.5, strength=0.3):
    """
    画像の顔部分を検出して、Stable Diffusionの出力結果に置き換える。
    """
    face_rect = face_detection(file_name, offset=40)[0]
    left, top, right, bottom = face_rect
    w = right - left
    h = bottom - top

    #オリジナル画像から顔部分を切り出す
    init_img = Image.open(file_name)
    new_img = init_img.copy()
    face = new_img.crop(face_rect)

    #顔部分をアップスケール
    #顔画像が小さすぎる場合は、resizeではなくアップスケールで細かい所を補完した方が良い結果になる事が多い
    #upscaled_face = upscale(face, prompt="face")
    upscaled_face = face.resize((512, 512))

    #スタイルチェンジ
    new_face = style_change(upscaled_face, prompt, n_prompt, guidance_scale=guidance_scale, strength=strength)

    #元の画像にスタイルチェンジした顔画像を貼り付け
    #この時点だとエッジ部分が不自然
    new_img.paste(new_face.resize((w, h)), (left, top))

    #エッジ部分をインペインティングでボカすためのマスクを作成
    image_width, image_height = new_img.size
    mask = create_mask(image_width, image_height, h, w, left, top, offset=30)

    #元画像とマスクの顔周辺512x512ピクセル分を切り出す
    woffset = int((512 - w) /2)
    hoffset = int((512 - h) /2)
    forcus_rect = (left-woffset, top-woffset, right+woffset, bottom+hoffset)
    forcus_img = new_img.crop(forcus_rect)
    forcus_mask = mask.crop(forcus_rect)

    #512x512部分だけでインペインティングし、元画像に貼り付け
    forcus_img = inpainting(forcus_img, forcus_mask)
    new_img.paste(forcus_img, (forcus_rect[0], forcus_rect[1]))

    return init_img, new_img, mask


prompt = "masterpiece, high quality, very_high_resolution, large_filesize, full color, an extremely cute face, woman, symmetrical, HDR, real, realistic"
n_prompt = "lowres, bad anatomy, bad hands, text, error, missing fingers, extra digit, fewer digits, cropped, worst quality, low quality, normal quality, jpeg artifacts, signature, watermark, username, blurry, artist name, multiple legs, malformation"

file_name = "2421729_s.jpg"

init_img, new_img, mask = face_style_change(file_name, prompt, n_prompt, guidance_scale=8.5, strength=0.4)
grid = image_grid([init_img, new_img], cols=2)
grid
おまけ
-
ちょっとblueberrymix成分強めた場合
マスク部分を大きく取るとblueberrymix成分強めてもそれなりに自然に保管してくれるけど、マスク部分に謎の描画が増える可能性が高くなる
-
ものすごくblueberrymix成分強めた場合
何事もやりすぎは良くない
-
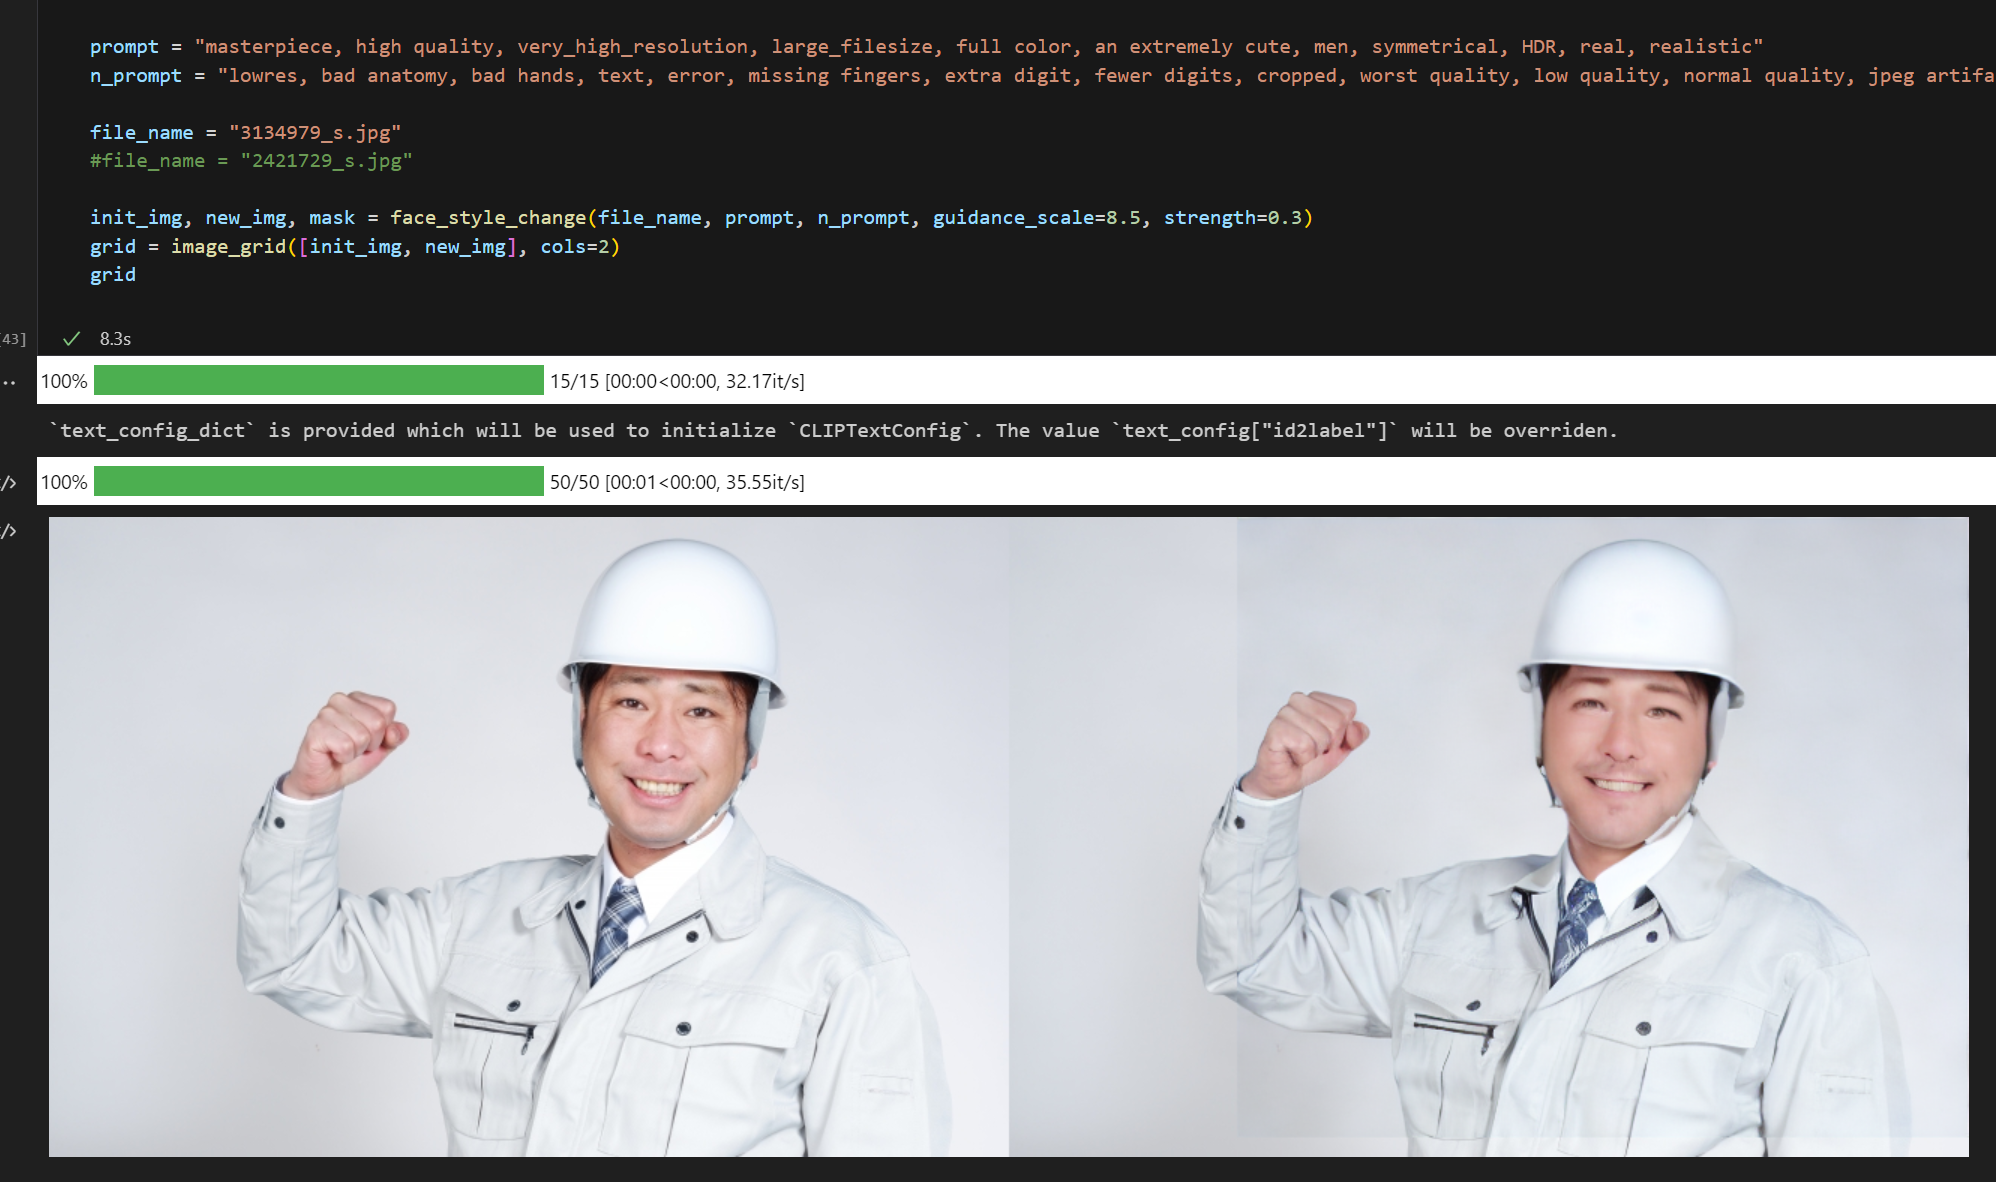
男性をイケメン化
ちょっと目のあたりの解像度が低めなので改善の余地あり
-
男性をおじいさんに
