XTechグループ 2 Advent Calendar 2020の21日目は、エキサイト株式会社 エンジニアの@aharenchiがお送りします。
ZoomではWebhookが用意されています。
今回はngrokとPythonを使って、Zoom Meetingの開始イベントを受け取る方法を紹介します。
Zoom Webhookとは
Webhookについておさらいしたいと思います。
Webhookとは、アプリケーションでイベントが発生した際に、外部のアプリケーションに対してHTTPで通知する仕組み
つまり、Zoom Webhookとは、ZoomでMeetingが開始された際に、今回用意するアプリケーションに通知する機能ということです。
ちなみに、Zoom Webhookで通知してくれるイベントは、Meeting開始イベント以外にも、ユーザの入退出イベントや、ウェビナーの開始イベント、アカウント作成イベント等々たくさんあります。
Zoom Webhookアプリの種類
WebhookができるZoomのアプリは4種類あります。
・Webhookのみアプリ
概要:Webhook提供
利用シーン:個人や組織等の1つのZoomアカウントに提供するアプリケーションでWebhookを使いたい
・JWTアプリ
概要:JWT Tokenで認可されたAPIに追加でWebhook提供
利用シーン:個人や組織等の1つのZoomアカウントに提供するアプリケーションでZoom APIとWebhookを使いたい
・OAuthアプリ
概要: OAuth認可されたAPIに追加でWebhook提供
利用シーン:不特定多数のユーザに提供するアプリケーションでZoom APIとWebhookを使いたい
・チャットボットアプリ
概要:Zoomのチャットbotに追加でWebhook提供
利用シーン:ZoomのチャットbotとWebhookを使いたい
JWT認可APIとOAuth認可APIについては、以前の記事で説明していますのでそちらをご覧ください。
今回は、Webhookのみのアプリを作成します。
ngrokとPythonでZoom Meetingの開始イベントを受け取る
通知を受け取るアプリケーションの用意
ZoomからのHTTP通知を受け取るアプリケーションを、ngrokとPythonを使って用意します。
PythonでHTTPサーバーを用意します。以下がソースコードです。
# coding: utf-8
import http.server
import socketserver
import json


class Handler(http.server.BaseHTTPRequestHandler):
   def do_POST(self):
       # Zoomから通知されたJSONを取得する
       request_body = self.__get_body()

       # Zoomから通知されたJSONを表示
       print(request_body)

       self.send_response(200)

   def __get_body(self):
       content_len = int(self.headers['content-length'])
       request_body = json.loads(self.rfile.read(content_len).decode('utf-8'))

       return request_body


with http.server.HTTPServer(('', 3000), Handler) as httpd:
   httpd.serve_forever()
Zoom Webhookは、イベント通知をPOSTリクエスト(JSON)で送信してくるので、
POSTを受け取る処理を書きました。今回は受け取ったJSONをprint出力しています。
このままではローカルサーバーでしか動作しないので、ngrokを利用してこのHTTPサーバーを外部公開します。
ngrokがない方は、公式サイトまたはbrew等でインストールしてください。
$ brew install ngrok
ngrokが用意できたら、HTTPサーバーを外部公開します。
$ python sample.py
$ ngrok http 3000
ngrok by @inconshreveable                                                                                                                  (Ctrl+C to quit)

Session Status          online
Session Expires         7 hours, 59 minutes
Version                 2.3.35
Region                  United States (us)
Web Interface           http://127.0.0.1:4040
Forwarding              http://**********.ngrok.io -> http://localhost:3000
Forwarding              https://**********.ngrok.io -> http://localhost:3000

Connections                   ttl     opn     rt1      rt5       p50     p90
                              0       0       0.00     0.00      0.00    0.00
上記の表示になれば、ローカルサーバーが外部公開されています。
「Forwarding」に表示されているURL(http://**********.ngrok.io)で、イベント通知を受け取ります。
通知を受け取るアプリケーションの用意ができたので、Zoomの設定をしていきます。
Zoom側での設定
-
Zoomアカウントを用意します。Zoomアカウントが無い方は新規登録してください。
-
アカウントログイン後、Zoom Developer Platformにアクセスし、Webhook Onlyアプリを作成します。「App Name」「Company Name」「Developer Contact Name」「Developer Contact Email」が入力必須なので、忘れずに記入していきます。
-
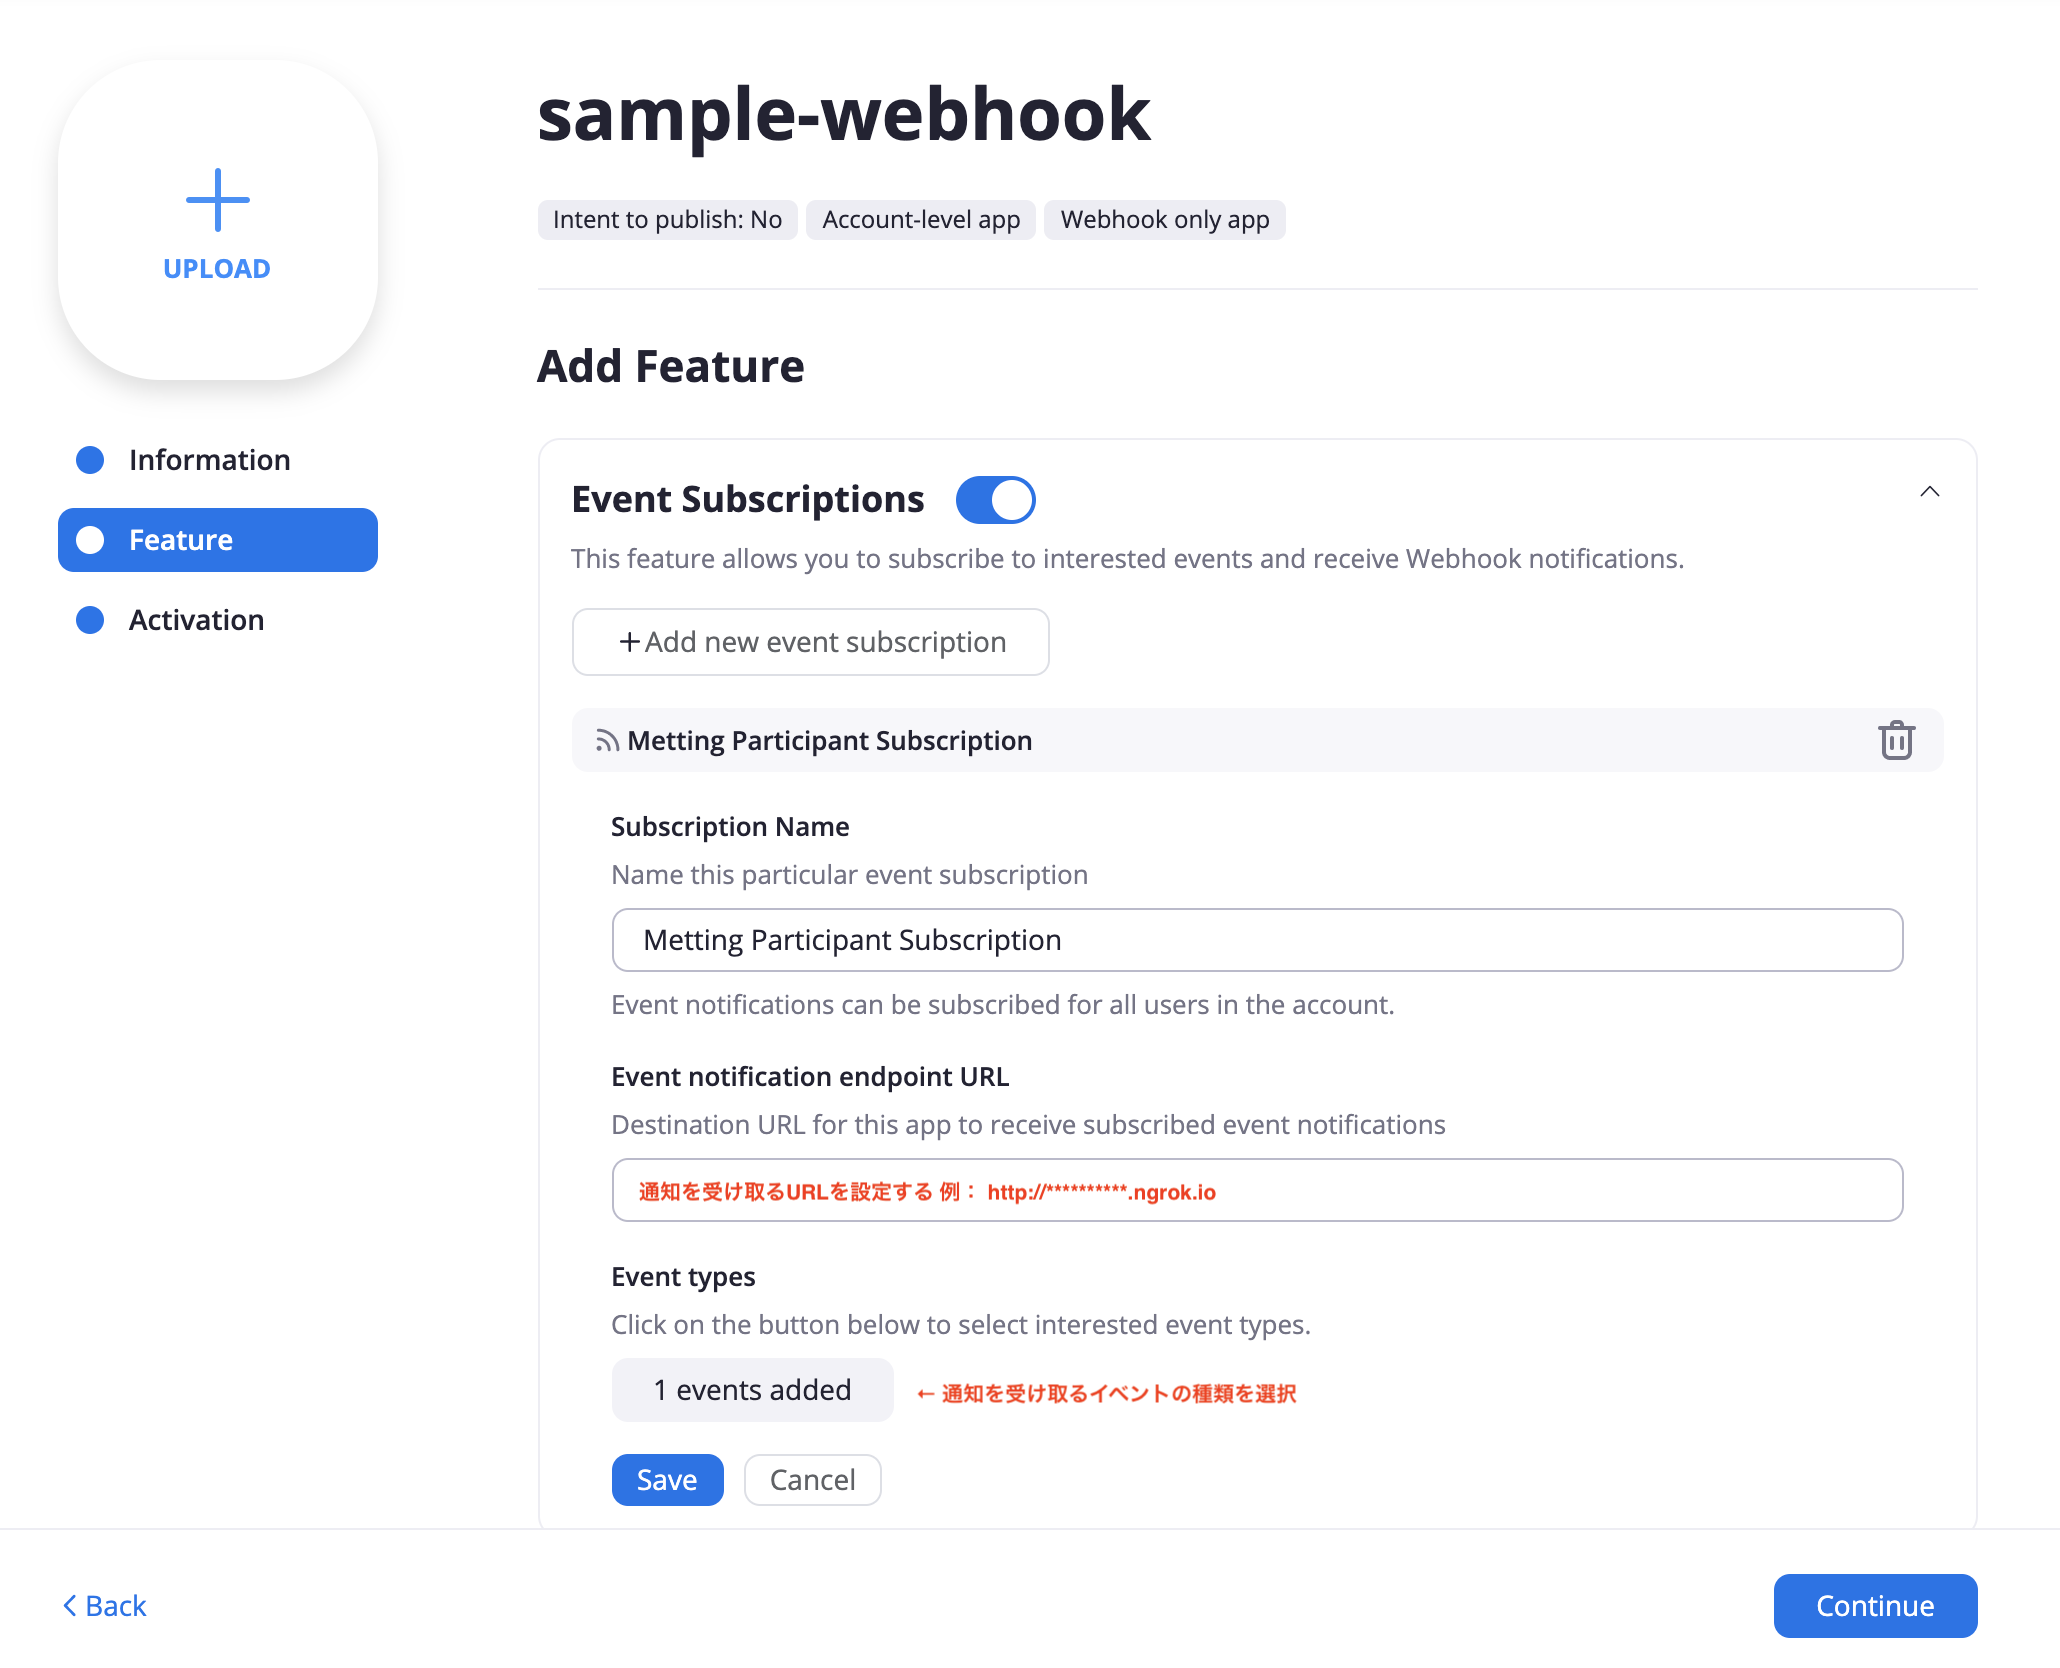
イベントサブスクリプション機能を有効にし、「Subscription Name」「Event notification endpoint URL」「Event types」を記入していきます。「Event notification endpoint URL」にはngrokで外部公開しているURLを記入します。今回はMeeting開始イベントを受け取るので「Event types」には「Start Meeting」を追加します。

-
Activationで「Your app is activated on the account」と表示されていたら完了です!
試してみる
Zoomアプリを起動しMeetingを開始すると、ローカルサーバーの標準出力に、開始時間とミーティング名等の情報が表示されました。無事イベント通知を受け取ることができました。ぱちぱち👏
$ python sample.py
{'event': 'meeting.started', 'payload': {'account_id': '********', 'object': {'duration': 0, 'start_time': '2020-12-20T09:39:55Z', 'timezone': 'Asia/Tokyo', 'topic': "'Personal Meeting Room", 'id': '******', 'type': 4, 'uuid': *******', 'host_id': '*****'}}, 'event_ts': *******}
127.0.0.1 - - [20/Dec/2020 18:39:55] "POST / HTTP/1.1" 200 -
Webhookのリクエストの正当性の確認
受け取ったPOSTリクエストがZoomからのものかを確認する方法として、POSTのヘッダに含まれているauthorizationを利用します。
authorizationには、作成したZoomアプリ固有のトークンが含まれています。
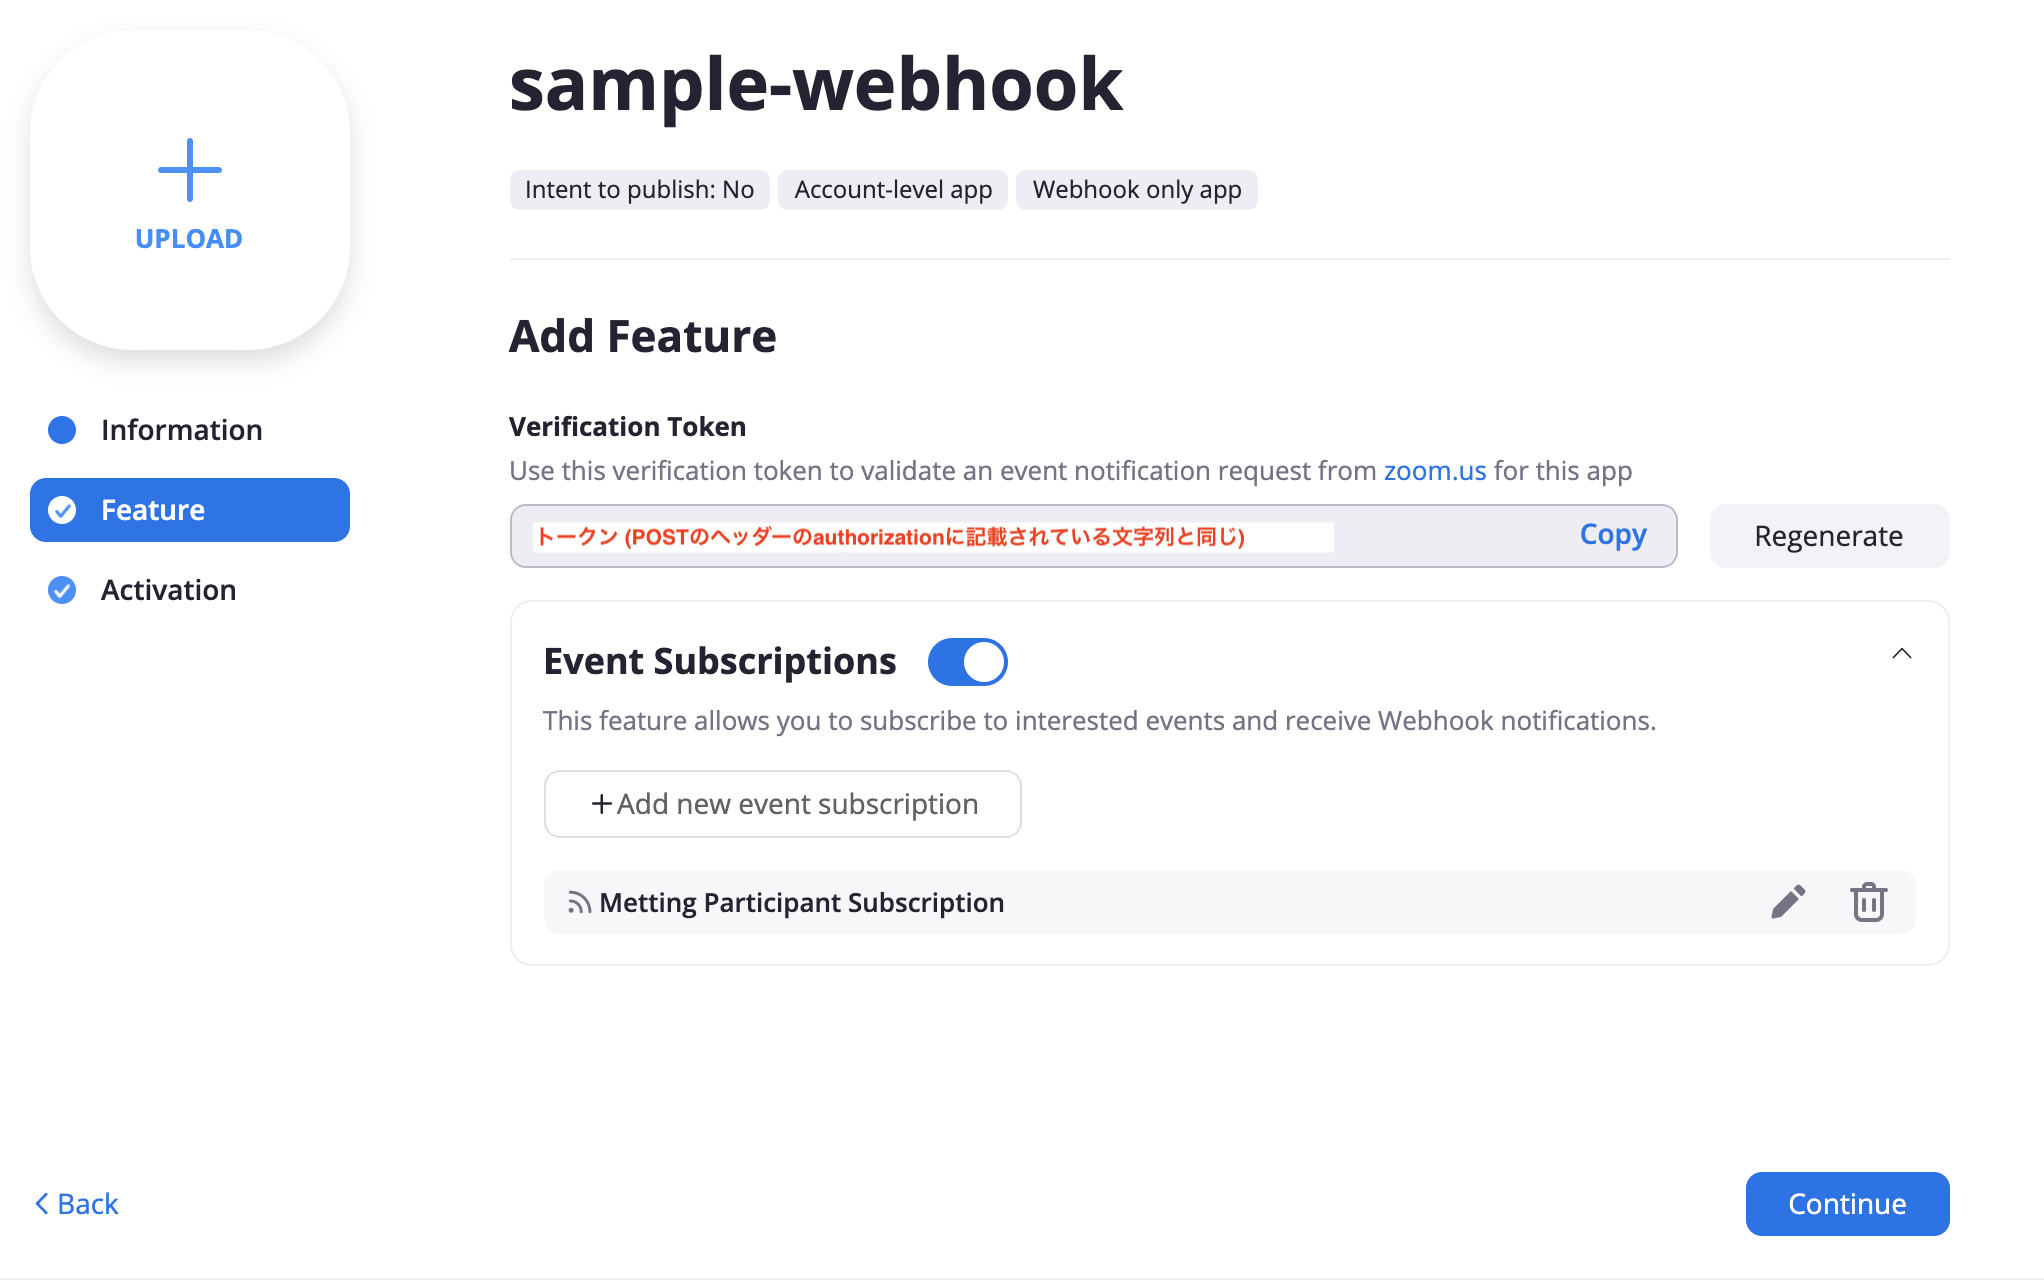
Webhookの設定画面にトークンが記載されているので、POSTのヘッダのauthorizationが同じかを確認します。
       # リクエストがZoomServiceによって送信されたかどうかを確認
       if self.headers['Authorization'] != '[下記画像のVerification Tokenを記載する]':
           return self.send_response(403)
まとめ
ngrokとPythonでZoom Webhookを試す方法を紹介しました。
実際にアプリケーションとしてつくる際は、print出力の部分を永続化させたり、クラウドサーバー上にHTTPサーバーを用意したりするのではないかと思います。
とりあえず動かしてみたいという方のお役に少しでもなれたらと思います。
今回紹介したサンプルコードの完成形は以下になります。
サンプルコード(完成形)
# coding: utf-8
import http.server
import socketserver
import json


class Handler(http.server.BaseHTTPRequestHandler):
    def do_POST(self):

        # リクエストがZoomServiceによって送信されたかどうかを確認
        if self.headers['Authorization'] != '[Verification Tokenを記載する]':
            return self.send_response(403)

        # Zoomから通知されたJSONを取得する
        request_body = self.__get_body()

        # Zoomから通知されたJSONを表示
        print(request_body)

        self.send_response(200)

    def __get_body(self):
        content_len = int(self.headers['content-length'])
        request_body = json.loads(self.rfile.read(content_len).decode('utf-8'))

        return request_body


with http.server.HTTPServer(('', 3000), Handler) as httpd:
    httpd.serve_forever()
XTechグループのアドベントカレンダーは残り4日です。
明日の執筆担当は@oka_chibaさんです。引き続きお楽しみください。
エキサイト株式会社の採用情報はこちら↓
https://www.wantedly.com/companies/excite
参考文献
https://marketplace.zoom.us/docs/guides/build/webhook-only-app
https://marketplace.zoom.us/docs/api-reference/webhook-reference
https://ngrok.com/
