TL;DR
ノートブックはこちら!
はじめに
WEB会議を行う際に自分の顔をカスタマイズしたい(いわゆる顔フィルター)。
そのため、まずはローカルで顔のフィルターを作成して、その第一歩として、
今回は簡単な「唇フィルター」を作ってみよう!
手順
「唇フィルター」の作成には下記の手順で行う。
- 画像を読み込む。
- 顔認識を行う。
- 認識した顔データから「唇」に合わせてマスクを作成する。
- 抽出した「唇マスク」に対して画像処理を行う。
- 元画像と新しい「唇マスク」を融合させる。
使用するツール
インストール
まずは必要なライブラリーをインストールしよう!
pipenvやvirtualenvなどの仮想環境をおすすめします!
$ pip install numpy opencv-python mediapipe
コード
①必要なモジュールをimportする
import cv2
import numpy as np
import mediapipe as mp
import matplotlib.pyplot as plt
②画像データをと読み込む
今回使った画像データはGAN(敵対的生成ネットワーク)によって生成されたものである。
(https://thispersondoesnotexist.com/)
img_path = "../input/image.jpg"

src = cv2.imread(img_path)
src = cv2.cvtColor(src, cv2.COLOR_BGR2RGB)
img = src.copy()

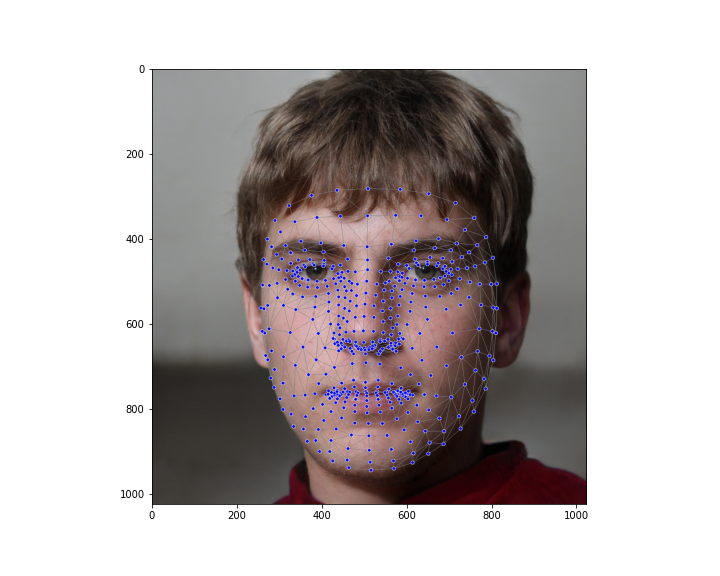
②Mediapipeを用いて顔認識を行う
# 検知器のインスタンス化
drawing = mp.solutions.drawing_utils
drawing_spec = drawing.DrawingSpec(thickness=1, circle_radius=1, color=(0, 255, 0))
drawing_styles = mp.solutions.drawing_styles
face_mesh = mp.solutions.face_mesh
face_detector = face_mesh.FaceMesh(min_detection_confidence=0.5, min_tracking_confidence=0.5)

# 検知処理
results = face_detector.process(img)
face_landmarks = results.multi_face_landmarks

# 可視化
drawing.draw_landmarks(
    image=img,
    landmark_list=face_landmarks[0],
    connections=face_mesh.FACEMESH_TESSELATION,
    connection_drawing_spec=drawing_styles.get_default_face_mesh_tesselation_style())
③「唇マスク」を作成する
# 入力画像と同じサイズの黒マスクを作成
gray = np.zeros((src.shape[0], src.shape[1], 3), dtype=np.uint8)

# 検知した顔における「唇」に関するINDEXを抽出する
lips_idx = list(face_mesh.FACEMESH_LIPS)
lips = np.ravel(lips_idx)

# 唇のINDEXを用いてピクセル座標に戻し、リストを作成する
empty_lip = []
for i in lips:
    pt1 = face_landmarks[0].landmark[i]
    x = int(pt1.x * img.shape[1])
    y = int(pt1.y * img.shape[0])
    empty_lip.append((x, y))
④「唇マスク」に対して画像処理を行う
# ピクセル座標をもとに唇の凸包を作成
convexhull  = cv2.convexHull(np.array(empty_lip))

# 作成した凸包に対して色を塗る
mask = cv2.fillConvexPoly(gray, convexhull, ((100, 30, 100)))

# 見た目をより円滑化するため、ガウシアンブラーをかける
mask = cv2.GaussianBlur(mask, (7, 7), 20)

⑤入力画像と「唇マスク」の融合
resulting_image = cv2.addWeighted(mask, 0.5, src, 1, 0.)

あと書き
Mediapipeの使いやすさを感じた!さすがGoogleさん!
唇だけではなく、顔の他のパーツのINDEXさえ分かれば自由にフィルターをかけられる。
さらにフィルターをかけた結果をWEB会議などで活用できるのではないかと!