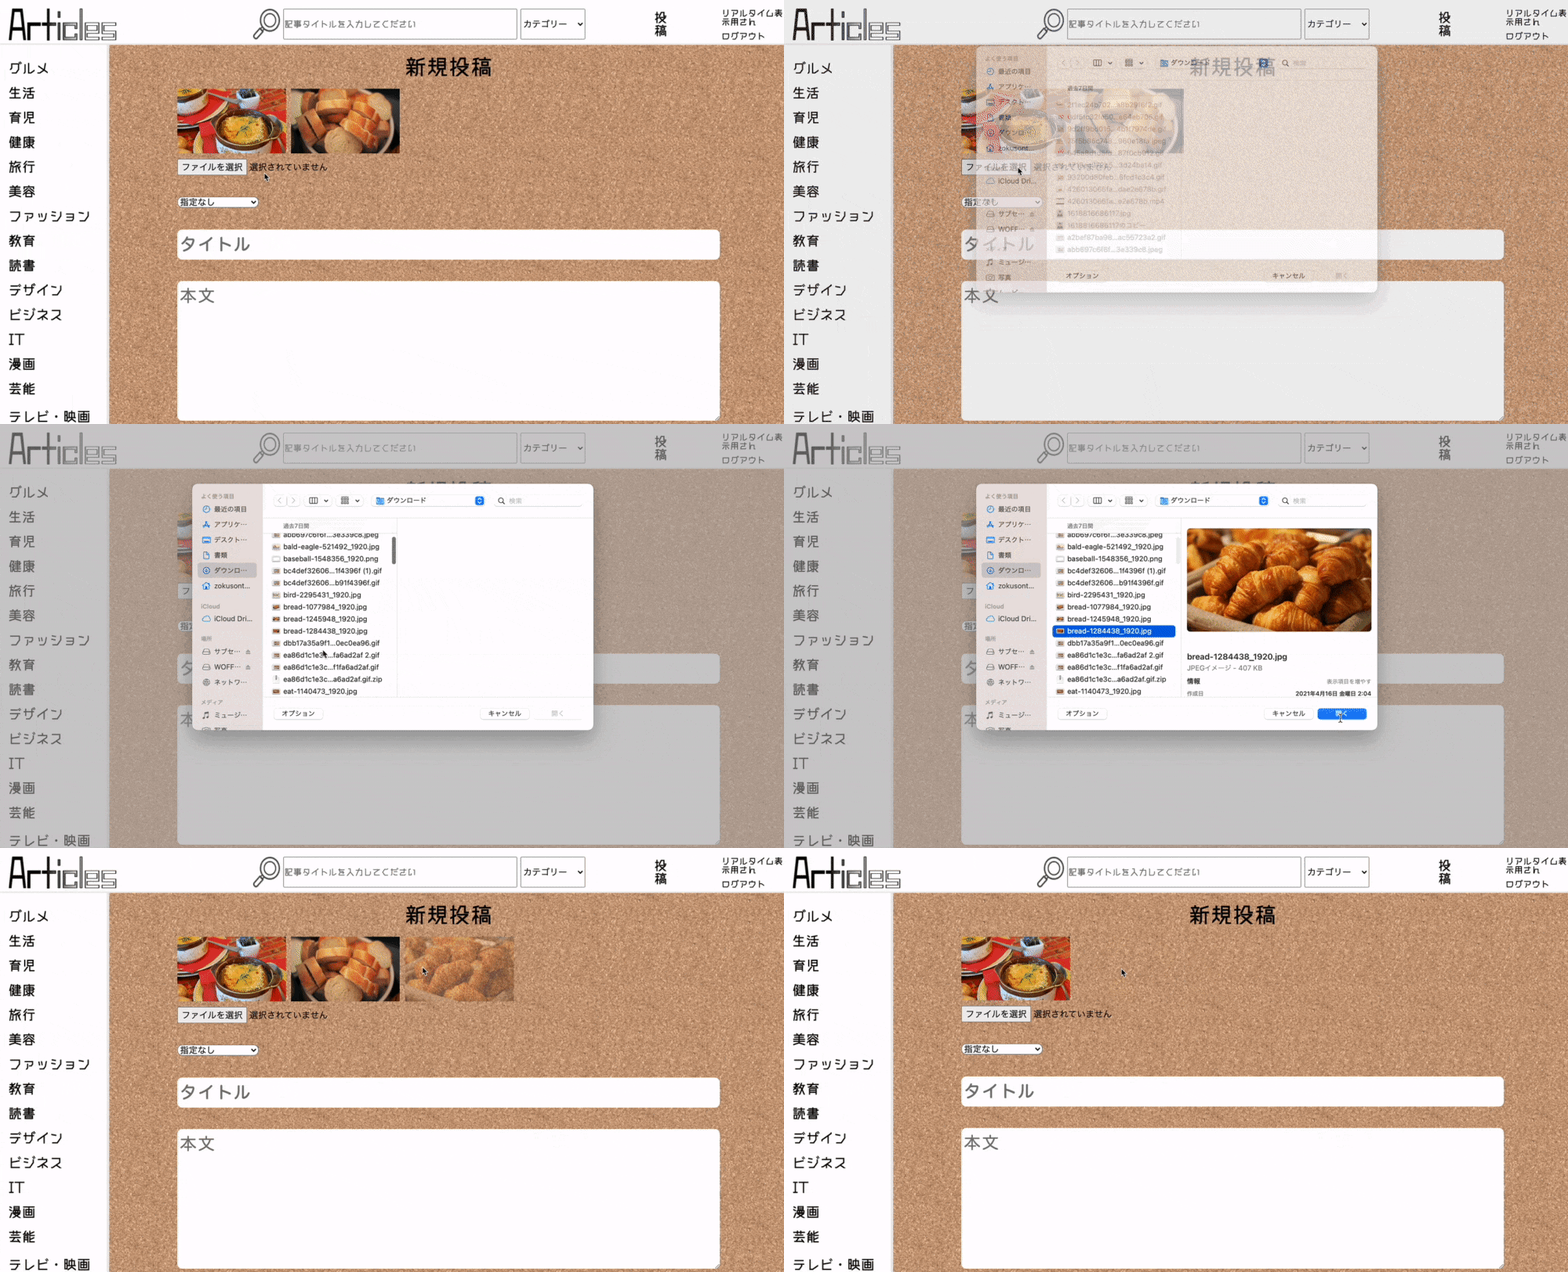
ドラッグ&ドロップに対応した改良版はこちら
現在RubyとJavaScriptを用いて記事投稿サイトを作成しています。
今回は新規投稿画面の
「画像複数投稿に伴うプレビュー表示と選択解除」
を実装していきたいと思います。
■前提と仕様
・画像投稿の実装にはActiveStorageを使用
・jQueryを使用しない
・プレビューをクリックすると選択を解除
■完成後の画像とコード
//⓪↓↓
if (document.URL.match( /new/ ) || document.URL.match( /edit/ )) {
  document.addEventListener('DOMContentLoaded', function(){
    const imageList = document.getElementById("image-list");
    const inputList = document.getElementById("input-list");
//⓪↑↑
//②-1↓↓
    const createImageHTML = (blob) => {
      const imageElement = document.createElement('div');
      imageElement.setAttribute('id', 'image-element');
      imageElement.setAttribute('class', 'image-element');
      let imageElementNum = document.querySelectorAll('.image-element').length
//②-1↑↑
//②-2↓↓
      const blobImage = document.createElement('img');
      blobImage.setAttribute('src', blob);
      blobImage.setAttribute('id', 'blob-image');
      if (document.getElementsByClassName('article_image_input').length == 0 ) {
        blobImage.setAttribute('class', 'article_image_-1');
       } else {
        blobImage.setAttribute('class', `article_image_${imageElementNum - 1}`);
      }
//②-2↑↑
//③↓↓
      const inputHTML = document.createElement('input');
      inputHTML.setAttribute('id', `article_image_${imageElementNum}`);
      inputHTML.setAttribute('name', 'article[images][]');
      inputHTML.setAttribute('class', 'article_image_input');
      inputHTML.setAttribute('type', 'file');
//③↑↑
//④↓↓
      imageElement.appendChild(blobImage);
      inputList.appendChild(inputHTML)
      imageList.appendChild(imageElement);
//④↑↑
//⑤↓↓
      if (document.getElementsByClassName('article_image_input').length == 1 ) {
      document.getElementById(`article_image_-1`).setAttribute('style', 'visibility: hidden;');
      } else {
      document.getElementById(`article_image_${imageElementNum - 1}`).setAttribute('style', 'visibility: hidden;');
      }
//⑤↑↑
//⑥-1↓↓
      inputHTML.addEventListener('change', (e) => {
        const file = e.target.files[0];
        const blob = window.URL.createObjectURL(file);
        createImageHTML(blob);
      });
//⑥-1↑↑
//⑥-2↓↓
      blobImage.addEventListener('mouseover', () => {
        blobImage.setAttribute('style', "opacity: 0.4;")
      });
      blobImage.addEventListener('mouseout', () => {
        blobImage.removeAttribute('style', "opacity: 0.4;")
      });
//⑥-2↑↑
//⑥-3↓↓
      blobImage.addEventListener('click', () => {
      const targetInput = document.getElementById(`${blobImage.className}`);
      targetInput.value = "";
      if (!(targetInput.id == 'article_image_-1')) {
        targetInput.remove();
      };
      blobImage.parentNode.setAttribute('style', 'display: none;')
      blobImage.remove();
      if (document.getElementsByClassName('article_image_input').length == 1 && document.getElementById('article_image_-1').value == "" ) {
        document.getElementById('article_image_-1').nextElementSibling.remove();
        document.getElementById('article_image_-1').removeAttribute('style', 'visibility: hidden;');
      }
      });
    };
//⑥-3↑↑
//①↓↓
    const newArticleImage = document.getElementById("article_image_-1");
    newArticleImage.addEventListener('change', function(e) {
      const file = e.target.files[0];
      const blob = window.URL.createObjectURL(file);
      createImageHTML(blob);
    });
//①↑↑
  });
};
 <%= form_with model: @article, url: articles_path, local: true, class: "new-article-form" do |f| %>
        <%= render partial: "shared/error_message", locals: { model: f.object },  class: "error-messages"%>
        <div id="image-list"></div>
        <div id="input-list">
        <%= f.file_field :images, name: "article[images][]", id: "article_image_-1", class: "new-article-image" %>
        </div>
        <%= f.collection_select(:category_id, Category.all, :id, :name, {include_blank: "指定なし"}, class: "new-article-category") %>
        <%= f.text_field :title, placeholder: "タイトル", class: "new-article-title" %>
        <%= f.text_area :text, placeholder: "本文", class: "new-article-text" %>
        <%= f.submit "投稿", class: "new-article-post", id: "new-article-post" %>
      <% end %>
■実装手順(コード内番号)
⓪ 全体の処理を行う条件と一部の要素を取得
① 一枚目の画像を選択
② プレビュー表示
1- div要素を生成する
2- img要素を生成する
③ 二枚目以降の画像選択
④ 生成した各要素をHTMLに挿入する
⑤ 画像情報が追加されたinput要素を非表示にする
⑥生成した要素に対するアクション
1- 二枚目以降が選択される
2- プレビュー画像がマウスオーバーされると半透明化する
3- プレビュー画像がクリックされると選択を解除する
■本題
⓪ 全体の処理を行う条件と一部の要素を取得
if (document.URL.match( /new/ ) || document.URL.match( /edit/ )) {
  document.addEventListener('DOMContentLoaded', function(){
    const imageList = document.getElementById("image-list");
    const inputList = document.getElementById("input-list");
1行目/2行目
今回の処理を行う条件です。
「新規投稿と編集ページにおいてHTMLを読み込んだ後に処理を行う」という内容です。
3行目/4行目
div要素(image-list)(input-list)を取得しています。
④まで使いません。
① 一枚目の画像を選択
    const newArticleImage = document.getElementById("article_image_-1");
    newArticleImage.addEventListener('change', function(e) {
      const file = e.target.files[0];
      const blob = window.URL.createObjectURL(file);
      createImageHTML(blob);
    });
1行目
最初のファイル選択ボタンであるinput要素を取得しています。
2行目~6行目
1行目の要素に対して値が変化した際の処理を定義しています。
値が変化した際とはつまり「画像情報が入力された時」です。
3行目
入力された画像情報を取得しています。
画像情報は要素.target.files[0]に保持されるので、それを指定しています。
4行目
3行目で指定した画像情報をimg要素のsrc属性に設定したいのでURLに変換して取得しています。
5行目
後述する関数に4行目で生成したURLを渡しています。
②-1 プレビューを表示 - div要素を生成する
画像が二枚目、三枚目と選択される度に生成される要素は以下の3つです。
・div要素(img要素の親要素)
・img要素(プレビュー画像)
・input画像(入力情報)
div要素を生成する理由は、
各img要素、各input要素に重複しない番号(ID)を付与する為です。
この後にプレビュー画像であるimg要素を生成しますが、その親要素として生成します↓
<div id='image-element' class='image-element'>
  <img>
</div>
↓選択解除によりimg要素(プレビュー画像)が消えても
<div id='image-element' class='image-elemant'>
</div>
このように親要素のdiv要素が残るようにしてあげます。
「画像が追加される度に増え、減る事のない要素」なので、
このdiv要素のlengthをもとにimg要素やinput要素のid属性に番号を付与すれば、
idの重複を避けることができます。(例:img_1、img_2...)
    const createImageHTML = (blob) => {
      const imageElement = document.createElement('div');
      imageElement.setAttribute('id', 'image-element');
      imageElement.setAttribute('class', 'image-element');
      let imageElementNum = document.querySelectorAll('.image-element').length
1行目
関数の宣言です。
2行目
div要素を生成しています。
3行目/4行目
id属性とclass属性を追加しています。
5行目
このdiv要素の総数を取得しています。
②-2 プレビューを作成する - img要素を生成する
      const blobImage = document.createElement('img');
      blobImage.setAttribute('src', blob);
      blobImage.setAttribute('class', 'blob-image');
      if (document.getElementsByClassName('article_image_input').length == 0 ) {
        blobImage.setAttribute('id', 'article_image_-1');
       } else {
        blobImage.setAttribute('id', `article_image_${imageElementNum - 1}`);
      }
プレビュー画像であるimg要素の生成です。
1行目
img要素を生成しています。
2行目
src属性に①の4行目で作成したURLを設定しています。
3行目
class属性を追加しています。
4行目
id属性を追加しています。
処理の内容としては、
- 二枚目以降の画像に対応するinput要素が
存在しない時(4行目)
id属性としてarticle_image-1を設定(5行目) - 二枚目以降の画像に対応するinput要素が
存在する時(6行目)
id属性としてarticle_image_${imageElementNum - 1}を設定(7行目)
#### ③二枚目以降の画像選択
      const inputHTML = document.createElement('input');
      inputHTML.setAttribute('id', `article_image_${imageElementNum}`);
      inputHTML.setAttribute('name', 'article[images][]');
      inputHTML.setAttribute('class', 'article_image_input');
      inputHTML.setAttribute('type', 'file');
二枚目以降の画像のファイル選択ボタン、すなわち追加のinput要素を生成します。
1行目
input要素を生成しています。
2行目
id属性を追加しています。
このinput要素に紐付くであろうimg要素のid名と同じ値にします。
このinput要素はまだ生成したばかりで画像情報は未入力です。
なので紐づくimg要素も勿論ありません。
画像が選択され画像情報がこのinput要素に格納されると、②-1で定義したimg要素が生成されます。
そのimg要素のid名と同じ値にして紐付けたい為、「imageElementNum」に「-1」は付けずに
article_image_${imageElementNum}と記述しています。
3行目
name属性を追加しています。投稿処理に必要な情報です。
4行目
class属性を追加しています。②-2の4行目の処理で使用しているように、
この「追加されたinput要素」が存在するか否かを調べる際に必要となります。
5行目
type属性にfileを設定しています。
④生成した要素をHTMLに挿入する
      imageElement.appendChild(blobImage);
      imageList.appendChild(imageElement);
      inputList.appendChild(inputHTML)
1行目
②-1で説明したようにdiv要素にimg要素を子要素として追加しています。
2行目
1行目のdiv要素を、⓪で取得したimageListの子要素として追加しています。
3行目
③で生成したinput要素を、⓪で取得したinputListの子要素として追加しています。
⑤画像情報が追加されたinput要素を非表示にする
      if (document.getElementsByClassName('article_image_input').length == 1 ) {
      document.getElementById(`article_image_-1`).setAttribute('style', 'visibility: hidden;');
      } else {
      document.getElementById(`article_image_${imageElementNum - 1}`).setAttribute('style', 'visibility: hidden;');
      }
この処理をしなければ、input要素つまりファイル選択ボタンが次々と表示されてしまいます。
ファイル選択ボタンは1つで良いので、既に入力を終えたボタンは非表示にする事にしました。
1行目
追加のinput要素が1つの場合、
つまり「一枚目の画像が選択がされた後、input要素が1つ追加された状態の場合」
という条件を示します。
2行目
「一枚目の画像情報が入力されているinput要素」のstyle属性に
visibility: hidden;を設定することで非表示化しています。
3行目
1行目の条件ではない場合、
つまり「二枚目以降が選択されている状態の場合」という条件を示します。
4行目
直前に入力したinput要素を非表示化しています。
⑥-1 生成した要素に対するアクション - 二枚目以降が選択される
      inputHTML.addEventListener('change', (e) => {
        const file = e.target.files[0];
        const blob = window.URL.createObjectURL(file);
        createImageHTML(blob);
      });
1行目
③で生成したinput要素の値が変化した場合、
つまり二枚目以降が選択された際の処理です。
処理の内容は①と同じです。
⑥-2 生成した要素に対するアクション - プレビュー画像がマウスオーバーされると半透明化する
      blobImage.addEventListener('mouseover', () => {
        blobImage.setAttribute('style', "opacity: 0.4;")
      });
      blobImage.addEventListener('mouseout', () => {
        blobImage.removeAttribute('style', "opacity: 0.4;")
      });
⑥-3 生成した要素に対するアクション - プレビュー画像がクリックされると選択が解除される
      blobImage.addEventListener('click', () => {
      const targetInput = document.getElementById(`${blobImage.className}`);
      targetInput.value = "";
      if (!(targetInput.id == 'article_image_-1')) {
        targetInput.remove();
      };
      blobImage.parentNode.setAttribute('style', 'display: none;')
      blobImage.remove();
      if (document.getElementsByClassName('article_image_input').length == 1 && document.getElementById('article_image_-1').value == "" ) {
        document.getElementById('article_image_-1').nextElementSibling.remove();
        document.getElementById('article_image_-1').removeAttribute('style', 'visibility: hidden;');
      }
      });
    };
1行目
「②-2で生成したimg要素がクリックされた場合」の処理を示します。
2行目
そのimg要素のid名と同じid名をもつinput要素、つまり紐づくinput要素を取得しています。
3行目
2行目で取得したinput要素の値を消去しています。
4行目
「2行目で取得したinput要素が最初のinput要素ではない場合」を示します。
5行目
trueとしてinput要素を削除しています。
この様な条件を設けた理由は、
もし最初のinput要素だった場合、
それを消してしまうとinput要素(ファイル選択ボタン)が画面から1つも無くなってしまうからです。
7行目
img要素の親要素つまり②-1で生成したdiv要素を非表示化しています。
「display:none;]にすることでdiv要素でビューが押し出されていくのを避けます。
8行目
img要素すなわちプレビュー画像を削除しています。
9行目
「選択画像が全て解除されて、1つも画像が選択されていない状態の場合」の処理を示します。
10行目
選択画像が無い場合は最初のファイル選択ボタンを使用したいので、
追加された空のinput要素を削除しています。
11行目
非表示化していた最初のファイル選択ボタンを表示化しています。
あとはCSSでファイル選択ボタンの表示位置をposition:absolute;等で固定して完成となります。
