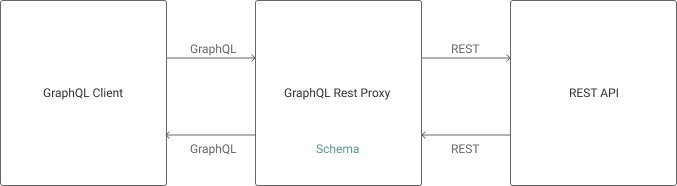
graphql-rest-proxy という、 REST な API を GraphQL サーバーに変換するツールを作りました。
動機
GraphQL は素晴らしいので、 REST API から GraphQL に移行したいと思ったとします。
ただ、既存の REST API を GraphQL に置き換えるのは大変でしょう。
graphql-rest-proxy は、既存の REST API に変更を与えることなく、 GraphQL サーバーを稼働させることができます。
インストール
npm -g install graphql-rest-proxy
または Yarn で
yarn global add graphql-rest-proxy
使い方
STEP 1. GraphQL の Schema を定義する
type User {
  id: Int
  name: String
  isActive: Boolean
}

type Query {
  getUser: User @proxy(get: "https://my-rest-api.com/user")
}
STEP 2. Proxy server を起動する
graphql-rest-proxy schema.graphql

# => graphql-rest-proxy is running on http://localhost:5252
STEP 3. クライアントからGraphQLのリクエストをする
curl -XPOST -H 'Content-Type: application/json' \
    -d '{ "query": "{ getUser { id name isActive } }" }' \
    http://localhost:5252/graphql
このようなレスポンスが帰ってきます。
{
  "data": {
    "getUser": {
      "id": 1,
      "name": "Tom",
      "isActive": false
    }
  }
}
Schema 定義例
基本的なクエリ
type User {
  id: Int
  name: String
}

type Query {
  getUser: User @proxy(get: "https://my-rest-api.com/user")
  getUsers: [User] @proxy(get: "https://my-rest-api.com/users")
}
パラメータ付きのクエリ
id というクエリパラメータは $id という変数名で参照できます。
type User {
  id: Int
  name: String
}

type Query {
  getUserById(id: Int!): User @proxy(get: "https://my-rest-api.com/users/$id")
}
Input Parameters
Mutation は variables を REST API に送信します。
type UserInput {
  name: String!
}

type User {
  id: Int
  name: String
}

type Mutation {
  createUser(user: UserInput!): User @proxy(post: "https://my-rest-api.com/users")
  updateUser(id: Int!, user: UserInput!): User @proxy(patch: "https://my-rest-api.com/users/$id")
}
リクエスト例
fetch('http://localhost:5252/graphql', {
  method: 'patch',
  headers: {
    'Content-Type': 'application/json',
  },
  body: JSON.stringify({
    query: gql`
      mutation UpdateUser($id: Int!, $user: UserInput!) {
        updateUser(id: $id, user: $user) {
          id
          name
        }
      }
    `,
    variables: {
      id: 1,
      user: {
        name: 'acro5piano',
      },
    },
  }),
})
ネストしたオブジェクト
親の ID は、これまた $id で参照できます。
type Post {
  id: Int
  title: String
}

type User {
  id: Int
  name: String
  posts: [Post] @proxy(get: "https://my-rest-api.com/users/$id/posts")
}

type Query {
  getUser: User @proxy(get: "https://my-rest-api.com/user")
}
base url を設定する
冗長な記述をへらすため、 baseUrl という CLI オプションを設定できます。
graphql-rest-proxy --baseUrl https://my-rest-api.com schema.graphql
type Query {
  getUser: User @proxy(get: "/user")
}
工夫点
最小のリクエストで済むように、子オブジェクトがレスポンスに含まれていた場合、それを返します。
例えば Schema が下記のようだったとして
type Post {
  id: Int
  title: String
}

type User {
  id: Int
  name: String
  posts: [Post] @proxy(get: "https://my-rest-api.com/users/$id/posts")
}

type Query {
  getUser: User @proxy(get: "https://my-rest-api.com/user")
}
REST API が下記のようなレスポンスを返した時、
curl https://my-rest-api.com/user
{
  "id": 1,
  "name": "acro5piano",
  "posts": {
    "id": 1,
    "title": "graphql-rest-proxy"
  }
}
posts は /user に含まれているので、 graphql-rest-proxy は https://my-rest-api.com/users/1/posts にリクエストしません。
詳しい情報は、 https://github.com/acro5piano/graphql-rest-proxy を参照してくださいm(_ _)m
おまけ
パッケージは今まで Rollup.js を使っていましたが、今回を機に @pika/pack を使ってみました。
Rollup では面倒だった、実行可能コマンドの指定やWebpack的なコード埋め込みが、ほぼ自動で設定できるようになり、非常に快適でした。 @pika/pack もいつか記事にしたい。