Deno + Vite + React構成でサクッとSPAを作ってみます。
基本的な流れは公式のチュートリアルと一緒です。
0. 事前準備:vscodeの設定
vscodeをお使いの方は、設定ファイル(.vscode/settings.json)に以下を書いておくと、Denoの拡張機能が有効になります。
{
  // Deno拡張機能を有効にするために必要
  "deno.enable": true,
  "deno.lint": true,
  // 以下はお好みで
  "editor.defaultFormatter": "denoland.vscode-deno",
  "editor.formatOnSave": true
}
1. Viteのインストール&初期化
チュートリアルに従って、deno run -RWE npm:create-vite-extra@latestコマンドを実行します。
途中でどのテンプレートを選択するか質問されるので、deno-reactを選択します。
また、使用言語を聞かれるので、TypeScriptまたはTypeScript + SWCを選択します。
$ deno run -RWE npm:create-vite-extra@latest
✔ Project name: (プロジェクト名を入力)
✔ Select a template: › deno-react
✔ Select a variant: › TypeScript + SWC
すると、カレントディレクトリの下に、プロジェクト名のディレクトリができます。
cdで移動しておきます。
$ cd <プロジェクト名>
2. viteの実行
次はviteを起動します。
$ deno task dev
localhostでサーバーが立ち上がると思います。以上でviteが実行できました。簡単ですね!
ここまでで、viteをDenoで動かす手順は完了です。🎉
本記事では、更にdeno deployへデプロイする手順も解説したいと思います。
3. デプロイ(deno deployを使用)
deno deployはDeno社が運営している、Denoアプリケーションをデプロイできるサービスです。
作成したviteアプリをdeno deployにデプロイしてみましょう。
基本的に無料枠で済むと思うのでクレカなどの登録は不要ですが、GitHubアカウントが必要なので持っていない人は取得しましょう。
まず、deno deployのCLIツールである、deployctlコマンドをインストールします。
$ deno install -A jsr:@deno/deployctl --global
次に、viteのビルドコマンドを実行しておきます。
$ deno task build
ビルドを実行するとdistというディレクトリに静的ファイルが吐き出されるので、これをデプロイします。
以下のコマンドでデプロイします。
(<プロジェクト名>のところがデプロイ先のドメインになります。空にしておくと、ランダムに名前を付けてくれます。)
$ deployctl deploy --entrypoint=jsr:@std/http/file-server --root=dist --project=<プロジェクト名>
上記のコマンドを実行すると、ブラウザが立ち上がりGitHub認証を求められます。
GitHub認証を行うと、自動でデプロイが始まります。
✔ Found 57 assets.
✔ Uploaded 64 new assets.
✔ Production deployment complete.
✔ Updated config file './deno.json'.

View at:
 - https://<プロジェクト名>.deno.dev
以上でデプロイ完了です!🎉
(参考)GitHubから自動デプロイ
GitHub Actionsを使用して自動デプロイしたい場合も、Deno Deployのダッシュボードから設定することができます。
プロジェクトページのSettings>Git Integrationから、リポジトリを選択し、ビルドコマンドを以下のように入力します。
- Install Step:
deno install - Build Step:
deno task build - Root directory:
dist - Entrypoint:
jsr:@std/http/file-server
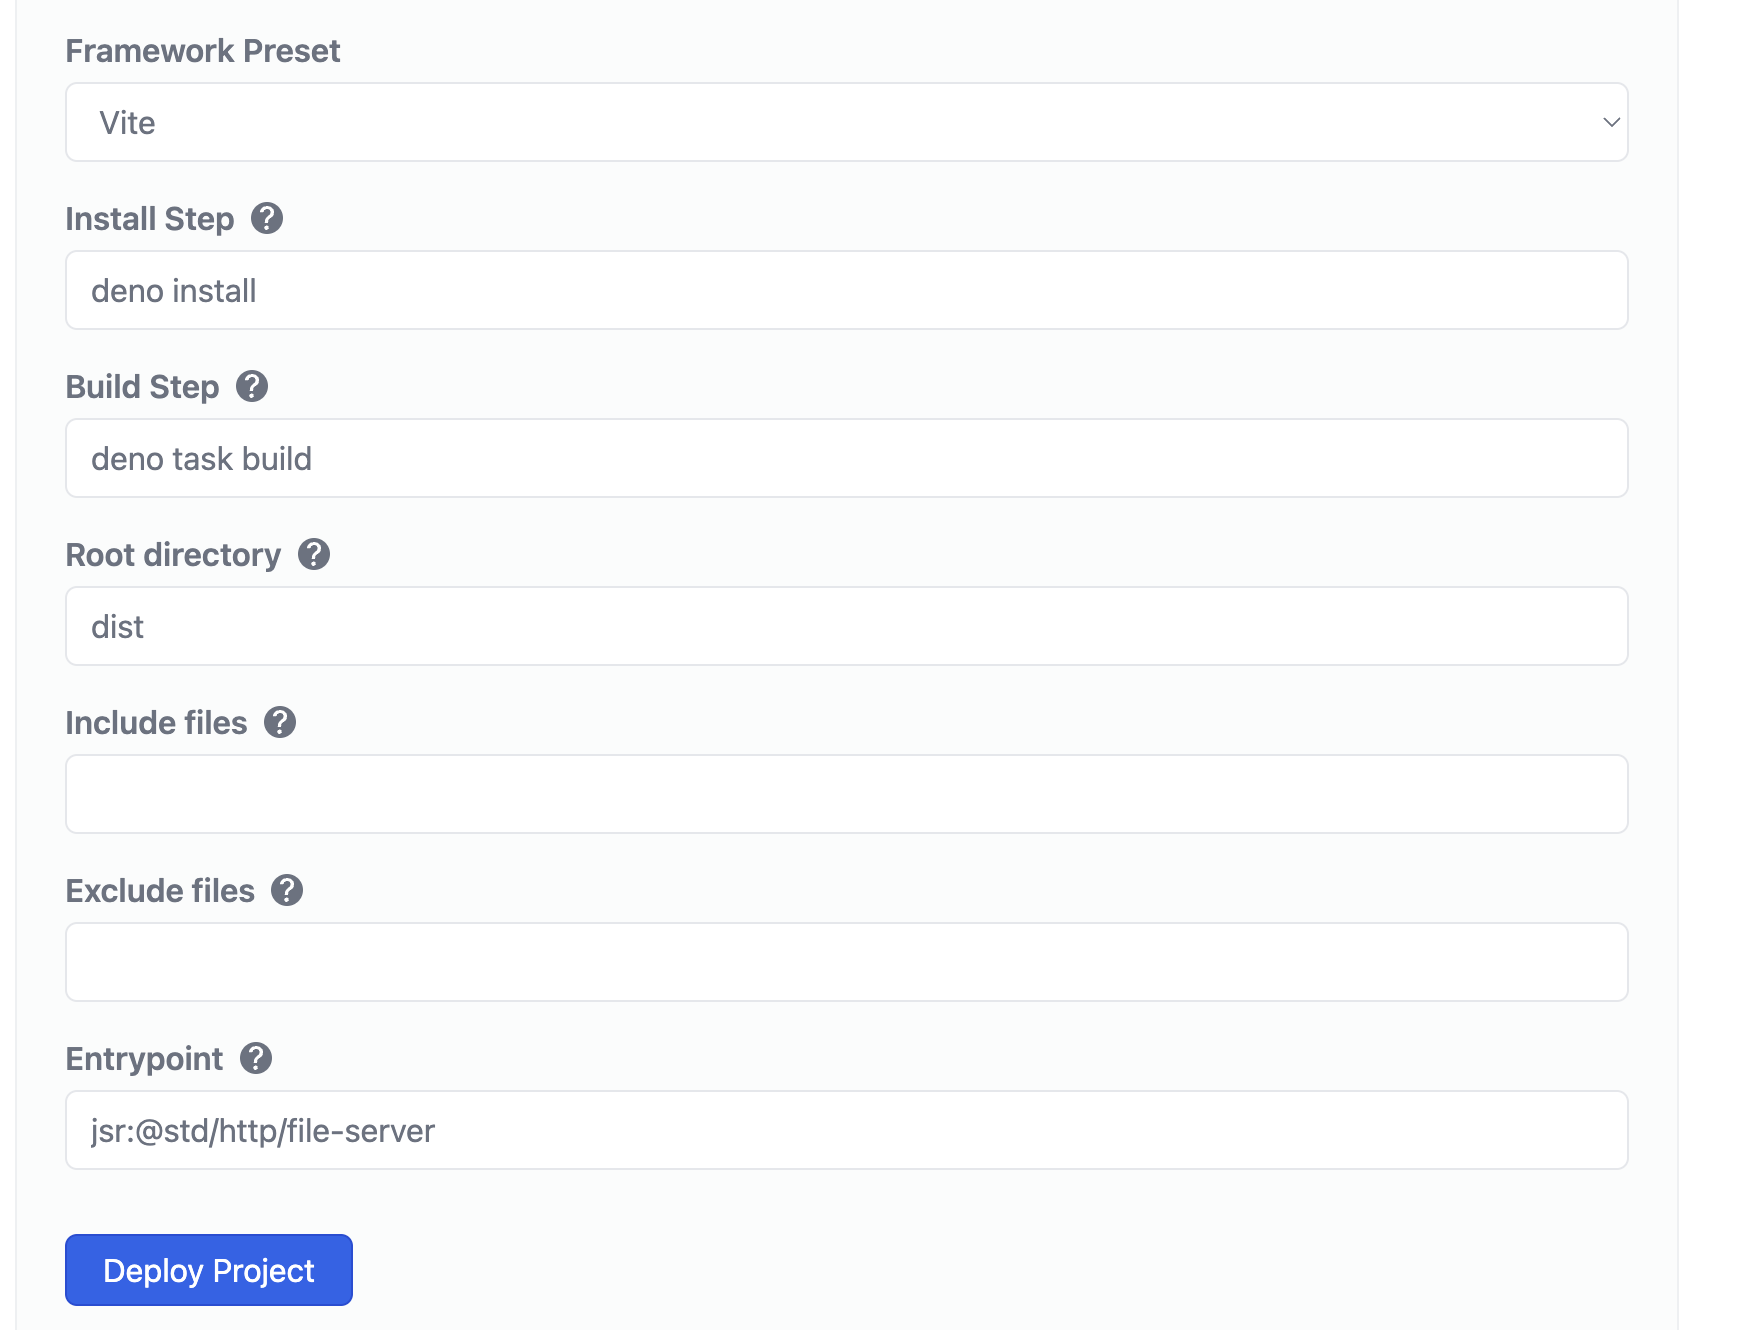
Deploy Projectを押すと、GitHubリポジトリ内に.github/workflows/deploy.ymlが自動生成され、自動デプロイの設定が完了します!
presetでViteを選択するとnpmを使用したビルドコマンドが設定されてしまうようです。そのため、上記の設定に手動で書き換える必要があります。(2025/02現在)
4. 補足:その他の細かい設定など
viteの初期化をした際に以下のようなWarningが出ることがあります。
Warning The following packages contained npm lifecycle scripts (preinstall/install/postinstall) that were not executed:
┠─ npm:@swc/core@1.10.18
┃
┠─ This may cause the packages to not work correctly.
┠─ Lifecycle scripts are only supported when using a `node_modules` directory.
┠─ Enable it in your deno config file:
┖─ "nodeModulesDir": "auto"

Warning The following packages contained npm lifecycle scripts (preinstall/install/postinstall) that were not executed:
┠─ npm:@swc/core@1.10.18
┃
┠─ This may cause the packages to not work correctly.
┖─ To run lifecycle scripts, use the `--allow-scripts` flag with `deno install`:
   deno install --allow-scripts=npm:@swc/core@1.10.18
これはnpmライブラリの「ライフサイクルスクリプト」(npm installのタイミングで実行されるスクリプト)に起因しています。
この場合、指示に従ってdeno.jsonを書き換えたり、deno installコマンドを実行すればよいです。
 {
   ...
+  "nodeModulesDir": "auto" // 追加
 }
$ deno install --allow-scripts=npm:@swc/core@1.10.18
5. まとめ
以上の手順で、ViteとReactをDenoで動かすことができました!
Node.jsを使用する場合では、この後にフォーマッターやリンターの設定をする必要があります。
しかしDenoでは、deno fmtコマンドやdeno lintコマンドがデフォルトで利用可能です。
更にdeno lintにはReact向けのルールも存在します。
Denoを使うと開発環境のセットアップが楽になるので、2025年も積極的にDenoを活用していきたいですね!!