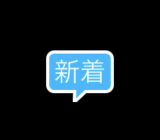
UIViewに新着と書かれたツールチップを描画します。ライブラリなんか使わずに簡単に描画できます。

まずPaddingラベルです。UILabelでは残念ながらPaddingを指定できないのでサブクラスを作成します。
final class PaddingLabel: UILabel {
    var padding: UIEdgeInsets = .zero

    override func drawText(in rect: CGRect) {
        super.drawText(in: rect.inset(by: padding))
    }

    override var intrinsicContentSize: CGSize {
        var size = super.intrinsicContentSize
        size.width += padding.left + padding.right
        size.height += padding.top + padding.bottom
        return size
    }
}
ツールチップの形はUIViewのdraw(_ rect: CGRect)メソッドをOverrideしてコンテクスト描画します。
といっても別に難しいことはなく、鉛筆でツールチップを描くようにPathで線を引くだけです。
ツールチップの大きさはUILabelのintrinsicContentSizeによって決められるのでtextを指定してあげればいい感じに表示されます。今回は矢印の位置を下に固定しています。
final class TooltipView: UIView {
    private let arrowWidth: CGFloat = 7
    private let arrowHeight: CGFloat = 4.5
    private let radius: CGFloat = 4
    private let fillColor: UIColor = .init(hex: "01b7ff")
    private let lineWidth: CGFloat = 2
    private let strokeColor: UIColor = .white
    private let titleLabel: PaddingLabel = {
        let it = PaddingLabel()
        it.textColor = .white
        it.font = .systemFont(ofSize: 17)
        it.text = "新着"
        it.textAlignment = .center
        it.padding = UIEdgeInsets(top: 2, left: 4, bottom: 2, right: 4)
        return it
    }()

    override init(frame: CGRect) {
        super.init(frame: frame)
        configure()
    }

    required init?(coder aDecoder: NSCoder) {
        super.init(coder: aDecoder)
    }

    override func draw(_ rect: CGRect) {
        let top: CGFloat = rect.minY + arrowHeight
        let left: CGFloat = rect.minX + arrowWidth
        let right: CGFloat = rect.maxX - arrowWidth
        let bottom: CGFloat = rect.maxY - arrowHeight - lineWidth

        let topLeft = CGPoint(x: left + radius, y: top + radius)
        let topRight = CGPoint(x: right - radius, y: top + radius)
        let bottomLeft = CGPoint(x: left + radius, y: bottom - radius)
        let bottomRight = CGPoint(x: right - radius, y: bottom - radius)

        let path = UIBezierPath()


        //     _____________________
        //   /
        //  |
        path.addArc(
            withCenter: topLeft,
            radius: radius,
            startAngle: .pi,
            endAngle: 3 * .pi / 2,
            clockwise: true
        )
        path.addLine(to: CGPoint(x: topRight.x, y: top))

        //                    __
        //                       \
        //                        |
        //                        |

        path.addArc(
            withCenter: topRight,
            radius: radius,
            startAngle: -.pi / 2,
            endAngle: 0,
            clockwise: true
        )
        path.addLine(to: CGPoint(x: right, y: bottomRight.y))

        //                        |
        //                        |
        //                        /
        //                     --

        path.addArc(
            withCenter: bottomRight,
            radius: radius,
            startAngle: 0,
            endAngle: .pi / 2,
            clockwise: true
        )

        //  ----------  ---------
        //            \/

        let centerX = rect.midX
        path.addLine(to: CGPoint(x: centerX + arrowWidth / 2, y: bottom))
        path.addLine(to: CGPoint(x: centerX - arrowWidth / 2, y: rect.maxY))
        path.addLine(to: CGPoint(x: centerX - arrowWidth / 2 + 0.2, y: bottom))
        path.addLine(to: CGPoint(x: bottomLeft.x, y: bottom))


        //  |
        //  |
        //  |
        //   \ _______

        path.addArc(
            withCenter: bottomLeft,
            radius: radius,
            startAngle: .pi / 2,
            endAngle: .pi,
            clockwise: true
        )

        path.addLine(to: CGPoint(x: left, y: topLeft.y))

        fillColor.setFill()
        strokeColor.setStroke()
        path.lineWidth = lineWidth
        path.fill()
        path.stroke()
    }
}

private extension TooltipView {
    func configure() {
        addSubview(titleLabel)
        titleLabel.translatesAutoresizingMaskIntoConstraints = false
        NSLayoutConstraint.activate([
            titleLabel.leftAnchor.constraint(equalTo: leftAnchor, constant: arrowWidth),
            titleLabel.rightAnchor.constraint(equalTo: rightAnchor, constant: -arrowWidth),
            titleLabel.topAnchor.constraint(equalTo: topAnchor, constant: arrowHeight),
            titleLabel.bottomAnchor.constraint(equalTo: bottomAnchor, constant: -arrowHeight - lineWidth),
        ])
    }
}
多少のカスタマイズ性を持たせたをgistに公開しました。
昔はこれどうやって実装するのかわからず悲しかったです。
(追記) UIBezierPath(roundedRect: cornerRadius: )を使えば周りは1行でかけそう。
若干カスタマイズできるようにしたやつのソースをGistに乗っけました。
https://gist.github.com/churabou/8057aedcf91333bce49aa43a656244ce


