サマーインターンの季節になりました。応募するたびに似たようなエントリーシートをなんども書くのが正直めんどいです。そこで前々からやろうと思っていた自分のホームページを作成することにしました。まだ自分のHPを作成していなくて普段webをやらないような方の参考になれば嬉しいです。
適当すぎるけどだいたいこんな感じで作成中です。あと実際のものと一部画像とリンクを変更しています。
vue.jsに触れる
この二つでなんとなく雰囲気掴めました。
vue cli を使う
なんか記憶ないけど既にnpmもvue-cliも入ってた。 これとか参考になると思う。
とりあえずプロジェクト作ります。
vue init webpack my-project
cd my-project
npm run dev
ブラウザで http://localhost:8080/ をアクセスするとサンプルが表示された。
いじってみる
今回いじるのはsrc/配下のファイルで
components/~~.vue を追加していくのと、App.vueおよびrouter/index.jsを変更していきます。
とりあえずアピール用のホームページなので
- プロフィール
- インターン経験
- 制作物・研究内容
ここら辺を右上にタブがあるよくある感じのやつで記述したいです。
ざっくりと・・
- HTML/CSS/JavaScriptを.vueファイルでコンポネント別に作成できる。
- importして利用できる。
- router-viewが切り替わる。
タブメニューを作成する
<template>
  <div>
    <ol>
      <li v-for="(item, index) in items" :key=index>
         <router-link v-bind:to=item.path>
            {{ item.title }}
         </router-link>
      </li>
    </ol>
  </div>
</template>

<script>
export default {
  name: 'TabMenu',
  data () {
    return {
      items: [
        { title: 'top', path: '/' },
        { title: 'profile', path: '/profile' },
        { title: 'skills', path: '/skills' },
        { title: 'outputs', path: '/outputs' }
      ]
    }
  }
}
</script>

<style scoped>

ol {
  margin-left: auto;
  width: 480px;
  display:flex;
  justify-content: center;
  padding: 0;
  list-style: none;
}

li {
  width: 100px;
  height: 50px;
  margin-left:10px;
  margin-right:10px;
  font-size: 14px;
  background-color: skyblue;
  border-radius: 8px;
  position: relative;
}

li:hover {
  opacity: 0.4;
}

/*  router-linkがaタグとして表示されてたのでスタイルをaタグに書いた*/
a {
  position: absolute;
  left: 0;
  top: 0;
  width: 100%;
  height: 100%;
  color: white;
  text-decoration: none;
  line-height: 50px;
}

</style>
これをApp.vueで読み込みます。
import TabMenu from '@/components/TabMenu'で読み込むと
tab-menuがタグみたいに使えました。
<template>
  <div id="app">
    <tab-menu></tab-menu>
    <router-view/>
  </div>
</template>

<script>

import TabMenu from '@/components/TabMenu'

export default {
  name: 'App',
  components: {
    TabMenu
  }
}
</script>

<style>
# app {
  font-family: 'Avenir', Helvetica, Arial, sans-serif;
  -webkit-font-smoothing: antialiased;
  -moz-osx-font-smoothing: grayscale;
  text-align: center;
  color: #2c3e50;
  margin-top: 60px;
}
</style>
この状態で右上にタブメニューが配置されました。outputsをクリックすると/outputsに飛びます。
次はこの時に表示される要素を作成していきます。
ページを作成する
自分の制作物のページを適当に作成します。
<template>
  <div class="output">
    <div class="content" v-for="i in 6" :key=i>
    <h3> {{ name }} </h3>
    <p> {{ text }} </p>
  </div>
  </div>
</template>

<script>
export default {
  name: 'Output',
  data () {
    return {
      name: 'カメラアプリを作成した',
      text: 'このような意図で作成しました。ここをこのように工夫しました。ここが難しかったです。今後はこうゆう機能を追加したいです。'.repeat(3)
    }
  }
}
</script>

<!-- Add "scoped" attribute to limit CSS to this component only -->
<style scoped>

div.output {
  text-align: center;
}

div.content {
  background-color: #eee;
  display: inline-block;
  margin: 10px;
  width: 30%;
}

h3 {
  color: white;
}

p {
  width: 90%;
  display: inline-block;
  text-align: left;
}

</style>
ルートを定義する
router/index.js を編集して/outputにアクセスした際に先ほど作成した要素を返します。
import Vue from 'vue'
import Router from 'vue-router'
import HelloWorld from '@/components/HelloWorld'
import Output from '@/components/Output' //①import


Vue.use(Router)

export default new Router({
  routes: [
    {
      path: '/',
      name: 'HelloWorld',
      component: HelloWorld
    },

//②profile
   {
      path: '/outputs',
      name: 'Output',
      component: Output
    }
  ]
})
outputをクリックすると制作物が表示されました。
今まで/にアクセスした際に表示されてたのはHelloWorld.vueでした。
同様に各ページを作成します。
より推奨されるべき実装があるかもしれませんが、これでタブメニューが完成しました。
これだけでも
- vueファイルでコンポネント別に要素を作れる。
- ルーターで簡単にページ切り替えが実装できる。
- v-for:やv-if:で簡潔にかける。
上記のようなvue.jsの恩恵を受けることがでました。
後はSNSをまとめたコンポネントとかPageとかレスポシブルにしつつもう少し作り込みました。
buildする
buildして最適化されたファイルを作成し公開します。
デフォルトでは/distにファイルが作成されるのですがgithub pagesで公開する際の都合上/docsに吐き出すように設定ファイルを変更します。
const path = require('path')

module.exports = {
  dev: {
     /* 中略 */
  },

  build: {
    // Template for index.html
    index: path.resolve(__dirname, '../docs/index.html'), //①

    // Paths
    assetsRoot: path.resolve(__dirname, '../docs'),  //②
    assetsSubDirectory: 'static',
    assetsPublicPath: './',  //③
    /* 中略 */
  }
}
npm run build
参考
GitHub Pagesで公開する
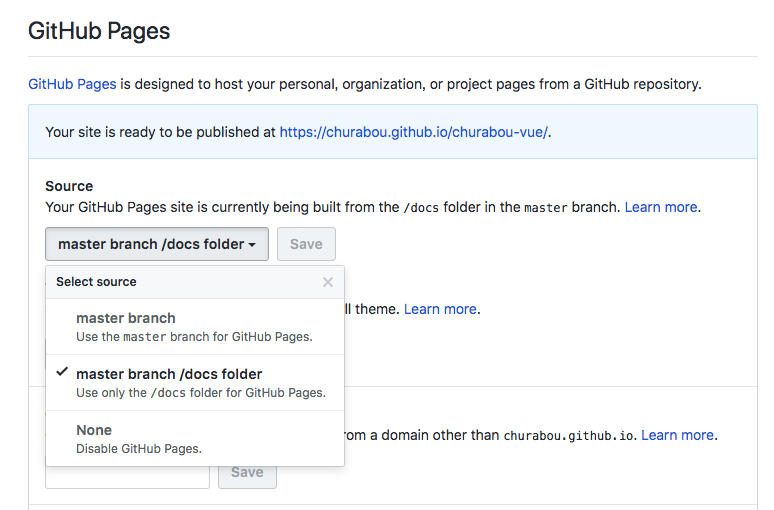
設定で/docsを読み込めます。先ほどdocsにbuildしたのはこのためです。
これで https://ユーザ名.github.io/リポジトリー名 でアクセスできると思います。
さっき設定いじらないと https://ユーザ名.github.io/リポジトリー名/dist/index.htmlとurlが若干長くなります。
感想
- 初学者でもなんとなくで使える。ドットインストールでHTML/CSS/JavaScriptを見終えたレベルでも大丈夫そう。
- 短時間で自分のHP作成するには良い選択肢だった。
- vuexとかAPI叩きまくるとかもう少し実践的なことをやりたい。
追記
ホームページ作りたいならGatsbyがおすすめ

