qiitaの記事がobjcだったのでサクッとコピペで動かしたい方に最新版のコードを共有
UILabelにUIImageを表示する方法
①NSTextAttachmentを作成する。
②NSTextAttachmentからNSAttributedStringを作成する。
③UILabelのattributedTextに指定する。
画像のサイズや表示位置は①で調整します
今回は実際に起こりそうなものとして、ラベルの末尾に画像を表示してみます

    override func viewDidLoad() {
        super.viewDidLoad()

        let text = "labelに犬を表示する"
        let image = UIImage(named: "dog.jpg")!
        let font: UIFont = .systemFont(ofSize: 30)
        let size = CGSize(width: 30, height: 30)

        let attachment = NSTextAttachment()
        attachment.image = image

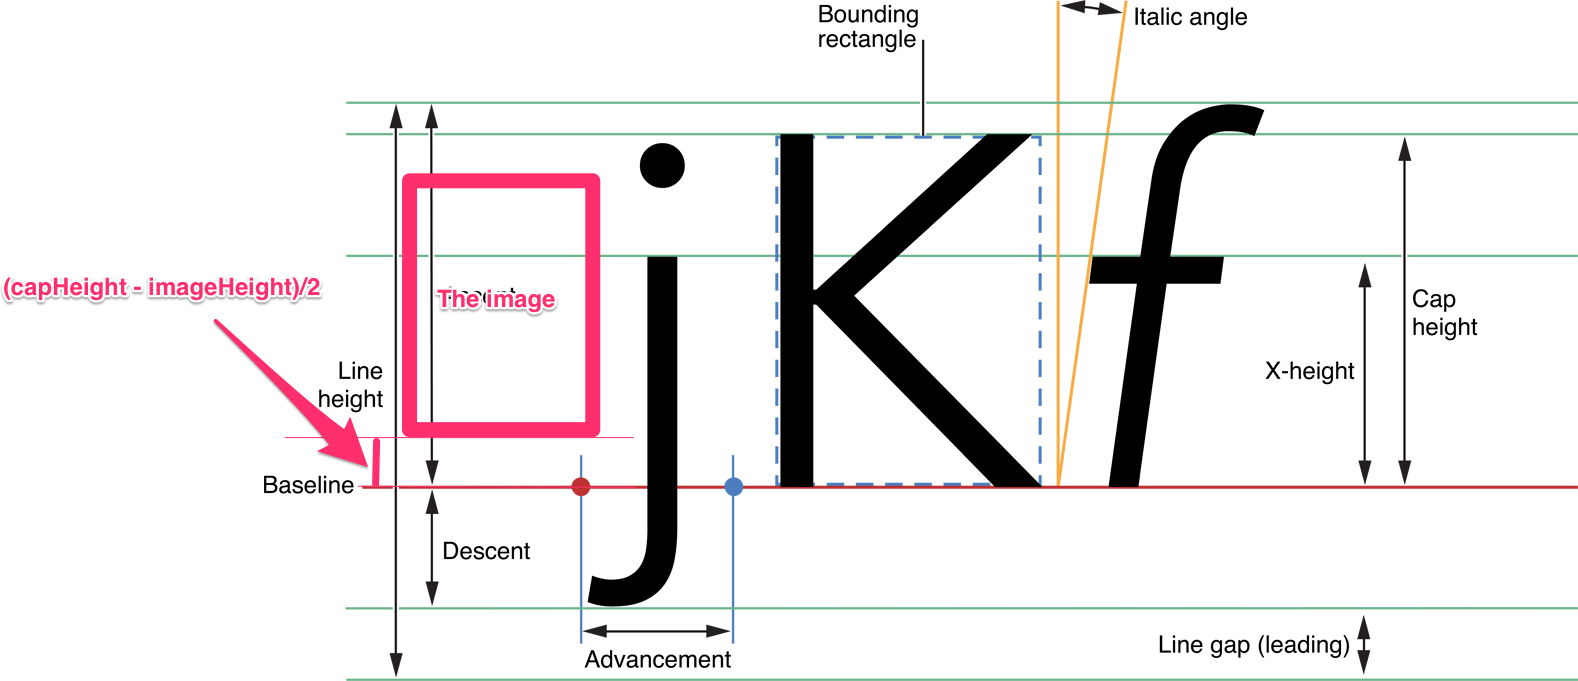
        let y = (font.capHeight-size.height).rounded() / 2
        attachment.bounds.origin = CGPoint(x: 0, y: y)
        attachment.bounds.size = size

        let imageAttribute = NSAttributedString(attachment: attachment)
        let mutableString = NSMutableAttributedString(string: text)
        mutableString.insert(imageAttribute, at: text.count)

        let label = UILabel()
        view.addSubview(label)
        label.textAlignment = .center
        label.frame.size = .init(width: view.bounds.width-20, height: 50)
        label.center = view.center
        label.font = font
        label.attributedText = mutableString
    }
attachmentにsizeを指定すると表示されます。ただそれだと、画像が表示される高さがずれてしまうので、
今回は中央に揃うように高さを調整しました。
当たり前ですがinsertする場所をずらせば中央に表示できます

デスクトップに犬の写真しかなかったですが、例えば仮想通貨の保有量+💶(通過のアイコン)スコア+👑(王冠やメダル)などが考えられると思います。
結構コード量が多くてとっつきにくい気もします。
Extension
うまい感じに共通化したいですが高さを揃えるにはUILabelのfontと表示したい画像のサイズの情報が必要になってきます。
UILabelのextensionにするのもなんか違う気がしますが一応
    label.text = "labelに犬を表示する"
    label.insertImage(UIImage(named: "dog.jpg")!, at: label.text!.count, alignment: .center)
sizeはデフォルトでimage.sizeを指定します。
label.insertImage(UIImage(named: "dog.jpg")!, at: label.text!.count, size: CGSize(width: 30, height: 30), alignment: .center)
extension UILabel {
    func insertImage(_ image: UIImage, at index: Int, size: CGSize? = nil, alignment: NSTextAttachment.VerticalAlignment = .center) {
        let attr = attributedText as? NSMutableAttributedString ?? NSMutableAttributedString(string: text ?? "")
        let attachment = NSTextAttachment(image: image, font: font, size: size ?? image.size, alignment: alignment)
        attr.insert(NSAttributedString(attachment: attachment), at: index)
        attributedText = attr
    }
}

extension NSTextAttachment {
    convenience init(image: UIImage, font: UIFont, size: CGSize, alignment: VerticalAlignment) {
        self.init()
        self.image = image
        let y: CGFloat
        switch alignment {
        case .top:
            y = font.capHeight - size.height
        case .bottom:
            y = font.descender
        case .center:
            y = (font.capHeight - size.height).rounded() / 2
        case .baseline:
            y = 0
        }
        bounds.origin = CGPoint(x: 0, y: y)
        bounds.size = size
    }

    enum VerticalAlignment {
        case bottom, baseline, center, top
    }
}
ラベルの上にsizeや表示位置の調整についてはこちらを参考にしました。

ちなみにy座標は反転していて、UIFont.desendentは-の値を返します。
画像ともじのマージンを調整したい場合
テキストと画像の間にのマージンを調整したい場合は
スペースを入れる、fontSizeを調整する、もしくは最悪の場合Paddingをつけた画像を生成する必要があるのかなと思いました。
    func makeImageWithPadding(image: UIImage, padding: UIEdgeInsets) -> UIImage {
        UIGraphicsBeginImageContextWithOptions(image.size, false, UIScreen.main.scale)
        UIGraphicsBeginImageContext(.init(
                width: image.size.width + padding.left + padding.right,
                height: image.size.height + padding.top + padding.bottom
            )
        )
        image.draw(at: .init(x: padding.left, y: padding.top))
        let image = UIGraphicsGetImageFromCurrentImageContext()!
        UIGraphicsEndImageContext()
        return image
    }
(追記) Swift5で強化された機能をつかうと
let attrStr: AttributedString = "今日はいい天気だ\(image)"
こうゆう実装もできるよう