はじめに
今回は、CiecleCIを使ったPythonのテストについて解説します。
この内容に決めた理由は、2つあります。
1つ目の理由は、CircleCIは1ヶ月1,000時間分まで無料で利用できるので、この事実をいろんな人に知って欲しかったからです。尚、無料なのは1並列でLinuxの自動テストをクラウド上で実行する場合に限ります。リポジトリのGitHubは法人でもprivateなリポジトリでも無料ですが、テストを並列で行ったり、MacOSでテストする場合は有料となります。
CircleCIは、リモート上のGitHubへプログラムを更新すると、すぐにCIを実施します。後で説明しますが、この手順には、CircleCIのアカウントを登録して、GitHub上のリポジトリを選んで、簡単な設定ファイルを準備するだけです。それだけで自分のPCのリソースを使わず、テストを実施することができます。
私は、データ分析ではjupyter notebookを使いますが、開発ではPyCharmを利用するので、ソース管理メニューからGitHubへプログラムをpushするだけでサーバー上で自動テストを行って確認するのでとても便利です。今回説明しませんが、CI/CDのようにデプロイまで自動化することもできます。
2つ目の理由は、今年の夏に、アジャイルコーチのやっとむさんが監修した『テスト駆動型Python』の翻訳のレビューをして、ここでunittestより、pytestがよくできることに気づいたので、これを伝えたかったからです。
それでは、早速、説明に入ります。
pytestとは
pythonには標準でunittestがありますが、pytestはそれよりも簡潔にかけるテストフレームワークです。失敗したテストの詳細がわかりやすかったり、fixtureやmock機能が簡単に使えるのが一番評価されているところですが、詳細については『テスト駆動Python』で学んでいただけるとありがたいです。
サンプルコードについて
今回は、あまり良い例ではないですが、電卓クラス(Calculator)のテストを行います。
このクラスには、足し算、引き算、掛け算、割り算の4つの機能があります。
GitHub上の、以下の場所にあるので、ダウンロードするとすぐに確認できます。
$ git clone https://github.com/abenben/circleci-pytest.git
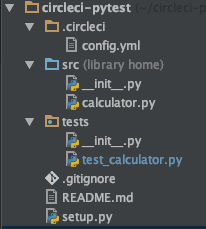
プログラムファイル、設定ファイルは以下の階層図のとおりです。
電卓クラス
まず、電卓クラスはsrcフォルダの下にあります。
計算用関数がそれぞれ実装されてます。
class Calculator(object):

    def addition(self, x, y):
        result = x + y;
        return result

    def subtraction(self, x, y):
        result = x - y;
        return result

    def multiplication(self, x, y):
        result = x * y;
        return result

    def division(self, x, y):
        result = x / y;
        return result
電卓クラスをテストするプログラム
電卓クラスのテストを行うプログラムは以下になります。
こちらはtestsフォルダにあります。
詳細をざっくり説明すると、
例えば足し算のテストは、$0+0=0,0+10=10,,,$のように、パラメータ2つと結果期待値のテストパターン5つをパラメータリスト化してaddition_listsへ格納しています。
addition_taskのフィクスチャのparamにaddition_listsに登録するとテストパターンごとに処理されます。
func_idsは、パラメータと期待値を可視化するための関数です。
addition_taskフィクスチャのidsへ登録すると、テストパターンごとにfunc_idsの形式にフォーマットされます。
test_addition_normalの引数にaddition_taskを渡すとパターンごとに前処理が行われます。
尚、このテストプログラムでは、意図的に間違えを書いたり、必要なテストをコメントアウトしてます。
import calculator
import pytest

# 足し算のテストパラメータ*2と、結果
addition_lists=(
    [0,0,0],
    [0,10,10],
    [10,0,10],
    [5,5,10])

# 引き算のテストパラメータ*2と、結果
subtraction_lists=(
    [0,0,0],
    [1,1,0],
    [10,5,5])

# 掛け算のテストパラメータ*2と、結果
multiplication_lists=(
    [0,0,0],
    [1,1,1],
    [5,1,5],
    [10,10,1000]) # ここ間違い

# 割り算のテストパラメータ*2と、結果
division_lists=(
    [0,1,0],
    [1,1,0],
    [10,5,2])

def func_ids(params):
    return 'Param1={},Param2={}, Result={}'.format(params[0],params[1],params[2])

@pytest.fixture(params=addition_lists,ids=func_ids)
def addition_task(request):
    return request.param

def test_addition_normal(addition_task):
    cal = calculator.Calculator()
    result = cal.addition(addition_task[0],addition_task[1])
    assert result == addition_task[2]

@pytest.fixture(params=subtraction_lists,ids=func_ids)
def subtraction_task(request):
    return request.param

def test_subtraction_normal(subtraction_task):
    cal = calculator.Calculator()
    result = cal.subtraction(subtraction_task[0],subtraction_task[1])
    assert result == subtraction_task[2]

@pytest.fixture(params=multiplication_lists,ids=func_ids)
def multiplication_task(request):
    return request.param

def test_multiplication_normal(multiplication_task):
    cal = calculator.Calculator()
    result = cal.multiplication(multiplication_task[0],multiplication_task[1])
    assert result == multiplication_task[2]

@pytest.fixture(params=division_lists,ids=func_ids)
def division_task(request):
    return request.param

# 今回はテストしない(テストカバレッジを確認するため)
# def test_division_normal(division_task):
#    cal = calculator.Calculator()
#    result = cal.division(division_task[0],division_task[1])
#    assert result == division_task[2]
パッケージのインストール
テストプログラムを説明する前に、pytestのインストールと、テストの対象となるcalclatorをインストールしてませんでしたので、以下の通り準備します。
まずは、pytestをインストールします。
ついでにテストのカバレッジをとるpytest-covもインストールしましょう。
$ cd circleci-pytest
$ pip install pytest
$ pip install pytest-cov
続いて、calclatorをインストールするためにsetupファイルをプロジェジェクト直下に準備します。
"""Calclator project."""

from setuptools import setup, find_packages

setup(
    name='calclator',
    version='0.1.0',
    license='none',
    description='Calclator',

    author='Abenben',
    author_email='aaaaa@bbbbb.com',
    url='https://github.com/abenben/circleci-pytest',

    packages=find_packages(where='src'),
    package_dir={'': 'src'},

    install_requires=[],
    extras_require={},

    entry_points={
        'console_scripts': [
            'calclator = calclator',
        ]
    },
)
calclatorをインストールします。
$ cd circleci-pytest
$ pip install -e ./.
これで準備完了です。
早速、テストを実施してみましょう。
まずは、自分の環境でそのままテストを実行してみます。
$ pytest -v
以下のように、各テストの成功(PASSED)、失敗(FAILED)がわかります。
嬉しいのはテストで与えたパラメータがはっきりしている事と、失敗したテストの詳細な箇所がunittestよりも非常にわかりやすいところです。
今回は10*10の結果が1,000と予想したテストプログラム側の障害でした。
============================= test session starts ==============================
platform darwin -- Python 3.5.6, pytest-3.8.1, py-1.6.0, pluggy-0.7.1 -- /Users/abe/.pyenv/versions/anaconda3-4.2.0/bin/python
cachedir: .pytest_cache
rootdir: /Users/abe/circleci-pytest, inifile:
plugins: remotedata-0.3.0, openfiles-0.3.0, doctestplus-0.1.3, cov-2.6.0, arraydiff-0.2
collected 11 items

tests/test_calculator.py::test_addition_normal[Param1=0,Param2=0, Result=0] PASSED [  9%]
tests/test_calculator.py::test_addition_normal[Param1=0,Param2=10, Result=10] PASSED [ 18%]
tests/test_calculator.py::test_addition_normal[Param1=10,Param2=0, Result=10] PASSED [ 27%]
tests/test_calculator.py::test_addition_normal[Param1=5,Param2=5, Result=10] PASSED [ 36%]
tests/test_calculator.py::test_subtraction_normal[Param1=0,Param2=0, Result=0] PASSED [ 45%]
tests/test_calculator.py::test_subtraction_normal[Param1=1,Param2=1, Result=0] PASSED [ 54%]
tests/test_calculator.py::test_subtraction_normal[Param1=10,Param2=5, Result=5] PASSED [ 63%]
tests/test_calculator.py::test_multiplication_normal[Param1=0,Param2=0, Result=0] PASSED [ 72%]
tests/test_calculator.py::test_multiplication_normal[Param1=1,Param2=1, Result=1] PASSED [ 81%]
tests/test_calculator.py::test_multiplication_normal[Param1=5,Param2=1, Result=5] PASSED [ 90%]
tests/test_calculator.py::test_multiplication_normal[Param1=10,Param2=10, Result=1000] FAILED [100%]

=================================== FAILURES ===================================
_________ test_multiplication_normal[Param1=10,Param2=10, Result=1000] _________

multiplication_task = [10, 10, 1000]

    def test_multiplication_normal(multiplication_task):
        cal = calculator.Calculator()
        result = cal.multiplication(multiplication_task[0],multiplication_task[1])
>       assert result == multiplication_task[2]
E       assert 100 == 1000

tests/test_calculator.py:54: AssertionError
===================== 1 failed, 10 passed in 0.11 seconds ======================
ここまで、pytestについてざっくりと説明しましたが、実はもっと機能が豊富です。これが使えると皆さんを早く幸せにできると私は信じています。
CircleCIとは
続いてCiecleCIについて説明します。
CiecleCIはクラウド上で一気にテストしてくれることが嬉しいサービスで、有料サービスにはMacOS用もありますが、ローカル版もあります。
ローカル版は何に使うのと思うかもしれませんが、例えば、CircleCIの設定はyaml形式で準備する必要があり、設定があってるのかの動作を確認するために使ったりします。
また、DockerをサポートしているのでVMに比べて起動が早いのも嬉しいです。
ローカル版の準備にはdockerやcircleciを以下の用にインストールする必要があります。
※windows版はそれぞれのインストーラを使います。
$ brew update
$ brew cask install docker
$ open /Applications/Docker.app
$ brew update
$ brew install circleci
dockerベースのCircleCIの設定は以下のようになります。
dockerでイメージを選べるのでpythonを選びます。
stepsでは以下の5つのことを実行してます。
checkoutではGitHubからチェックアウトをしています。
runは全部で3つありますが、最初のrunではパッケージをインストールしています。
2つ目のrunはpytestを実行し、結果をxml形式のファイル(test-reports/junit.xml)で出力しています。
tore-test-resultsは結果のレポートファイルを保存します。
3つ目のrunはpytestでテストのカバレッジをとってます。
version: 2
jobs:
  build:
    docker:
      - image: circleci/python:3.6.3
    steps:
      - checkout
      - run:
          name: install dependencies
          command: |
            python3 -m venv venv
            . venv/bin/activate
            pip install pytest
            pip install pytest-cov
            pip install -e ./.
      - run:
          name: run test
          command: |
            . venv/bin/activate
            pytest --junitxml=test-reports/junit.xml
      - store-test-results:
          path: test-reports
      - run:
          name: run test-cov
          command: |
            . venv/bin/activate
            pytest --cov=src
ローカル版のCircleCIを利用する
設定ファイルが間違っていないかチェックするには、以下のコマンドを実行します。
$ circleci config validate
Config file at .circleci/config.yml is valid.
ローカルで動作させるには、以下のコマンドを実行します。
$ circleci local execute
Docker image digest: sha256:7b3f88035e74739f72373aff135919f3a42cf59006b2832ec6293afdf727c5c1
====>> Spin up Environment
Build-agent version 0.1.1250-22bf9f5d (2018-12-12T11:32:15+0000)
Starting container circleci/python:3.6.3
  using image circleci/python@sha256:5dc907889693b4d140aadaa0a0ea1c08203c77b8835ccb2ba1fd29afe0b810e4
 :
 :
 :

=================================== FAILURES ===================================
__________ test_multiplication_normal[Param1=10,Param2=10, Result=1000] __________

multiplication_task = [10, 10, 1000]

    def test_multiplication_normal(multiplication_task):
        cal = calculator.Calculator()
        result = cal.multiplication(multiplication_task[0], multiplication_task[1])
>       assert result == multiplication_task[2]
E       assert 100 == 1000

tests/test_calculator.py:62: AssertionError
-------- generated xml file: /home/circleci/repo/test-reports/junit.xml --------

----------- coverage: platform linux, python 3.6.3-final-0 -----------

========================= 1 failed, 13 passed in 0.12s =========================
Error: Exited with code 1
Step failed
====>> Uploading test results
Archiving the following test results
  * /home/circleci/repo/test-reports

Error: Failed uploading test results directory
Error &errors.errorString{s:"not supported"}

{"Runner":true,"level":"error","msg":"Can't add file ///home/circleci/repo/test-reports to tar: io: read/write on closed pipe","task-id":"localbuild-1568539806","time":"2019-09-15T09:30:27Z"}
{"Runner":true,"level":"error","msg":"Can't close tar writer: io: read/write on closed pipe","task-id":"localbuild-1568539806","time":"2019-09-15T09:30:27Z"}
====>> Uploading artifacts
Uploading /home/circleci/repo/test-reports to test-reports
Uploading /home/circleci/repo/test-reports/junit.xml (3.0 kB): Error: FAILED with error not supported

Error: runner failed
{"Runner":true,"level":"error","msg":"runner failed","task-id":"localbuild-1568539806","time":"2019-09-15T09:30:27Z"}
Task failed
Error: job failed
CircleCIのサービスを利用する
CircleCIのサービスを利用する方法を説明します。
※もし、私のサンプルを使って動作確認したい人は、自分のGitHubにそのままcloneしたリポジトリを登録してみてください。
CircleCIのサービスを利用するには以下のページでアカウント登録する必要があります。
私は、自分のGitHubアカウントで登録しました。

左の「Add Projects」を選ぶと、リポジトリの一覧が見えるので、circleci-pytestを選択(Set Up Project)してください。

Set UPするとCIが実行されます。しばらく待ちましょう。

数秒待つと、テストが失敗してFAILEDと表示されるのでクリックして詳細を確認します。

掛け算のテストプログラムで10*10=10を期待しているので、テスト側の間違いであることがわかります。

下の方を見ると、インストールはうまくいってるのかなど、それぞれのステップの内容もチェックできます。今回は解説しませんが、10分以内であればsshでログインしてデバッグすることも可能です。

テストが失敗するとメールが届きます。Slackなどへ通知することも可能です。
上記のようにテストが失敗しましたが、GitHub上のプログラムを修正すると、CirclrCIが反応してテストをやり直します。すでにJenkinsやTravisCIなどでしっかり自動化されている場合には意味がないかもしれませんが、これからやりたい人には、ちょっとした作業でここまで自動化されるので非常に便利ですね。
おまけ:テストカバレッジ
$ pytest --cov=src
=============================================================== test session starts ===============================================================
platform darwin -- Python 3.5.6, pytest-3.8.1, py-1.6.0, pluggy-0.7.1
rootdir: /Users/abe/circleci-pytest, inifile:
plugins: remotedata-0.3.0, openfiles-0.3.0, doctestplus-0.1.3, cov-2.6.0, arraydiff-0.2
collected 11 items

tests/test_calculator.py ..........F                                                                                                        [100%]

==================================================================== FAILURES =====================================================================
___________________________________________ test_multiplication_normal[Param1=10,Param2=10, Result=10] ____________________________________________

multiplication_task = [10, 10, 10]

    def test_multiplication_normal(multiplication_task):
        cal = calculator.Calculator()
        result = cal.multiplication(multiplication_task[0],multiplication_task[1])
>       assert result == multiplication_task[2]
E       assert 100 == 10

tests/test_calculator.py:54: AssertionError

---------- coverage: platform darwin, python 3.5.6-final-0 -----------
Name                Stmts   Miss  Cover
---------------------------------------
src/__init__.py         0      0   100%
src/calculator.py      13      2    85%
---------------------------------------
TOTAL                  13      2    85%

======================================================= 1 failed, 10 passed in 0.09 seconds =======================================================
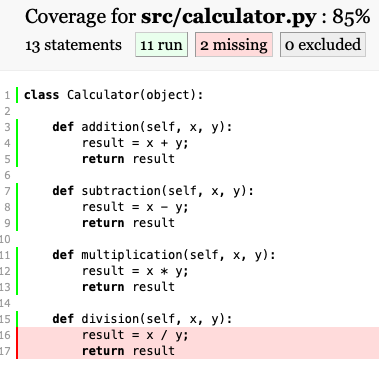
また、以下のようにhtml形式で出力すると、関数の詳細カバレッジをhtmlページで確認することができます。devisionのテストをコメントアウトしたので警告が出てますね。
$ pytest --cov=src --cov-report=html:test-reports
まとめ
駆け足で説明しましたが、pytestもCiecleCIも簡単で、かつ、機能が豊富です。もし興味を持っていただけたなら、自分やプロジェクトのjobの自動化として役立てみてください。


