はじめに
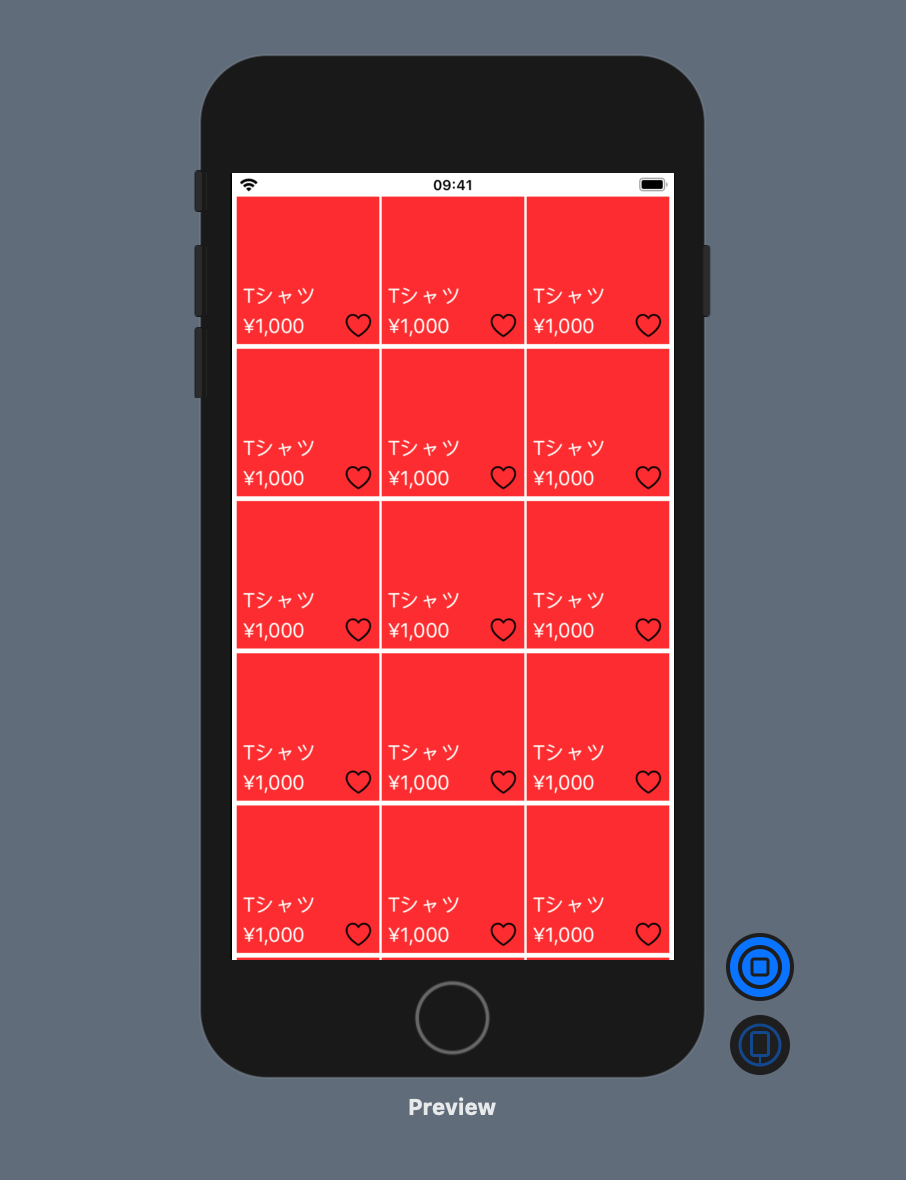
メルカリ/フリルなどのフリマアプリでよく目にするホーム画面の3カラムのデザインを作成する方法を紹介します。
今回はUICollectionViewControllerをSwiftUI上で動かしています。(これでUIKitにホットリロードのCanvasを導入する事が出来ます)
*ストーリーボードは使用していないので、Extension.swiftファイルに制約のルールを設定しています。(ステップ3をご覧ください)

開発環境
Swift 5.2.4
Xcode 11.5(Deployment Target 13.0)
ストーリーボードなし
ステップ1
SceneDelegate.swift内に初期ページ設定をします。初期ページはFrimaContentViewとします
class SceneDelegate: UIResponder, UIWindowSceneDelegate {

    var window: UIWindow?

    func scene(_ scene: UIScene, willConnectTo session: UISceneSession, options connectionOptions: UIScene.ConnectionOptions) {
        // Use this method to optionally configure and attach the UIWindow `window` to the provided UIWindowScene `scene`.
        // If using a storyboard, the `window` property will automatically be initialized and attached to the scene.
        // This delegate does not imply the connecting scene or session are new (see `application:configurationForConnectingSceneSession` instead).

        // Create the SwiftUI view that provides the window contents.
        let frimaContentView = FrimaContentView()
        // Use a UIHostingController as window root view controller.
        if let windowScene = scene as? UIWindowScene {
            let window = UIWindow(windowScene: windowScene)
            window.rootViewController = UIHostingController(rootView: frimaContentView)
            self.window = window
            window.makeKeyAndVisible()
        }
    }
ステップ2: SwiftUIからUICollectionViewControllerを表示する
以下を実装するとUIKitでもホットリロード機能(canvas)が使えるため一々Runしなくてもいいので便利です。
import UIKit
import SwiftUI

class FrimaController: UICollectionViewController {

    override func viewDidLoad() {
        super.viewDidLoad()
        //背景を白にする
        collectionView.backgroundColor = .white

    }
}

struct FrimaIntegratedViewController: UIViewControllerRepresentable {

    func makeUIViewController(context: UIViewControllerRepresentableContext<FrimaIntegratedViewController>) -> FrimaController {
        return FrimaController(collectionViewLayout: UICollectionViewFlowLayout())
    }

    func updateUIViewController(_ uiViewController: FrimaController, context: Context) {

    }
}

struct FrimaContentView: View {
    var body: some View {
        FrimaIntegratedViewController().edgesIgnoringSafeArea(.all)
    }
}

struct FrimaContentView_Previews: PreviewProvider {
    static var previews: some View {
        FrimaContentView()
    }
}
ステップ3: 個々のアイテムセルを作成
セル上にアイテムの名前と値段、いいねボタンを作成します。
class FrimaItemCell: UICollectionViewCell {

    let priceLabel: UILabel = {
        let label = UILabel()
        label.text = "¥1,000"
        label.textColor = .white
        return label
    }()

    let itemNameLabel: UILabel = {
        let label = UILabel()
        label.text = "Tシャツ"
        label.textColor = .white
        return label
    }()

    let likeButton: UIButton = {
        let button = UIButton(type: .system)
        //Xcodeにデフォルトである画像を使用 *これはDeplotment Targetが13.0以降で使えます
        button.setImage(UIImage(systemName: "heart")?.withRenderingMode(.alwaysOriginal), for: .normal)
        return button
    }()

    override init(frame: CGRect) {
        super.init(frame: frame)

        backgroundColor = .systemRed

        setupView()
    }

    fileprivate func setupView() {
        addSubview(priceLabel)
        priceLabel.anchor(top: nil, left: leftAnchor, bottom: bottomAnchor, right: nil, paddingTop: 0, paddingLeft: 5, paddingBottom: 5, paddingRight: 0, height: 0, width: 0)

        addSubview(itemNameLabel)
        itemNameLabel.anchor(top: nil, left: priceLabel.leftAnchor, bottom: priceLabel.topAnchor, right: nil, paddingTop: 0, paddingLeft: 0, paddingBottom: 5, paddingRight: 0, height: 0, width: 0)

        addSubview(likeButton)
        likeButton.anchor(top: nil, left: nil, bottom: bottomAnchor, right: rightAnchor, paddingTop: 0, paddingLeft: 0, paddingBottom: 5, paddingRight: 5, height: 0, width: 0)
    }

    required init?(coder: NSCoder) {
        fatalError("init(coder:) has not been implemented")
    }
}
制約ルールは別ファイルExtensions.swiftで設定しています。
//Extensions.swift
import Foundation
import UIKit

extension UIView {
func anchor(top: NSLayoutYAxisAnchor?, left: NSLayoutXAxisAnchor?,  bottom: NSLayoutYAxisAnchor?, right: NSLayoutXAxisAnchor?, paddingTop: CGFloat, paddingLeft: CGFloat, paddingBottom: CGFloat, paddingRight: CGFloat, height: CGFloat, width: CGFloat){

    translatesAutoresizingMaskIntoConstraints = false

    if let top = top {
        self.topAnchor.constraint(equalTo: top, constant: paddingTop).isActive = true
    }

    if let left = left {
        self.leftAnchor.constraint(equalTo: left, constant: paddingLeft).isActive = true
    }

    if let bottom = bottom {
        bottomAnchor.constraint(equalTo: bottom, constant: -paddingBottom).isActive = true
    }

    if let right = right {
        rightAnchor.constraint(equalTo: right, constant: -paddingRight).isActive = true
    }

    if width != 0 {
        widthAnchor.constraint(equalToConstant: width).isActive = true
    }

    if height != 0 {
        heightAnchor.constraint(equalToConstant: height).isActive = true
    }
    }
}
ステップ4: レイアウトを作成
ステップ3で作成したCellをFrimaController上に登録し、レイアウトを作成します。
class FrimaController: UICollectionViewController, UICollectionViewDelegateFlowLayout {

    let frimaItemCellId = "frimaItemCellId"

    override func viewDidLoad() {
        super.viewDidLoad()

        collectionView.backgroundColor = .white

        //ステップ3で作成したFrimaCellを登録
        collectionView.register(FrimaItemCell.self, forCellWithReuseIdentifier: frimaItemCellId)

    }

    override func collectionView(_ collectionView: UICollectionView, numberOfItemsInSection section: Int) -> Int {
        return 20
    }

    override func collectionView(_ collectionView: UICollectionView, cellForItemAt indexPath: IndexPath) -> UICollectionViewCell {
        let cell = collectionView.dequeueReusableCell(withReuseIdentifier: frimaItemCellId, for: indexPath) as! FrimaItemCell
        return cell
    }

    func collectionView(_ collectionView: UICollectionView, layout collectionViewLayout: UICollectionViewLayout, sizeForItemAt indexPath: IndexPath) -> CGSize {
        return CGSize(width: view.frame.width / 3 - 4, height: view.frame.width / 3)
    }

    func collectionView(_ collectionView: UICollectionView, layout collectionViewLayout: UICollectionViewLayout, insetForSectionAt section: Int) -> UIEdgeInsets {
        return UIEdgeInsets(top: 0, left: 4, bottom: 0, right: 4)
    }

    func collectionView(_ collectionView: UICollectionView, layout collectionViewLayout: UICollectionViewLayout, minimumLineSpacingForSectionAt section: Int) -> CGFloat {
        return 4
    }

    func collectionView(_ collectionView: UICollectionView, layout collectionViewLayout: UICollectionViewLayout, minimumInteritemSpacingForSectionAt section: Int) -> CGFloat {
        return 0
    }

}
完成
最後に
今は全てのアイテムが"Tシャツ"、と¥1,000そして画像がありませんが、
次回はアイテムクラスを作り個々のアイテムを設定していきます。
最後に一句(初心者時代にやっていたNG行動)
テラテイル 聞きすぎ怒られ 気がメイル
