はじめに
今回はTwitterアプリの検索タブにあるカテゴリー分けニュースフィードのデザインを紹介します。これはNewsPicksやメルカリでも利用されている、ユーザーエクスペリエンス向上にはもってこいの機能です。ちなみに私の作ったフィットネスアプリ『モニトレ』でもある機能です。

*ストーリーボードは使用していないので、Extension.swiftファイルに制約のルールを設定しています。(ステップ3をご覧ください)
開発環境
Swift 5.2.4
Xcode 11.5(Deployment Target 13.0)
ストーリーボードなし
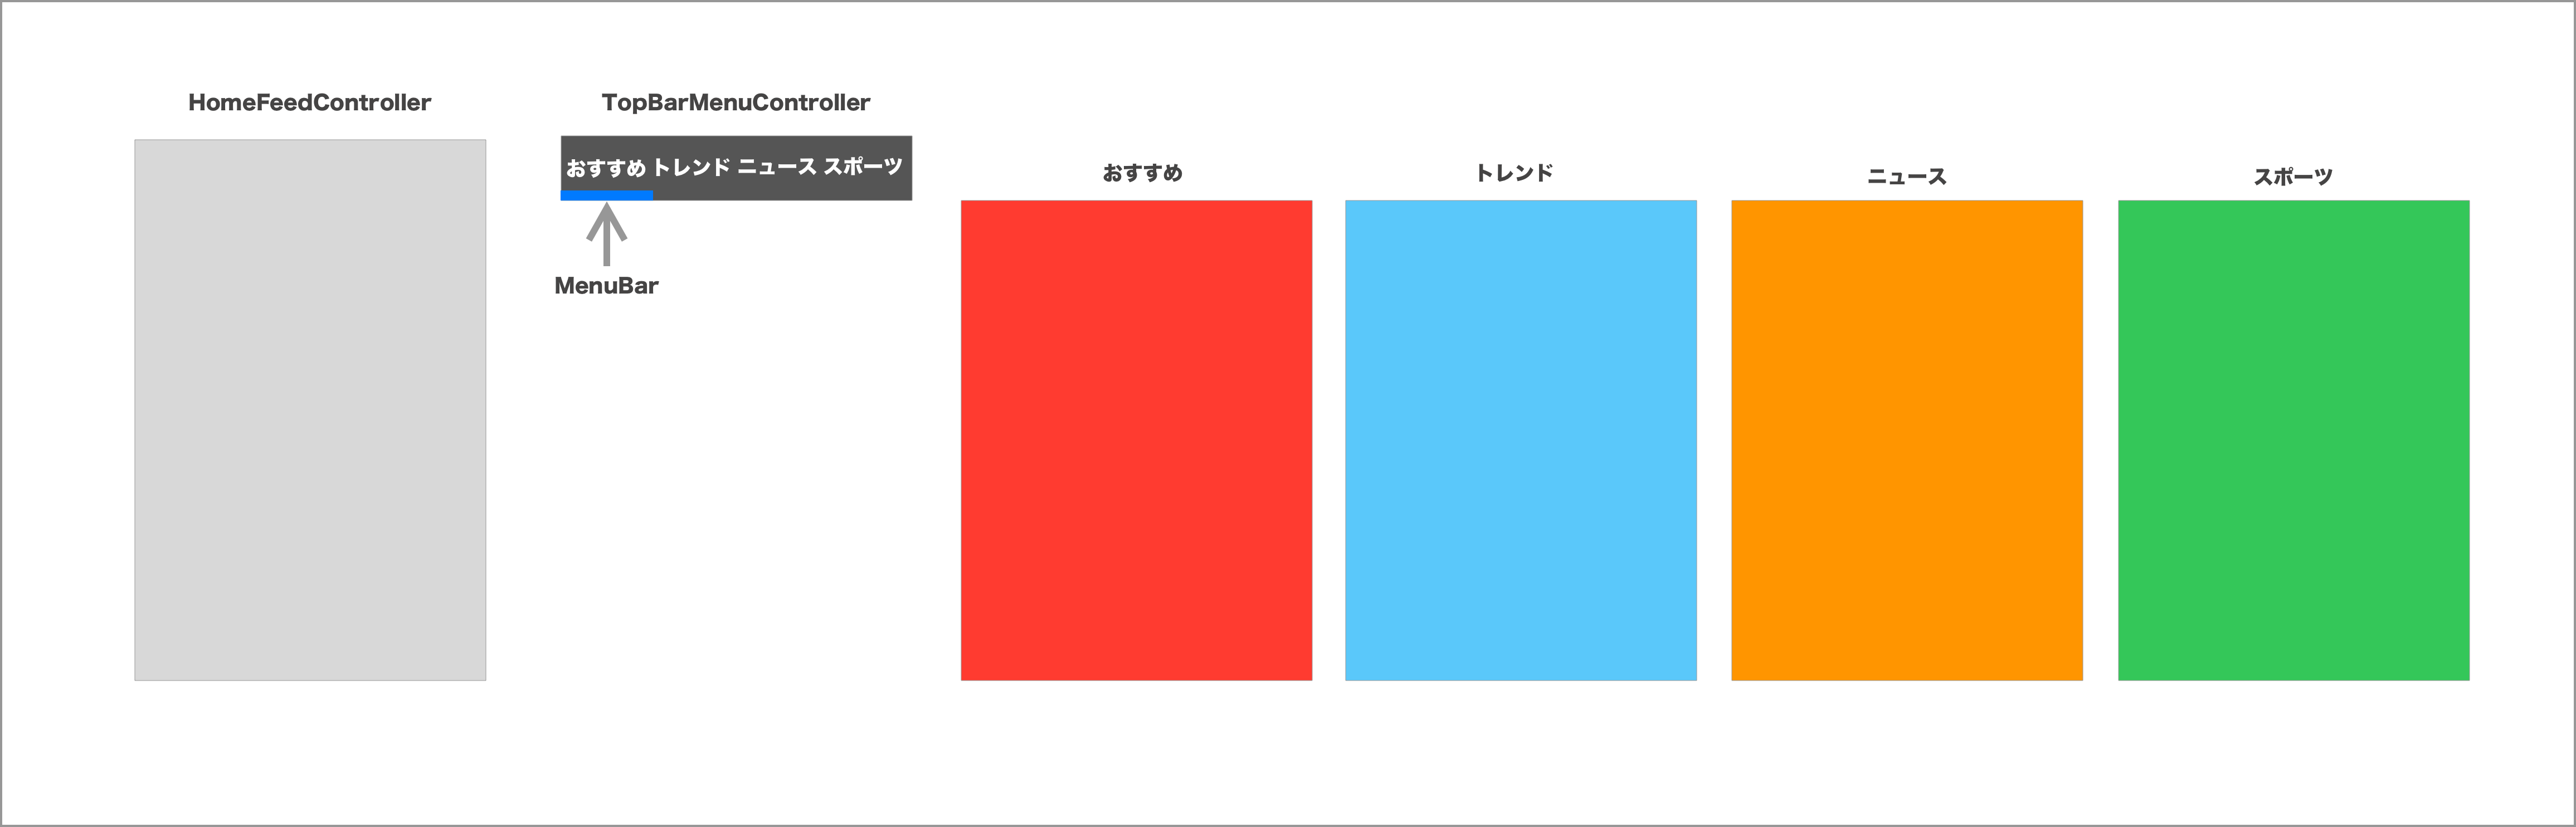
ストラクチャー
構成は以下の様になっています。
ステップ1: 初期設定
SceneDelegate.swift内に初期ページ設定をします。初期ページはHomeFeedContentViewとします
class SceneDelegate: UIResponder, UIWindowSceneDelegate {

    var window: UIWindow?

    func scene(_ scene: UIScene, willConnectTo session: UISceneSession, options connectionOptions: UIScene.ConnectionOptions) {
        // Use this method to optionally configure and attach the UIWindow `window` to the provided UIWindowScene `scene`.
        // If using a storyboard, the `window` property will automatically be initialized and attached to the scene.
        // This delegate does not imply the connecting scene or session are new (see `application:configurationForConnectingSceneSession` instead).

        // Create the SwiftUI view that provides the window contents.
        let homeFeedContentView = HomeFeedContentView()
        // Use a UIHostingController as window root view controller.
        if let windowScene = scene as? UIWindowScene {
            let window = UIWindow(windowScene: windowScene)
            window.rootViewController = UIHostingController(rootView: homeFeedContentView)
            self.window = window
            window.makeKeyAndVisible()
        }
    }
ステップ2: SWiftUIからUICollectionViewControllerを表示する
以下を実装するとUIKitでもホットリロード機能(canvas)が使えるため一々Runしなくてもいいので便利です。
class HomeFeedController: UICollectionViewController {

    override func viewDidLoad() {
        super.viewDidLoad()

        collectionView.backgroundColor = .lightGray
    }
}
struct HomeFeedIntegratedController: UIViewControllerRepresentable {

    func makeUIViewController(context: UIViewControllerRepresentableContext<HomeFeedIntegratedController>) -> HomeFeedController {
        return HomeFeedController(collectionViewLayout: UICollectionViewFlowLayout())
    }

    func updateUIViewController(_ uiViewController: HomeFeedController, context: Context) {

       }
}


struct HomeFeedContentView: View {
    var body: some View {
        HomeFeedIntegratedController().edgesIgnoringSafeArea(.all)
    }
}

struct HomeFeedContentView_Preview: PreviewProvider {
    static var previews: some View {
        HomeFeedContentView()
    }
}
ステップ3: トップメニューバー作り
トップに配置するメニューバーを作成します。
import UIKit
import SwiftUI

protocol TopBarMenuControllerDelegate {
    func didTapMenu(indexPath: IndexPath)
}

class TopBarMenuController: UICollectionViewController, UICollectionViewDelegateFlowLayout {

    var topBarMenuControllerDelegate: TopBarMenuControllerDelegate?

    fileprivate let menuCellId = "menuCellId"
     fileprivate let menuItem = ["おすすめ", "トレンド", "ニュース", "エンタメ"]

    //メニューバー内の青いライン
    let menuBottomLine: UIView = {
        let view = UIView()
        view.backgroundColor = .systemBlue
        return view
    }()

    override func viewDidLoad() {
        super.viewDidLoad()

        collectionView.backgroundColor = .darkGray
        collectionView.register(TopBarCell.self, forCellWithReuseIdentifier: menuCellId)
        collectionView.alwaysBounceHorizontal = true

        //横にスクロールするための機能
        if let layout = collectionViewLayout as? UICollectionViewFlowLayout {
            layout.scrollDirection = .horizontal
            layout.minimumLineSpacing = 0
            layout.minimumInteritemSpacing = 0
        }

        view.addSubview(menuBottomLine)
        menuBottomLine.anchor(top: nil, left: view.leftAnchor, bottom: view.bottomAnchor, right: nil, paddingTop: 0, paddingLeft: 0, paddingBottom: 0, paddingRight: 0, height: 7, width: 0)
        menuBottomLine.widthAnchor.constraint(equalTo: view.widthAnchor, multiplier: 1 / 4).isActive = true
    }

    //menuItem配列の数を返す
    override func collectionView(_ collectionView: UICollectionView, numberOfItemsInSection section: Int) -> Int {
        return menuItem.count
    }

    override func collectionView(_ collectionView: UICollectionView, cellForItemAt indexPath: IndexPath) -> UICollectionViewCell {
        let cell = collectionView.dequeueReusableCell(withReuseIdentifier: menuCellId, for: indexPath) as! TopBarCell
        cell.menuLabel.text = menuItem[indexPath.item]
        return cell
    }
    //それぞれのセルサイズ(width)はmenuItem配列の数に合わせる = CGSize(width: view.frame.width / 4, height: view.frame.height)
    func collectionView(_ collectionView: UICollectionView, layout collectionViewLayout: UICollectionViewLayout, sizeForItemAt indexPath: IndexPath) -> CGSize {
        return CGSize(width: view.frame.width / 4, height: view.frame.height)
    }

    //メニューアイテムをタップした時の機能を追加するためにプロトコールを宣言
    override func collectionView(_ collectionView: UICollectionView, didSelectItemAt indexPath: IndexPath) {
        topBarMenuControllerDelegate?.didTapMenu(indexPath: indexPath)
    }

}

class TopBarCell: UICollectionViewCell {

    let menuLabel: UILabel = {
        let label = UILabel()
        label.font = .boldSystemFont(ofSize: 16)
        label.textColor = .white
        label.text = "Menu"
        label.textAlignment = .center
        return label
    }()

    override init(frame: CGRect) {
        super.init(frame: frame)

        setupMenuView()
    }

    fileprivate func setupMenuView() {
        addSubview(menuLabel)
        menuLabel.anchor(top: nil, left: nil, bottom: nil, right: nil, paddingTop: 0, paddingLeft: 0, paddingBottom: 0, paddingRight: 0, height: 20, width: 0)
        menuLabel.centerXAnchor.constraint(equalTo: centerXAnchor).isActive = true
        menuLabel.centerYAnchor.constraint(equalTo: centerYAnchor).isActive = true
    }

    required init?(coder: NSCoder) {
        fatalError("init(coder:) has not been implemented")
    }

}

struct TopBarIntegratedController: UIViewControllerRepresentable {

    func makeUIViewController(context: UIViewControllerRepresentableContext<TopBarIntegratedController>) -> TopBarMenuController {
        return TopBarMenuController(collectionViewLayout: UICollectionViewFlowLayout())
    }

    func updateUIViewController(_ uiViewController: TopBarMenuController, context: Context) {

       }
}


struct TopBarMenuContentView: View {
    var body: some View {
        TopBarIntegratedController().edgesIgnoringSafeArea(.all)
    }
}

struct TopBarMenuContentView_Preview: PreviewProvider {
    static var previews: some View {
        TopBarMenuContentView()
    }
}
制約ルールは別ファイルExtensions.swiftで設定しています。
//Extensions.swift
import Foundation
import UIKit

extension UIView {
func anchor(top: NSLayoutYAxisAnchor?, left: NSLayoutXAxisAnchor?,  bottom: NSLayoutYAxisAnchor?, right: NSLayoutXAxisAnchor?, paddingTop: CGFloat, paddingLeft: CGFloat, paddingBottom: CGFloat, paddingRight: CGFloat, height: CGFloat, width: CGFloat){

    translatesAutoresizingMaskIntoConstraints = false

    if let top = top {
        self.topAnchor.constraint(equalTo: top, constant: paddingTop).isActive = true
    }

    if let left = left {
        self.leftAnchor.constraint(equalTo: left, constant: paddingLeft).isActive = true
    }

    if let bottom = bottom {
        bottomAnchor.constraint(equalTo: bottom, constant: -paddingBottom).isActive = true
    }

    if let right = right {
        rightAnchor.constraint(equalTo: right, constant: -paddingRight).isActive = true
    }

    if width != 0 {
        widthAnchor.constraint(equalToConstant: width).isActive = true
    }

    if height != 0 {
        heightAnchor.constraint(equalToConstant: height).isActive = true
    }
    }
}
ステップ4: メニューアイテムの作成とメニューバーの動き
メニューアイテム[おすすめ、トレンド,ニュース、スポーツ]のテキストと背景の色を指定するためにFeedというクラスを作成。最後にメニューバーの動きを加えます。
import UIKit
import SwiftUI

//メニューアイテムの詳細クラスを作成
class Feed {
    let text: String
    let backgroundColor: UIColor

    init(text: String, backgroundColor: UIColor) {
        self.text = text
        self.backgroundColor = backgroundColor
    }
}

class HomeFeedController: UICollectionViewController, TopBarMenuControllerDelegate, UICollectionViewDelegateFlowLayout {

    fileprivate let menuCellId = "menuCellId"

    var feeds = [Feed]()

    fileprivate let topBarMenuController = TopBarMenuController(collectionViewLayout: UICollectionViewFlowLayout())

    override func viewDidLoad() {
        super.viewDidLoad()

        collectionView.backgroundColor = .lightGray
        collectionView.register(HomeFeedCell.self, forCellWithReuseIdentifier: menuCellId)

        collectionView.isPagingEnabled = true

        if let layout = collectionViewLayout as? UICollectionViewFlowLayout {
            layout.scrollDirection = .horizontal
            layout.minimumLineSpacing = 0
            layout.minimumInteritemSpacing = 0
        }

        topBarMenuController.topBarMenuControllerDelegate = self

        setupTopBarMenuController()

        feeds = [Feed(text: "おすすめ画面", backgroundColor: .systemRed), Feed(text: "トレンド画面", backgroundColor: .systemTeal), Feed(text: "ニュース画面", backgroundColor: .systemOrange), Feed(text: "エンタメ画面", backgroundColor: .systemGreen)]
    }
    //画面を横にスクロールした時にメニューバー内の下枠(青)が付いてくる仕様
    override func scrollViewDidScroll(_ scrollView: UIScrollView) {
        let x = scrollView.contentOffset.x
        let offset = x / 4
        topBarMenuController.menuBottomLine.transform = CGAffineTransform(translationX: offset, y: 0)
    }

    override func scrollViewWillEndDragging(_ scrollView: UIScrollView, withVelocity velocity: CGPoint, targetContentOffset: UnsafeMutablePointer<CGPoint>) {
        let x = targetContentOffset.pointee.x
        let item = x / view.frame.width
        let indexPath = IndexPath(item: Int(item), section: 0)
        topBarMenuController.collectionView.selectItem(at: indexPath, animated: true, scrollPosition: .centeredHorizontally)
    }

    //ステップ3で宣言したプロトコールを実装
    //メニューアイテムをタップした時に画面がスライドする機能
    func didTapMenu(indexPath: IndexPath) {
        collectionView.scrollToItem(at: indexPath, at: .centeredHorizontally, animated: true)

    }
    //feeds配列の数を返す
    override func collectionView(_ collectionView: UICollectionView, numberOfItemsInSection section: Int) -> Int {
        return feeds.count
    }

    //セルにそれぞれのテキスト背景色を設定する
    override func collectionView(_ collectionView: UICollectionView, cellForItemAt indexPath: IndexPath) -> UICollectionViewCell {
        let cell = collectionView.dequeueReusableCell(withReuseIdentifier: menuCellId, for: indexPath) as! HomeFeedCell
        cell.backgroundColor = feeds[indexPath.item].backgroundColor
        cell.titleLabel.text = feeds[indexPath.item].text
        return cell
    }

    fileprivate func setupTopBarMenuController() {
        //ナビゲーションバーの高さと色を設定
        let navBarController = UINavigationBar(frame: CGRect(x: 0, y: 0, width: view.frame.width, height: 72))
        view.addSubview(navBarController)
        navBarController.barTintColor = .darkGray

        //TopBarMenuControllerを設置する
        view.addSubview(topBarMenuController.view)
        topBarMenuController.view.anchor(top: navBarController.bottomAnchor, left: view.leftAnchor, bottom: nil, right: view.rightAnchor, paddingTop: 0, paddingLeft: 0, paddingBottom: 0, paddingRight: 0, height: 60, width: 0)
    }

    func collectionView(_ collectionView: UICollectionView, layout collectionViewLayout: UICollectionViewLayout, sizeForItemAt indexPath: IndexPath) -> CGSize {
        return CGSize(width: view.frame.width, height: view.frame.height)
    }
}

class HomeFeedCell: UICollectionViewCell {

    let titleLabel: UILabel = {
        let label = UILabel()
        label.text = "タイトル"
        label.font = .boldSystemFont(ofSize: 16)
        label.textColor = .white
        return label
    }()

    override init(frame: CGRect) {
        super.init(frame: frame)

        addSubview(titleLabel)
        titleLabel.anchor(top: nil, left: nil, bottom: nil, right: nil, paddingTop: 0, paddingLeft: 0, paddingBottom: 0, paddingRight: 0, height: 0, width: 0)
        titleLabel.centerXAnchor.constraint(equalTo: centerXAnchor).isActive = true
        titleLabel.centerYAnchor.constraint(equalTo: centerYAnchor).isActive = true
    }

    required init?(coder: NSCoder) {
        fatalError("init(coder:) has not been implemented")
    }
}

struct HomeFeedIntegratedController: UIViewControllerRepresentable {

    func makeUIViewController(context: UIViewControllerRepresentableContext<HomeFeedIntegratedController>) -> HomeFeedController {
        return HomeFeedController(collectionViewLayout: UICollectionViewFlowLayout())
    }

    func updateUIViewController(_ uiViewController: HomeFeedController, context: Context) {

       }
}


struct HomeFeedContentView: View {
    var body: some View {
        HomeFeedIntegratedController().edgesIgnoringSafeArea(.all)
    }
}

struct HomeFeedContentView_Preview: PreviewProvider {
    static var previews: some View {
        HomeFeedContentView()
    }
}
最後に
今回はデザインのみですが、実際にはカテゴリー別の情報(APIなど)ををそれぞれのページに表示させます。
次の記事はそれを実装しようと思いますが、何がいいですかね?
何かリクエストがあればお気軽にコメントからどうぞ!
現在、私の制作した体験/遊び/学びが楽しめるアプリ『WalCal』でジャンケンアプリ制作体験を掲載しています。
ご興味ある方は是非チェックして見てください!