日頃ほぼLaravelしか触っていない人間が、
Swiftに入門してみたので、メモメモ。✏️
コメント
// コメントはスラッシュ2個(Command + /)
変数
変数名はキャメルケースを用いる。最後にカンマは不要。
var name = "Hoge"
name = "Foo"
print(name)

// Foo
定数
let age = 20
print(age)

// 20
型の指定
Swiftは、自動的に型を推論してくれるしてくれるみたい。
ただ、バグ防止のため型を指定する。
// 型の指定
// var 変数名: 型名 = 値
var string: String = "文字列" //String型(文字列)
var int: Int = 1 //Int型(整数)
var float: Float = 1.2345 //Float型(小数)
var double: Double = 1.2345 //Double型(小数)
var bool: Bool = true // Bool型(真偽値)
演算
print(10 + 2) //12
print(10 - 2) //8
print(10 * 2) //20
print (10 / 2) //5
print(10 % 3) //0

//文字列同士の結合にも+が使える
print("10" + "2" + "これは結合される") //102これは結合される
if文(条件分岐)
var myAge: Int = 20

if myAge > 20 {
    print("成人!")
} else if myAge == 20 {
    print("ハタチ!")
} else {
    print("未成年!")
}

// ハタチ!
関数
関数名はキャメルケースを用いる
引数に値を渡す1
関数を呼び出し、値を渡すときは(name: "ウッチャン")←このような形で渡す
func callName(name: String) {
    print("あなたは" + name + "って言うんですね!")
}
callName(name: "ウッチャン")

// ウッチャン
引数に値を渡す2
関数側の引数にアンスコ(_ name: String)←このように書くと、
呼び出す側で引数名の指定を省略できる
func callName(_ name: String) {
    print("あなたは" + yourName + "って言うんですね!")
}
callYourName("ナンチャン")

// ナンチャン
戻り値、返り値
func CallName(name: String) -> String {
    return name + "!"
}
print(CallName(name: "ウッチャンナンチャン"))

// ウッチャンナンチャン!
配列
var array = ["hoge", "foo", "fuga"]
print(array[1])

// foo
for文
for i in 1...10 {
    print(i)
}
クラスとインスタンス
//クラスを作成する
class Twitter {
    // プロパティを作成する
    var id: Int!
    var userName: String!
    var content: String!

    //関数を作成する
    func tweet() {
        print("ユーザID:\(id!)")
        print("ユーザ名:\(userName!)")
        print("投稿内容:\(content!)")
    }
}


//インスタンスを複製し、それらに要素を詰める
let tweetData1 = Twitter()
tweetData1.id = 1234
tweetData1.userName = "Mr.Hoge"
tweetData1.content = "ウッチャン!"
tweetData1.tweet()

let tweetData2 = Twitter()
tweetData2.id = 5678
tweetData2.userName = "Ms.Foo"
tweetData2.content = "ナンチャン!"
tweetData2.tweet()

//ユーザID:1234
//ユーザ名:Mr.Hoge
//投稿内容:ウッチャン!
//ユーザID:5678
//ユーザ名:Ms.Foo
//投稿内容:ナンチャン!
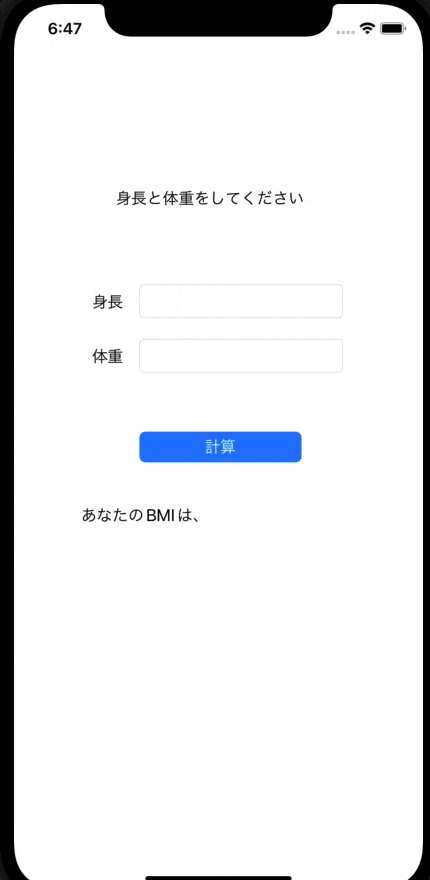
BMI計算するアプリを作成してみた
class ViewController: UIViewController {

    @IBOutlet weak var heightField: UITextField!
    @IBOutlet weak var weightField: UITextField!
    @IBOutlet weak var bmiLabel: UILabel!

    override func viewDidLoad() {
        super.viewDidLoad()
        // Do any additional setup after loading the view.
    }


    @IBAction func calcButtonAction(_ sender: Any) {
        let doubleH = Double(heightTextField.text!)
        let doubleW = Double(heightTextField.text!)
        bmiLabel.text = calculation(height: doubleH!, weight: doubleW!)
    }

    func calculation(height: Double, weight: Double) -> String {
        let h = height / 100
        let w = weight
        var result = w / (h * h)
        result = floor(result * 10) / 10
        return result.description
    }
}
とりあえずここまで。
参考
https://www.youtube.com/watch?v=x8izf43bjHk
https://www.youtube.com/watch?v=3v4OIds-OOg