Nexus5を買ったのでAndroidのウィジェットを作ってみます.
初Androidのためかなりシンプルなサンプルを作ります.
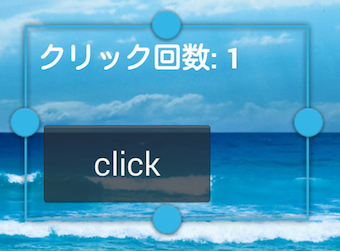
ボタンをクリックするとカウントアップするだけ...です.
Androidのウィジェットとは
ウィジェットはAndroidの特徴でホームに色々貼り付けることができる,iPhoneとの大きな差異の1つで,APIのLevel3(Android1.5)から使えているそうです.今はAPI Level19(Android4.4)だからかなり初期から利用できているものです.
ウィジェットは次の手順で作ることができます.
- ウィジェットの設定ファイル作成
- ウィジェットのレイアウト作成
- AppWidgetProviderのサブクラス作成
- BroadcastReceiverのサブクラス作成
- AndroidManifest修正
1. ウィジェットの設定ファイル作成
以下のようなXMLファイルを,ウィジェットの設定ファイルとして xml/demo_widget_provider.xml に定義します.
<?xml version="1.0" encoding="utf-8"?>
<appwidget-provider xmlns:android="http://schemas.android.com/apk/res/android"
    android:initialLayout="@layout/widget_layout"
    android:minHeight="146dp"
    android:minWidth="292dp"
    android:previewImage="@drawable/widget"
    android:updatePeriodMillis="1000000" >
</appwidget-provider>
- initialLayoutはレイアウトファイルを設定.
- previewImageに画像を設定すると,ウィジェットの追加画面でサムネイルが表示可能.
- updatePeriodMills属性は,ウィジェットの更新タイマを定義します.このタイマに従ってAppWidgetProviderはonUpdateコールバックメソッドで呼ばれる(と書いてありますが,このサンプルでは時間を短くしても動作しなかったです).
細かい点はガイドラインに記載されているようです.
2. ウィジェットのレイアウト作成
ウィジェットは他のアクティビティと同じようにレイアウトを作ることができるますが,制限があります.
レイアウトは以下4つのみが利用可能です.
- FrameLayout
- LinearLayout
- RelativeLayout
- GridLayout
ウィジェットのクラスは以下をサポートしています.
- AnalogClock
- Button
- Chronometer
- ImageButton
- ImageView
- ProgressBar
- TextView
- ViewFlipper
- ListView
- GridView
- StackView
- AdapterViewFlipper
今回のサンプルでは以下のようなテキストフィールドとボタンだけのものを作ります.
<?xml version="1.0" encoding="utf-8"?>
<RelativeLayout xmlns:android="http://schemas.android.com/apk/res/android"
    android:layout_width="fill_parent"
    android:layout_height="wrap_content"
    android:layout_margin="5sp"
    android:orientation="vertical" >

    <TextView
        android:id="@+id/title"
        android:layout_width="fill_parent"
        android:layout_height="wrap_content"
        android:maxLines="2"
        android:paddingBottom="5dp"
        android:textColor="#fcfcfc"
        android:textSize="16sp"
        android:textStyle="bold"
         />

    <Button
        android:id="@+id/button"
        android:layout_width="100dp"
        android:layout_height="50dp"
        android:layout_alignParentBottom="true"
        android:layout_alignParentLeft="true"
        android:text="click" />

</RelativeLayout>
3. AppWidgetProviderのサブクラス作成
ウィジェットをコントロールするため,AppWidgetProviderクラスを継承したクラスを追加します.
onUpdateメソッドが実行時に画面を変更するために使われます.
このクラスはウィジェットとのインターフェイスとなります.サンプルではonUpdateしか使っていませんが,ウィジェットの更新や有効・無効化・削除などのイベントを受けとることができるそうです.
public class MyWidgetProvider extends AppWidgetProvider {

	@Override
	public void onUpdate(Context context, AppWidgetManager appWidgetManager, int[] appWidgetIds) {
		// ウィジェットレイアウトの初期化
		RemoteViews remoteViews = new RemoteViews(context.getPackageName(),	R.layout.widget_layout);

		// ボタンイベントを登録
		remoteViews.setOnClickPendingIntent(R.id.button, clickButton(context));

		// テキストフィールドに"初期画面"と表示
		remoteViews.setTextViewText(R.id.title, "初期画面");

	    // アップデートメソッド呼び出し
		pushWidgetUpdate(context, remoteViews);
	}

	public static PendingIntent clickButton(Context context) {
		// クリック回数を増加
		MyWidgetIntentReceiver.clickCount ++;

		// initiate widget update request
		Intent intent = new Intent();
		intent.setAction("UPDATE_WIDGET");
		return PendingIntent.getBroadcast(context, 0, intent, PendingIntent.FLAG_UPDATE_CURRENT);
	}

	// アップデート
	public static void pushWidgetUpdate(Context context, RemoteViews remoteViews) {
		ComponentName myWidget = new ComponentName(context, MyWidgetProvider.class);
		AppWidgetManager manager = AppWidgetManager.getInstance(context);
		manager.updateAppWidget(myWidget, remoteViews);
	}
}
4. BroadcastReceiverのサブクラス作成
ボタンクリック時のアクションを実現するためにBroadcastReceiverを実装します.
ウィジェットのをonReceiveメソッドで実現します.
public class MyWidgetIntentReceiver extends BroadcastReceiver {
	public static int clickCount = 0;

	@Override
	public void onReceive(Context context, Intent intent) {
		if (intent.getAction().equals("UPDATE_WIDGET")) {
			RemoteViews remoteViews = new RemoteViews(context.getPackageName(), R.layout.widget_layout);

			// テキストをクリック回数を元に更新
			remoteViews.setTextViewText(R.id.title, "クリック回数: " + MyWidgetIntentReceiver.clickCount);

			// もう一回クリックイベントを登録(毎回登録しないと上手く動かず)
			remoteViews.setOnClickPendingIntent(R.id.button, MyWidgetProvider.clickButton(context));

			MyWidgetProvider.pushWidgetUpdate(context.getApplicationContext(), remoteViews);
		}
	}
}
5. Androidマニフェストにreceiverを登録する
最後に,マニフェストファイルを記載して,ウィジェットを登録します.
(demo_widget_providerは,1で定義したXMLファイルです.)
<?xml version="1.0" encoding="utf-8"?>
<manifest xmlns:android="http://schemas.android.com/apk/res/android"
    package="com.torua.hellowidget"
    android:versionCode="1"
    android:versionName="1.0" >

    <uses-sdk
        android:minSdkVersion="8"
        android:targetSdkVersion="18" />

    <application
        android:allowBackup="true"
        android:icon="@drawable/ic_launcher"
        android:label="@string/app_name"
        android:theme="@style/AppTheme" >
         <receiver android:name=".MyWidgetProvider" >
            <intent-filter>
                <action android:name="android.appwidget.action.APPWIDGET_UPDATE" />
            </intent-filter>

            <meta-data
                android:name="android.appwidget.provider"
                android:resource="@xml/demo_widget_provider" />
        </receiver>
        <receiver
            android:name=".MyWidgetIntentReceiver"
            android:label="@string/app_name" >
            <intent-filter>
                <action android:name="UPDATE_WIDGET" />
            </intent-filter>

            <meta-data
                android:name="android.appwidget.provider"
                android:resource="@xml/demo_widget_provider" />
        </receiver>
    </application>
</manifest>
動作の流れは以下の通りです.
- ウィジェット登録→MyWidgetProvier.onUpdate→描画
- ボタンクリック→インテント(UPDATE_WIDGET)→MyWidgetIntentReceiver.onReceive→描画