Dockerについて勉強した時のメモ。
Docker概要
Dockerとは?
コンピュータ上にコンテナと呼ばれる箱を作ってそこにOSや他のソフトを入れてあたかも違うコンピュータのように扱えるもの。
Dockerを使うと何がいいの?
コンテナ内で環境構築を行うので、他の人のPCでの環境、開発環境、テスト環境、本番環境全て同じ環境を簡単かつ便利に構築できる。
つまりDockerを使えばめんどくてしんどい環境構築のエラーに悩まされなくて済むということ!
Dockerの基本の流れ
DockerfileからDocker imageを作成し、Docker imageから各コンテナを作成するのが基本の流れ。
Dockerを使ってみる
今回はDocker Hubからdocker imageをpull(自分のPCに持ってくる)し、持ってきたdocker imageに変更を加えて、再度Docker Hubにリポジトリとして保存するということをやってみます。
Docker Hubからdocker imageをpullする
以下のURLからDocker Hubに登録しログインする。
https://hub.docker.com/
$ docker login
ログインできたらHost(自分のPC)にdocker imageをpullしていく
$ docker pull hello-world

Using default tag: latest
latest: Pulling from library/hello-world
2db29710123e: Pull complete
Digest: sha256:37a0b92b08d4919615c3ee023f7ddb068d12b8387475d64c622ac30f45c29c51
Status: Downloaded newer image for hello-world:latest
docker.io/library/hello-world:latest
Pull completeとあればpull成功。
$ docker images

REPOSITORY    TAG       IMAGE ID       CREATED       SIZE
hello-world   latest    feb5d9fea6a5   3 weeks ago   13.3kB
docker imagesコマンドでHostにあるimageのリストを確認できる。
docker imageからコンテナを作る
pullしてきたdocker imageからコンテナを起動する。
$ docker run hello-world

ello from Docker!
This message shows that your installation appears to be working correctly.

To generate this message, Docker took the following steps:
 1. The Docker client contacted the Docker daemon.
 2. The Docker daemon pulled the "hello-world" image from the Docker Hub.
    (amd64)
 3. The Docker daemon created a new container from that image which runs the
    executable that produces the output you are currently reading.
 4. The Docker daemon streamed that output to the Docker client, which sent it
    to your terminal.

To try something more ambitious, you can run an Ubuntu container with:
 $ docker run -it ubuntu bash

Share images, automate workflows, and more with a free Docker ID:
 https://hub.docker.com/

For more examples and ideas, visit:
 https://docs.docker.com/get-started/
runコマンドを使うことでdocker imageからコンテナを作成できる。
ちなみに出力されているのはdocker imageであるhello-worldのデフォルトコマンド。
$ docker ps
$ docker ps -a

CONTAINER ID   IMAGE         COMMAND    CREATED         STATUS                     PORTS     NAMES
6d4f7a8029be   hello-world   "/hello"   4 minutes ago   Exited (0) 4 minutes ago             dazzling_gagarin
docker psコマンドでコンテナを見ることができる。
psはactiveなコンテナps -aは全てのコンテナを見ることができる。
ちなみにpsはProcess Statusの略。
今回の場合hello-worldはexit状態にあるのでdocker ps -aで確認できる。
ここまでの流れを図でまとめるとこんな感じ。

docker imageをrunするとコンテナがcreateされコンテナ内設定されているプログラムをexcute(実行)しexitするというのがコンテナが作られる流れ。
ubuntuのdocker imageをrunする
hello-worldをrunした時に出力されていたコマンドを実行してみる。
$ docker run -it ubuntu bash
-itはオプションubuntuはLinux派生のOSでbashの部分はコンテナ起動時に実行するプログラムを指定している。
実際に実行してみる。
$ docker run -it ubuntu bash

Unable to find image 'ubuntu:latest' locally
latest: Pulling from library/ubuntu
f3ef4ff62e0d: Pull complete
Digest: sha256:a0d9e826ab87bd665cfc640598a871b748b4b70a01a4f3d174d4fb02adad07a9
Status: Downloaded newer image for ubuntu:latest
root@8650a53129ac:/#
今の状態は、ubuntuをdocker hubからpullしてきてubuntu内のプログラムであるbashを起動してコンテナの中にいる状態。
ここにtestというファイルを作成してコンテナを更新し更新できたらexitします。
root@8650a53129ac:/# touch test
root@8650a53129ac:/# ls
bin  boot  dev  etc  home  lib  lib32  lib64  libx32  media  mnt  opt  proc  root  run  sbin  srv  sys  test  tmp  usr  var

root@8650a53129ac:/# exit
exit
exitとdetach
コンテナをexitして抜けるとコンテナのstatusはexitになります。
$ docker ps -a
CONTAINER ID   IMAGE         COMMAND    CREATED       STATUS                     PORTS     NAMES
8650a53129ac   ubuntu        "bash"     2 hours ago   Exited (0) 3 minutes ago             kind_shannon
detachを使うことでexit状態にしないで抜けることができます。
そもそもexitというのはいままで動いていたプロセスを切ってコンテナから抜けます。
逆にdetachはプロセスを残したまま抜けることができます。
実際に見てみましょう。
先ほどexitして抜けたコンテナに再度入ります。
そのためにまずコンテナをrestartさせます。コンテナの指定はIDを使って指定しています。
$ docker restart 8650a53129ac
Upになっていることを確認します。
$ docker ps -a
CONTAINER ID   IMAGE         COMMAND    CREATED       STATUS                   PORTS     NAMES
8650a53129ac   ubuntu        "bash"     2 hours ago   Up 13 seconds                      kind_shannon
コンテナに再度入るためのコマンドはexecを使います。
$ docker exec -it <container> bash
コンテナ名を指定して実際に実行してみます。
$ docker exec -it 8650a53129ac bash
root@8650a53129ac:/# ls
bin  boot  dev  etc  home  lib  lib32  lib64  libx32  media  mnt  opt  proc  root  run  sbin  srv  sys  test  tmp  usr  var
コンテナに入ることができ、先ほど作ったtestファイルもちゃんとあります。
ここで前回はexitで抜けましたが今回はdetachで抜けます。
detachで抜ける方法はctrl+p+qで抜けることができます。
実際に抜けてコンテナのstatusを確認します。
root@8650a53129ac:/# read escape sequence
$ docker ps -a
CONTAINER ID   IMAGE         COMMAND    CREATED       STATUS                   PORTS     NAMES
8650a53129ac   ubuntu        "bash"     2 hours ago   Up 9 minutes                       kind_shannon
Up状態のまま抜けることができました。
基本はexitで抜けることが多いらしいです。
こういうやり方もあるのだと今の段階では覚えておけばいいと思います。
docker commit
testというファイルを追加したdocker imageを元のdocker imageにcommitして更新していきます。
commitのコマンド
$ docker commit <container> <new image>
実際に動かしてみます。
:でimageにタグをつけることができます。
$ docker commit 8650a53129ac ubuntu:updated

sha256:6f8a0c2aee370356b0ef80aee365575901c90684a8ca303619eeb1b8069481ff
$ docker images
REPOSITORY    TAG       IMAGE ID       CREATED         SIZE
ubuntu        updated   6f8a0c2aee37   2 minutes ago   72.8MB
ubuntu        latest    597ce1600cf4   2 weeks ago     72.8MB
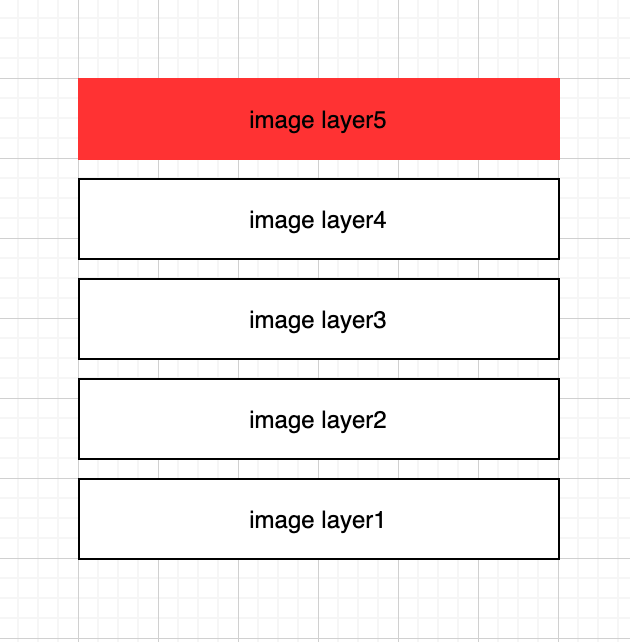
docker imageはlayer構造になっていて、既存のimageに新しく何かを追加すると、新しいlayerとして追加されます。
今回の場合だとtestファイルを作成したというlayerが追加され、新しいdocker imageがcommitによって反映されたということです。
Docker Hubにリポジトリ作成
作成したdocker imageをDocker Hubに上げていきます。
まずはDocker Hubにリポジトリを追加します。
右上にある青いボタンのCreate Repositoryを押してリポジトリを作成します。
今回リポジトリ名はmy-first-repoとしています。

Docker Hubにpushする
Docker Hubにpushする前に現在のimage名をDocker Hubのリポジトリ名に合わせます。
tagコマンドを使うことで変更できます。
$ docker tag <今の名前> <更新する名前>
今回の場合は以下のように書きdocker imagesで名前が変わっているか確認します。
$ docker tag ubuntu:updated <username>/my-first-repo
$ docker images
REPOSITORY               TAG       IMAGE ID       CREATED          SIZE
aaaasahi/my-first-repo   latest    6f8a0c2aee37   39 minutes ago   72.8MB
新しく設定したimageができてることが確認できます。
最後にDocker Hubにpushしていきます。
$ docker push aaaasahi/my-first-repo
pushの際に実際にpushされるのは追加したlayerだけです(図で見るとlayer5の部分)
残りのlayer1〜4はもともとDocker Hubに存在するのでわざわざpushする必要がなく容量の節約になるわけです。

最後に必要ないdocker imageはrmiコマンドで削除できます。
$ docker rmi <image>
参考
