Numpyで画像(2次元配列)の畳み込み演算を実装してみます。
コードは以下のようになります。
import numpy as np

def _convolve2d(image, kernel):
  shape = (image.shape[0] - kernel.shape[0] + 1, image.shape[1] - kernel.shape[1] + 1) + kernel.shape
  strides = image.strides * 2
  strided_image = np.lib.stride_tricks.as_strided(image, shape, strides)
  return np.einsum('kl,ijkl->ij', kernel, strided_image)

def _convolve2d_multichannel(image, kernel):
  convolved_image = np.empty((image.shape[0] - kernel.shape[0] + 1, image.shape[1] - kernel.shape[1] + 1, image.shape[2]))
  for i in range(image.shape[2]):
    convolved_image[:,:,i] = _convolve2d(image[:,:,i], kernel)
  return convolved_image

def _pad_singlechannel_image(image, kernel_shape, boundary):
  return np.pad(image, ((int(kernel_shape[0] / 2),), (int(kernel_shape[1] / 2),)), boundary)

def _pad_multichannel_image(image, kernel_shape, boundary):
  return  np.pad(image, ((int(kernel_shape[0] / 2),), (int(kernel_shape[1] / 2),), (0,)), boundary)

def convolve2d(image, kernel, boundary='edge'):
  if image.ndim == 2:
    pad_image = _pad_singlechannel_image(image, kernel.shape, boundary) if boundary is not None else image
    return _convolve2d(pad_image, kernel)
  elif image.ndim == 3:
    pad_image = _pad_multichannel_image(image, kernel.shape, boundary) if boundary is not None else image
    return _convolve2d_multichannel(pad_image, kernel)
シングルチャネルの場合で解説します。
例として、以下のようなshapeが(4, 4)の画像配列imageで考えます。
\begin{bmatrix}
0 & 1 & 2 & 3 \\
4 & 5 & 6 & 7 \\
8 & 9 & 10 & 11 \\
12 & 13 & 14 & 15 \\
\end{bmatrix}
画像配列imageのshapeが(H, W)でカーネルkernelのshapeが(2N+1, 2M+1)のときに畳み込み演算を行うと、畳み込み後の配列のshapeは(H-2N, W-2M)になります。畳み込み後の配列が元の画像配列と同じshapeとなるように、0軸目の両端Nだけ、1軸目の両端をMだけ拡張します。
カーネルkernelのshapeが(3, 3)だとして、先の画像配列imageをboundary='edge'で拡張したpad_imageは次のようになります。
\begin{bmatrix}
0 & 0 & 1 & 2 & 3 & 3 \\
0 & 0 & 1 & 2 & 3 & 3 \\
4 & 4 & 5 & 6 & 7 & 7 \\
8 & 8 & 9 & 10 & 11 & 11 \\
12 & 12 & 13 & 14 & 15 & 15 \\
12 & 12 & 13 & 14 & 15 & 15 \\
\end{bmatrix}
この拡張した画像配列からnp.lib.stride_tricks.as_stridedを用いてカーネルkernelのshapeと同じ大きさのウィンドウをスライドさせたような配列を作成します。先の例の場合、_convolve2d内のstrided_imageは以下のようになります。
\begin{bmatrix}
\begin{bmatrix}
0 & 0 & 1 \\
0 & 0 & 1 \\
4 & 4 & 5 \\
\end{bmatrix}
&
\begin{bmatrix}
0 & 1 & 2 \\
0 & 1 & 2 \\
4 & 5 & 6 \\
\end{bmatrix}
&
\begin{bmatrix}
1 & 2 & 3 \\
1 & 2 & 3 \\
5 & 6 & 7 \\
\end{bmatrix}
&
\begin{bmatrix}
2 & 3 & 3 \\
2 & 3 & 3 \\
6 & 7 & 7 \\
\end{bmatrix}
\\
\begin{bmatrix}
0 & 0 & 1 \\
4 & 4 & 5 \\
8 & 8 & 9 \\
\end{bmatrix}
&
\begin{bmatrix}
0 & 1 & 2 \\
4 & 5 & 6 \\
8 & 9 & 10 \\
\end{bmatrix}
&
\begin{bmatrix}
1 & 2 & 3 \\
5 & 6 & 7 \\
9 & 10 & 11 \\
\end{bmatrix}
&
\begin{bmatrix}
2 & 3 & 3 \\
6 & 7 & 7 \\
10 & 11 & 11 \\
\end{bmatrix}
\\
\begin{bmatrix}
4 & 4 & 5 \\
8 & 8 & 9 \\
12 & 12 & 13 \\
\end{bmatrix}
&
\begin{bmatrix}
4 & 5 & 6 \\
8 & 9 & 10 \\
12 & 13 & 14 \\
\end{bmatrix}
&
\begin{bmatrix}
5 & 6 & 7 \\
9 & 10 & 11 \\
13 & 14 & 15 \\
\end{bmatrix}
&
\begin{bmatrix}
6 & 7 & 7 \\
10 & 11 & 11 \\
14 & 15 & 15 \\
\end{bmatrix}
\\
\begin{bmatrix}
8 & 8 & 9 \\
12 & 12 & 13 \\
12 & 12 & 13 \\
\end{bmatrix}
&
\begin{bmatrix}
8 & 9 & 10 \\
12 & 13 & 14 \\
12 & 13 & 14 \\
\end{bmatrix}
&
\begin{bmatrix}
9 & 10 & 11 \\
13 & 14 & 15 \\
13 & 14 & 15 \\
\end{bmatrix}
&
\begin{bmatrix}
10 & 11 & 11 \\
14 & 15 & 15 \\
14 & 15 & 15 \\
\end{bmatrix}
\\

\end{bmatrix}
最後にnp.einsumを用いて各ウィンドウごとにカーネルkernelとの積和を求めることで畳み込みを行います。
実装したconvolve2dを用いていくつか畳み込みを行ってみます。
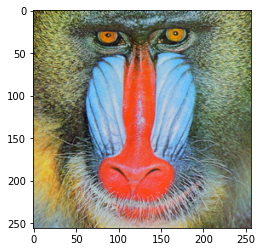
まず、画像を読み込みます。
import numpy as np
import matplotlib.pyplot as plt

original_image = plt.imread(image_name)
if np.issubdtype(original_image.dtype, np.integer):
  original_image = original_image / np.iinfo(original_image.dtype).max
plt.imshow(original_image)
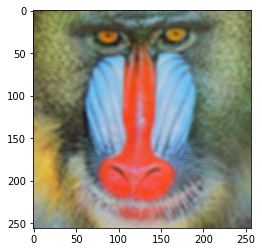
3x3の平均化フィルターを適用してみます。
def create_averaging_kernel(size):
  return np.full(size, 1 / (size[0] * size[1]))

averaging3x3_kernel = create_averaging_kernel((3, 3))
averaging3x3_image = convolve2d(original_image, averaging3x3_kernel)
plt.imshow(averaging3x3_image)

5x5の平均化フィルターを適用してみます。
averaging5x5_kernel = create_averaging_kernel((5, 5))
averaging5x5_image = convolve2d(original_image, averaging5x5_kernel)
plt.imshow(averaging5x5_image)
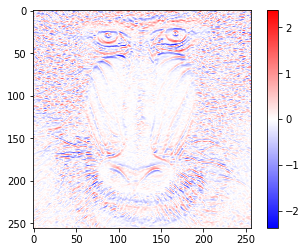
横方向のエッジを検出するSobelフィルターを適用してみます。
gray_image = 0.2116 * original_image[:,:,0] + 0.7152 * original_image[:,:,1] + 0.0722 * original_image[:,:,2]

sobel_h_kernel = np.array(([[1, 2, 1],
                            [0, 0, 0],
                            [-1, -2, -1]]))
sobel_h_image = convolve2d(gray_image, sobel_h_kernel)
value_range = max(abs(sobel_h_image.min()), abs(sobel_h_image.max()))
plt.imshow(sobel_h_image, cmap='bwr', vmin=-value_range, vmax=value_range)
plt.colorbar()
今回実装したコードはGoogle Colabratoryにも置いておきました