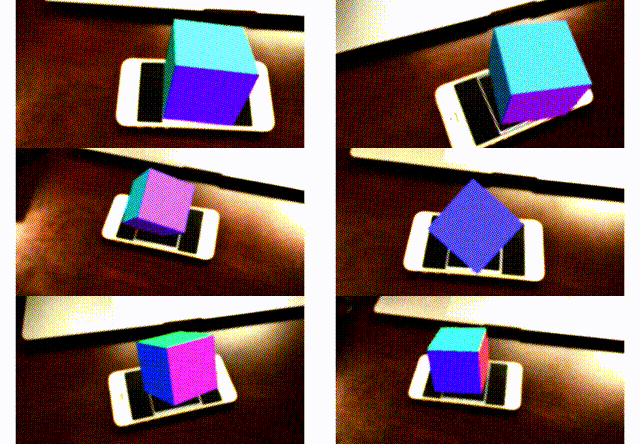
AR.jsとthree.jsでAR表示した3Dオブジェクトにカメラから取得した映像も含めて、ポストプロセスをかけてみたいと思います。
AR.jsとthree.jsでMarker Based ARを行う方法については以前の記事で書きました。この記事で書いたようにAR.jsではvideoHTML要素でカメラから取得した映像を表示し、その上にcanvasHTML要素を重ねてAR表示を実現しています。そのためカメラ映像も含めてポストプロセスをかけるためには、カメラ映像をthree.js側に持ってくる必要があります。
サンプルコードは以下のようになっています。以下のようにARでキューブを表示した後に、グリッチ系のエフェクトをかけています。前回と同じようにdataというディレクトリを作成して、その中にcamera_para.datとpatt.hiroを配置する必要があります。

<!DOCTYPE html>
<html>
  <head>
    <meta name="viewport" content="width=device-width, user-scalable=no, minimum-scale=1.0, maximum-scale=1.0">
    <title>Post-processing with AR.js and Three.js</title>
    <script src="https://cdnjs.cloudflare.com/ajax/libs/three.js/r110/three.min.js"></script>
    <script src="https://unpkg.com/three@0.110.0/examples/js/postprocessing/EffectComposer.js"></script>
    <script src="https://unpkg.com/three@0.110.0/examples/js/postprocessing/ShaderPass.js"></script>
    <script src="https://unpkg.com/three@0.110.0/examples/js/postprocessing/RenderPass.js"></script>
    <script src="https://unpkg.com/three@0.110.0/examples/js/postprocessing/GlitchPass.js"></script>
    <script src="https://unpkg.com/three@0.110.0/examples/js/postprocessing/HalftonePass.js"></script>
    <script src="https://unpkg.com/three@0.110.0/examples/js/shaders/CopyShader.js"></script>
    <script src="https://unpkg.com/three@0.110.0/examples/js/shaders/DigitalGlitch.js"></script>
    <script src="https://unpkg.com/three@0.110.0/examples/js/shaders/HalftoneShader.js"></script>
    <script src="https://raw.githack.com/AR-js-org/AR.js/3.1.0/three.js/build/ar.js"></script>
  </head>
  <body style='margin: 0px; overflow: hidden;'>
    <script>
      const renderer = new THREE.WebGLRenderer({
        antialias: true,
        alpha: true
      });
      renderer.setClearColor(new THREE.Color(), 0);
      renderer.setSize(640, 480);
      renderer.domElement.style.position = 'absolute';
      renderer.domElement.style.top = '0px';
      renderer.domElement.style.left = '0px';
      document.body.appendChild(renderer.domElement);

      const scene = new THREE.Scene();
      const camera = new THREE.Camera();
      scene.add(camera);

      const arToolkitSource = new THREEx.ArToolkitSource({
        sourceType: 'webcam'
      });

      let cameraPlane;
      arToolkitSource.init(() => {
        setTimeout(() => {
          onResize();
        }, 2000);

        const video = document.querySelector('video');
        const videoTexture = new THREE.VideoTexture(video);
        videoTexture.minFilter = THREE.LinearFilter;
        videoTexture.magFilter = THREE.LinearFilter;
        videoTexture.format = THREE.RGBFormat;

        cameraPlane = new THREE.Mesh(
          new THREE.PlaneBufferGeometry(2, 2),
          new THREE.RawShaderMaterial({
            uniforms: {
              videoTexture: {value: videoTexture},
              videoScale: {value: 1.0},
            },
            vertexShader: `
              precision highp float;

              attribute vec3 position;
              attribute vec2 uv;

              varying vec2 v_uv;

              uniform float videoScale;

              void main() {
                v_uv = uv;
                gl_Position = vec4(position.x * videoScale, position.y, position.z, 1.0);
              }
            `,
            fragmentShader: `
              precision highp float;

              varying vec2 v_uv;

              uniform sampler2D videoTexture;

              void main() {
                gl_FragColor = vec4(texture2D(videoTexture, vec2(v_uv.x, v_uv.y)).rgb, 1.0);
              }
            `,
            depthTest: false,
            depthWrite: false,
          })
        );
        cameraPlane.renderOrder = -1;
        cameraPlane.frustumCulled = false;
        scene.add(cameraPlane);
      });

      addEventListener('resize', () => {
        onResize();
      });

      function onResize() {
        arToolkitSource.onResizeElement();
        arToolkitSource.copyElementSizeTo(renderer.domElement);
        if (arToolkitContext.arController !== null) {
          arToolkitSource.copyElementSizeTo(arToolkitContext.arController.canvas);
        }
        const video = document.querySelector('video');
        if (video !== null) {
          cameraPlane.material.uniforms.videoScale.value = (video.videoWidth / video.videoHeight) / 1.33333;
        }
      };

      const arToolkitContext = new THREEx.ArToolkitContext({
        cameraParametersUrl: 'data/camera_para.dat',
        detectionMode: 'mono'
      });

      arToolkitContext.init(() => {
        camera.projectionMatrix.copy(arToolkitContext.getProjectionMatrix());
      });

      const marker = new THREE.Group();
      scene.add(marker);

      const arMarkerControls = new THREEx.ArMarkerControls(arToolkitContext, marker, {
        type: 'pattern',
        patternUrl: 'data/patt.hiro',
        changeMatrixMode: 'modelViewMatrix'
      });

      const cube = new THREE.Mesh(
        new THREE.CubeGeometry(1, 1, 1),
        new THREE.MeshNormalMaterial(),
      );
      cube.position.y = 1.0;
      marker.add(cube);

      const composer = new THREE.EffectComposer(renderer);
      const renderpass = new THREE.RenderPass(scene, camera);
      composer.addPass(renderpass);
      composer.addPass(new THREE.GlitchPass());
      composer.addPass(new THREE.HalftonePass());

      const clock = new THREE.Clock();
      requestAnimationFrame(function animate(){
        requestAnimationFrame(animate);
        if (arToolkitSource.ready) {
          arToolkitContext.update(arToolkitSource.domElement);
        }
        const delta = clock.getDelta();
        cube.rotation.x += delta * 1.0;
        cube.rotation.y += delta * 1.5;
        composer.render();
      });
    </script>
  </body>
</html>
基本的には以前の記事をベースにしているので、ポストプロセスに関わる部分だけを解説します。
まず、カメラ映像をthree.jsに持ってくる箇所です。video要素はAR.jsにより作られます。ArToolkitSource.initの第一引数は準備ができたときに実行されるコールバックなので、ここで処理を行います。three.jsにはTHREE.VideoTextureという映像をテクスチャにできる機能があるので、これを画面全体を覆う平面メッシュに適用することでカメラ映像を背景にします。シェーダーで背景を作る方法については過去の記事に書いたので参考にしてください。canvasのアスペクト比は4:3ですが、カメラから取得した映像は必ずしも4:3ではないので、シェーダー内のvideoScaleで調整しています。
let cameraPlane;
arToolkitSource.init(() => {
  ...
  const video = document.querySelector('video');
  const videoTexture = new THREE.VideoTexture(video);
  videoTexture.minFilter = THREE.LinearFilter;
  videoTexture.magFilter = THREE.LinearFilter;
  videoTexture.format = THREE.RGBFormat;

  cameraPlane = new THREE.Mesh(
    new THREE.PlaneBufferGeometry(2, 2),
    new THREE.RawShaderMaterial({
      uniforms: {
        videoTexture: {value: videoTexture},
        videoScale: {value: 1.0},
      },
      vertexShader: `
        precision highp float;

        attribute vec3 position;
        attribute vec2 uv;

        varying vec2 v_uv;

        uniform float videoScale;

        void main() {
          v_uv = uv;
          gl_Position = vec4(position.x * videoScale, position.y, position.z, 1.0);
        }
      `,
      fragmentShader: `
        precision highp float;

        varying vec2 v_uv;

        uniform sampler2D videoTexture;

        void main() {
          gl_FragColor = vec4(texture2D(videoTexture, vec2(v_uv.x, v_uv.y)).rgb, 1.0);
        }
      `,
      depthTest: false,
      depthWrite: false,
    })
  );
  cameraPlane.renderOrder = -1;
  cameraPlane.frustumCulled = false;
  scene.add(cameraPlane);
});
個人的な検証ではデバイスを回転させたときにカメラ映像のアスペクト比が変化することを確認したので、リサイズに合わせて先述したvideoScaleの値も変更しています。
function onResize() {
  arToolkitSource.onResizeElement();
  arToolkitSource.copyElementSizeTo(renderer.domElement);
  if (arToolkitContext.arController !== null) {
    arToolkitSource.copyElementSizeTo(arToolkitContext.arController.canvas);
  }
  const video = document.querySelector('video');
  if (video !== null) {
    cameraPlane.material.uniforms.videoScale.value = (video.videoWidth / video.videoHeight) / 1.33333;
  }
};
ここまでで、three.js側にカメラの映像を持ってこれたので、通常通りのやり方でポストプロセスをかけます。ここでは、グリッチとハーフトーンのポストプロセスをかけています。
const composer = new THREE.EffectComposer(renderer);
const renderpass = new THREE.RenderPass(scene, camera);
composer.addPass(renderpass);
composer.addPass(new THREE.GlitchPass());
composer.addPass(new THREE.HalftonePass());
...
requestAnimationFrame(function animate(){
  ...
  composer.render();
});
AR.jsとthree.jsの組み合わせでポストプロセスをかける方法について解説しました。video要素をthree.jsに持ってくるなど、少しトリッキーな感じになっています。カメラの映像が4:3でないときにアスペクト比を合わせる処理の部分が若干怪しいので、各自で検証していただければと思います。
追記
window.resizeイベント時にビデオのアスペクト比をもとにシェーダーのvideoScaleプロパティを設定していますが、このイベントの段階ではビデオのアスペクト比が更新されていない場合があるようです。以下のように、videoタグのresizeイベントでvideoScaleプロパティを設定したほうがよさそうです。
arToolkitSource.init(() => {
  ...
  video.addEventListener('resize', () => {
    videoPlane.material.uniforms.videoScale.value = (video.videoWidth / video.videoHeight) / 1.33333;
  });
});
参考: javascript - Detecting video resolution changes - Stack Overflow