はじめに
私が通っている大学のすぐ近くには東京ドームがあり,コロナ禍に入る前はライブ帰りの客で駅や電車がやたら混むということがよくありました.
今年に入ってからイベントが再開されてきていることもあり,またこういったことが起こる気がしたので,予めイベント情報を知れる仕組みを作りたいと思いました.
使用した技術
- Go
- goquery
- Serverless Framework
- AWS Lambda
- Github Actions
プロジェクトの作成
予め作成したディレクトリに移動した上で,以下を実行します.
$ sls create -t aws-go-mod
そうすると,最低限動くServerless Frameworkのプロジェクトが作成されます.
もしServerless Frameworkをインストールしていない場合は,以下のコマンドでインストールしましょう.(Node.jsが必要)
$ npm i -g serverless
or
$ yarn add global serverless
実装
初期のファイル構成
./tokyo-dome-event-notifier
├── Makefile
├── gomod.sh
├── hello
│   └── main.go
├── serverless.yml
└── world
    └── main.go
最初はこうなっているはずです.
今回は,worldを削除したうえで,helloをhandlerに改名しましょう.
serverless.yml
以下のように編集します.
service: tokyo-dome-event-notifier

frameworkVersion: '3'

useDotenv: true

provider:
  name: aws
  runtime: go1.x
  lambdaHashingVersion: 20201221
  stage: prod
  region: ap-northeast-1

package:
  patterns:
    - '!./**'
    - ./bin/**

functions:
  notify:
    handler: bin/handler
    memorySize: 128
    events:
      - schedule: cron(0 21 * * ? *)
    environment:
      SLACK_WEBHOOK_URL: ${env:SLACK_WEBHOOK_URL}
scraper
スクレイピングを実行するコードの実装をします.
まず,scraperという名前のディレクトリを作成し,その中にscraper.goを作成します.
$ midir scraper
$ touch scraper.go
goqueryのインストール
スクレイピング処理にはgoqueryを用います.以下のコマンドでインストールしましょう.
$ go get github.com/PuerkitoBio/goquery
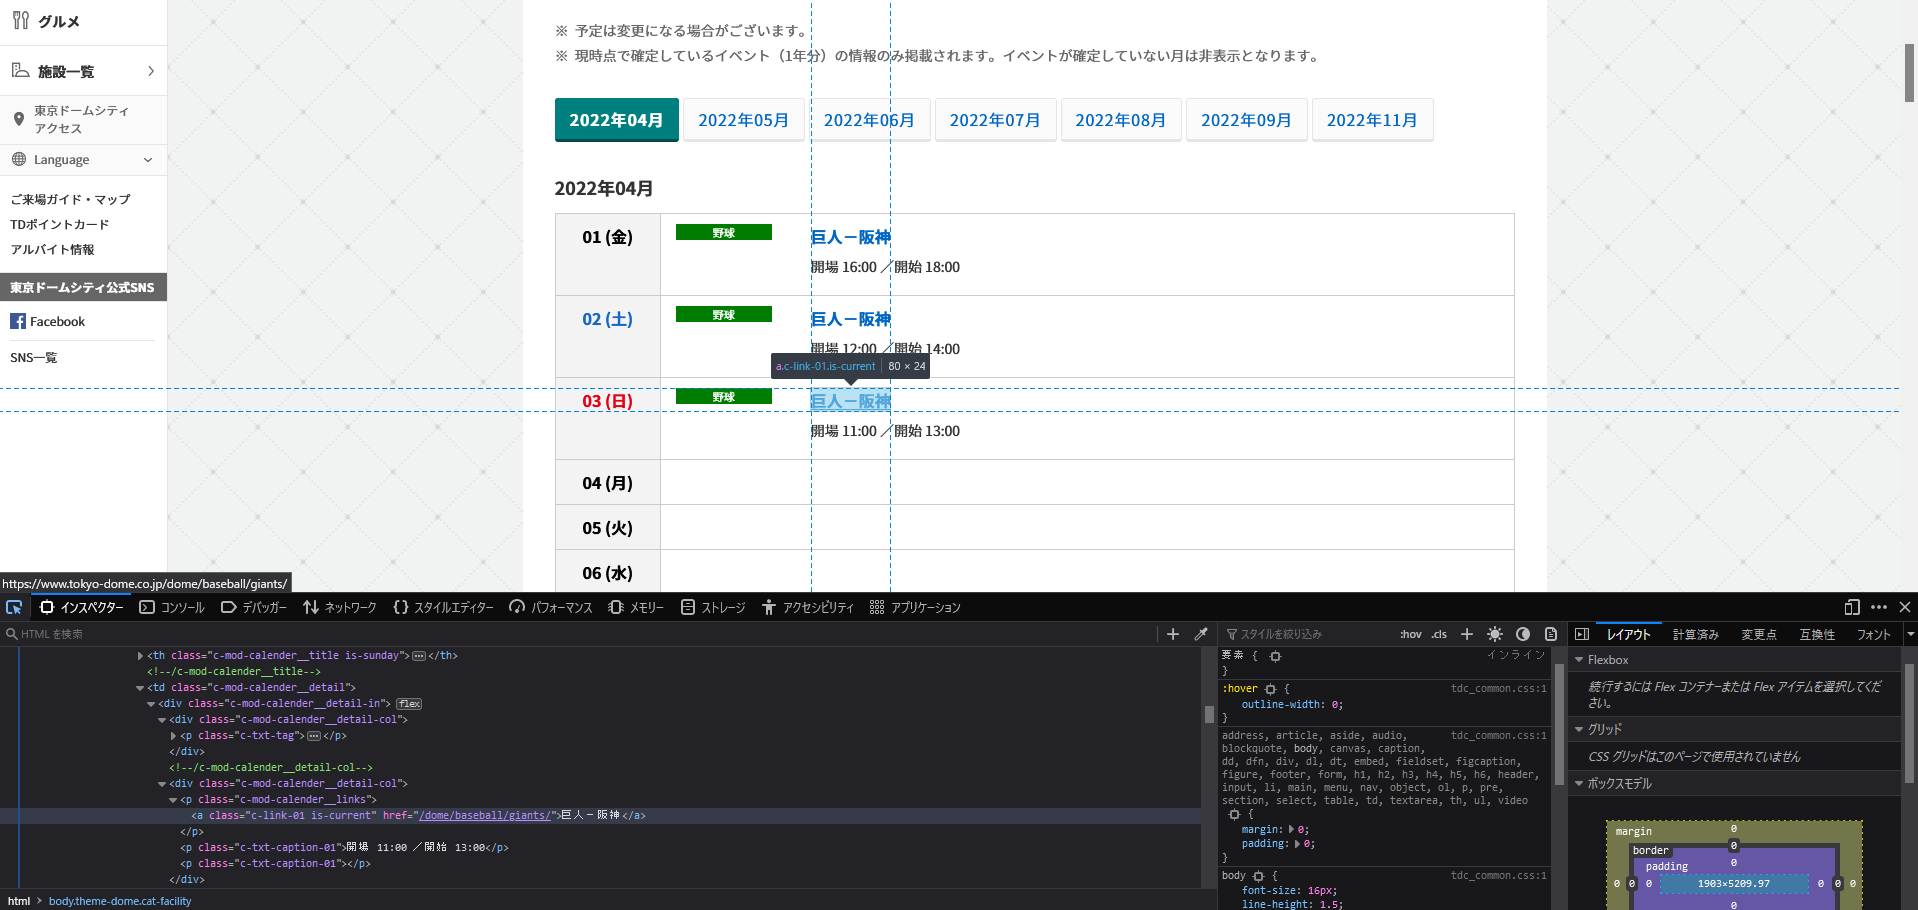
スクレイピング対象のセレクタを調べる
以下のサイトから情報を取得します.
https://www.tokyo-dome.co.jp/dome/event/schedule.html
ブラウザを開いた状態でF12を押すとインスペクターが表示されるので,これを用いてセレクタを調べましょう.

実装例
package scraper

import (
	"fmt"
	"net/http"
	"strconv"
	"time"

	"github.com/PuerkitoBio/goquery"
)

func FetchTodayEvent() string {
	jst, _ := time.LoadLocation("Asia/Tokyo")

	res, err := http.Get("https://www.tokyo-dome.co.jp/dome/event/schedule.html")

	if err != nil {
		fmt.Println("Failed to scrape")
		panic(err)
	}
	defer res.Body.Close()

	doc, _ := goquery.NewDocumentFromReader(res.Body)

	selector := "div.c-mod-tab__body:nth-child(2) > table > tbody"
	innerSelector := "tr.c-mod-calender__item"
	dateSelector := "th > span:nth-child(1)"
	categorySelector := "td:nth-child(2) > div > div:nth-child(1) > p > span"
	titleSelector := "td > div > div:nth-child(2) > p.c-mod-calender__links"
	timeSelector := "td > div > div:nth-child(2) > p:nth-child(2)"

	selection := doc.Find(selector)

	var event string
	selection.Find(innerSelector).Each(func(index int, s *goquery.Selection) {
		date, _ := strconv.Atoi(s.Find(dateSelector).Text())
		category := s.Find(categorySelector).Text()
		title := s.Find(titleSelector).Text()
		info := s.Find(timeSelector).Text()

		if date == time.Now().In(jst).Day() {
			if title == "" {
				event = "イベントなし"
			} else {
				event = title + "(" + category + ")" + "\n" + info
			}
		}
	})
	return event
}
slack/slack.go
先ほど同様,ディレクトリとファイルを作成しましょう.
$ mkdir slack
$ touch slack.go
今回はWebhookを用いて通知を送信します.(URL取得方法は後述)
APIを叩くだけなので,追加のライブラリを入れる必要はありません.
実装例
package slack

import (
	"bytes"
	"fmt"
	"net/http"
	"os"
	"strings"
	"time"
)

func SendEventInfo(text string) {
    jst, _ := time.LoadLocation("Asia/Tokyo")
	t := time.Now().In(jst)
	weekdayja := strings.NewReplacer(
		"Sun", "日",
		"Mon", "月",
		"Tue", "火",
		"Wed", "水",
		"Thu", "木",
		"Fri", "金",
		"Sat", "土",
	)
	date := weekdayja.Replace(t.Format("2006年1月2日(Mon曜日)"))

	url := os.Getenv("SLACK_WEBHOOK_URL")
	body := fmt.Sprintf(`{
		"text": "%sのイベント情報",
		"blocks": [
			{
				"type": "header",
				"text": {
					"type": "plain_text",
					"text": "%sのイベント情報"
				}
			},
			{
				"type": "divider"
			},
			{
				"type": "section",
				"text": {
					"type": "plain_text",
					"text": "%s",
					"emoji": true
				}
			}
		]
	}`, date, date, text)

	req, err := http.NewRequest("POST", url, bytes.NewBuffer([]byte(body)))
	req.Header.Set("Content-Type", "application/json")

	if err != nil {
		panic(err)
	}

	client := new(http.Client)
	res, err := client.Do(req)

	if err != nil {
		panic(err)
	}
	defer res.Body.Close()
}
handler/main.go
最初の段階では依存ライブラリが不足しているはずです.以下のコマンドでインストールしましょう.
$ go get github.com/aws/aws-lambda-go/events
$ go get github.com/aws/aws-lambda-go/lambda
main.goを以下のように編集しましょう.
package main

import (
	"bytes"
	"context"
	"encoding/json"
	"fmt"

	"github.com/aws/aws-lambda-go/events"
	"github.com/aws/aws-lambda-go/lambda"
	"github.com/tokyo-dome-event-notifier/scraper"
	"github.com/tokyo-dome-event-notifier/slack"
)

// Response is of type APIGatewayProxyResponse since we're leveraging the
// AWS Lambda Proxy Request functionality (default behavior)
//
// https://serverless.com/framework/docs/providers/aws/events/apigateway/#lambda-proxy-integration
type Response events.APIGatewayProxyResponse

// Handler is our lambda handler invoked by the `lambda.Start` function call
func Handler(ctx context.Context) (Response, error) {
	event := scraper.FetchTodayEvent()
	fmt.Println(event)

	slack.SendEventInfo(event)

	var buf bytes.Buffer

	body, err := json.Marshal(map[string]interface{}{
		"message": "Go Serverless v1.0! Your function executed successfully!",
	})
	if err != nil {
		return Response{StatusCode: 404}, err
	}
	json.HTMLEscape(&buf, body)

	resp := Response{
		StatusCode:      200,
		IsBase64Encoded: false,
		Body:            buf.String(),
		Headers: map[string]string{
			"Content-Type":           "application/json",
			"X-MyCompany-Func-Reply": "hello-handler",
		},
	}

	return resp, nil
}

func main() {
	lambda.Start(Handler)
}
今回はAPIとして使うことは想定していないため,Handler関数の最初の部分にちょっと付け足すだけでOKです.
Slackの設定
アプリケーション作成方法はこちらが参考になると思います.
https://api.slack.com/authentication/basics
以下,アプリケーション作成は行っているものとします.
Webhookの設定
Features > Incoming Webhookをクリックし,Add New Webhook to Workspaceと書かれたボタンを押します.
チャンネルを指定し,表示されたURLを安全な場所に控えておきます.
URLを環境変数に設定
.envを作成し,内容を以下のようにします.
SLACK_WEBHOOK_URL=<控えたURL>
一旦ローカル上で動かしてみる
Goはコンパイラ型言語なので,予めビルドする必要があります.
$ make build
ビルド出来たら,以下のコマンドで実行します.
$ sls invoke local -f notify
Github Actionsの設定
.github/actions/配下に,ymlファイルを作成しましょう.名前は何でもよいです.
今回は,deploy.ymlとしました.
実装例
name: Deploy

on:
  push:
    branches: [ master ]

jobs:

  build:
    runs-on: ubuntu-latest
    env:
      SLACK_WEBHOOK_URL: ${{ secrets.SLACK_WEBHOOK_URL }}
    steps:
    - uses: actions/checkout@v3

    - name: Set up Go
      uses: actions/setup-go@v3
      with:
        go-version: 1.17

    - name: Build
      run: make build

    - name: Serverless deploy
      uses: serverless/github-action@v3
      with:
        args: deploy
      env:
        AWS_ACCESS_KEY_ID: ${{ secrets.AWS_ACCESS_KEY_ID }}
        AWS_SECRET_ACCESS_KEY: ${{ secrets.AWS_SECRET_ACCESS_KEY }}
AWS_ACCESS_KEY_ID,AWS_SECRET_ACCESS_KEYは予め取得しておきましょう.
Secretsに,その2つと,SLACK_WEBHOOK_URLを設定しておきます.
あとはpushさえすれば,デプロイされているはずです!
リポジトリ
