前置き
componentの内容を、ページによって変えたいってこと、ありますよね?
親によって文字を変えたり、
buttonの色を変えたりできたら…!
そんな時に超便利なprops!
これを使えれば、効率よく表現の幅を広げることができます😄
Vue.jsも同様に使えます。
応用編ではオプションの使い方、cssの付け替えをやっていく予定です。
propsって?メリットは?
propsは超簡単に説明すると、
親から子に自由にデータを渡せるものです。
は?と思った方、まずは超簡単な例を見てみましょう!
今回は分かりやすくテキストを表示させます。
スタイリングは省きますが
複雑なcssをあてていたら、何度も書くのが面倒ですよね。
cssを使いまわしてテキストだけ変えたい!
ということにしましょう。
【表示結果】

【コード】
Component.vue // 子コンポーネント
<template>
 <div class="component">
   <p>{{ message }}</p>
 </div>
</template>

<script>
export default {
 props: ['message']
}
</script>
子で親からデータを受け取るprops: ['message']を用意
propsは空箱のようなものです。
index.vue // 親ページ
<template>
 <div class="page">
   <Component message="Hello Vue.js!"></Component>
  </div>
</template>

<script>
import Component from '~/components/Component.vue';
export default {
 components: {
   Component: Component,
 },
}
</script>
子のprops: ['message']に
親でHello Vue.js!のテキストを渡しています。
イメージは、
messageという空箱に
Hello Vue.js!というテキストを入れ込む感じです。
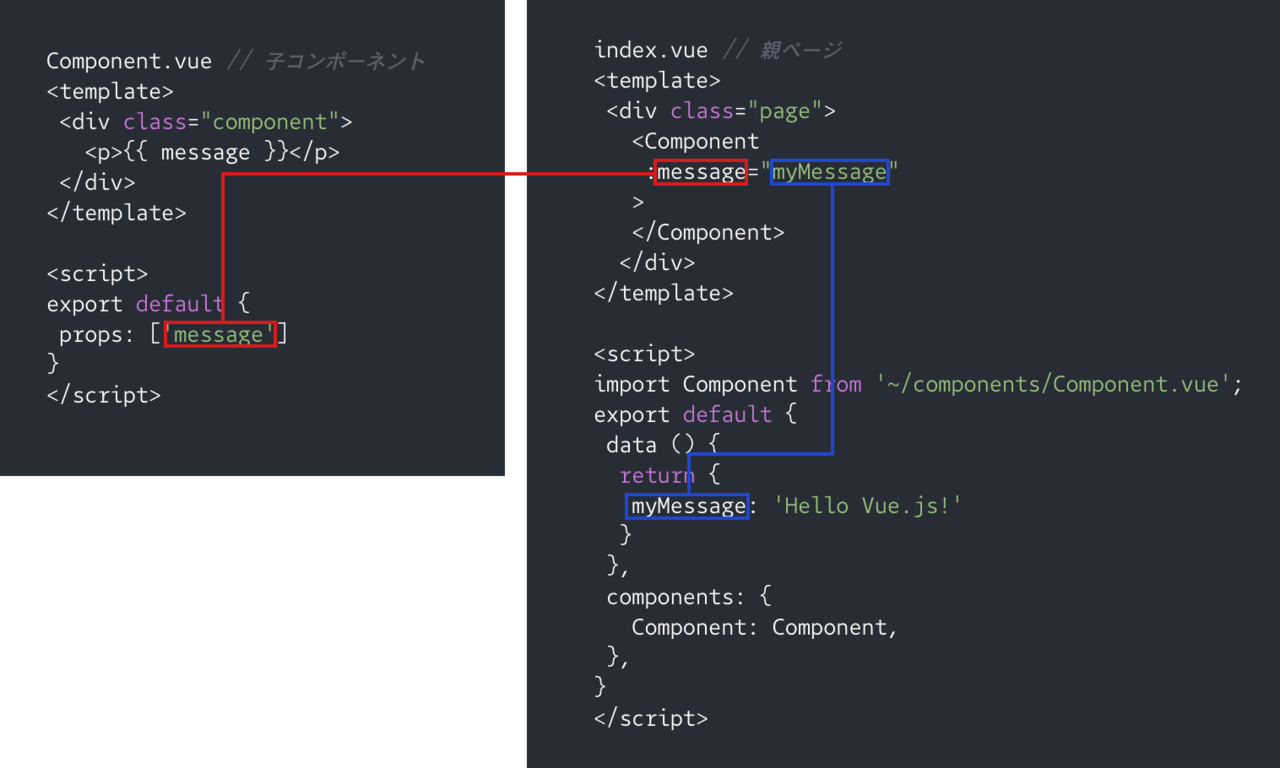
v-bindを使うと
index.vue // 親ページ
<template>
 <div class="page">
   <Component
    :message="myMessage" //子のmessageを親ではmyMessageと名付ける
   >
   </Component>
  </div>
</template>

<script>
import Component from '~/components/Component.vue';
export default {
 data () {
  return {
   myMessage: 'Hello Vue.js!'
  }
 },
 components: {
   Component: Component,
 },
}
</script>
ん〜よく分からんと思った方、
分かりやすく関係性を線で繋ぎました。
これで使い方は分かりましたね!
子は使い回す前提です。
子自身のdataにテキストを入れてしまうと、
当然ですがそのテキストでしか表示されません。
だから子のdataを使うのではなく、
代わりに親でデータを保管し、
子の空いたdataを空箱propsにしちゃえば良いのです!
そして空箱を親で命名し、親のdataで呼び出します。
slotと一緒?
slotの記事を読んでくださった方は、
slotと一緒やんけ!!!と思ったことでしょう。
はい、テキストを渡す時は一緒です。
つまりテキストを渡せれば良いならslotの方が便利です。
今回の例は誰にでも分かるようにテキストにしました。
ただし、
slotでは親によってcssの付け替えなどはできません。
テキスト以外はpropsです!
propsで使えるオプション
今回はテキスト(String)を例にしましたが
渡せるデータの種類は、真偽値や数値など様々です。
propsに種類を明記することで、
実際に渡されているデータの種類と一致しているかチェックしてくれます。
一致しなければconsoleエラーが出るので、確認しやすいです!
この場合はオブジェクト構文を使用します。
Component.vue // 子コンポーネント
<script>
export default {
 props: {
   message: {
     type: String,
     required: true,
   }
 },
}
</script>
オブジェクト構文で使えるオプションは4つ
・type(データの種類): String, Number, Booleanなど
・required(必須項目かどうか): Boolean
・default(初期値): any
・validator(typeよりも細かく条件指定): Function
オプション: default
親からデータが渡されなかった場合の初期値を設定します。
【表示結果】
データが渡されない場合

データが渡された場合

Component.vue // 子コンポーネント
<template>
 <div class="component">
   <p>{{ message }}</p>
 </div>
</template>

<script>
export default {
 props: {
   message: {
     type: String,
     default: 'ハロー!',
   }
 },
}
</script>
index.vue // 親ページ
<template>
 <div class="page">
   <Component /> //データを渡さないため、表示は「ハロー!」
  </div>
</template>

<script>
import Component from '~/components/Component.vue';
export default {
 components: {
   Component: Component,
 },
}
</script>
index.vue // 親ページ
<template>
 <div class="page">
   <Component
    :message="myMessage" //データを渡しているため、表示は「Hello Vue.js!」
   >
   </Component>
  </div>
</template>

<script>
import Component from '~/components/Component.vue';
export default {
 data () {
  return {
   myMessage: 'Hello Vue.js!'
  }
 },
 components: {
   Component: Component,
 },
}
</script>
ここまで出来れば基礎はバッチリです✨🤗
props応用編では
・オプション: validator(ちょっと複雑なため)
・cssの付け替え
などをやっていく予定です!