Intro
こんにちは、水谷です。今回はBlob Trackerを使って
半自動的に動き続けるヴィジュアルを作ってみたいと思います。
dfxはここにアップロードしてありますので、参考にしながら読んで頂くと理解が深まるかもしれません。
DFX DOWNLOAD 
Hi, it's aki. I'm trying to ab/mis-use the blob tracker to achieve
unique, self-driven visuals like shown above.
I uploaded the dfx here. So please feel free to play with it(CC0).
Blob Tracker I
さて、Blob Trackerって何でしょう、と言う所からですが、
Wikipediaにはツラツラ長い数式や解説がありますが、超圧縮してまとめると
「イメージのインプットから一定、あるいは概ね一定したプロパティ(動きや密度?)を
エリアとしてマーキングしてくれる」らしいです。
どうやらBlob Trackというアルゴリズムはコンスタントな変位のある映像の
特定のエリアをできる限りトラックしてくれるみたいですね。
何やらいい感じに響きますね。ラクできそうな気がします。
So what is blob tracker?
Wiki explains as following:
Informally, a blob is a region of an image in which some properties are constant or approximately constant
Ok, that sounds already kind of cool. That means, in other words, blob tracker will find approximately constant region from the input image and will track as much as he can.
Blob Tracker II
最近とあるプロジェクトでBlob Track(Touchdesignerのほう)が
関連したものに参加していたのですが、安定性・信頼性においてそこまで
僕はポジティブな印象は持ちませんでした。
ただ、お手軽に何らかを、リアルタイムにトラッキングできるというのは
表現の幅が広がりそうなので、何かやってみるっきゃないかもですね。
Actually I used blob tracker in some commercial work(which I can't show, meh).
Blob Tracking is not really accurate or highly reliable.
But the ability of continuous tracking is pretty nice.
というところから、いろんなイメージをBlob Trackerにfeedしてみた結果、
Fractal Noiseを使う事で、細々と有機的に育ったりするような興味深いビヘイビアを
作り、それをベースにタイトル絵の作例が生まれたという感じです。
以下はそのセットアップをミニマムに省略したものになります。
So I came up with the idea to track several different types of images and I found animating fractal noise as input image most handy.
I made sort of minimum setup to demonstrate what I achieved.
Result(simplified)
前述の通り、ややジターしながらも、全体に何か関連性のあるような
面白い挙動が見て取れると思います。
これは別にBlob Trackerを通さなくてもImage Emitterからluminanceを見て直接パーティクル出したら
いいんじゃないの?とも思いますが、Blob Trackerを通すと、えも言われぬ「認識感」「センシング感」
が出るような気もするので、こっちのほうが個人的には「より興味深い」表現だと思います。
さておいて、ノードグラフの方も見てみましょう。
So you see the particles moving somewhat jitterly but also in organic manner. That's kind of interesting movement! Let's check the nodegraph as well:
Nodegraph(simplified)
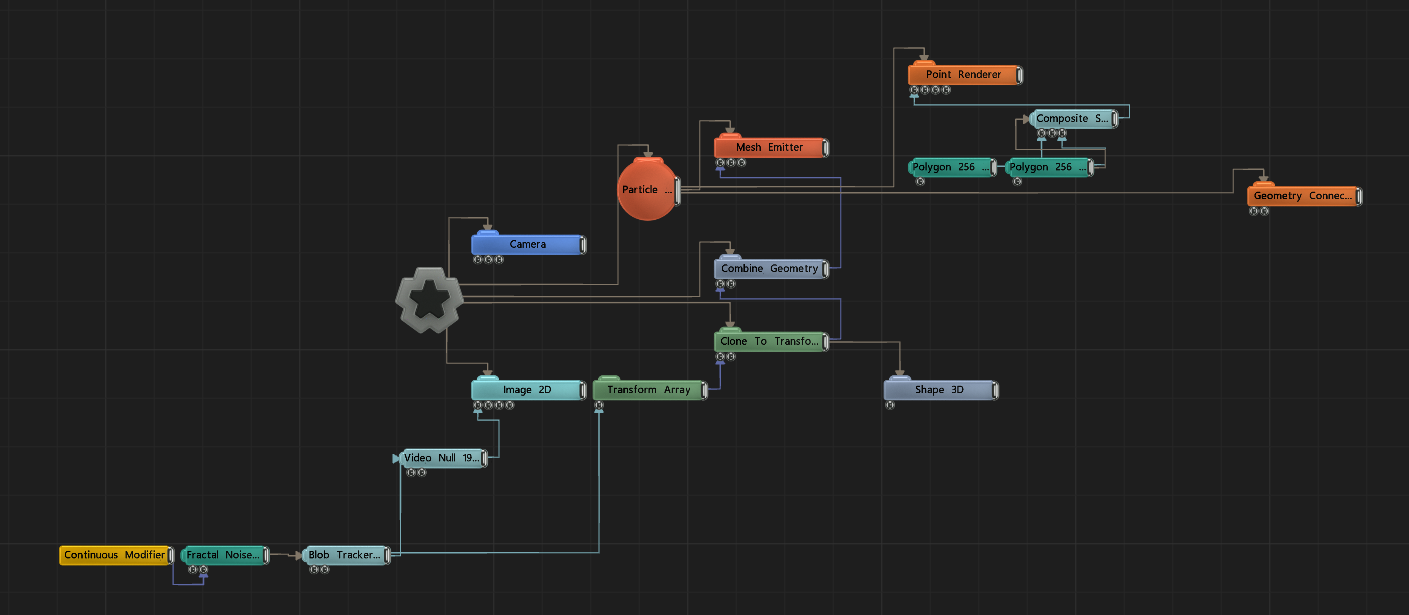
そこまで読み解くのが大変じゃない感じでしょうか、18個に収まりました。
いくつか聞き慣れないノードが見られるかもしれませんが、それらについては
この記事の後ほどにて説明を加えていきたいと思います。
Ok,not too many nodes, only 18.
You may notice several less familiar nodes but I'll explain about it later in this article. So let's break down the node setup!
Nodegraph(description)
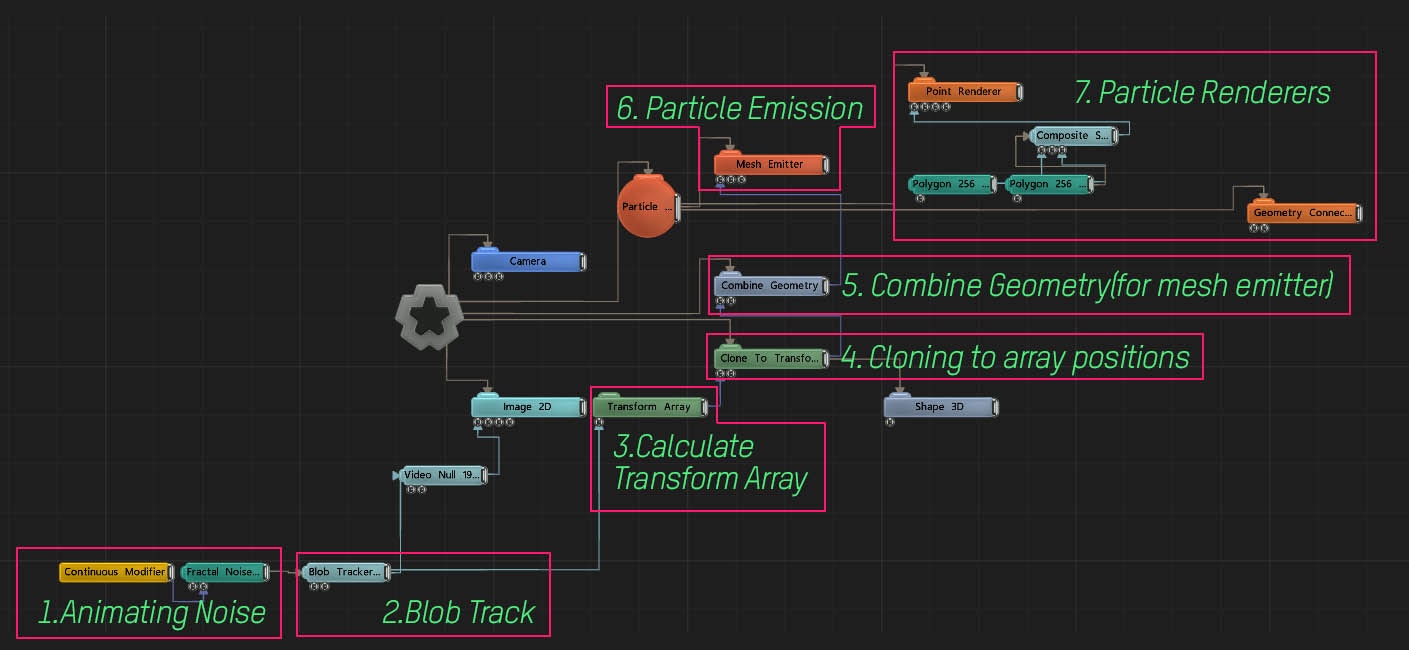
ノードのデータフローを大まかに説明します。
数字の順番に追って説明していきたいと思います。
Here's small description how the data flow(or way of thinking) goes. I'll use these numbering for further explanation so that we know which part we're talking about.
1-2 Animating noise and blob tracker
1-2の部分ではinput imageをBlob Trackerにfeedしている所ですね。
こちらがインプットイメージ、フラクタルノイズのrotationにContinuous Modifierをアサインして
ノイズをループさせています。
This is my input image. Fractal noise with continuous modifier to offset the noise rotation:

これにBlob Trackerを繋ぐと以下の様な絵になります。
...and blob tracker gives us this:
上記2つのイメージを重ねると以下の結果になります。
Blob Trackerが、Fractal Noiseのプロパティ(この場合は面積と明度)を
トラックしている様子が見て取れると思います。
If we combine both of the images above(composite node), we'll get this.

So as you see, you can definitely see the tracker does its job, more or less.
3-4 Transform Array to Clone To Transform Array / I
3,4の部分です。Blob Trackerで得られたカラフルな長方形たちが動いている絵を得られた所で
これがラスタライズされたビデオの場合、それほど使いでがありませんね。
この無数の長方形の座標を抽出できたりすれば、もっといろいろな事ができそうです。
答えを言ってしまうと、Transform Array Effectorがまさにそれで、このノードは
Blob Trackerによりトラックされたポイントの座標を
Clone To Transform Arrayに渡す事ができるいわば両者の橋渡し役を行います。
Clone To Transform Arrayは基本Clonerなので、そこから様々なEffectorを追加して挙動をつくっていくこともできます。
Ok, cool.
But this quickly moving colorful boxes won't bring us further as far as it's rasterized video.
What great would be if we can extract position information out of these boxes, right?
Yes there's one, Transform Array Effector.
Transform Array create array of coordinates from tracked feature points and this can be used as source information of Clone To Transform Node.
この2つのノード(Transform Array / Clone To Transform Array)
は他のノードと比較して、「特定のノードのみ」をfeedできる、ちょっと変わったノード
となっています。この場合、Blob Trackerノードですね。
ちょっと似たノードにTUIO Transform Arrayというものがあり、
マルチタッチのプロトコルのTUIOの座標をArrayとして保存してClonerに渡せる、というもののようです。
どちらもとても特定の機能を前提に作られたノードのようです。
These two nodes have very unique characteristics compared to other nodes just because
they expect pretty specific information as input.
And in our case, it's Blob Tracker Node.
AFAIK, I don't know the other way to bring blob track information to other nodes.
If you know more about this point, I'd be highly appreciated!
3-4 Transform Array to Clone To Transform Array / II
さて、このClone To Transform ArrayにShape 3Dをつなぐと以下の様に
CloneがBlob Trackerによりトラックされた座標群に配置され、アップデートされていく
ようになります。
大きい色付きの四角がBlob Track、白い小さな点がClonerにより生成されたShape 3Dになります。
Okay, now we came so far that we generate tracking point out of source image and create Clones oour of it
and this should look like this:
5-7 Create Particles on the position of clones.
さて、ここにそれぞれのClonerを線で繋げたい場合どうしたらよいのでしょうか?
一番ストレートな方法はGeometry Connection Nodeですが
このノードはParticle グループのNodeですね。現在僕たちが持っているのはCloneです。
CloneのアウトをPaticlesのMesh Emitterに繋げばいいんじゃないの、
と思いつきますが、その場合残念ながら機能しません。
Great, we have now cloners moving with tracking points together!
What if we say we want connect these clones with the lines?
Here's the quick answer "Geometry Connection Node".
Easy! but it's Particle Node Group and what we have now is Cloner.
So we need small bridge to be able to feed our clones as emitter.
そこで登場するのが、Combine Geometry Nodeです。
名前の通り、CloneなどのジオメトリをくっつけてくれるNodeです。
これを橋渡し約に使い、Mesh Emitterのinput Geometryに接続することで
パーティクルをClonesの位置に正確に発生させることができます。
This is it, the Combine Geometry Node.
As the node name tells us, this combines clone geometry so that other emitter can understand.
残りはストレートに、Point RendererとGeometry Connection Rendererを
繋いで行きます。
(Geometry Connection RendererはLine(デフォルトで閉じているペインを開いてLines Visibleにチェックを入れたあとに、Draw Trianglesをオフにしてあります)
Finally we build the particle setup and the emitter will be the Mesh Emitter.
The rest is straightforward, point and geometry connection renderer as usual :).
Result(Repost)
以上です。もともとのBlob Trackerの用途とは少し違うかもしれませんが、
アメーバの様な、いい感じに規則性とランダム性が同居した
興味深い動きが作れたと思います。
上記の例では、Blob TrackerのRGB画像もPlane 2Dを使ってParticles, Cloneたちと同位置に
配置してあります。これらをIMAGでコンピングしていくのも楽しいのでおすすめです。
So that's it! I think blob tracker is considered for completely different usage.
But this amoeba-like movement is pretty interesting.
Continuously changing topology of blob tracker itself is worth comping as well.
My original setup
こちらはオリジナルの作例です。絵の複雑さは増しましたが、骨子をなす構成要素は
シンプル化されたものと全く同じです。
Here's my original setup which based on absolutely the same procedure as base.
Nodegraph
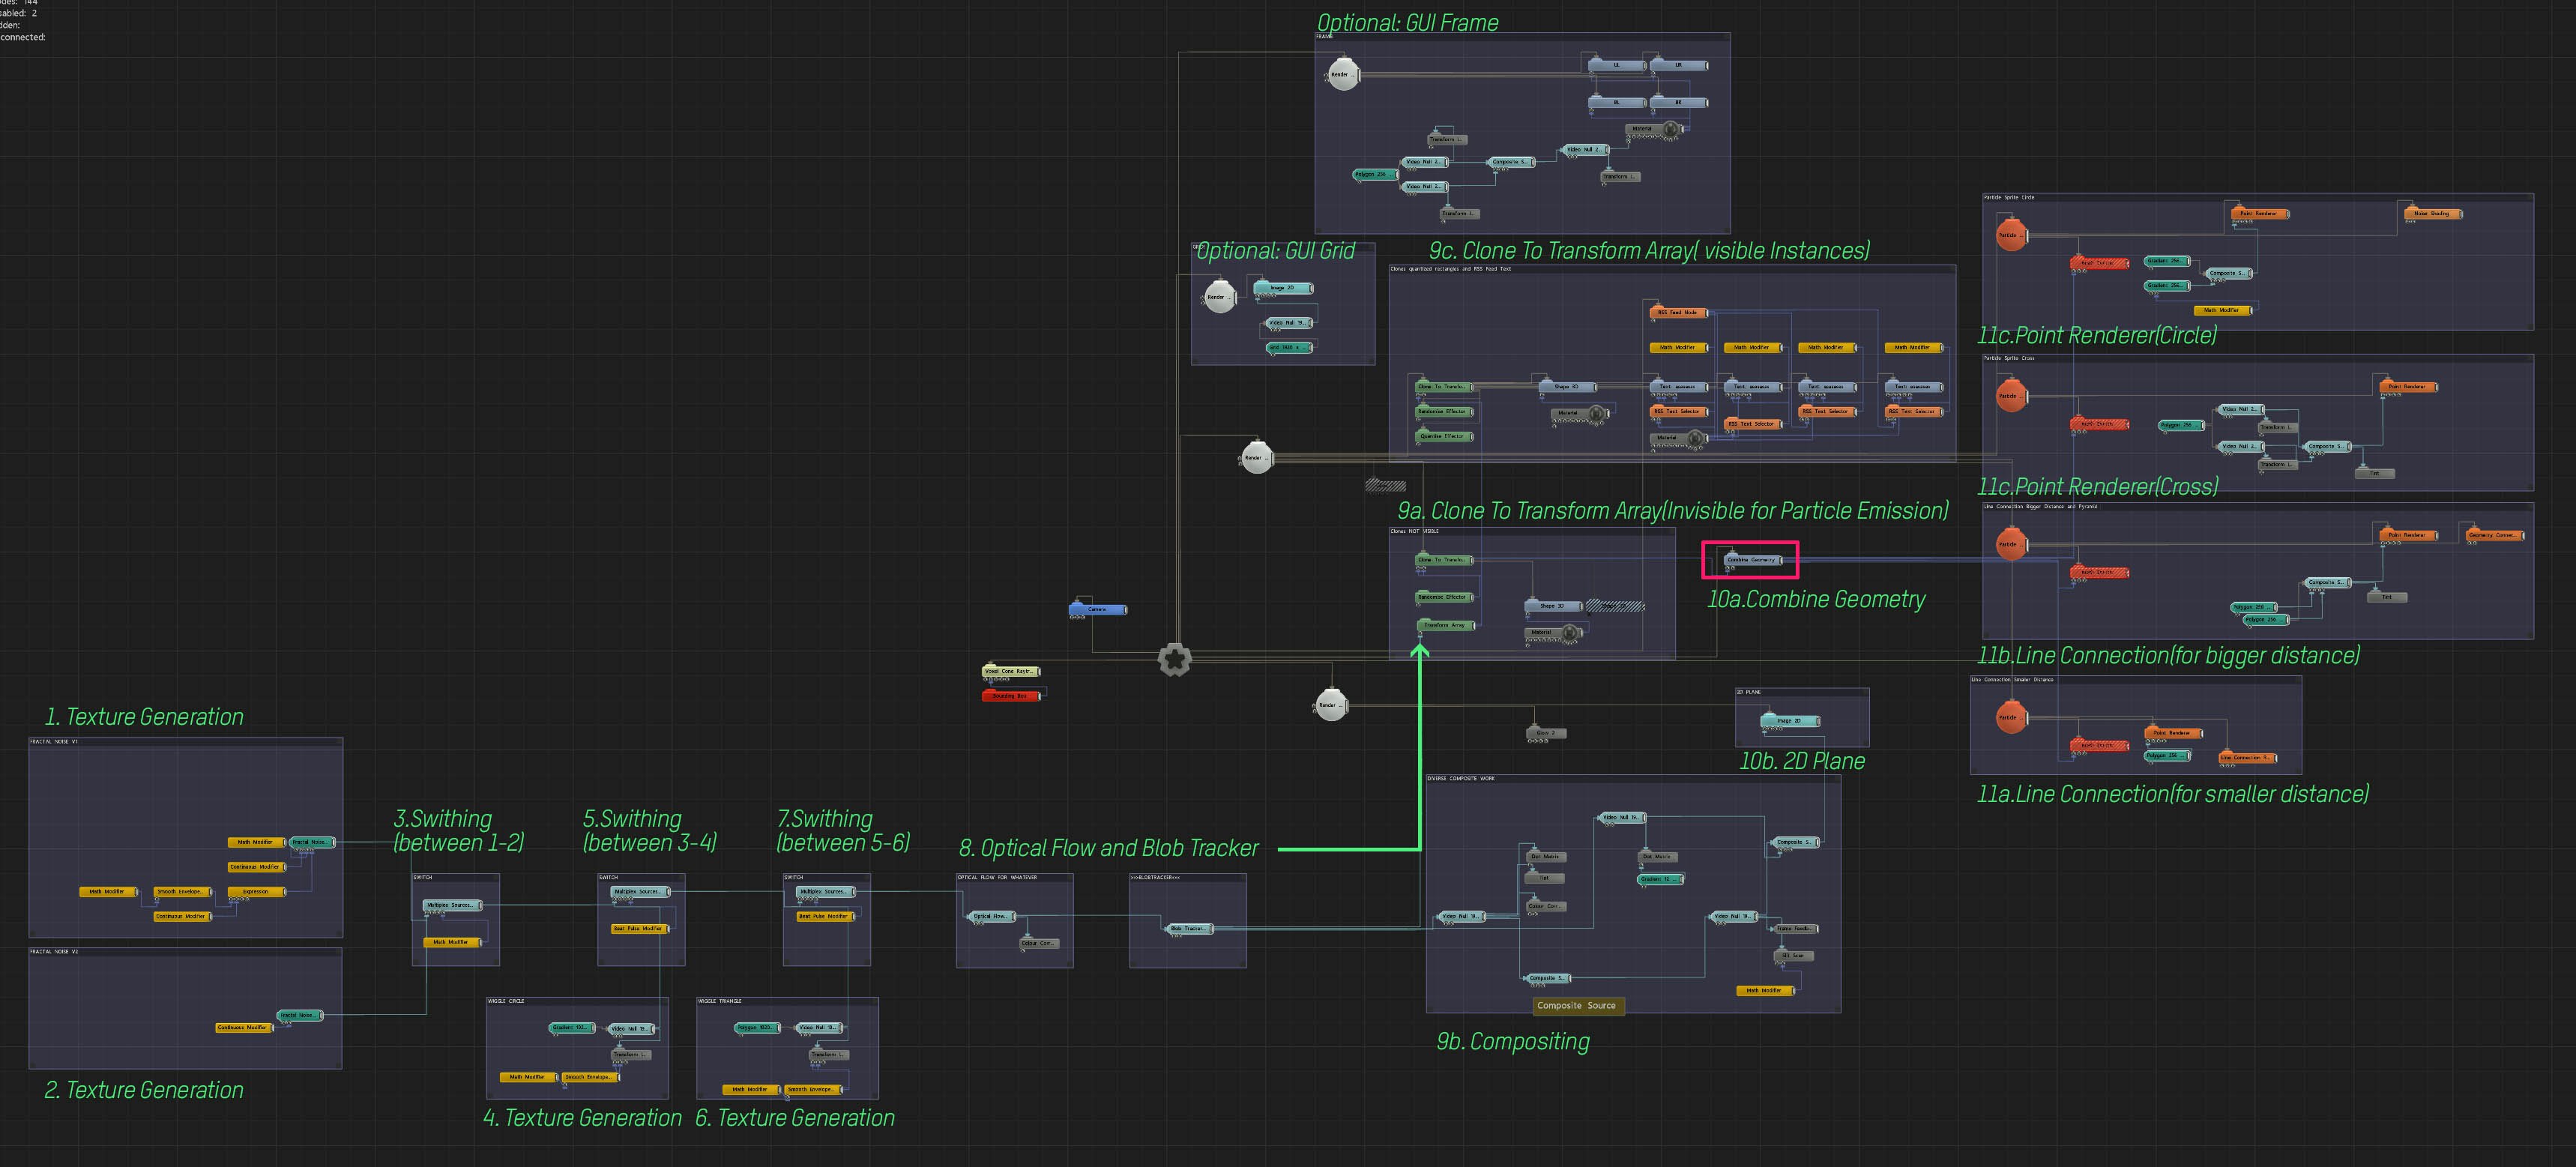
オリジナルの作例のノードグラフはこちらになります。
ノードの数は違えど、シンプル化された作例と同じように
(Texture->Blob->Transform Array->Clone To Transform->Combine Geometry->Particles)
の流れを辿っているのが見て取れるかと思います。
Here's my nodegraph of original work.
Surely the amount and size of nodegraph is bigger.
But you may notice it still based on simplified version
(Texture->Blob->Transform Array->Clone To Transform->Combine Geometry->Particles)
Verdict
さて、いかがでしたでしょうか。
今回はある特定のノードをとても変な使い方をする、というちょっと変わった記事でしたね。
このように特定のノードにこだわってとても特殊なビジュアルを作る、というのも
面白いと思います。どんなノードでも、「面白そう」と思ったらとりあえず「?」ボタンを押してReference Manualを一読することをオススメします。
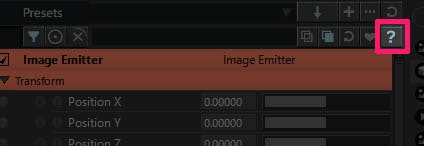
そこにはノードの性質、役割から、インプットノードがどのタイプのノードを受け入れるかなど詳細に記してあります。
気になったノードにより深くダイブして、パワフルなノードのハッキーに使う
アプローチは楽しいですよ!
So hopefully you enjoyed it.
This time I wrote about pretty unique(weird) aspect of using very certain node.
I think there's much more of this kind of very interesting nodes which are absolutely worth digging.
It's highly recommended to press [?] button to see what each specific node can and which connection they accept.
Selection is huge, so please try to dive deeper into the node of your selection and find hacky way to take advantage of it. Until next time then, cheers!!
PS:ちなみにBlob Tracker Nodeは何故かNotch Reference Manualの中にはありません。
ディスコンされたらちょっと悲しいな~。