Intro
こんにちは、水谷です。今回はCOUNTERについて考えてみたいと思います。
この記事は絵作りに直接寄与する部分ではなく、かつ
確定したワークフローがないので、半ば問題提起にも似た記事なのですが、解決したい問題でもあり、
様々な人が困るかもしれない問題なので記します。
dfxはここにアップロードしてありますので、参考にしながら読んで頂くと理解が深まるかもしれません。
Hi, it’s Aki! This time I’d like to talk/think about the counter.
Even it has less to do with image creation itself, I encountered often the situation where I need one so bad.
Check the scene file, this should help you to understand the article better.
DFX DOWNLOAD 
Index manipulation
前段として話しておくべきこととして、notchには、Select Children Node / Multiplexer Node / Tweening Nullなど、
Children Nodeをindexナンバーによって切り替えるという仕組みをもったノードがいくつかあります。
これらを使う場合、かつ、Touchdesignerやその他のOSC senderアプリケーションを使
わないケースには主にModifierを使ってアサインするべき値を生成する運びが一般的だと思います。
Notch has several nodes where you can switch the connected children nodes via index number e.g: Select Children Node/ Multplex Source Node/ Tweening Null etc.
To manipulate these index number to control which child should be activated or selected, using the modifier is the most straight way, expect you control them per OSC from external softwares.
Examples
前述の3ノードを軽く紹介したいと思います。
For better explanation, I’ll explain the three nodes I already introduced above.
Tweening Null Node
上記の左から順番に説明すると、Tweening Null NodeはinputにFeedしたNullの位置を集約し、Childrenノードにindexによって
indexに対応した番号のNullの位置を渡し、かつ補間するというノードです。Gifアニメーションでは Math ModifierのPerlin Noiseによって0-3の間を漂わせています。
Let’s take a look the three nodes mentioned above, from left to right manner.
Tweening Null Node will create tweening animation from the positions of connected nulls.
Select child Node
真ん中はSelect Child Nodeです。これはinputにFeedされたNode(Camera,Geometry, .etc)をindexにより
スイッチングするノードです。Gifアニメーションでは0、1という内容のTextノードがfeedされたSelect Child Nodeのindexに
Math ModifierのSquareをアサインし、indexの0と1をハードに切り替えています。
Select Child Node, in the middle, is fairly simple switching node.
It can switch inputs(cameras, geometries .etc) which are fed into the input node of Select Child node per
index parameter.
Gif animation shows the switching of 0 and 1(both as text node) which is driven by Math Modifiers with square mode. Square Mode generates wave with hard switching between 0 and 1 in given frequency.
Multiplex Source Node
最後に右側ですが、Multiplex Source Nodeです。Select Child NodeのVideo版というのが最もピンとくる感じでしょうか
ImageやVideo Sourceをindexによって切り替えることができるノードです。Gifアニメーションでは、丸、三角、四角の2Dシェイプをinputにfeedしたのち、これもまたMath ModifierのRandomによって0-3の間を漂わせています。
Lastly, on the left you can see the Multiplex Source Node. Pretty similar to the Select Child Node.
Multiplex takes the image/video as input and these inputs can be switched per index value.
Gif animation shows the switching of three different input textures(circle, triangle and square) per Math Modifier.
In this time the mode is random between 0-3
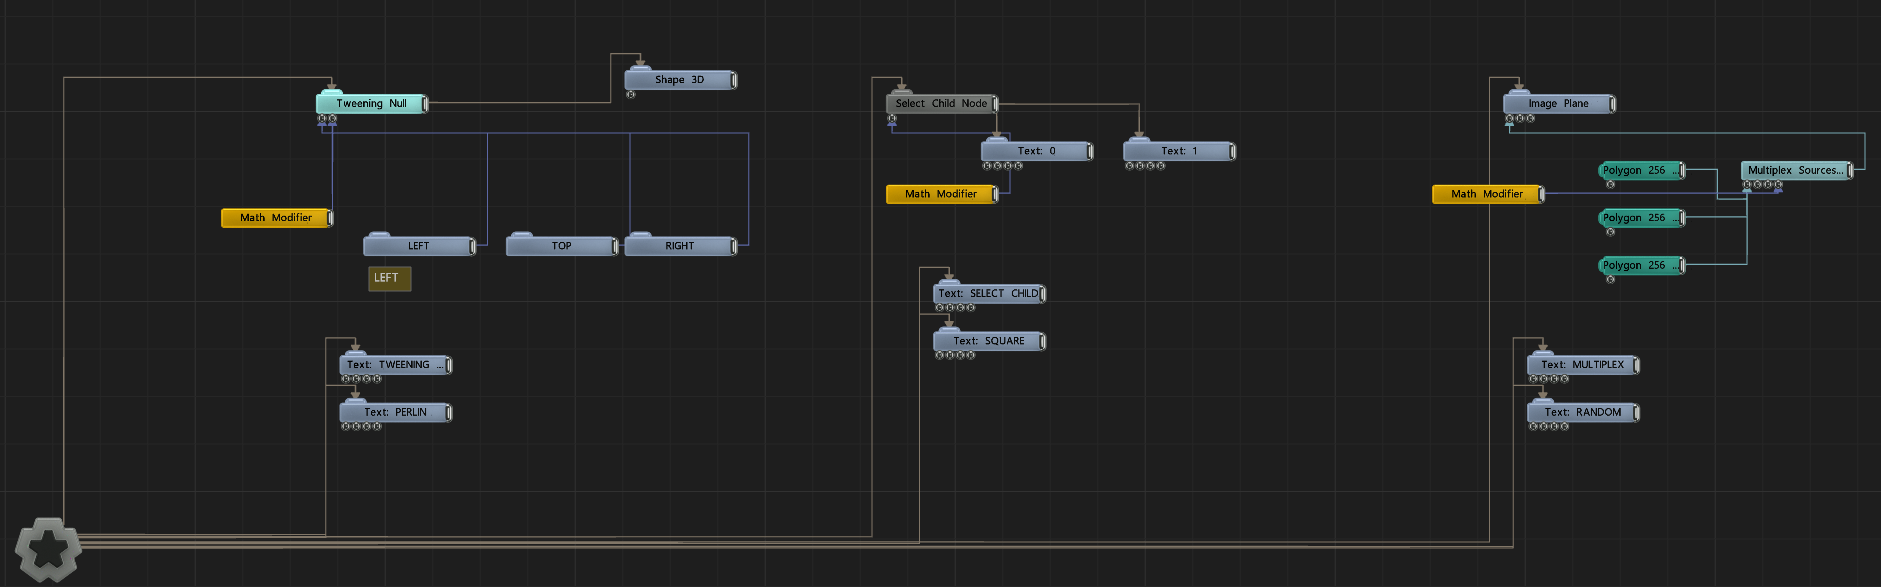
Node Graphはこのようになっています。
先程説明したそれぞれのindexを管理するノードにはModifierが繋がっていて、そのChildrenには
切り替えるべき要素のノードが並んでいるのが見て取れます。
Tweening NullとMultiplexはChildren Nodesは下側の丸いinputに接続するのに、Select Child Nodeは右側のoutletと子ノードを繋ぐという感じで、作法が微妙に違いますね。
Node Graph looks like this:
As explained, all the nodes with index parameter are connected with the Modifiers.
And the node itself has several children nodes which should be switched.
Please note the subtle grammatical difference between Tweening Null and the rest(Select Child Node/ Multiplex).
少し長くなりましたが、ここまでが前段です。
Okay so far so good.
Now I’m going to explain about main topic, making counter.
COUNTER
前段で説明した通り、0/1の切り替え、ランダムの切り替えは特に問題はなく行える訳ですが、
たとえば、0-10の間をカウントして、10になったら0に戻る、という
挙動をしたい場合、どうしたらいいのか困ってしまいます。
そのような挙動が必要なケースとしては、ランダムではなく特定の順番で見せるオブジェクトを
変えたりしたい(Select Children Nodeで丸、三角、四角の順に出してループさせたい)、複数のカメラの位置を遷移させたい (Tweening Nullの一用法 = Morph Camera)ケースですね。
そこで必要なのがCounterです。
Well then, you’ve learned how to switch children input per 0-1(Math Modifier / square) and
changing this in random manner(Math Modifier/ random).
But what if we want to make it in ordered manner, like, let’s say it should add up numbers in certain frequency
and reset the value after reaching given max.
This kind of behavior is useful when you want to switch input in very specific order.
Then you need the counter!
TouchdesignerではCounter CHOPを使う事であっさりできますが
Touchdesigner has very straightforward solution which looks like this:
notchではそれに相当するNodeが無いんですね。これは困ります。
もしあれば教えてください、これまで書いたことは無駄になってしまいますが、それでもそっちの方が嬉しいです。
But, notch doesn’t offer these kind of node and we’re stucked.
So I’ll show the workaround to make one. If you know better variation, please don’t hesitate to mention it to me here or on Twitter. I’ll be highly appreciated for your inspiration.
Accumlator Modifier
0.9.2.2くらいからでしょうか、Accumlator Nodeが追加されました。
これはインプットがthresholdを超えた場合にのみ、指定の値を加算し続ける
という割と特殊なノードで、個人としても使い所が今ひとつわかっていないのですが
Accumlator Nodeにはwrapという機能がついていて、Max valueに達した際に
0にループさせることができます。
Notch newly added the Accumulator Node.
This node keep adding values while input value is bigger than threshold.
I didn’t get the point of this node at first glance.
But Accumulator has one useful option “wrap”. This option resets the value once the value reaches given max.
Accumlator Counter
あれ、これをがんばって使ったらループカウンターが作れるのではないかな?
と思って試してみました。
Oh, I thought, it’s pretty easy to make the loopable counter function with Accumulator. So I tried one.
フレームレートが安定していないせいか、毎回0.03秒くらいづつズレながらも一応カウントには成功しているようです(かなしい)。クリティカルな用途で使うのは恐ろしいのでTouchdesignerを挟んでOSCで切り替えた方がいいな、という結論には達しているものの、そこまでの厳密なタイミングが必要でない場合はnotch内で完結できる方法としてなくはないのかもしれません。
And this is the one. somewhat unstable.
It’s kind of working, but you may notice the growth of the value is inconsistence.
So I’d not use it in critical situation. But if the timing is not the critical concern, it’s still usable.
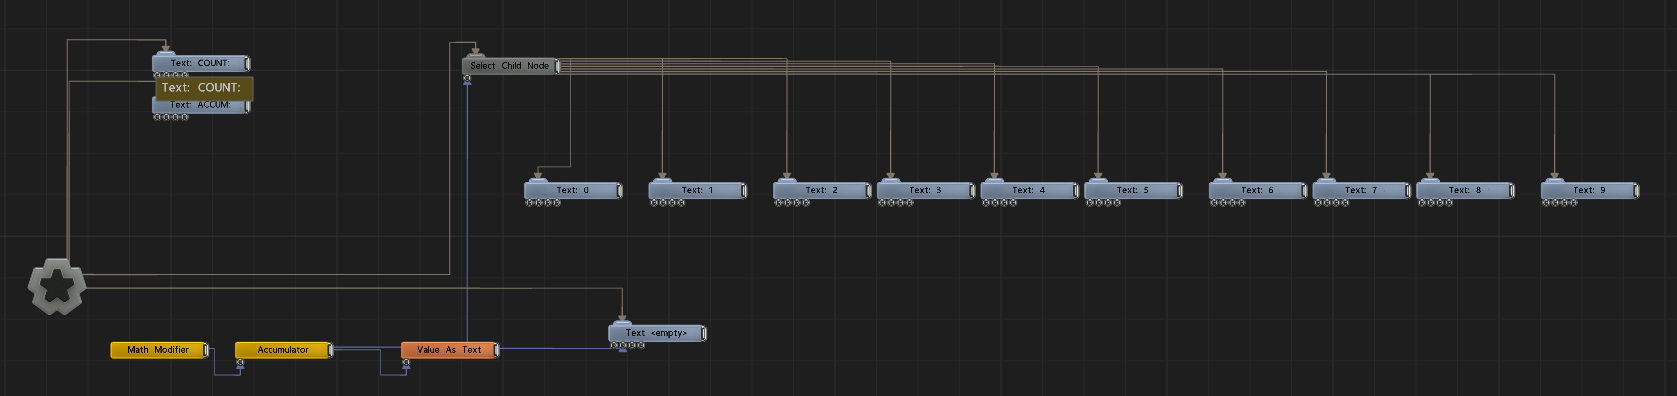
Node Graphはこちら。一番左下のMath ModifierのSquareにて0と1を一定の間隔で切り替えたものをAccumulatorの
inにfeedして、オンになっている間だけ数字を増やし、カウントしています。
Let’s take a look of Node Graph:
Left-bottom-most Math Modifier has square option and switching between 0 and 1 in certain frequency.
Accumulator add the value only the input is 1.
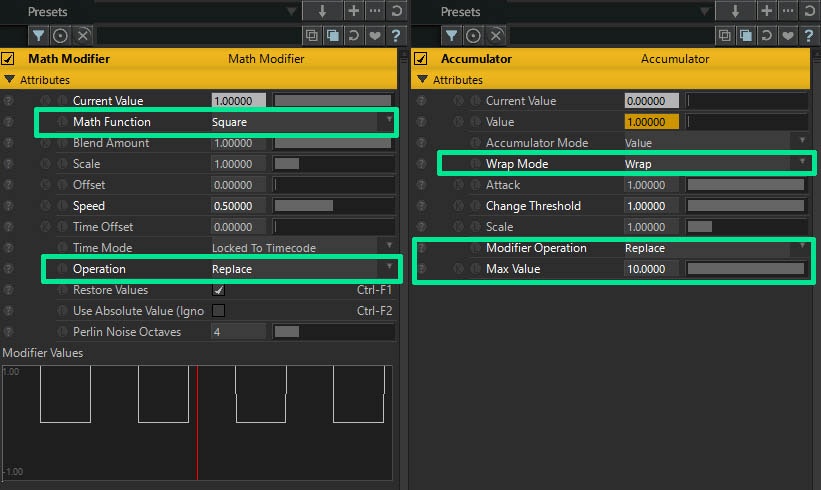
Accumlatorの設定はWrap ModeをWrapにすることで、0-10まで値を蓄積したあとに0に戻しています、clampしたら10のままですね。Max Valueは有効にしたいChild Nodeの数です。 AccumlatorからはSelect Child Nodeのindexにfeedしてあるのと、純粋に表示用として、Value As Textを通して値をStringにしてからTextノードに渡してあります。
Accumulator has Wrap mode on and max value is set as 10. So the node accumulates the value until 10 and after exceeding 10, it’ll go back to 0 and loop the same behavior over and over again.
Morph Camera Rig
一瞬でできたAccumlator Counter。明らかにパーフェクトではないですが、これをベースにMorph Cameraを作ってみましょう。
Morph Cameraといっても、Cinema4Dや、Touchdesignerのように画角や角度、フォーカスターゲットを補間しない、位置のみを遷移する悲しみ要素が多めのMorph Cameraです。ただ、それでもカメラの位置を自動で何回も変えて貰えれば絵持ちという点での貢献度は高いと思います。
Okay, accumulator counter is sort of done. It isn’t obviously perfect.
I’d say if we need perfect control we’d need the middleware which counts much more precise way and send these
informations over OSC or UDT.
But whinning doesn’t bring us further, so let’s make one step further and create position morph for the camera.
Notch has no morph camera function like cinema 4D or Touchdesigner where the function switches multiple parameters of cameras like position, rotation, FOV, Focal plane distance and so on.
Yet, swiching position in automatic way might be still useful in several situations so here you go.
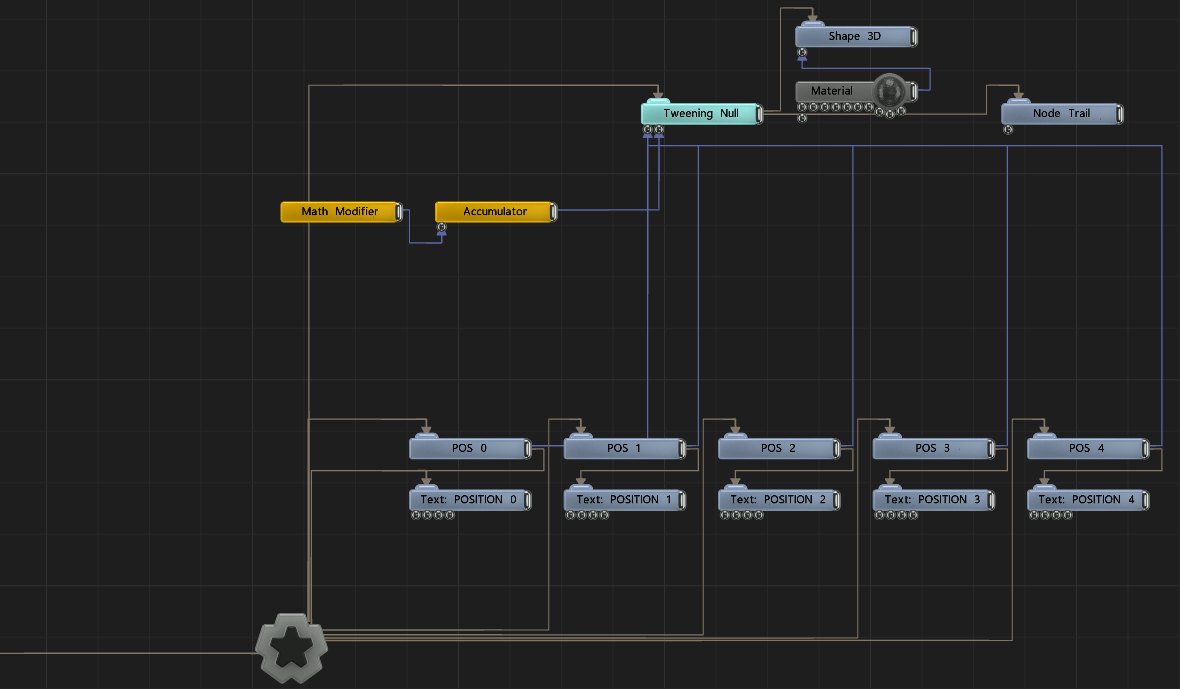
Node Graphはこのような感じです。 Tweening Nullのinputに場所の違うNull(POSと命名)をたくさん繋いで、
Tweening NullのChildにはShape 3Dでマジェンタ色のキューブを繋げています。あと軌跡を描くためにNode Trailを同様に
繋いでいます。Accumlator Counterは0-5の間をループします。
Node Graph looks like this:
Tweening Null has multiple Nulls with different position coordinates.
And we have shape 3D node(Magenta cube) is direct child node of Tweening Null and it jumps the positions
of input nulls. I added Node Trail node just for visualizing purpose.
結果、何となくできました(最初に1から0に戻っているのはHomeボタンを押してTimelineを0に戻したからです)ね。
Ok, it’s working somehow…
Practical Usage
実際に何らかのシーンに適用してみたのがこちら。
I made small scene with this self-build camera switcher
全体を見てみるとCamPosがカウンターの数字によって位置をループしているのが見て取れると思います。
全く関係ありませんが、何気にNode Trailの描く軌跡が面白いですね。
Here the scene with same setup. You may notice visualizing text node(Campos) indicates the current index.
Please note the nice looking trail shape as interesting side effect(off topic though).
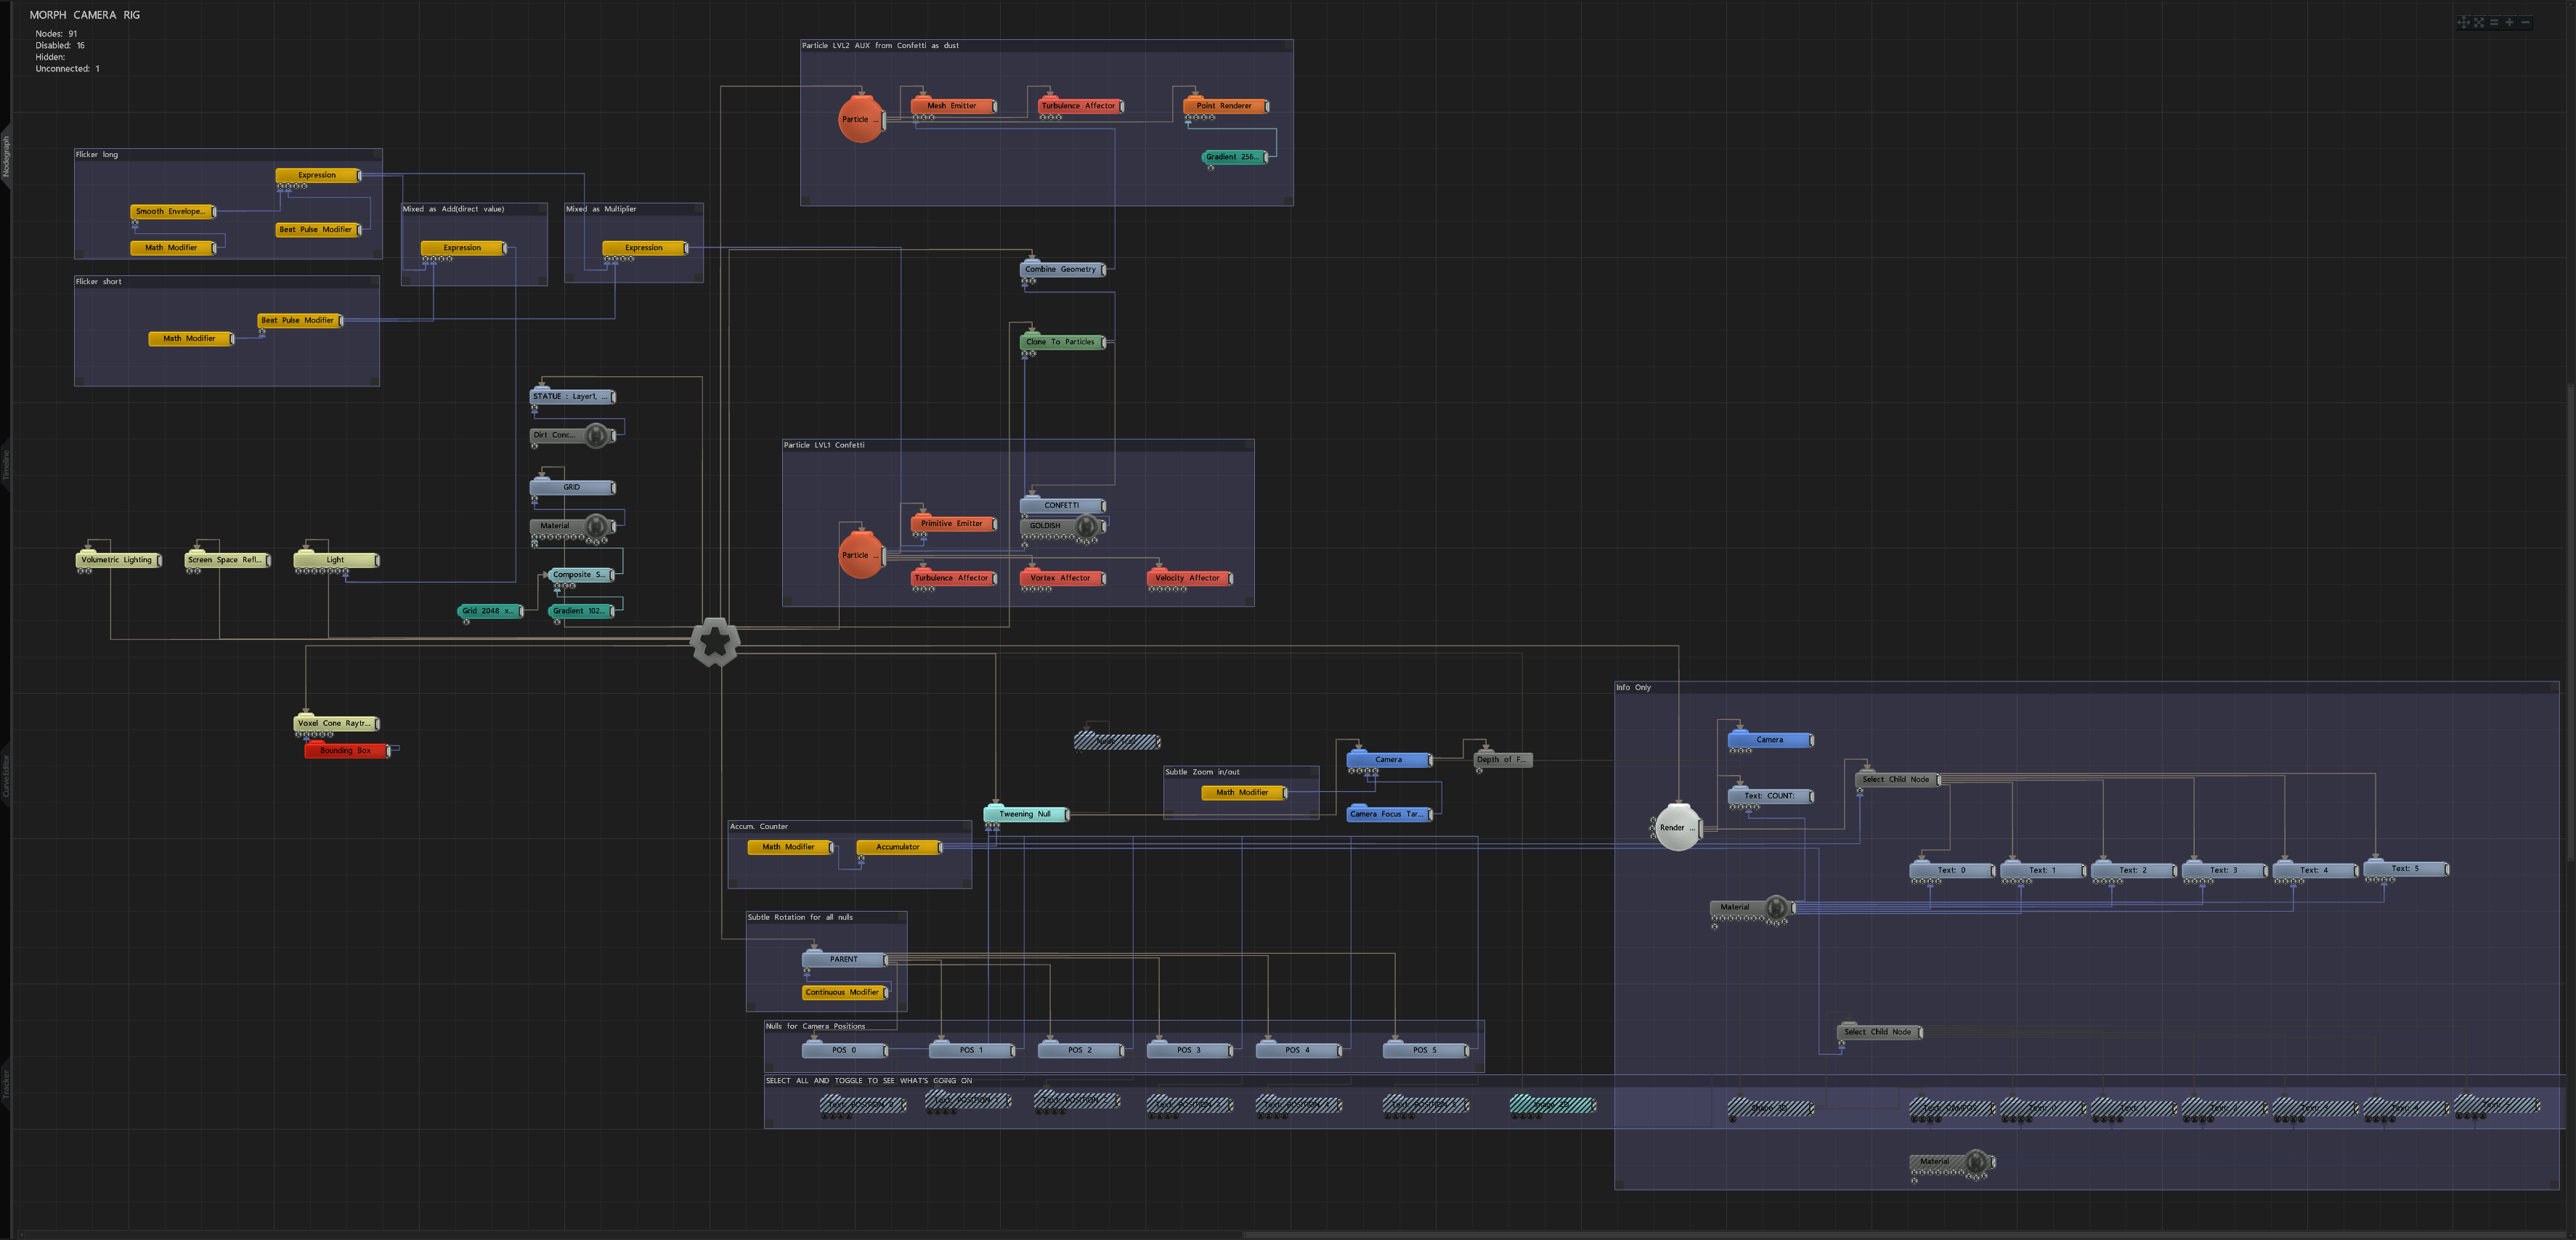
Node Graphはこちら。
特に複雑なデータフローでもないので、dfxにコメントはしてありますが、スクリーンショット上のメモは省いてあります。
テキストで補足することとしては、Tweening NullにくっつけたNullにさらに別のParentをつけて、それを回転させることで
、カメラグループ全体に回転をかけたりしています。
あとはLightのFlickerを作るためにこまごまとModifierを繋いだぐらいでしょうか。
Here’s the Node Graph.
Thus it’s not tough to follow the data-flow, I only wrote comment in dfx.
Additional note would be:
I added additional parent null for the nulls which go to Tweening Null, to give overall rotation movement.
And kind of good looking light flicker :).
今回のAdvent Calenderの別の記事でも紹介した、Render To Textureノードや、Particle->Cloner->Combine Geometry->Mesh Emitterのチェーンも使われていますね。
これによって、ParticleからParticleを出す、俗に言うAuxiliary Particle(AEのParticularや、Stardustなどでよく使いますね)ことをしています。実際にはParticleから出したClonerからParticleを出しているのですが、最終的なしくみは同じですね。
also used Render To Texture Node and the chain of “Particle->Cloner->Combine Geometry-> Mesh Emitter”
which I described in older article of this advent calender.
In this time I made this chain to create AUX-Particle effect.
Verdict
いかがでしたでしょうか。NotchはTouchdesignerとは違い、開発環境というよりも
ビジュアルクリエイションに特化したツールなので、かゆい所に手が届かないのは
仕方がないですが、困ったら自分で代替品も作ってみよう、
みたいな考え方はある程度あっても良いのかもしれませんね。
それでは、次のアップデートであっさりとMorph Camera NodeもCounter Nodeも
追加されることを祈って。
Well, that’s about it. Obviously it’s nonsense to compare notch with Touchdesigner, but
speaking of precision level, Touchdesigner has clear advantage.
Of course notch has his own strength somewhere else and that’s great.
But notch starts to offer more fundamental part of value generation and manipulation.
So if you have some idea or function, you can build sort of replacement out of the box.
I hope next update will bring us Morph Camera Node and Counter Node!
That would be the best Christmas present :)