AWS Elastic Beanstalk http://aws.amazon.com/jp/elasticbeanstalk/
AWSアカウント作成時の12ヶ月無料枠で、t2.microのBeanstalkも使えるので触ってみまして。
要点
- Beanstalkのメモリ設定(heap/permgen)に注意
- Grails動かすには heap 512MB permgen 128MB くらい必須
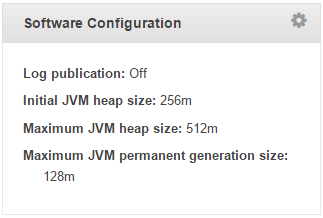
- デフォルト設定は heap 256MB permgen 64MB なので動かない
- Grails動かすには heap 512MB permgen 128MB くらい必須
- 初期リージョンがオレゴンだから初めての人は気を付けよう
- デプロイ後のURL構造は appName が付かない形だから development 環境もそうなるようにしとくと幸せ
DataSource.groovy 設定例
environments {
    development {
        grails.serverURL = "http://localhost:8080/"
        dataSource {
            // development環境のDB設定
        }
    }
    test {
            // test環境のDB設定
    }
    production {
        dataSource {
            driverClassName = "org.postgresql.Driver"
            username = "{username}"
            password = "{password}"
            dbCreate = "update"
            url = "jdbc:postgresql://{endpoint}:{port}/ebdb?user={username}&password={password}"
    }
RDS は PostgreSQL で、今回はバックアップ無し(0day)マルチAZ無しで作成した{endpoint}:{port}を設定しました。JDBC URLに ebdb をお忘れなく。
run-app でも appName が付かないURLの設定は application.properties にこれ。
app.context=/
あとは BuildConfig.groovy に
runtime 'org.postgresql:postgresql:9.3-1102-jdbc41'
とかしますね。最後に
$ grails war
で作成したwarをBeanstalkにアップロードすればok。
参考資料: http://www.inoneo.com/en/blog/5/amazon-aws/deploy-a-grails-application-on-aws-elastic-beanstalk