はじめに
前回viewメイン、コントローラメインの記事を記載しました。
今回は両方を使って学習したものを記載しています。
クエリ文字列
Route::get('/hello','App\Http\Controllers\HelloController@index');
<?php

namespace App\Http\Controllers;

use Illuminate\Http\Request;
use Illuminate\Http\Response;

class HelloController extends Controller
{
    public function index(Request $request) {
        $data = [
            'msg'=>'名前はなんですか',
            'name'=>$request->name
        ];
        return view('hello.index', $data);
    }
}
<html>
<body>
   <h1>Blade</h1>
   <p>Hello View</p>
   <p>{{$msg}}</p>
   <p>{{$name}}</p>
</body>
</html>
helloにアクセスすると画面にmsgの内容が表示されているのを確認できます。
http://localhost/Laravelプロジェクト/public/hello
クエリ文字列として「?name=a」を付与すると画面にaと表示されるのを確認できます。
http://localhost/Laravelプロジェクト/public/hello?name=a
※サーバはxamppのapacheを使用しています。
Blade
index.phpとindex.blade.phpが存在する場合、bladeとつく方が読み込まれる。
Route::get('/hello','App\Http\Controllers\HelloController@index');

Route::post('/hello','App\Http\Controllers\HelloController@post');
<?php

namespace App\Http\Controllers;

use Illuminate\Http\Request;
use Illuminate\Http\Response;

class HelloController extends Controller
{
    public function index() {
        $data = [
            'msg'=>'名前はなんですか'
        ];
        return view('hello.index', $data);
    }

    public function post(Request $request) {
        $msg = $request -> msg;
        $data = [
            'msg'=>'ようこそ'.$msg.'さん'
        ];
        return view('hello.index', $data);
    }
}
<html>
<body>
   <h1>Blade</h1>
   <p>Hello View</p>
   <p>{{$msg}}</p>
   <form method="POST" action="/laravelapp/public/hello">
      @csrf
      <input type="text" name="msg">
      <button type="submit">送信</button>
   </form>
</body>
</html>
-
@csrf
CSRF攻撃を防ぐために、formでは記載が必須。
無いと送信時に419エラーになる。 -
継承
既にあるテンプレートのレイアウトを引き継いで新しいテンプレートを作成する。 -
セクション
継承元となるレイアウトの各パーツがセクション。
例えばヘッダー、コンテンツ、フッターとしてレイアウトを継承するのであれば
いずれもセクションと呼ぶ。表示させたい文字だけ変えて、レイアウトは他の画面と同じということができる。
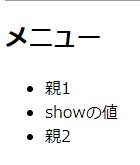
セクションサンプル

下記プログラムを実行すると上図の結果になる。
Route::get('/hello','App\Http\Controllers\HelloController@index');
@extends('layouts.helloapp')

@section('title', 'タイトル')

@section('menubar')
   @parent
   showの値
   <li>子</li>
@endsection

@section('content')
   <h2>コンテンツ</h2>
   <p>コンテンツを記載します。</p>
@endsection

@section('footer')
   <h2>フッター</h2>
   <p>フッターを記載します。</p>
@endsection
<html>
<head>
  <title>@yield('title')</title>
</head>
<body>
  <h1>@yield('title')</h1>
  <hr size="1">
  @section('menubar')
  <h2 class="menutitle">メニュー</h2>
  <ul>
    <li>親1</li>
    <li>@show</li>
    <li>親2</li>
  </ul>
  <hr size="1">
  <div class="content">
    @yield('content')
  </div>
  <hr size="1">
  <div class="footer">
    @yield('footer')
  </div>
</body>
</html>
web.phpにより/helloにアクセスするとindex.blade.php(子)が呼ばれる。
子の下記処理により親レイアウトが継承される。
@extends('layouts.helloapp')
親のレイアウトがベースとして使用され、下記のようにすることで値をセットできる。
@section('title', 'タイトル')
<h1>@yield('title')</h1>
下記のようにするとセクションを上書きできる。
@section('menubar')
   @parent
   showの値
   <li>子</li>
@endsection
  @section('menubar')
  <h2 class="menutitle">メニュー</h2>
  <ul>
    <li>親1</li>
    <li>@show</li>
    <li>親2</li>
  </ul>
セクションの上書きはせずに値をセットした状態(タイトル更新と同じやり方)だと下図のようになるが、上記のように記述することで「showの値」と「親2」の間に「子」を追加できる。
ディレクティブ
下記サイトにディレクティブについてまとめられています。
参考