内容
Vue3を動かしてみました。
環境構築
- 下記手順を実行します。
https://ja.vuejs.org/guide/quick-start.html - サーバの起動後「http://localhost:5173/ 」にアクセスすることで、
下記画面が表示されます。

ファイル内容(一部)
- プロジェクト名\
- src\
- components\
- HelloWorld.vue
- App.vue
- main.js
- components\
- index.html
- src\
環境構築後のコード
index.html
<!DOCTYPE html>
<html lang="">
  <head>
    <meta charset="UTF-8">
    <link rel="icon" href="/favicon.ico">
    <meta name="viewport" content="width=device-width, initial-scale=1.0">
    <title>Vite App</title>
  </head>
  <body>
    <div id="app"></div>
    <script type="module" src="/src/main.js"></script>
  </body>
</html>
main.js
import './assets/main.css'

import { createApp } from 'vue'
import App from './App.vue'

createApp(App).mount('#app')
App.vue
<script setup>
import HelloWorld from './components/HelloWorld.vue'
import TheWelcome from './components/TheWelcome.vue'
</script>

<template>
  <header>
    <img alt="Vue logo" class="logo" src="./assets/logo.svg" width="125" height="125" />

    <div class="wrapper">
      <HelloWorld msg="You did it!" />
    </div>
  </header>

  <main>
    <TheWelcome />
  </main>
</template>

<style scoped>
header {
  line-height: 1.5;
}

.logo {
  display: block;
  margin: 0 auto 2rem;
}

@media (min-width: 1024px) {
  header {
    display: flex;
    place-items: center;
    padding-right: calc(var(--section-gap) / 2);
  }

  .logo {
    margin: 0 2rem 0 0;
  }

  header .wrapper {
    display: flex;
    place-items: flex-start;
    flex-wrap: wrap;
  }
}
</style>
HelloWorld.vue
<script setup>
defineProps({
  msg: {
    type: String,
    required: true,
  },
})
</script>

<template>
  <div class="greetings">
    <h1 class="green">{{ msg }}</h1>
    <h3>
      You’ve successfully created a project with
      <a href="https://vite.dev/" target="_blank" rel="noopener">Vite</a> +
      <a href="https://vuejs.org/" target="_blank" rel="noopener">Vue 3</a>.
    </h3>
  </div>
</template>

<style scoped>
h1 {
  font-weight: 500;
  font-size: 2.6rem;
  position: relative;
  top: -10px;
}

h3 {
  font-size: 1.2rem;
}

.greetings h1,
.greetings h3 {
  text-align: center;
}

@media (min-width: 1024px) {
  .greetings h1,
  .greetings h3 {
    text-align: left;
  }
}
</style>
動き
- サーバ起動時にindex.htmlを読み込みます。
- index.html読み込み時にmain.jsを読み込みます。
- main.js読み込み時にApp.vueを読み込みます。
- App.vue読み込み時に、HelloWorld.vueを読み込みます。
- main.jsで読み込んだApp.vueをindex.htmlに反映します。
基本App.vueをいじって、部品化したいものはHelloWorld.vueのように分け、
index.html, main.jsは触らず放置でよさそうな気がします。
コード変更
App.vueを下記コードに変更します。
App.vue
<script setup>
import { ref, computed } from 'vue';

const bands = ref(getData());
const count = ref(0);

const bandNameArray = computed(() => Array.from(new Set(bands.value.map(band => band.bandName))));
const visibleBandArray = computed(() => getVisibleBand());

function getVisibleBand() {
  const visibleBand = bands.value.filter(band => !band.hidden);
  count.value = visibleBand.length;
  return visibleBand;
}

const changeBandName = (event) => {
  getDataByBandName(event.target.value);
}

function getDataByBandName(bandName) {
  bands.value.forEach(band => band.hidden = bandName === "" ? false : band.bandName !== bandName);
}

function getData() {
  return [
    {"id": 1, "bandName": "Ave Mujica", "memberName": "オブリビオニス", "birthday": "-", "roles": ["Key"], "hidden": false},
    {"id": 2, "bandName": "Ave Mujica", "memberName": "アモーリス", "birthday": "-", "roles": ["Dr"], "hidden": false},
    {"id": 3, "bandName": "Ave Mujica", "memberName": "ティモリス", "birthday": "-", "roles": ["Ba"], "hidden": false},
    {"id": 4, "bandName": "Ave Mujica", "memberName": "モーティス", "birthday": "-", "roles": ["Gt"], "hidden": false},
    {"id": 5, "bandName": "Ave Mujica", "memberName": "ドロリス", "birthday": "-", "roles": ["Gt", "Vo"], "hidden": false},
    {"id": 6, "bandName": "MyGO!!!!!", "memberName": "千早 愛音", "birthday": "9/8", "roles": ["Gt"], "hidden": false},
    {"id": 7, "bandName": "MyGO!!!!!", "memberName": "高松 燈", "birthday": "11/22", "roles": ["Vo"], "hidden": false},
    {"id": 8, "bandName": "MyGO!!!!!", "memberName": "長崎 そよ", "birthday": "5/27", "roles": ["Ba"], "hidden": false},
    {"id": 9, "bandName": "MyGO!!!!!", "memberName": "椎名 立希", "birthday": "8/9", "roles": ["Dr"], "hidden": false},
    {"id": 10, "bandName": "MyGO!!!!!", "memberName": "要 楽奈", "birthday": "2/22", "roles": ["Gt"], "hidden": false}
  ];
}
</script>

<template>
  <div>
    <p>件数: {{ count }}</p>
    <label for="bandList">バンド名:</label>
    <select id="bandList" @change="changeBandName">
      <option value=""></option>
      <option v-for="bandName in bandNameArray" :value="bandName" :key="bandName">{{ bandName }}</option>
    </select>
    <table>
      <thead>
        <tr>
          <th scope="col">バンド名</th>
          <th scope="col">メンバー</th>
          <th scope="col">誕生日</th>
          <th scope="col">担当</th>
        </tr>
      </thead>
      <tbody>
        <tr v-for="band in visibleBandArray" :key="band.id">
          <th scope="row" class="bandName">{{ band.bandName }}</th>
          <td class="memberName">{{ band.memberName }}</td>
          <td class="birthday">{{ band.birthday }}</td>
          <td class="roles">{{ band.roles.join(',') }}</td>
        </tr>
      </tbody>
    </table>
  </div>
</template>

<style scoped>
  table {
    border-collapse: collapse;
  }

  th, td {
    border-collapse: collapse;
    border: 1px solid;
  }

  .bandName, .memberName {
    text-align: left;
    width: 200px;
  }

  .birthday {
    text-align: right;
    width: 50px;
  }

  .roles {
    text-align: left;
    width: 50px;
  }
</style>
動作
初期表示

- getData()でデータを取得します。
- bandNameArrayで重複排除したデータをプルダウンにセットします。
- 1で取得したデータをvisibleBandArrayで加工します。
- 加工後のデータ数で件数を更新します。
- v-forにより加工後のデータ数分、行を作成します。
プルダウン表示
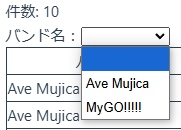
プルダウン選択(Ave Mujica)
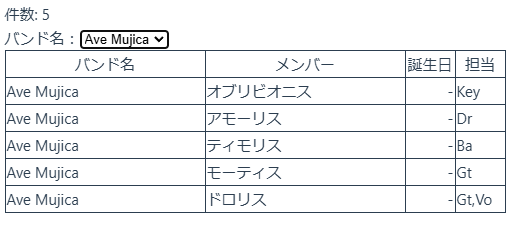
-
@changeによりchangeBandNameが呼ばれ、プルダウンの内容と一致するバンド名のみ表示するようにデータを加工します。
※bandsはref付きのため、データが更新されることでDOMが更新されます。 - DOMが更新されたことでbandsに依存した処理(v-forの処理)が再度実行され、件数とテーブルを更新します。
ref付きの変数が更新されるとその変数に依存した処理が再実行されます。
同じ値で更新された場合は再実行されません。
プルダウン選択(MyGO!!!!!)

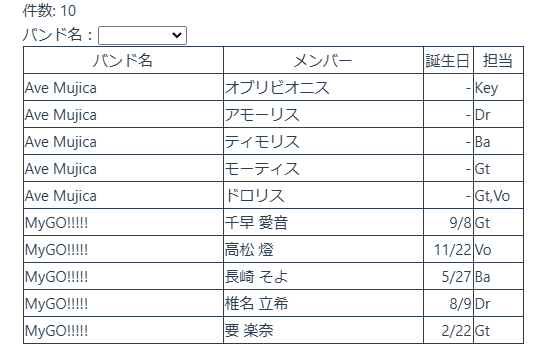
プルダウン選択(空欄)
感想
document.querySelector()と.value = ○○という処理やデータ数分何かする処理を簡略化できたのでバニラJSと比べて結構楽でした。
自分が初めて触ったVueは2のときだったのですが、その時と比べ記述もhtml, js寄りの記述になっているのでかなりやりやすかったです。
あと公式ドキュメントが読みやすく感動してます。