この記事はVALU Advent Calendar 1日目のエントリです。
こんばんは、Xamarin人材です。
現在はVALUという会社に所属しております。フィンテック感あふれるSNSです。
そこで私、いままではWPF/XamarinメインのC#er生活をしていましたが、最近はKotlinでAndroidネイティブ開発をしています。楽しいです。
はじめに
Android開発における設計パターンですが、最近はDataBindingを活用したMVVMパターンが比較的メジャーな選択肢になっているようです。そのおかげで、C#出身の私ですが比較的すんなり開発をすすめることができました。
とはいえ「あれはどうやるんだ」「これはできるのか」等々不安に思ったり都度調べたりしたことは多かったです。
そこで本記事では、3ヶ月前の自分が知りたかった、Androidネイティブ開発におけるDataBindingのポイントを、主にC#er視点で紹介していきたいと思います。
とりあえずデータバインディングをしてみたい
なんとなくでいいから、どんな感じでデータバインディングできるのかが知りたかったのです。とりあえずそれさえできれば色々察することが出来る気がしました。なので、ここから「とりあえずデータバインディングする」手順を示します。
テンプレートからActivityを生成
テンプレートは何を使ってもいいのですが、本記事の目的から鑑みて、雑味がないものを選びます。
なので、Android Studioのテンプレートの中から、"Basic Activity"を生成してみました。
次のような画面ができあがります。

FragmentのレイアウトXMLは以下のようになっています。
このコードを、DataBindingを利用するように変更していきたいとおもいます。
<?xml version="1.0" encoding="utf-8"?>
<android.support.constraint.ConstraintLayout
        xmlns:android="http://schemas.android.com/apk/res/android"
        xmlns:tools="http://schemas.android.com/tools"
        xmlns:app="http://schemas.android.com/apk/res-auto"
        android:layout_width="match_parent"
        android:layout_height="match_parent"
        tools:showIn="@layout/activity_main"
        tools:context=".MainActivityFragment">

    <TextView
            android:layout_width="wrap_content"
            android:layout_height="wrap_content"
            android:text="Hello World!"
            app:layout_constraintBottom_toBottomOf="parent"
            app:layout_constraintLeft_toLeftOf="parent"
            app:layout_constraintRight_toRightOf="parent"
            app:layout_constraintTop_toTopOf="parent"/>

</android.support.constraint.ConstraintLayout>
DataBindingするよ!とビルド定義で宣言
app/build.gradleにて、以下の記述を追加します。
android {
    ...
    dataBinding {
        enabled = true
    }
}
ViewModelを作成
たいへんシンプルなViewModelを実装しました。
textプロパティをViewにバインドできると素敵ですね。
class SampleViewModel {
    val text:String = "Hello Binding!!!"
}
レイアウトXMLにデータバインディングの定義を記述
WPF/XFのXAMLのように、XMLにデータバインディングの定義を記述します。
fragment_main.xmlを以下のように変更しました。
<?xml version="1.0" encoding="utf-8"?>
<!--ルート要素をlayoutタグにする-->
<layout
        xmlns:android="http://schemas.android.com/apk/res/android"
        xmlns:tools="http://schemas.android.com/tools"
        xmlns:app="http://schemas.android.com/apk/res-auto"
        >
    <!--ここでバインドするクラスを指定できる-->
    <data>
        <!--バインドするクラスの型と、それにアクセスするための変数名を指定する-->
        <variable name="viewModel" type="in.kikr.android.bindingsample.viewmodel.SampleViewModel"/>
    </data>
    <android.support.constraint.ConstraintLayout
            android:layout_width="match_parent"
            android:layout_height="match_parent"
            tools:showIn="@layout/activity_main"
            tools:context=".MainActivityFragment">

        <!--@{hogehoge}と記述することでバインドできる-->
        <TextView
                android:layout_width="wrap_content"
                android:layout_height="wrap_content"
                android:text="@{viewModel.text}"
                app:layout_constraintBottom_toBottomOf="parent"
                app:layout_constraintLeft_toLeftOf="parent"
                app:layout_constraintRight_toRightOf="parent"
                app:layout_constraintTop_toTopOf="parent"/>

    </android.support.constraint.ConstraintLayout>
</layout>
ポイントは以下の3点です。
- AndroidでDataBindingを行う場合、上記のようにレイアウトを
<layout>タグで囲む必要があります。 -
<data>タグでは、XAMLでいうところのBindingContext/DataContextにあたるものとして、データバインディング先のViewModel(とは限らないですが)を指定するプロパティを<variable>タグで定義します。 - 実際のバインディング定義は、
@{クラス名.プロパティ}と記述します。
レイアウトのInflate処理の書き換え
XMLレイアウトを<layout>タグで囲むことで、Bindingクラスと呼ばれるクラスが自動生成されます。このクラスでは、レイアウトに含まれるViewやvariableへの参照を持っており、それらにアクセスが可能です。1
また、レイアウトのInflate(XMLからViewを生成する処理)についても、Bindingクラスを経由して行う必要があります。今回はMainActicvityFragment(fragment_main.xml)のレイアウト定義をDataBindingを利用するように変更しましたので、以下のようにMainActivityFragment.ktのOnCreateViewを書き換えましょう。
    override fun onCreateView(
        inflater: LayoutInflater, container: ViewGroup?,
        savedInstanceState: Bundle?
    ): View? {
        // Bindingクラスを通してInflateする
        val binding = FragmentMainBinding.inflate(inflater, container, false)
        // DataBindingのため、ViewModelをセットする
        binding.viewModel = SampleViewModel()
        // inflateしたroot要素を返してやる
        return binding.root
    }
動作確認
TextViewの文字列が、SampleViewModelで指定した文字列となっていることがわかるかとおもいます。
以上、基本的なデータバインディングの手順でした。ここからは、XAML慣れした皆様が気になるであろうポイントを解説していきます。
XAMLでやってたアレはどうやるの
INotifyPropertyChanged的なやつとかは?
DataBindingに不可欠なプロパティ変更通知機構ですが、Androidでは android.databinding.Observableというインターフェースがあり、いわゆるC#でのINotifyPropertyChanged的なアレです。
あとは、多少簡便化するためのObservableFieldというクラスも存在します。
[ObservableField] (https://developer.android.com/topic/libraries/data-binding/#observablefields)
私はRxProperty派です
私はC#erの頃にはReactivePropertyを大変便利に使わせていただいていたので、AndroidネイティブでもRxProperty というライブラリを使わせていただいております。
RxPropertyの使い勝手はReactivePropertyとほぼ同じなので、特に戸惑うことはないんじゃないかなぁと思います。控えめに言って最高です。
(場合によってはLiveDataも使ったりはしますが、事情に応じて使い分けています。)
双方向Bindingはどうやるの
双方向Bindingのサンプルとして、MainActivityFragmentにEditTextを追加してみました。
次のように記述することで、双方向Bindingとなります。=を足すだけですね。
<?xml version="1.0" encoding="utf-8"?>
<!--ルート要素をlayoutタグにする-->
<layout
        xmlns:android="http://schemas.android.com/apk/res/android"
        xmlns:tools="http://schemas.android.com/tools"
        xmlns:app="http://schemas.android.com/apk/res-auto"
        >
    <!--ここでバインドするクラスを指定できる-->
    <data>
        <!--バインドするクラスの型と、それにアクセスするための変数名を指定する-->
        <variable name="viewModel" type="in.kikr.android.bindingsample.viewmodel.SampleViewModel"/>
    </data>
    <android.support.constraint.ConstraintLayout
            android:layout_width="match_parent"
            android:layout_height="match_parent"
            tools:showIn="@layout/activity_main"
            tools:context=".MainActivityFragment">

        <!--@{hogehoge}と記述することでバインドできる-->
        <TextView
                android:id="@+id/textView"
                android:layout_width="wrap_content"
                android:layout_height="wrap_content"
                android:text="@{viewModel.text}"
                app:layout_constraintBottom_toBottomOf="parent"
                app:layout_constraintLeft_toLeftOf="parent"
                app:layout_constraintRight_toRightOf="parent"
                app:layout_constraintTop_toTopOf="parent"/>

        <!--@={hogehoge}と記述することで双方向にバインドできる-->
        <EditText
                android:id="@+id/editText"
                android:layout_width="wrap_content"
                android:layout_height="wrap_content"
                android:text="@={viewModel.text}"
                app:layout_constraintLeft_toLeftOf="parent"
                app:layout_constraintRight_toRightOf="parent"
                app:layout_constraintTop_toBottomOf="@id/textView"
                android:inputType="text"/>


    </android.support.constraint.ConstraintLayout>
</layout>
また、ViewModelのtextプロパティをObservableFieldに変更しています
class SampleViewModel {
    val text: ObservableField<String> = ObservableField("Hello Binding!!!")
}
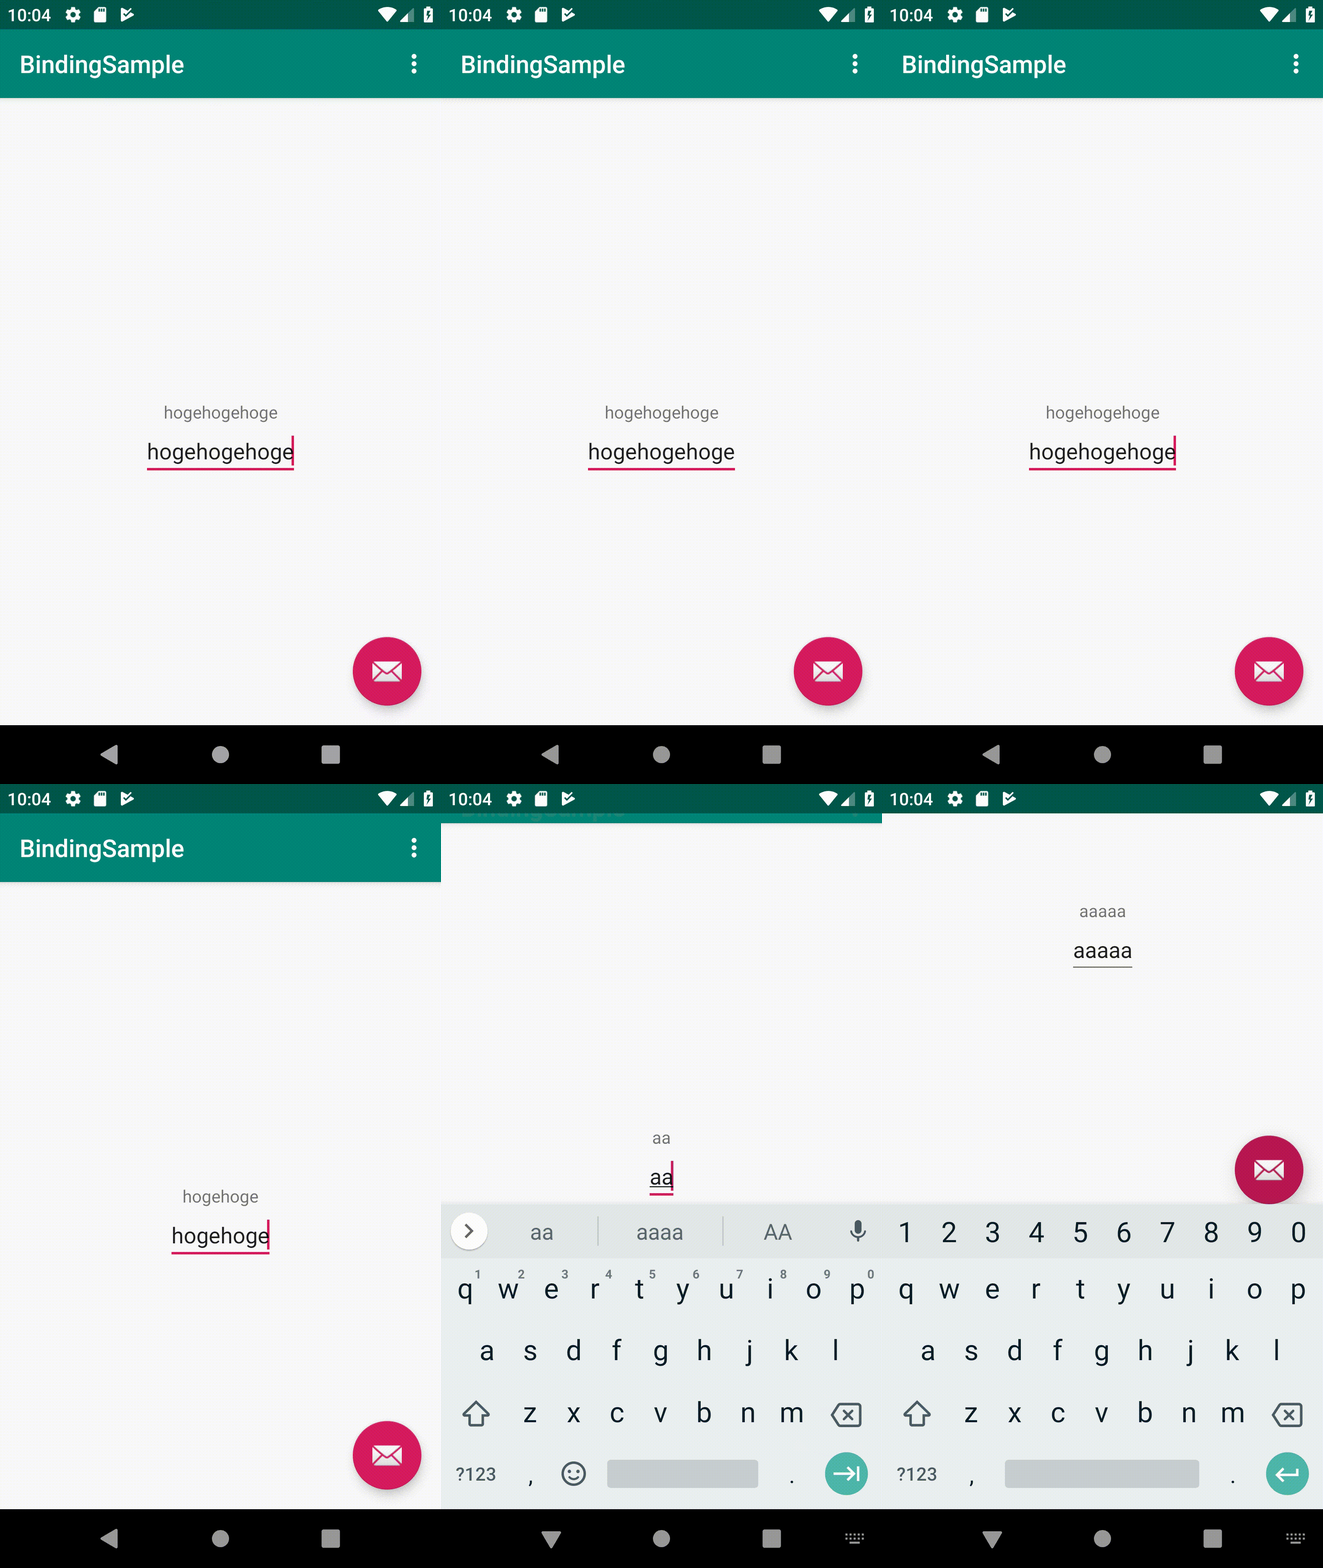
動作デモです。
EditTextに入力した値が即座にtextプロパティに反映され、その結果としてTextViewの文字列も追従していきます。

ValueConverterは?
XMLのバインディング定義の中で、以下のような表現が可能です。
android:text="@{String.valueOf(index + 1)}"
android:visibility="@{age < 13 ? View.GONE : View.VISIBLE}"
android:transitionName='@{"image_" + id}'
これでだいたいお察しいただけると思いますが、
- BooleanからVisibilityに変換したり
- コレクションが空のときに非表示にしたり
- 特定の条件下でのみビューを表示したり
みたいなことが、XMLに書くだけで実現できたりします。{StaticResource BoolToVisibilityConverter}みたいなことをしなくていいのが大変うれしいです。
詳しくは、公式ドキュメントの以下の説が参考になります。
https://developer.android.com/topic/libraries/data-binding/?hl=ja#expression_language
https://developer.android.com/topic/libraries/data-binding/#converters
動作デモ
テキストが空のときにだけ「空じゃん!!!」と表示するようにしてみました。

レイアウトは以下のようになりました。
<?xml version="1.0" encoding="utf-8"?>
<layout
        xmlns:android="http://schemas.android.com/apk/res/android"
        xmlns:tools="http://schemas.android.com/tools"
        xmlns:app="http://schemas.android.com/apk/res-auto"
        >
    <data>
        <variable name="viewModel" type="in.kikr.android.bindingsample.viewmodel.SampleViewModel"/>

        <!--additionalTextViewのVisibilityのためにViewをインポートしておく-->
        <import type="android.view.View"/>
    </data>
    <android.support.constraint.ConstraintLayout
            android:layout_width="match_parent"
            android:layout_height="match_parent"
            tools:showIn="@layout/activity_main"
            tools:context=".MainActivityFragment">

        <TextView
                android:id="@+id/textView"
                android:layout_width="wrap_content"
                android:layout_height="wrap_content"
                android:text="@{viewModel.text}"
                app:layout_constraintBottom_toBottomOf="parent"
                app:layout_constraintLeft_toLeftOf="parent"
                app:layout_constraintRight_toRightOf="parent"
                app:layout_constraintTop_toTopOf="parent"/>

        <EditText
                android:id="@+id/editText"
                android:layout_width="wrap_content"
                android:layout_height="wrap_content"
                android:text="@={viewModel.text}"
                app:layout_constraintLeft_toLeftOf="parent"
                app:layout_constraintRight_toRightOf="parent"
                app:layout_constraintTop_toBottomOf="@id/textView"
                android:inputType="text"/>

        <!--viewModel.textが空の時にだけ表示したいTextView-->
        <TextView
                android:id="@+id/additionalTextView"
                android:layout_width="wrap_content"
                android:layout_height="wrap_content"
                android:text="@string/empty_text"
                android:textColor="?attr/colorError"
                app:layout_constraintLeft_toLeftOf="parent"
                app:layout_constraintRight_toRightOf="parent"
                app:layout_constraintTop_toBottomOf="@id/editText"
                android:visibility="@{viewModel.text.isEmpty() ? View.VISIBLE : View.GONE}"
                />

    </android.support.constraint.ConstraintLayout>
</layout>
ポイントは以下のとおりです。
- kotlinコードは一切手を入れていない
-
additionalTextViewのVisibilityを、viewModel.textによって切り替えている(三項演算子的な書き方) - 名前空間の省略のために、
android.view.Viewをimportしている
CollectionBinding, DataTemplateは?
C#でObservableCollectionをListViewにバインドして、DataTemplateをつかって型によってレイアウトを変える、みたいなことはやりたくなりますよね。
大丈夫です。出来ます。
私は以下のライブラリがお気に入りです。大変お世話になっています。
このライブラリだけで、私のやりたかったことは大体実現可能でした。READMEがとても親切なので、使い方についてはそちらを参照いただければ問題ないと思いますが、このライブラリの利用方法やTipsについて、本AdventCalendarのどこかで解説できればなぁと思っています。
その他うれしかったこと
- XML中でViewModelのメソッド呼び出しができる(もちろんパラメータも渡せる)
- BindingAdapterという機構でかなり自由なバインド定義が可能
これらのおかげで、XAMLではTriggerやBehaviorで実現していたようなことも大体可能なのではないかな?と思います。また、
-
variable内のdataは複数指定できる(=複数のViewModelをバインド出来る)
というのも便利でした。RecyclerViewにバインドするItemについて、各要素のViewModelと、親ViewModelを2つともバインドしたりとか。
さいごに
ある程度勝手がわかった後でもいいので、ドキュメントはきちんと読もう!
まとめ
このように、Androidでは、高度なデータバインディングを手軽に実現できます。C#erも納得です。
そして当たり前ですが、C#での経験も無駄になりません。
個人的なお気に入りポイントはXMLで式を書ける点です。これはとても便利で、XAMLと比較してもかなり柔軟、かつ手軽にデータバインディングができて幸せだなぁと感じている昨今です。
Android Data Bindingに関連する便利テクニックや、いやいやお前が知らないだけでXAMLはもっと便利だ、というTipsがあればぜひ教えて頂けると嬉しいです。
次回はCollectionBindingのあたりを詳しく解説する予定です。
-
Bindingクラスから
Viewにアクセスできるおかげで、FindViewByIdとかする必要はなくなりました。素晴らしいですね ↩