はじめに
この記事では、Visual Studio(C++)でのRealSenseの開発に必要となるlibrealsense2とOpenCVの導入方法について紹介します
動作環境
- intel RealSense Depth Camera D435(購入はこちらから)
- Windows 10 Home(1909)
- Visual Studio 2019
- Intel.RealSense.SDK-WIN10-2.39.0.2337
- OpenCV 4.4.0
librealsense2のダウンロード
① IntelRealSenseのサイト から最新の IntelRealSnese.SDK.WIN10-*.exe をダウンロード
② ダウンロードファイルの実行、インストール
⇒ Intel RealSense Viewer,Examples for Intel RealSense SDK(サンプルプログラム)等
③ C:\Progran Files(x86) 内に Intel RealSense SDK 2.0 のフォルダができていることを確認
OpenCVのダウンロード
(※OpenCVが必要ない場合は飛ばす)
① githubのOpenCVページ から最新の opencv-*.-vc_14_vc_15.exe をダウンロード
② ダウンロードファイルの実行、適当な場所に展開
③ 作成された「opencv」というファイルをC直下へ移動
Visual Studioの設定
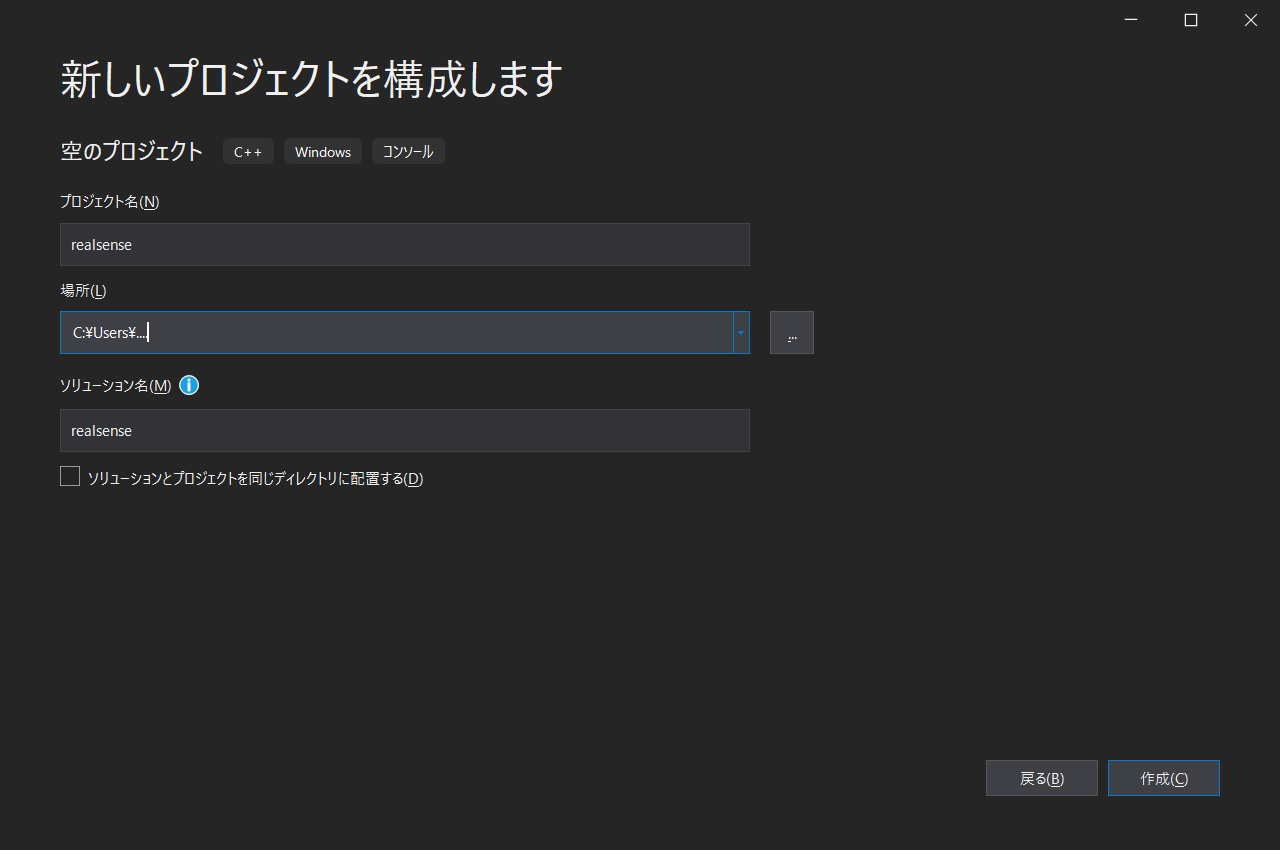
① Visual Studioを起動、適当な場所に新規プロジェクトの作成
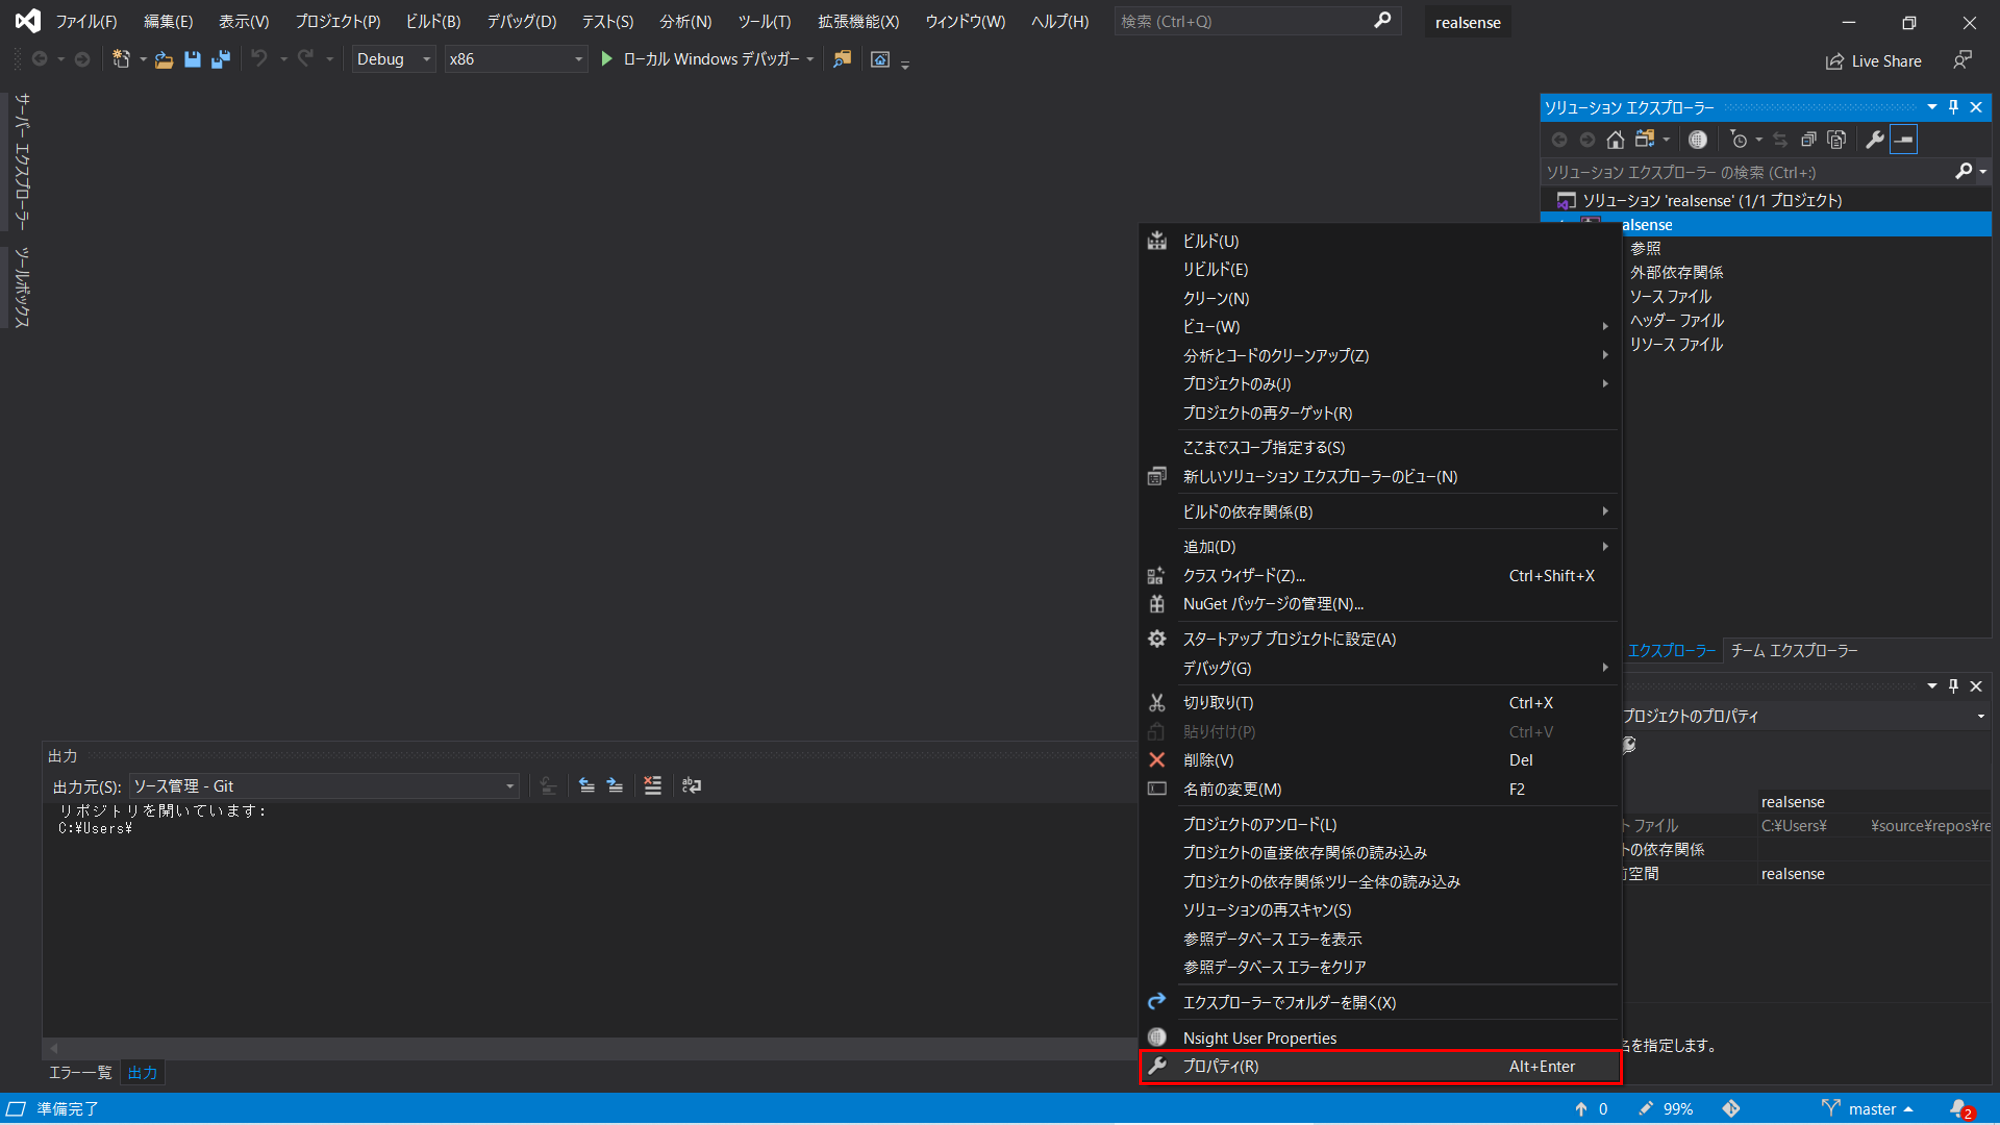
② プロジェクト名を右クリックしてプロパティを開く
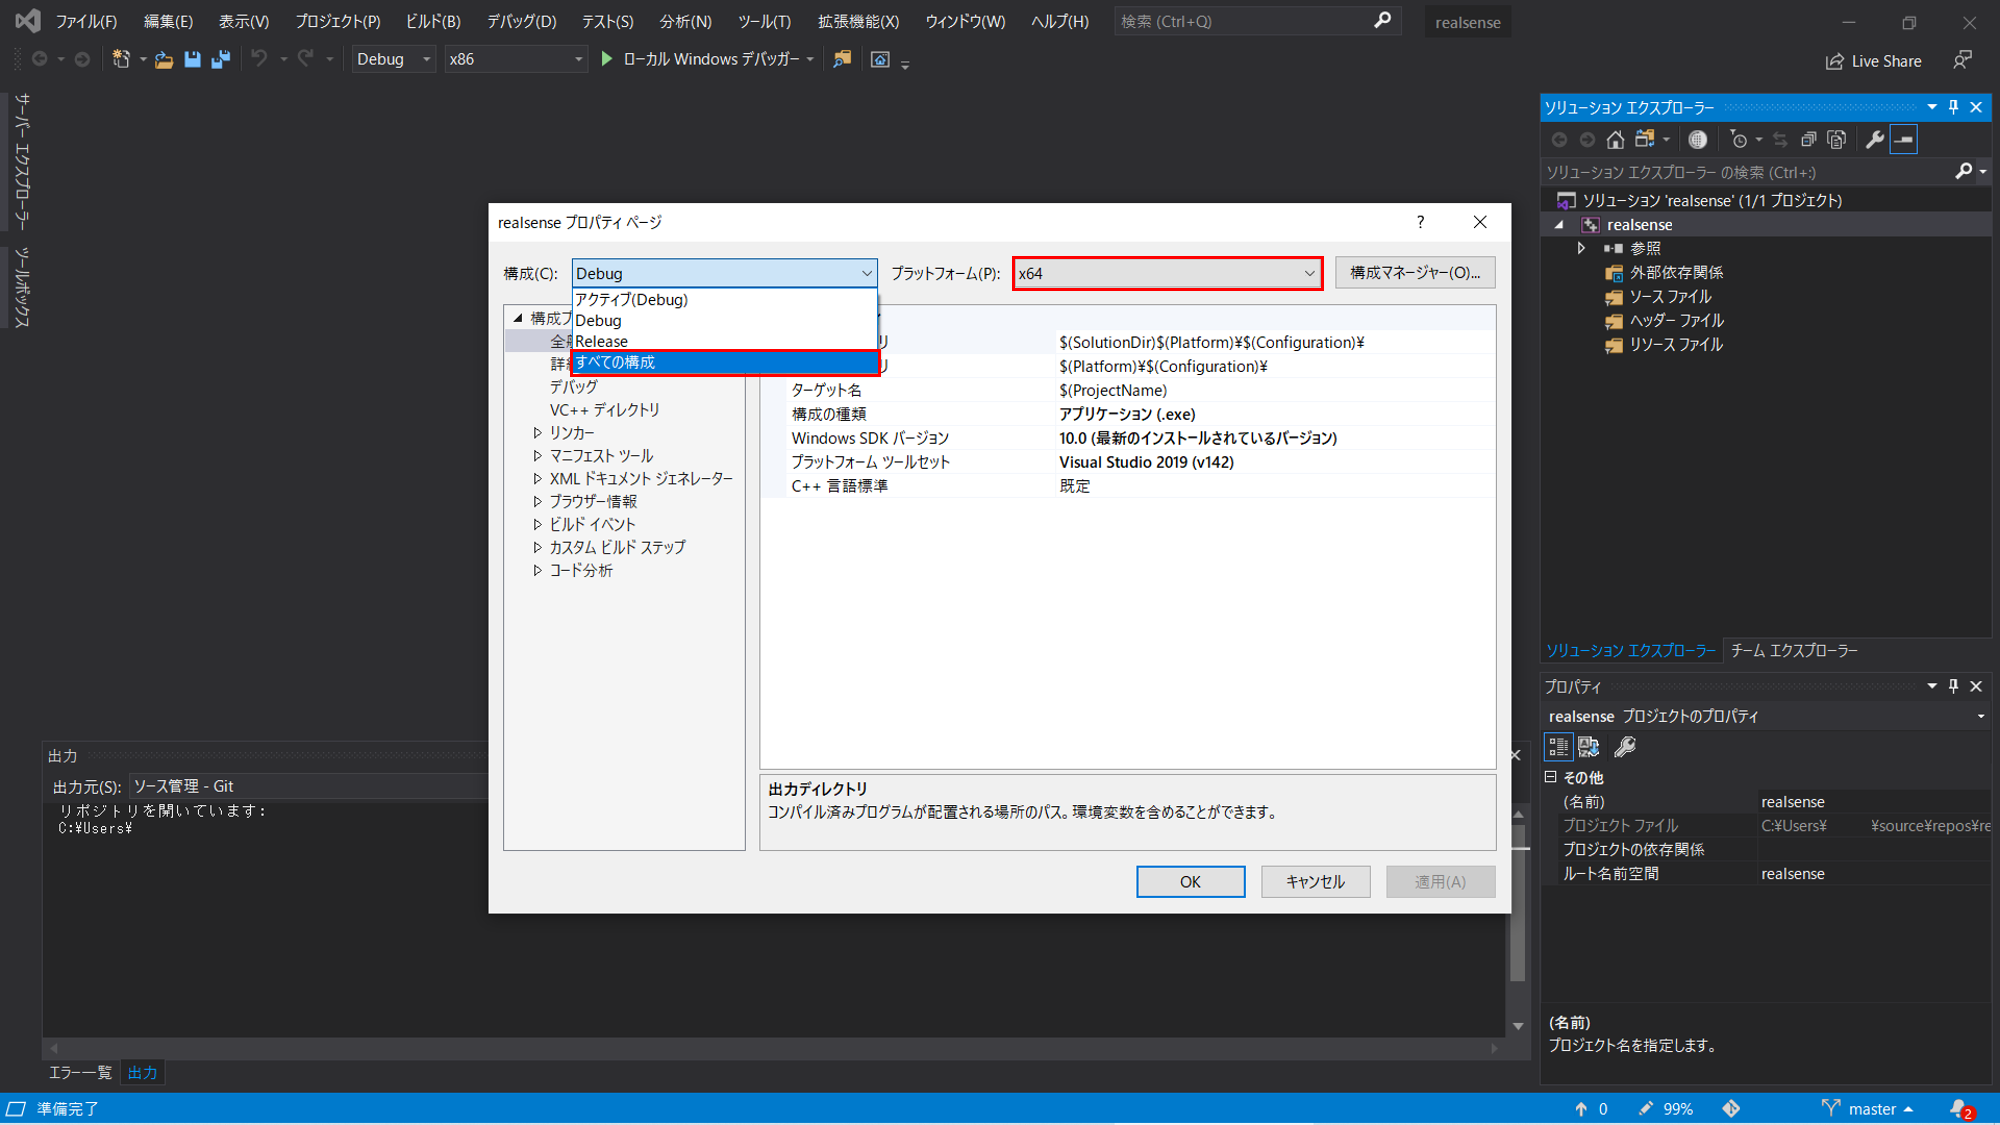
③ 構成:すべての構成、プラットフォーム:64x を選択
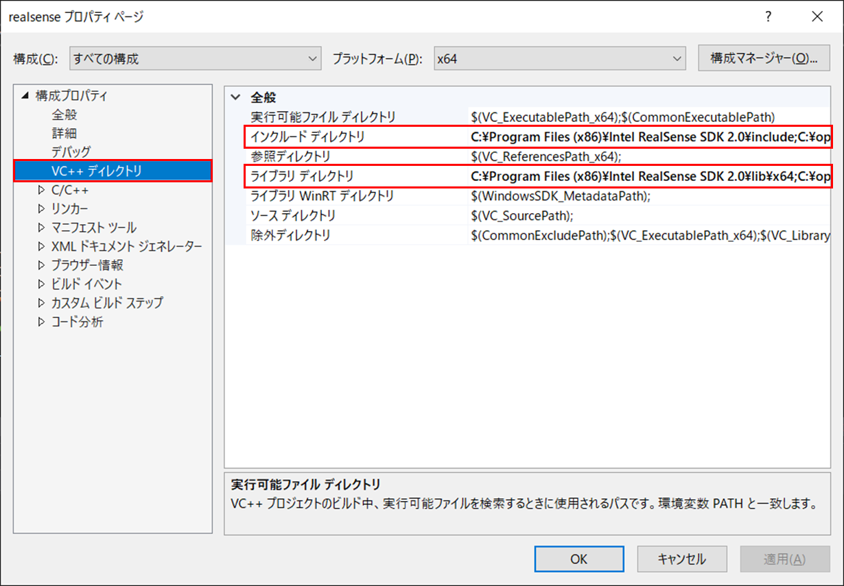
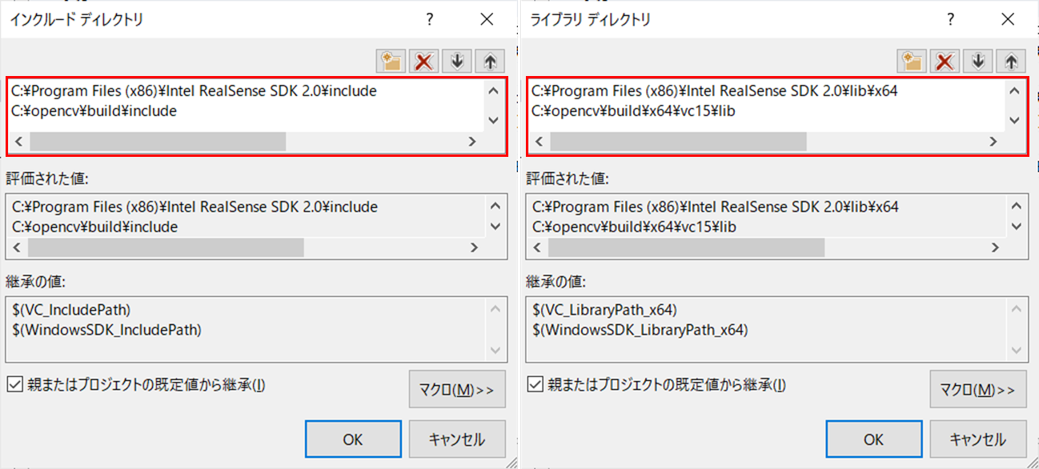
④ 構成プロパティ→VC++ディレクトリで
インクルードディレクトリを C:\Program Files (x86)\Intel RealSense SDK 2.0\include と C:\opencv\build\include
ライブラリディレクトリを C:\Program Files (x86)\Intel RealSense SDK 2.0\lib\x64 と C:\opencv\build\x64\vc15\lib
に設定
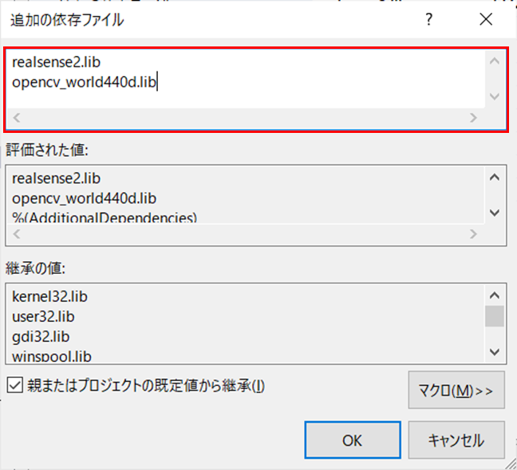
⑤ リンカー→入力で
追加の依存ファイルを realsense2.lib と opencv_world430d.lib に設定
適用→OK

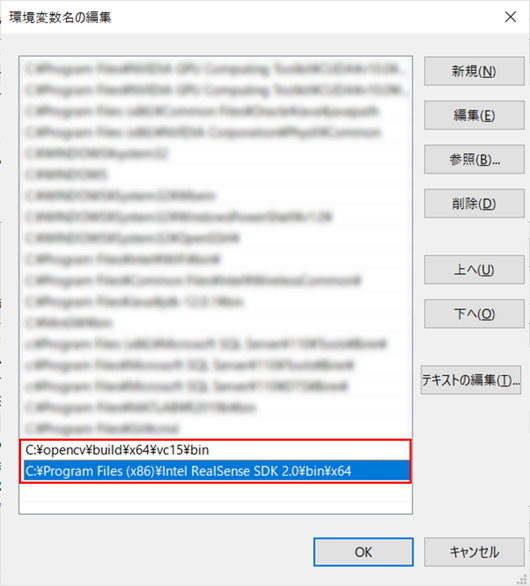
環境変数の設定
環境変数に C:\opencv\build\x64\vc15\bin と C:\Program Files (x86)\Intel RealSense SDK 2.0\bin\x64 を追加
その後、環境変数を適用するために再起動する
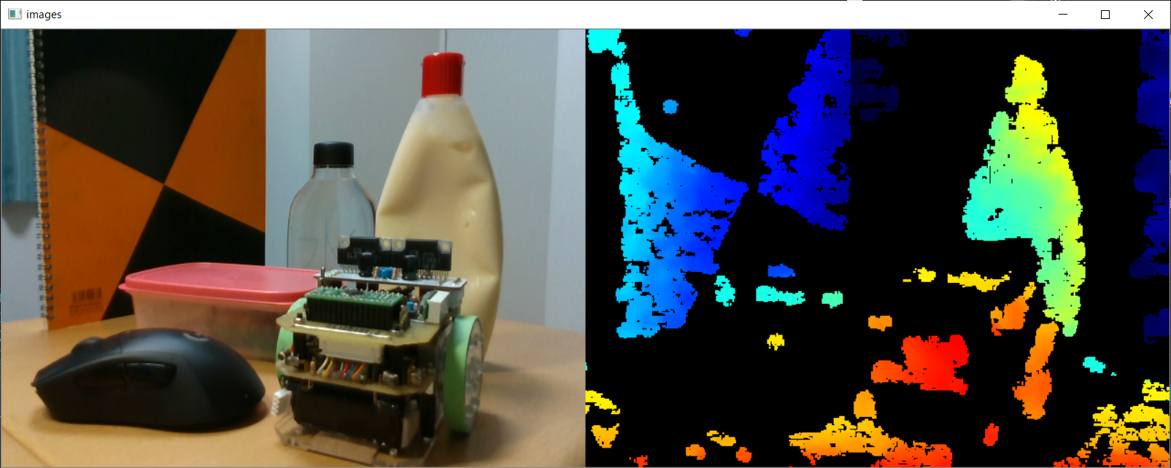
動作確認
RealSense SDKのサンプルプログラムをもとに作成した以下のプログラムが実行できれば成功
# include <librealsense2/rs.hpp>
# include <opencv2/opencv.hpp>
# include <iostream>

int main(int argc, char* argv[]) try
{
    int WIDTH = 640;
    int HEIGHT = 480;
    int FPS = 30;
    rs2::config config;
    config.enable_stream(RS2_STREAM_COLOR, WIDTH, HEIGHT, RS2_FORMAT_BGR8, FPS);
    config.enable_stream(RS2_STREAM_DEPTH, WIDTH, HEIGHT, RS2_FORMAT_Z16, FPS);
    rs2::pipeline pipe;
    pipe.start(config);

    rs2::colorizer color_map;
    rs2::align align(RS2_STREAM_COLOR);

    for (int i = 0; i < 3; i++)
    {
        rs2::frameset frames = pipe.wait_for_frames();
        cv::waitKey(10);
    }

    while (true)
    {
        rs2::frameset frames = pipe.wait_for_frames();
        auto aligned_frames = align.process(frames);
        rs2::video_frame color_frame = aligned_frames.first(RS2_STREAM_COLOR);
        rs2::video_frame depth_frame = aligned_frames.get_depth_frame().apply_filter(color_map);

        cv::Mat color_image(cv::Size(WIDTH, HEIGHT), CV_8UC3, (void*)color_frame.get_data(), cv::Mat::AUTO_STEP);
        cv::Mat depth_image(cv::Size(WIDTH, HEIGHT), CV_8UC3, (void*)depth_frame.get_data(), cv::Mat::AUTO_STEP);

        cv::Mat images(cv::Size(2 * WIDTH, HEIGHT), CV_8UC3);
        cv::Mat color_positon(images, cv::Rect(0, 0, WIDTH, HEIGHT));
        color_image.copyTo(color_positon);
        cv::Mat depth_positon(images, cv::Rect(WIDTH, 0, WIDTH, HEIGHT));
        depth_image.copyTo(depth_positon);
        cv::imshow("images", images);

        if (cv::waitKey(10) == 27)  // ESCキーで終了
        {
            cv::destroyAllWindows;
            break;
        }
    }
    pipe.stop();

    return EXIT_SUCCESS;
}
catch (const rs2::error& e)
{
    std::cerr << "RealSense error calling " << e.get_failed_function() << "(" << e.get_failed_args() << "):\n    " << e.what() << std::endl;
    return EXIT_FAILURE;
}
catch (const std::exception& e)
{
    std::cerr << e.what() << std::endl;
    return EXIT_FAILURE;
}
テンプレートの作成
ここまでのVisual Studioの設定を新規プロジェクトを作成した場合でも再度行わなくていいようにテンプレートを作成しておくと開発が進めやすくなる
① main.cppの内容かファイル自体を削除
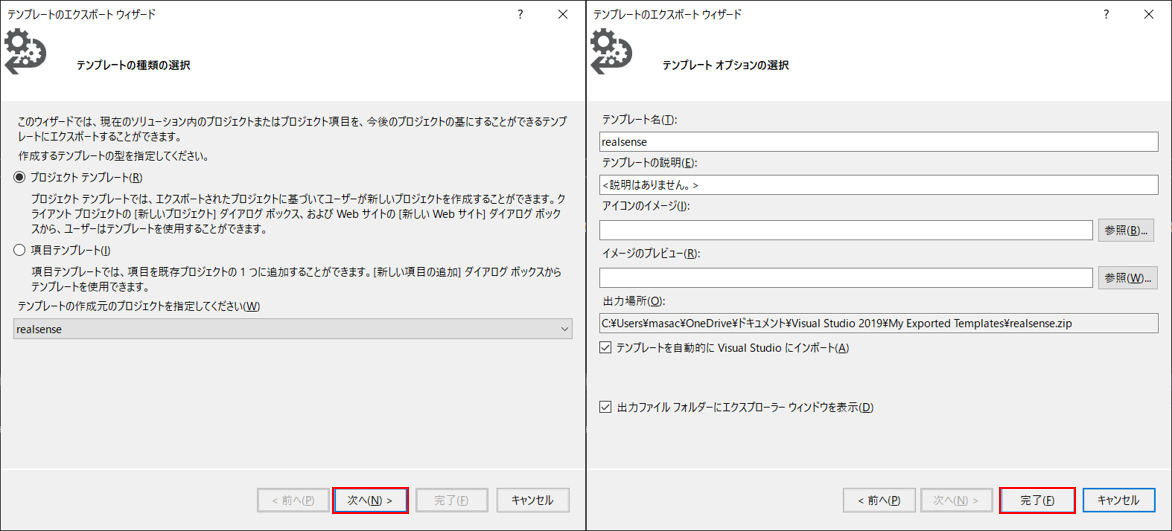
② プロジェクト→テンプレートのエクスポートを選択
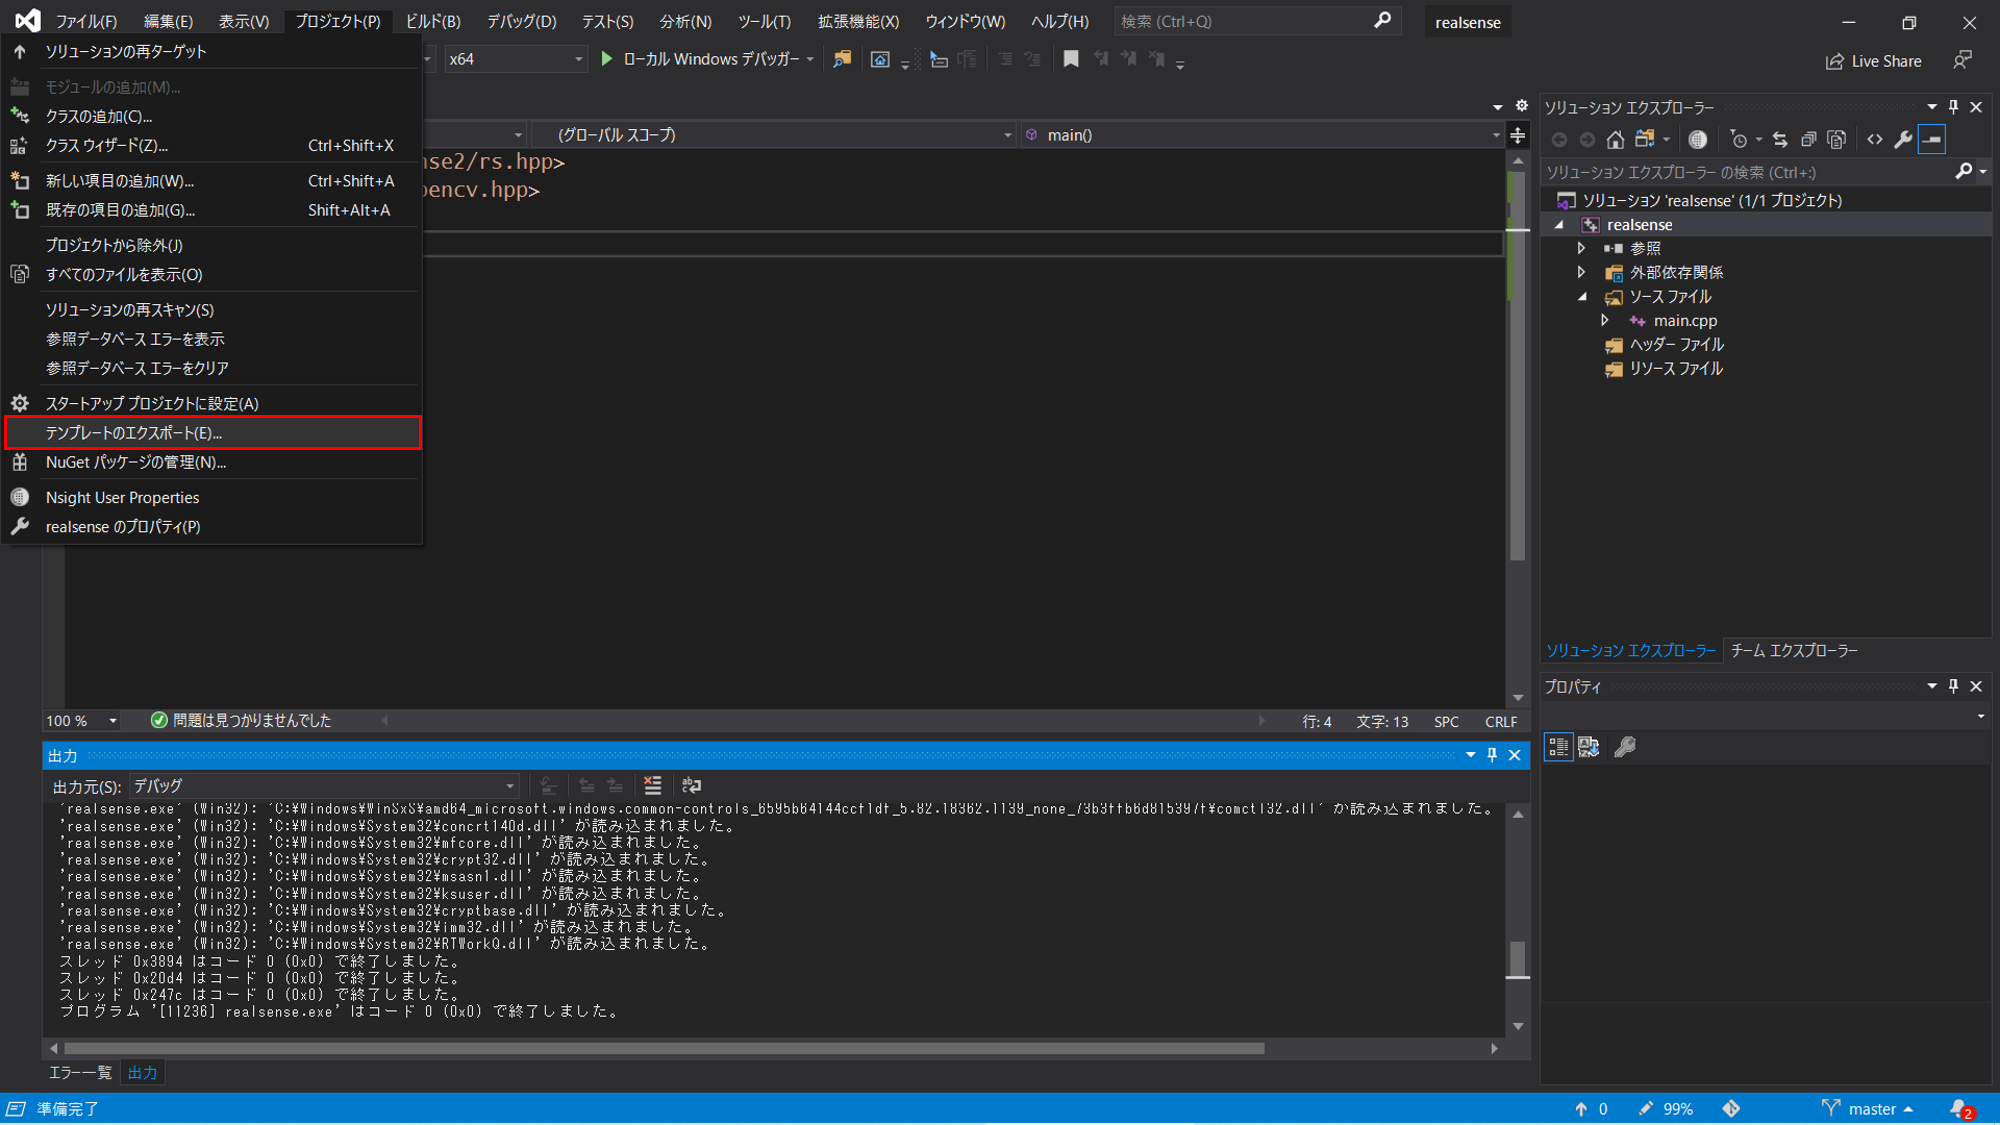
③ デフォルトのまま次へ、完了
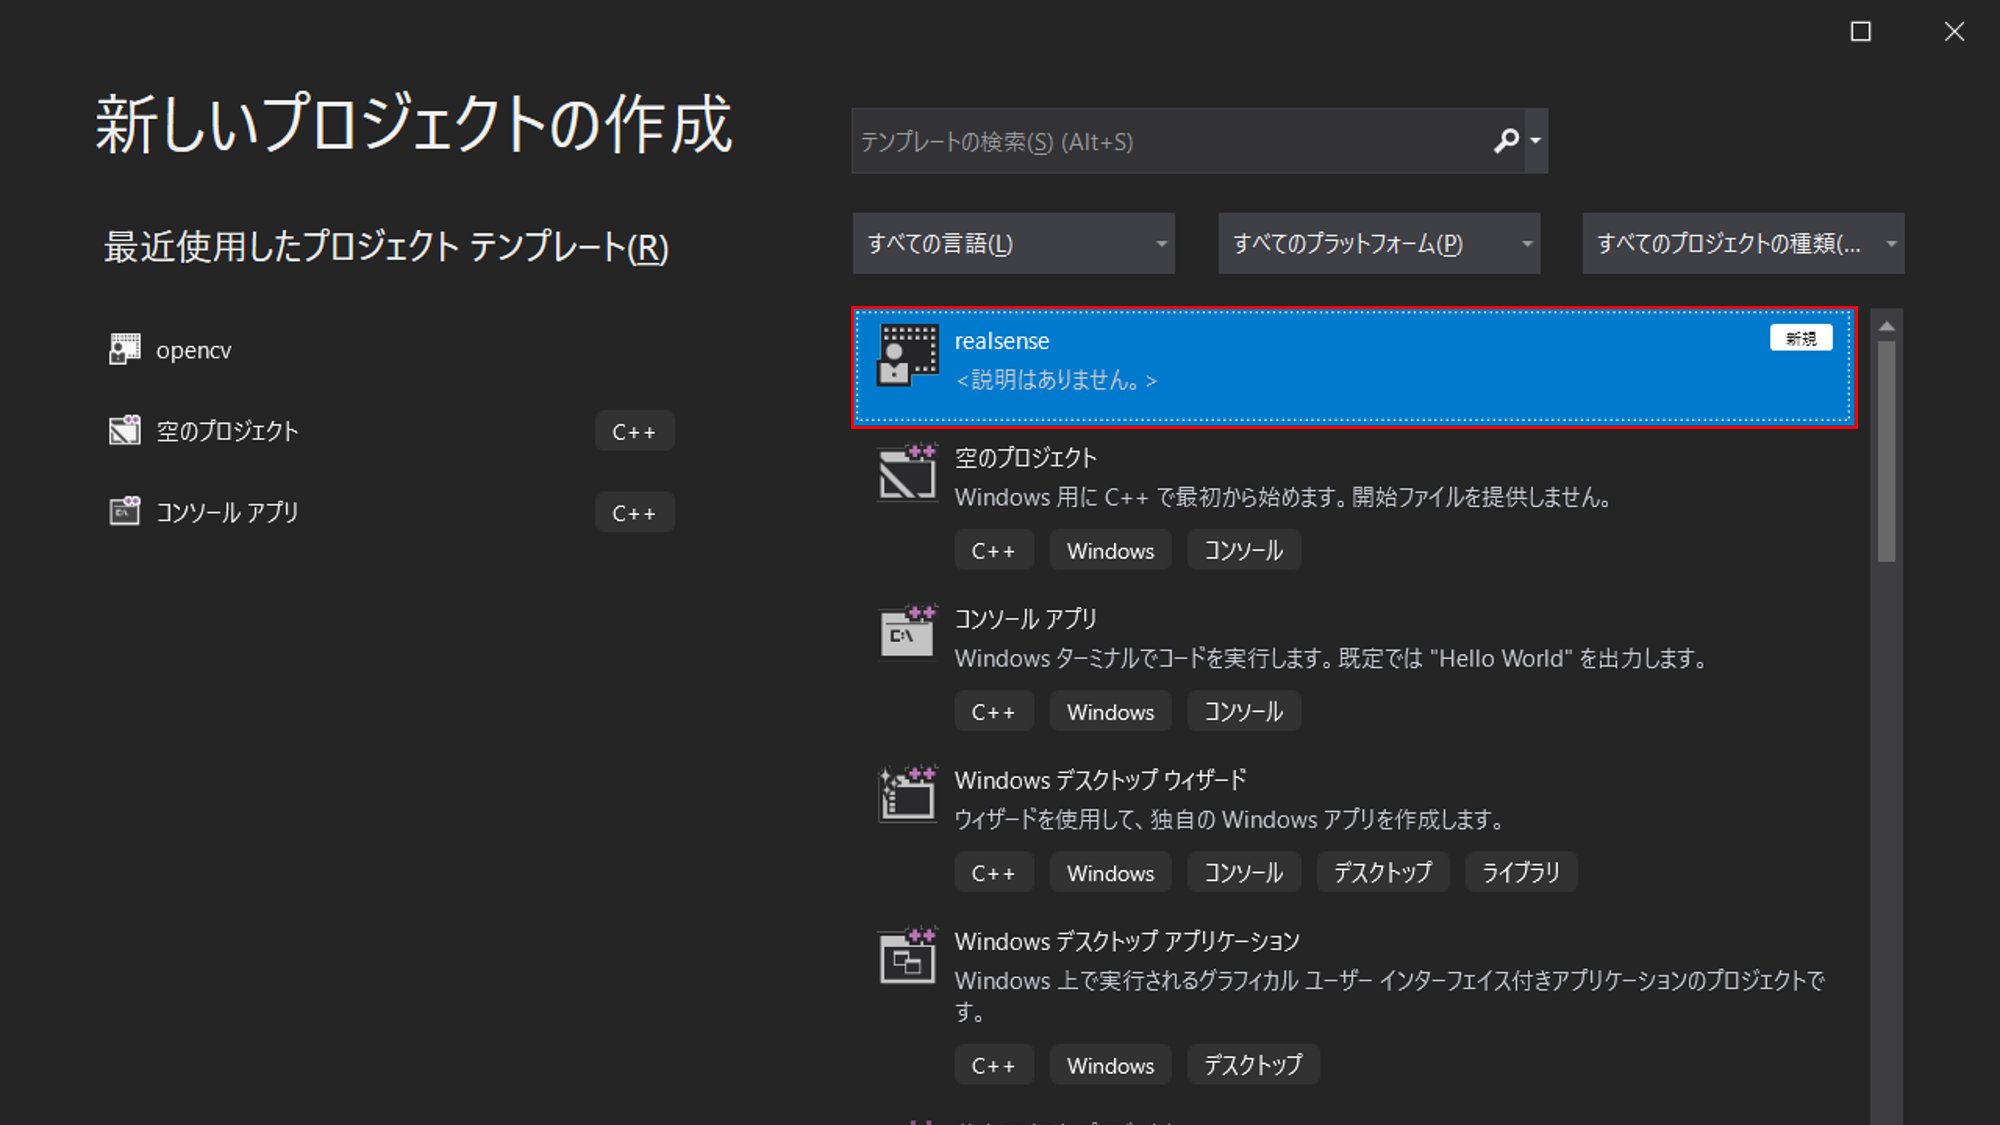
④ 正常にテンプレートが作成されると、新規プロジェクトを作成する際に「realsense」のテンプレートが表示される
終わり