React × LaravelでのSeverside Rendering
業務でSSR化が必要になり、色々と苦労したのでメモ。
あまり文献もない為誰かの助けになったら嬉しいです。
目標
今回はファーストビューのレスポンスをあげる目的もそうですが、内部でAPIを叩いて動的に生成されるコンテンツをFacebookやTwitterのOGPに写真付きであげれるようするまでがゴール
前提条件
- LaravelのスカフォールドでReactをビルドインしている
参考
サーバーは新規にNodeサーバーなどは立てずにPHPサーバーで行う。
最初からReact-Laravelを使っていれば早かった。。
- Laravelはv5.5LTS、Reactはv16.4、react-router v4を使用
NodeサーバーでのSSRの違い
本来Nodeサーバーで行うサーバーサイドレンダリングと少し考え方が違います。
自分はその違いに全く気づけずかなりハマりました。。。
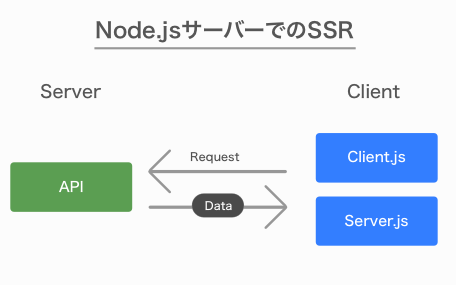
Nodeサーバーで行うSSRの場合と今回では、データのfetchの仕方に違いがありました。
Nodeサーバーの場合
Nodeサーバーの際は一つのAPIに対してリクエストをどちらからでも投げれる仕様
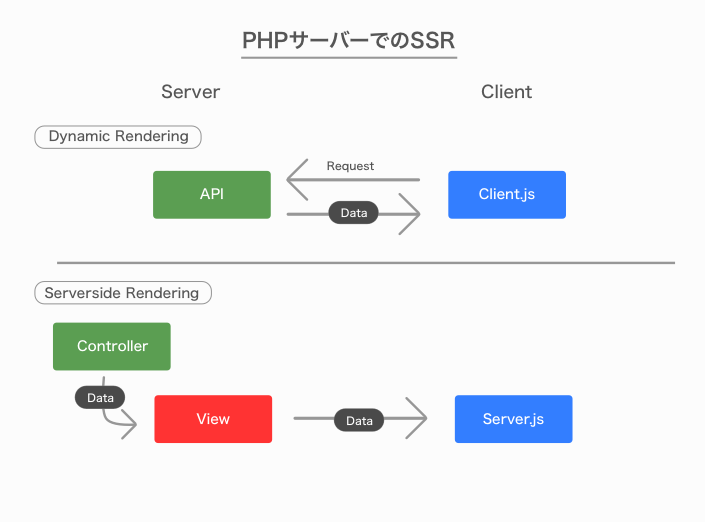
PHPサーバーの場合
しかし今回の場合はSSRする際はcontrollerでデータを作成して、Viewを介してClientに渡す必要があります。
しかしDynamic Rendering(SSRではない通常の読み込み)に対してはAPIへのリクエストを投げる必要がある為、SSR時の処理とDynamic Rendering時の処理をClient側で1つ1つ制御する必要があります。
準備
というわけでライブラリの下準備をReadmeを見ながら進めます。
1. インストール
composer require spatie/laravel-server-side-rendering

php artisan vendor:publish --provider="Spatie\Ssr\SsrServiceProvider" --tag="config"
2. Nodeのパスの設定
内部でV8エンジンを使う為Nodeへのパスの設定が必要になります。
// Nodeのパス取得

which node

// => 自分の環境だと /Users/ksk/.nodebrew/current/bin/node
取得したパスを.envに加えます。
ついでに同ファイル内のAPP_ENVをlocalからproductionに修整しておきます。
productionにしていないと「ソースを表示」でうまく表示されない為です。
// 追加
NODE_PATH=/Users/ksk/.nodebrew/current/bin/node

//修整
APP_ENV="production"
3. デバッグ用(?)の ファイル作成
storage > appの中にssrというフォルダを新規に作成します。
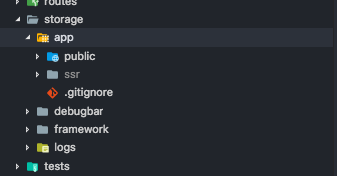
以上で準備は完了です!
Laravel側でのデータの準備、受け渡し
4. Routes、Controllerの作成
という事でRoutesファイルでパスの指定とコントローラーを内で取得したデータをviewファイルにreturnします。
Route::get('/', 'SSRSampleController@getData');
class UserTimelineController extends Controller {
  public function getData() {
    //
    // 諸々処理
    //

    return view('/ssrSample', ['data' => $data]);
  }
}
5. Viewファイル作成
Viewファイルを作成します。
その際にOGP、Title、Descriptionも設定します。
@extends('layout.common')

@section('header')
  <meta name="description" content="{{ $data->description }}">

  <!-- Facebook Meta Tags -->
  <meta property="fb:app_id" content="xxxxxxxxxxxxx">
  <meta property="og:url" content="https://xxxxxxx/post/{{ $data->id }}">
  <meta property="og:type" content="website">
  <meta property="og:title" content="{{ $data->title}}">
  <meta property="og:description" content="{{ $data->description}}">
  <meta property="og:image" content="{{ $data->image }}">
  <meta property="og:site_name" content="freeC" />

  <!-- Twitter Meta Tags -->
  <meta name="twitter:card" content="summary_large_image">
  <meta name="twitter:title" content="{{ $data->title }}">
  <meta name="twitter:description" content="{{ $data->description }}">
  <meta name="twitter:image" content="{{ $data->image }}">

  <title>{{ $data->title }}</title>
@endsection

@section('content')
{!! ssr('js/server.js')
  ->context(['data' => $data])
  ->fallback('<div id="root"></div>')
  ->render()!!}

<script defer>
  window.__PRELOADED_STATE__ = @json(['data' => $data]);
</script>
@endsection
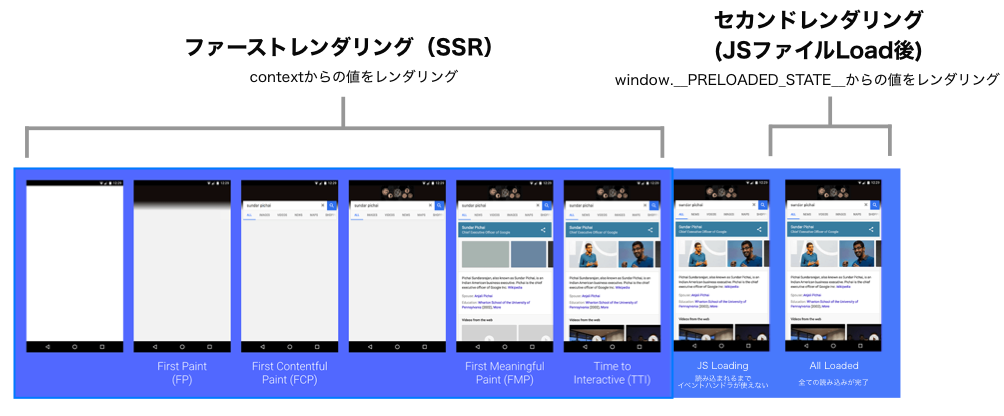
この中のssr()の中でcontextの配列の中にcontrollerで取得したデータを仕込みJSファイルへ流します。
window.__PRELOADED_STATE__はサーバーサイドレンダリングが終わりjsファイルのロード後のセカンドレンダリング時に使われます。
React側の処理
6. Server.jsの作成
サーバーレンダリングの際の受け口となるserver.jsを作成します。
import React from 'react';
import ReactDOMServer from 'react-dom/server';
import { StaticRouter } from 'react-router-dom';
import { Provider } from 'react-redux';
import { createStore, combineReducers } from 'redux';
import reducers from './reducers/';

import Routing from './Routing';

const store = createStore(combineReducers(reducers), context);

const html = ReactDOMServer.renderToString((
  <div id="root">
    <Provider store={store}>
      <StaticRouter location={context.url} context={context}>
        <Routing context={context} />
      </StaticRouter>
    </Provider>
  </div>
));

dispatch(html);
このファイル内のcontextとdispatchはlaravel-serverside-renderingのパッケージが持っているもので、暗黙的に使用できる関数です。
contextはLaravel側から流したデータが入っているオブジェクトで、dispatchはライブラリ内のhtml化の関数になります。
contextで渡されたデータオブジェクトをreact-routerのStaticRouterを使用して各アクセスしたコンポーネントに渡し、Reduxをいれている際にはReducer内で使用できるようにcreateStore関数の第2引数にデフォルト値として渡します。
なお SSRでは定番事ですが、Routing内でwindowオブジェクトなどのブラウザオブジェクトはインポートの対象に入っているだけでエラーとなります。
その為windowオブジェクトを使う際はif (typeof window !== 'undefined') {}でラップするなどして各々処理する。
7. webpack設定
上記で作成したserver.jsをclient側とは別にバンドルします。
スカフォールドの生成の際に作られるルートフォルダのwebpack.mix.jsを修整します。
mix.js('resources/assets/js/client.js', 'public/js')
   .js('resources/assets/js/server.js', 'public/js');
8. 初期Stateをcontextデータに置き換える
reducer内で定義しているinitialStateをSSR時にも対応した書き方に書き直します。
(class componentの際の書き方も記載)
またセカンドレンダリングの呼び出しが終わった後にwindow.__PRELOADED_STATE__を削除しておきます。
reducer内 - Global State
const initialState = {
  data: [],
};


if (typeof window === 'undefined') {
  initialState.data = context.data;
} else if (typeof window !== 'undefined' && window.__PRELOADED_STATE__) {
  initialState.data = window.__PRELOADED_STATE__.data;
}

//以下略
Class Component内 - Local State
class SampleComponent extends React.Component {
  constructor() {
    super();
    const initialState = {
      data: [];
    }
    if (typeof window === 'undefined') {
      initialState.data = context.data;
    } else if (typeof window !== 'undefined' && window.__PRELOADED_STATE__) {
      initialState.data = window.__PRELOADED_STATE__.data;
    }
    this.state = initialState;
  }
  componentDidMount() {
    delete window.PRELOADED_STATE;
  }

  // 以下略
}
完成
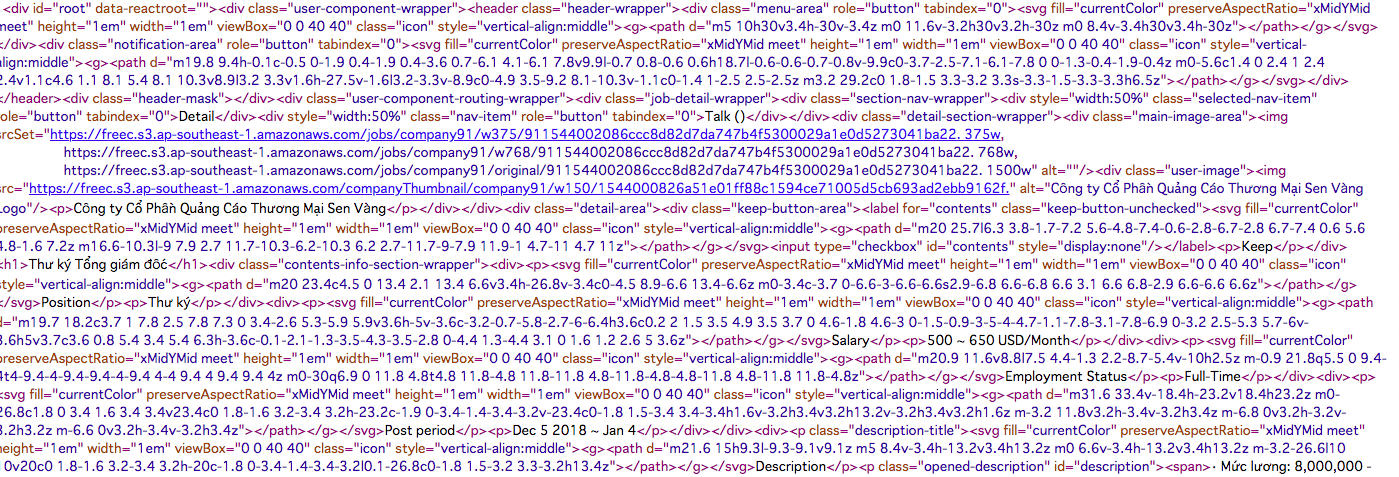
上記の流れでOGP設定含めたSSR処理ができているはずです。ソースで確認します。
ただファーストレンダリングとセカンドレンダリングの繋ぎが悪いと違和感あるレンダリングになります。
仮想DOMレベルでなるべく差異を出さない様な処理を心がけます。
参考
laravel-server-side-rendering
laravel-server-side-rendering-examples
Server side rendering JavaScript from PHP
You Need to know SSR by Yosuke Furukawa
React Js Server-Side Rendering With Laravel - SSR in Action
