今回VAIOのLinuxノートpcを手に入れました!
開発用に使用するためrails環境を構築する過程で、
仮想環境を構築に思わぬところでハマったので自分用のメモ。
VAIO VPCZ23AGJ
まずは仮想マシン作成!
1,VirtualBoxインストール
2,Vagrantインストール
3仮想環境を置くディレクトリ作成
ディレクトリ名はboxとする
terminal
$mkdir box

$cd box
4,仮想マシンを作成
Boxを配布している Vagrantbox.es からBoxを適当に選んで追加。
http://www.vagrantbox.es/
terminal
$ vagrant box add {title} {url}
私はubuntu14.04を仮想環境に構築したためtitleにはubuntuを入力
terminal
$ vagrant init ubuntu/trusty64
実行結果
A `Vagrantfile` has been placed in this directory. You are now
ready to `vagrant up` your first virtual environment! Please read
the comments in the Vagrantfile as well as documentation on
`vagrantup.com` for more information on using Vagrant.
5,Vagrantfileを編集
Vagrantfileが生成されるので、編集します
vimが好きなのでvimで編集(^_^)
terminal
$ vim Vagrantfile
vagrantfile
# -*- mode: ruby -*-
# vi: set ft=ruby :
Vagrant.configure(2) do |config|
  config.vm.box = "ubuntu/trusty64" # Ubuntu 14.04 を使用
  config.vm.network "forwarded_port", guest: 3000, host: 3000 # Railsで利用するポートを設定
  config.vm.provider "virtualbox" do |vb|
    vb.memory = "2048" # メモリを多めに設定
  end
end
仮想マシンを起動
terminal
$ vagrant up
ここでうまく立ち上がらず、、
実行結果
Bringing machine 'default' up with 'virtualbox' provider...
[default] Importing base box 'base'...
 [0K[default] Matching MAC address for NAT networking...
[default] Setting the name of the VM...
[default] Clearing any previously set forwarded ports...
[default] Creating shared folders metadata...
[default] Clearing any previously set network interfaces...
[default] Preparing network interfaces based on configuration...
[default] Forwarding ports...
[default] -- 22 => 2222 (adapter 1)
[default] Booting VM...
[default] Waiting for VM to boot. This can take a few minutes.
いろいろ試した結果、、
どうやら仮想環境が立ち上がらないのが原因っぽいので
GUIを起動して確認
警告画面が表示されて起動しない笑
それは無理なのも納得
警告画面
仮想化支援機構(VT-x/AMD-V)を有効化できません。64ビットゲストOSは64ビットCPUを検出できず、起動できません。
ホストマシンのBIOS設定でVT-x/AMD-V を有効化してください。
言われたとおりBIOS画面に移行すべく再起動、、、
terminal
$ sudo shutdown -r now
以下の設定が必要となる。
BIOS画面に入る。(PC起動時に、F2を押す)
Intel(R) Virtualization Technology: Enabled
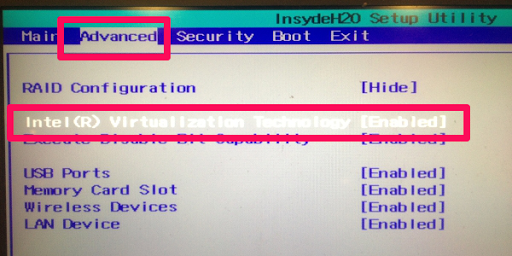
BIOSの種類によって、設定項目は異なりますが、どこかにあります。CPUがVT-xをサポートしてないときは、諦めるしかないのか、、笑
サポートされててよかった
設定が終わったらPCを再起動。無事にログインできました。
以下コマンド結果
$ vagrant up
Bringing machine 'default' up with 'virtualbox' provider...
==> default: Importing base box 'ubuntu/trusty64'...
==> default: Matching MAC address for NAT networking...
==> default: Checking if box 'ubuntu/trusty64' is up to date...
==> default: Setting the name of the VM: Kaminari_box_default_1474258910269_35337
==> default: Clearing any previously set forwarded ports...
==> default: Clearing any previously set network interfaces...
==> default: Preparing network interfaces based on configuration...
    default: Adapter 1: nat
==> default: Forwarding ports...
==> default: Booting VM...
==> default: Waiting for machine to boot. This may take a few minutes...
    default: SSH username: vagrant
    default: SSH auth method: private key
    default:
    default: Vagrant insecure key detected. Vagrant will automatically replace
    default: this with a newly generated keypair for better security.
    default:
    default: Inserting generated public key within guest...
    default: Removing insecure key from the guest if it's present...
    default: Key inserted! Disconnecting and reconnecting using new SSH key...
==> default: Machine booted and ready!
==> default: Checking for guest additions in VM...
    default: The guest additions on this VM do not match the installed version of
    default: VirtualBox! In most cases this is fine, but in rare cases it can
    default: prevent things such as shared folders from working properly. If you see
    default: shared folder errors, please make sure the guest additions within the
    default: virtual machine match the version of VirtualBox you have installed on
    default: your host and reload your VM.
    default:
    default: Guest Additions Version: 4.3.36
    default: VirtualBox Version: 5.0
立ち上がりました!やったー (^_^)/"
これでやっとLinuxノートで開発ができる!
以上です、お役に立てば幸いです!