Github Pagesは,面倒な契約やサーバ設定をしなくても簡単にウェブページを立ち上げることができる意味で非常に便利.今回は,この Github Pagesの上でウェブページをより簡単に立ち上げるために,静的サイトジェネレータの一つである Hugo を利用する方法について解説する.
- Hugo https://gohugo.io/
Hugoでは,ほとんどのコンテンツの内容をmarkdownで書けるので,気軽に追記・編集ができる点が魅力だと個人的には感じている.
(2020.11.25: Academic Theme の major update に合わせて大幅に書き直しました.)
環境
- MacOS Mojave Ver 10.14.6
- Xcode Ver 10.3 (10G8)
- Homebrew Ver 2.4.9
Hugo のインストール
Homebrew で簡単にインストールできる.
brew upgrade git
brew install golang hugo
もしHomebrewがインストールされていない場合には,以下のページなどを参考にしてHomebrewをインストールする.
MacにHomebrewを導入する方法&使い方まとめ
http://vdeep.net/intr-homebrew
サイトを作る
インストールできたら,サイトを作ってみる.サイト名は仮にtestとしてみる.名前は何でも良い.
$ hugo new site test
$ cd test
hugoを起動する.
$ hugo server --watch
--watchを設定しておくことで,編集を即座にサイトに反映してくれるようになる.
これで,http://localhost:1313 にサイトが立ち上がり,何もないページが見れるようになる.
以降では,別の場所にサイトを作っていくので,テストサイトは消しておく.
$ cd ..
$ rm -rf test
テーマの取得
サイトのテンプレートに相当するテーマを入れていく.今回は,研究者向けにカスタマイズされているテーマであるAcademicを利用する.
https://themes.gohugo.io/academic/
Academicテーマの場合には,kickstartを利用して最初からサイトを作った方が楽.公式ドキュメント https://wowchemy.com/docs/install-locally/ に従って,以下のように進める.
$ git clone https://github.com/wowchemy/starter-academic.git www
$ cd www
$ hugo server
http://localhost:1313 を見に行くと,テーマが適用されていることが確認できる.
(もしサイトを GitHub Pages ではなくどこでも良いという方については,公式ドキュメント https://wowchemy.com/docs/install/ の流れに従えば良い.こちらの方が簡単です.)
テーマの設定
公式ドキュメントの "Getting started" https://wowchemy.com/docs/get-started/ に沿っていけば大まかな設定ができる.
どのwidgetを使うか
Widgetはページの構成要素となる部品で,出版物・トーク・スライド・ソフトウェア・プロジェクト・ブログなど,研究者や技術者が使いそうなwidgetが一通り準備されている.
それぞれのwidgetを使うかどうかは,content/home内にある対応するmarkdownファイルの中にあるフラグを操作することで示せる.例として,初期状態ではonになっているデモwidgetを消すには,content/home/demo.mdのactiveフラグを編集して,falseにする.
active = false
Widgetの内容の修正
基本的には,公式ドキュメントの "Build your homepage" https://wowchemy.com/docs/page-builder/ の記述に従ってcontent/home内にある対応するmarkdownファイルを編集していけば良い.
例えば,一番最初に出てくる自己紹介部分を編集するには,about.mdを編集すれば良い.内容を確認すると,content/author/[ユーザ名]以下を編集すれば良いと書かれている.デフォルトでのauthorはadminに設定されているので,content/author/adminにある_index.mdを編集する.
# Display name
name: qiita

# Username (this should match the folder name)
authors:
- admin

# Is this the primary user of the site?
superuser: true

# Role/position
role: Standard user

...(以下略)
サイトの基本設定
config/_default/config.tomlでサイトの基本設定を行うことができる.例えば,サイト名やベースURL,Google Analytics tracking IDや言語設定などができる.ベースURLは独自にドメインを取得していない限り https://[github username].github.io を設定する.
# Title of your site
title = "Page title"

# The URL of your site.
# End your URL with a `/` trailing slash, e.g. `https://example.com/`.
baseurl = "https://yourname.github.io"

# Name of Academic theme folder in `themes/`.
theme = "academic"

# Get last modified date for content from Git?
enableGitInfo = true

# Default language to use (if you setup multilingual support)
defaultContentLanguage = "en"
hasCJKLanguage = true  # Set `true` for Chinese/Japanese/Korean languages.
また,もう少し細かい設定については,config/_default/params.tomlで行う.
連絡先情報は Contact Widget Setup の欄で設定する.Contact linksの部分は,以下に記載の例以外にも,Line・Facebook・Instagramなど,様々なウェブサービスを自由に設定できる.アイコンもここから自由に選択できる.
# Enter contact details (optional). To hide a field, clear it to "".
email = "your@meail.address"
phone = "your-phone-number"
address = "your mailing address ([Link to Google Maps](https://goo.gl/maps/xxxxxxxxxxxxxxxxx))"

# Office hours: use `<br>` to insert a line break, or set to "" to remove office hours
office_hours = ""

# Enter an optional link for booking appointments (e.g. calendly.com).
appointment_url = ""

# Contact links
#   Set to `[]` to disable, or comment out unwanted lines with a hash `#`.
contact_links = [
  {icon = "twitter", icon_pack = "fab", name = "Follow or DM Me", link = "https://twitter.com/your_twitter_account"},
  {icon = "github", icon_pack = "fab", name = "Follow Me", link = "https://github.com/your_github_account"},
  ]

[marketing]
  google_analytics = "UA-710608-3"
  google_tag_manager = ""
Github Pages にアップしてみる
内容を作っていく前に,サイト公開の準備を進める.まずは,公開用ファイルを生成する.
$ hugo
これで public 内に公開用ファイルが生成される.以降では,この公開用ファイル一式をGithub Pagesで公開する設定を行う.
$ cd public
$ git init
$ git remote add origin git@github.com:username/github-pages.git
$ git add --all
$ git commit -m "Initial commit for GitHub Pages"
$ git push origin master
サイト生成のためソースも同様にgit管理しておいた方が良いので,同様に設定しておく..gitignore は自動的に生成されるので,そのまま利用する.
$ cd ../
$ git remote add origin git@github.com:username/github-pages-sources.git
$ git add .gitignore config.toml
$ git commit -m i 'Initial commit for GitHub Pages sources'
$ git push origin master
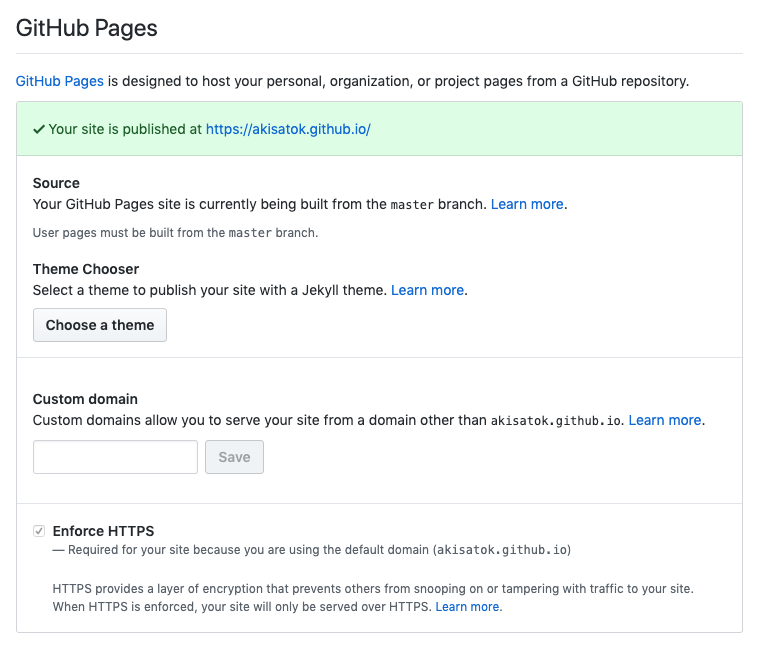
Pushした後,レポジトリの設定で GitHub Pages の設定項目を確認する.具体的には,config/_default/config.tomlで設定したbaseurlが正しく認識されていること,及びhttpsを設定できていること,この2点を確認する.
ここまでできていれば,自身で設定したbaseurlにコンテンツが表に辞されているはずなので,確認する.
コンテンツを作ってみる
ある程度サイト構築の基盤ができあがったところで,コンテンツの作成・編集を始める.
トップページの編集
content/authors/admin/_index.md を編集することでトップページの一番上にあるプロフィールを編集することができる.
# Display name
name: akisatok

# Is this the primary user of the site?
superuser: true

# Role/position
role: Researcher

# Organizations/Affiliations
organizations:
- name: qiita
  url: "http://qiita.com"

interests:
- Python
- C/C++
- Machine learning
- Computer vision

education:
  courses:
  - course: PhD in Engineering
    institution: Fake University
    year: 2020
  - course: MEng in Information Engineering
    institution: Fake University
    year: 2017
  - course: BEng in Information Engineering
    institution: Fake University
    year: 2015

# Social/Academic Networking
# For available icons, see: https://sourcethemes.com/academic/docs/widgets/#icons
#   For an email link, use "fas" icon pack, "envelope" icon, and a link in the
#   form "mailto:your-email@example.com" or "#contact" for contact widget.
social:
- icon: envelope
  icon_pack: fas
  link: '#contact'  # For a direct email link, use "mailto:test@example.org".
- icon: twitter
  icon_pack: fab
  link: https://twitter.com/_akisato
- icon: google-scholar
  icon_pack: ai
  link: https://scholar.google.co.jp/citations?user=dummy
- icon: github
  icon_pack: fab
  link: https://github.com/akisato-

# Enter email to display Gravatar (if Gravatar enabled in Config)
email: "akisatok@qiita.com"

---

akisatok is a researcher in Dummy University. His research interests include machine learning and computer vision.
上記のような _index.md を作成すると,下のようなプロフィールができあがる.
Publicationsの中身を追加する
研究者のページにおいて重要なコンテンツの一つであるが,活動がアクティブであればあるほど作成・更新のコストが重くなるやっかいなもの.しかし,今回利用している academic テーマでは,Bibtexファイルがあればほぼコマンド一発でpublicationsのページができあがる.
最初に,そのためのpythonパッケージをpipでインストールする.
$ pip3 install -U academic
このacademicを使って,bibファイルをpublicationページに変換する.
$ academic import --bibtex <path_to_your/publications.bib> --publication-dir publication --overwrite
content/home/publications.md をactiveにしておけば,最近のpublicationsを表示して,すべてのpublicationsへのリンクもできあがる.絞り込み・検索可能も非常に簡単.
サンプルは こちら からどうぞ.
content/home/publications.md の設定を編集すれば,トップページに表示させる論文の数や形式を変更できる.
[content]
  # Choose how much pages you would like to display (0 = all pages)
  count = 3

  # Page order. Descending (desc) or ascending (asc) date.
  order = "desc"

[design]
  # Toggle between the various page layout types.
  #   1 = List
  #   2 = Compact
  #   3 = Card
  #   4 = Citation (publication only)
  view = 2
より詳しい内容については,以下を参照すると良い.
- Academic (python package) https://github.com/sourcethemes/academic-admin
- Academic Theme - Create a Publication https://wowchemy.com/docs/managing-content/#create-a-publication
ブログ記事を書いてみる
これも非常に簡単.content/post フォルダの中に記事を置いていくだけで,記事はすべてmarkdownで記載するので,Qiitaの記事を書く感覚とほぼ同じようにできる.
まずは空記事ファイルを作る.
$ hugo new content/post/test.md
content/post/test.md はたぶん以下のようになっている.
---
title: ""
subtitle: ""
summary: ""
authors: []
tags: []
categories: []
date: 2020-08-30T10:18:50+09:00
lastmod: 2020-08-30T10:18:50+09:00
featured: false
draft: false

# Featured image
# To use, add an image named `featured.jpg/png` to your page's folder.
# Focal points: Smart, Center, TopLeft, Top, TopRight, Left, Right, BottomLeft, Bottom, BottomRight.
image:
  caption: ""
  focal_point: ""
  preview_only: false

# Projects (optional).
#   Associate this post with one or more of your projects.
#   Simply enter your project's folder or file name without extension.
#   E.g. `projects = ["internal-project"]` references `content/project/deep-learning/index.md`.
#   Otherwise, set `projects = []`.
projects: []
---
titleで記事のタイトルを決定,dateで作成時刻を設定,draftをfalseとすることで公開します.あとはmarkdown形式で記事を書くだけ.
title: "My first blog post!"
subtitle: ""
summary: ""
authors: [akisatok]
tags: [first]
categories: [misc]
date: 2020-08-30T10:18:50+09:00
lastmod: 2020-08-30T10:18:50+09:00
featured: false
draft: false

# Featured image
# To use, add an image named `featured.jpg/png` to your page's folder.
# Focal points: Smart, Center, TopLeft, Top, TopRight, Left, Right, BottomLeft, Bottom, BottomRight.
image:
  caption: ""
  focal_point: ""
  preview_only: false

# Projects (optional).
#   Associate this post with one or more of your projects.
#   Simply enter your project's folder or file name without extension.
#   E.g. `projects = ["internal-project"]` references `content/project/deep-learning/index.md`.
#   Otherwise, set `projects = []`.
projects: []
---

# Welcome to my new website!

## How are you doing?

### Enjoy the site!
参考にしたページ
Hugoを用いてGithub Pages上でサイトを公開する内容については,Qiita上でたくさんの情報があるので,そちらを確認した方がたぶん詳しい.今回の記事を書くに当たって直接参考にしたのは以下.
- HugoとGithub Pagesで静的サイトを公開する - Qiita https://qiita.com/satzz/items/e24bd703fc04fb45f7ef
- さよならQiita,こんにちはhugo×github pages - Qiita https://qiita.com/k_k_hogetaro/items/1a650678dc4f0ad43468

