■ 環境
device : windows
開発環境 : VSCode
spring boot : 3.2.6
MySQL : 8.0
java : 17
■ MySQLのデータを用意する
任意のデータベースで以下を実行する
-- データベース「shop」を作成
CREATE DATABASE shop;

-- 「shop」データベースを使用
USE shop;

-- 「items」テーブルを作成
-- 商品のID(整数,自動)、名前(最大20文字の文字列)、価格(整数)
CREATE TABLE items (
    id INT PRIMARY KEY AUTO_INCREMENT,  -- 商品の一意の識別子、自動増分
    name VARCHAR(20),                   -- 商品の名前
    price INT                           -- 商品の価格
);

-- 「items」テーブルにデータを挿入
INSERT INTO items VALUES (1, 'みかん', 100);
INSERT INTO items VALUES (2, 'りんご', 150);
INSERT INTO items VALUES (3, 'バナナ', 80);
INSERT INTO items VALUES (4, 'いちご', 200);
INSERT INTO items VALUES (5, 'ぶどう', 300);
INSERT INTO items VALUES (6, 'パイナップル', 250);
INSERT INTO items VALUES (7, 'キウイ', 200);
INSERT INTO items VALUES (8, 'レモン', 90);
INSERT INTO items VALUES (9, 'スイカ', 500);
INSERT INTO items VALUES (10, 'メロン', 500);
INSERT INTO items VALUES (11, 'もも', 350);
INSERT INTO items VALUES (12, 'なし', 180);
INSERT INTO items VALUES (13, 'さくらんぼ', 220);
INSERT INTO items VALUES (14, 'マンゴー', 400);
INSERT INTO items VALUES (15, 'パパイヤ', 500);
INSERT INTO items VALUES (16, 'アボカド', 130);
INSERT INTO items VALUES (17, 'グレープフルーツ', 160);
INSERT INTO items VALUES (18, 'ブルーベリー', 270);
INSERT INTO items VALUES (19, 'ラズベリー', 270);
INSERT INTO items VALUES (20, 'ブラックベリー', 310);

-- 「items」テーブルのデータの確認
SELECT * FROM items;
■ Spring Bootの設定を行う
(1) application.propertiesの設定を行う
| 項目 | 内容 |
|---|---|
| コンテキストパス | <context-path> |
| データベースユーザー名 | <database_username> |
| データベースパスワード | <database_password> |
# アプリケーションのコンテキストパスを設定
server.servlet.context-path=/<context-path>
# アプリケーションのポート番号を設定
server.port=7777
# Thymeleaf のキャッシュを無効
spring.thymeleaf.cache=false

# データベースの接続先URLを指定。database_name は接続するデータベース名を指定
spring.datasource.url=jdbc:mysql://localhost:3306/<database_name>
# データベースに接続するためのユーザー名を指定
spring.datasource.username=<database_username>
# データベースに接続するためのパスワードを指定
spring.datasource.password=<database_password>
# データベースのJDBCドライバのクラス名を指定
spring.datasource.driver-class-name=com.mysql.cj.jdbc.Driver
(2) pom.xmlの設定を行う
pom.xmlでJPA、MySQLのドライバの依存関係を設定。
<dependencies> </dependencies>の中に追加する。
<!-- JPA。データベースアクセスを容易にすることができる -->
<dependency>
    <groupId>org.springframework.boot</groupId>
    <artifactId>spring-boot-starter-data-jpa</artifactId>
</dependency>

<!-- MySQLデータベースとの接続を可能にするためのJDBCドライバ -->
<dependency>
    <groupId>mysql</groupId>
    <artifactId>mysql-connector-java</artifactId>
    <version>8.0.33</version>
</dependency>
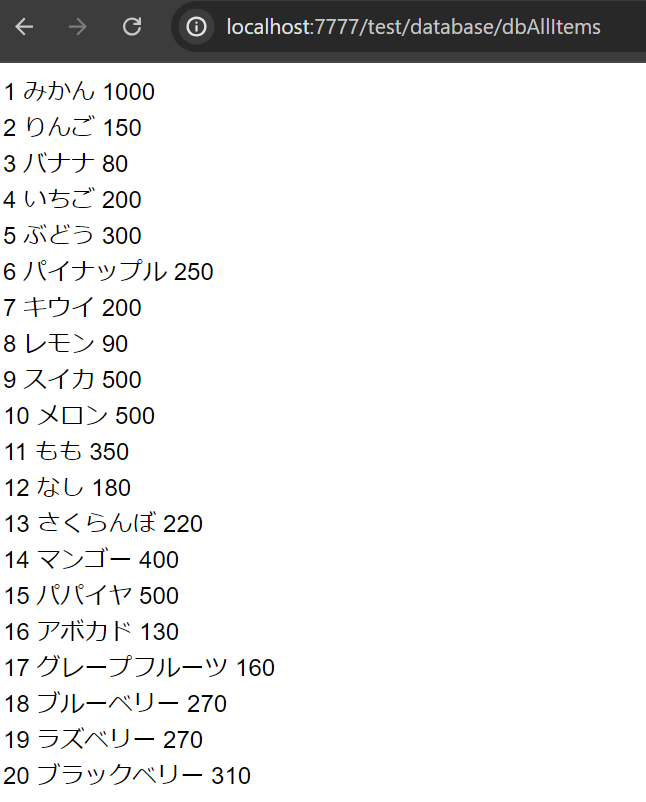
■ 1. 全件検索を行う
実装内容
すべてのテーブルデータを取得する
-- SQLで実装する場合
SELECT * FROM items;
(1-1) Entity を作成
Entityはデータベース内のテーブルの構造を表し、カラムをフィールドにマッピングすること
・@EntityでEntityに指定
・@Tableでテーブル名を指定
・@Idと@Columnアノテーションでフィールドにマッピング
・GetterとSetterを作成し、カプセル化を行う
import jakarta.persistence.Column;
import jakarta.persistence.Entity;
import jakarta.persistence.GeneratedValue;
import jakarta.persistence.GenerationType;
import jakarta.persistence.Id;
import jakarta.persistence.SequenceGenerator;
import jakarta.persistence.Table;

@Entity
@Table(name = "items")
public class Item {
    @Id
    @GeneratedValue(strategy = GenerationType.SEQUENCE, generator = "seq_items_gen")
    @SequenceGenerator(name = "seq_items_gen", sequenceName = "seq_items", allocationSize = 1)
    private Integer id;

    @Column
    private String name;

    @Column
    private Integer price;

    public Integer getId() {
        return id;
    }
    public void setId(Integer id) {
        this.id = id;
    }
    public String getName() {
        return name;
    }
    public void setName(String name) {
        this.name = name;
    }
    public Integer getPrice() {
        return price;
    }
    public void setPrice(Integer price) {
        this.price = price;
    }
}
(1-2) Repository を作成
Repositoryは、データベースとアプリケーションの間のデータアクセスを抽象化する役割
・extends JpaRepositoryでリポジトリの基本的なインターフェースを継承
・<Item, Integer>のItemでEntityクラスを指定
・<Item, Integer>のIntegerで主キーが整数型であることを指定
import org.springframework.data.jpa.repository.JpaRepository;
import jp.co.sss.test_spring.entity.Item;

public interface ItemRepository extends JpaRepository<Item, Integer> {
}
(1-3) Controller を作成
Controllerは、ユーザーのアクセスからViewの管理を行う
・@Controllerでコントローラーに指定
・@Autowiredでリポジトリをインスタンス化
・@RequestMappingでユーザーからの指定のパスでリクエスト処理を行う
・findAll()でitemRepositoryの全件検索を行う
・model.addAttribute("Items", ...)でItemという属性名を指定し、Viewに渡すデータをモデルに追加
・return "database/dbAllItems"でViewを選択
import org.springframework.beans.factory.annotation.Autowired;
import org.springframework.stereotype.Controller;
import org.springframework.ui.Model;
import org.springframework.web.bind.annotation.RequestMapping;

import jp.co.sss.test_spring.repository.ItemRepository;

@Controller
public class databaseController {
    @Autowired
    ItemRepository itemRepository;

    @RequestMapping("/database/dbAllItems")
    public String allItemsView(Model model) {
        model.addAttribute("Items", itemRepository.findAll());
        return "database/dbAllItems";
    }
}
(1-4) HTML を作成
HTMLは、ユーザーが見るViewを作成する
・item : ${Items}で、Controllerのmodel.addAttribute("Items", ...)で渡したデータを受け取る
・ <tr th:each = "...">で、反復処理を行う
・<td th:text="${item...}"></td>で、item : ${Items}で得られたitemの各要素を表示
<!DOCTYPE html>
<html lang="en">
<head>
    <meta charset="UTF-8">
    <meta name="viewport" content="width=device-width, initial-scale=1.0">
    <title>Document</title>
</head>
<body>
    <tr th:each = "item : ${Items}">
        <td th:text="${item.id}"></td>
        <td th:text="${item.name}"></td>
        <td th:text="${item.price}"></td><br>
    </tr>
</body>
</html>
(1-5) 実行
spring boot実行して、ブラウザで検索
application.propertiesのファイルで指定した<context-path>を変更する
http://localhost:7777/<context-path>/database/dbAllItems

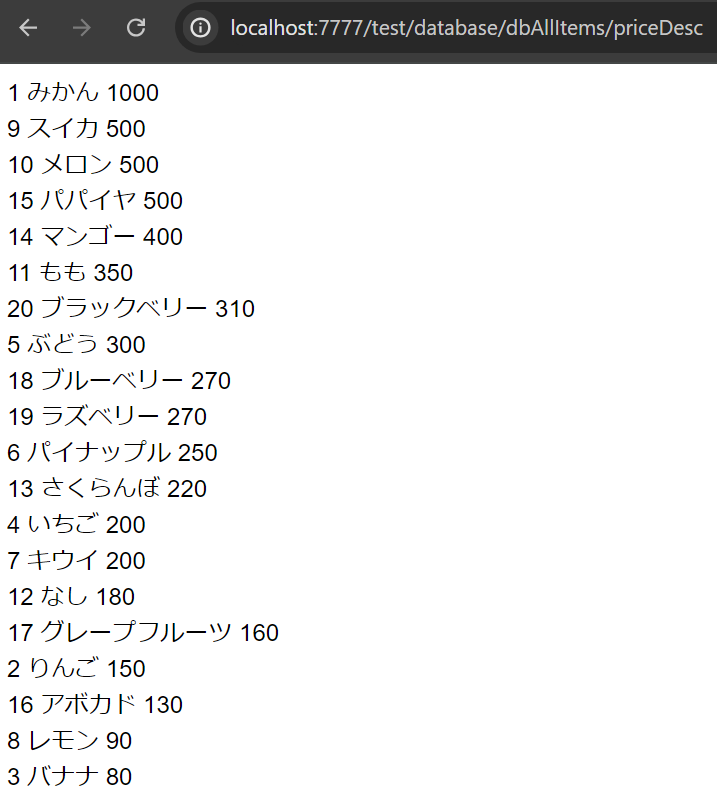
■ 2. 並べ替え
実装内容
全件検索を指定の並び替えをする
-- SQLで実装する場合
SELECT * FROM items
ORDER BY price DESC;
(2-1) Entity を作成
(1-1) Entity を作成をそのまま使用
(2-2) Repository を作成
リポジトリに命名規則に基づいたクエリメソッドを定義
・findAllBy...で、エンティティを検索する
・OrderBy...で、ソートの基準を指定
・Desc を最後につけることで、降順と指定する(昇順の場合は、ASC)
import java.util.List;
import org.springframework.data.jpa.repository.JpaRepository;

import jp.co.sss.test_spring.entity.Item;

public interface ItemRepository extends JpaRepository<Item, Integer> {
    List<Item> findAllByOrderByPriceDesc();
}
(2-3) Controller を作成
・Repositoryで定義したfindAllByOrderByPriceDescを使用して、SQLを変更する
import org.springframework.beans.factory.annotation.Autowired;
import org.springframework.stereotype.Controller;
import org.springframework.ui.Model;
import org.springframework.web.bind.annotation.RequestMapping;

import jp.co.sss.test_spring.repository.ItemRepository;

@Controller
public class databaseController {
    @Autowired
    ItemRepository itemRepository;

    //@RequestMapping("/database/dbAllItems")

    @RequestMapping("/database/dbAllItems/priceDesc")
    public String allItemsPriceDescView(Model model) {
        model.addAttribute("Items", itemRepository.findAllByOrderByPriceDesc());
        return "database/dbAllItems";
    }
}
(2-4) HTML を作成
(1-4) HTMLを作成をそのまま使用
(2-5) 実行
spring boot実行して、ブラウザで検索
application.propertiesのファイルで指定した<context-path>を変更する
http://localhost:7777/<context-path>/database/dbAllItems/priceDesc

■ 3. 条件検索 主キー
実装内容
主キーに対応するデータを取得する
-- SQLで実装する場合
SELECT * FROM Items
WHERE id = 1;
(3-1) Entity を作成
(1-1) Entity を作成をそのまま使用
(3-2) Repository を作成
(2-2) Repository を作成をそのまま使用
(3-3) Bean を作成
Beanは、エンティティのデータを一時的に保存してビューにデータを渡すための機能
public class ItemBean {
    private Integer id;
    private String name;
    private Integer price;

    public Integer getId() {
        return id;
    }
    public void setId(Integer id) {
        this.id = id;
    }
    public String getName() {
        return name;
    }
    public void setName(String name) {
        this.name = name;
    }
    public Integer getPrice() {
        return price;
    }
    public void setPrice(Integer price) {
        this.price = price;
    }
}
(3-4) Controller を作成
・@PathVariableで、URLパスの一部をメソッドの引数にバインドする役割
・idに対応するエンティティをリポジトリから取得
・BeanUtils.copyProperties(item, itemBean);で、itemの同じ名前のプロパティ値をitemsBeanにコピー
・itemBeanにコピーされたデータをmodel.addAttributeでItemsに渡す
package jp.co.sss.test_spring.controller;

import org.springframework.beans.BeanUtils;
import org.springframework.beans.factory.annotation.Autowired;
import org.springframework.stereotype.Controller;
import org.springframework.ui.Model;
import org.springframework.web.bind.annotation.PathVariable;
import org.springframework.web.bind.annotation.RequestMapping;

import jp.co.sss.test_spring.bean.ItemBean;
import jp.co.sss.test_spring.entity.Item;
import jp.co.sss.test_spring.repository.ItemRepository;

@Controller
public class databaseController {
    @Autowired
    ItemRepository itemRepository;

    //@RequestMapping("/database/dbAllItems")
    //@RequestMapping("/database/dbAllItems/priceDesc")

    @RequestMapping("/database/dbSelectName")
    public String selectName(Model model) {
        model.addAttribute("Items", itemRepository.findAll());
        return "database/dbSelectName";
    }

    @RequestMapping("/database/dbItemsDetail/{id}")
    public String itemsDetail(@PathVariable Integer id, Model model) {
        Item item = itemRepository.getReferenceById(id);
        ItemBean itemBean = new ItemBean();
        BeanUtils.copyProperties(item, itemBean);

        model.addAttribute("Items", itemBean);
        return "database/dbItemsDetail";
    }
}
(3-5) HTML を作成
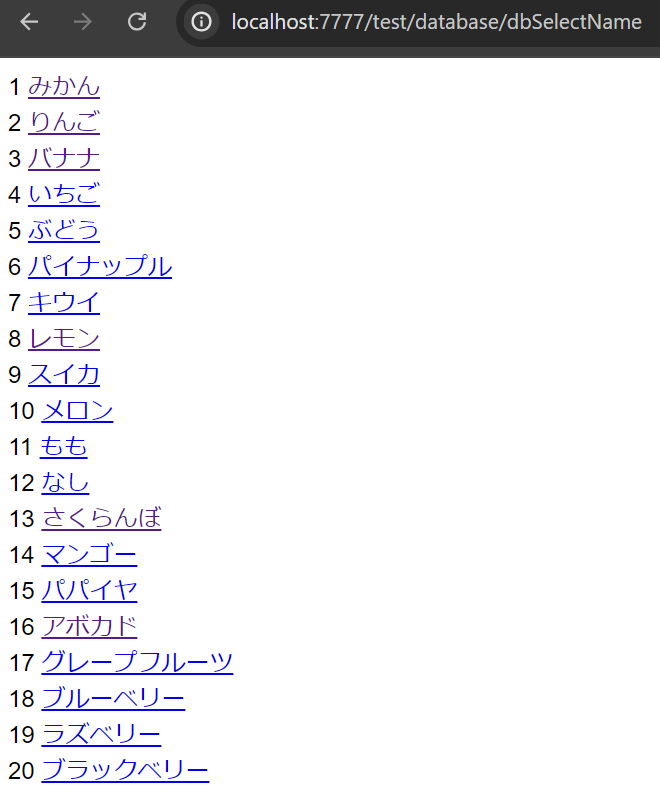
・/database/dbItemsDetail/{id}で、URLのテンプレートを作成
・{id}部分はid=${item.id}によって現在のitem.idプロパティの値に置き換える
<!DOCTYPE html>
<html lang="en">
<head>
    <meta charset="UTF-8">
    <meta name="viewport" content="width=device-width, initial-scale=1.0">
    <title>Document</title>
</head>
<body>
    <tr th:each="item:${Items}">
        <td th:text="${item.id}"></td>
        <td><a th:href="@{/database/dbItemsDetail/{id}(id=${item.id})}" th:text="${item.name}"></a></td><br>
    </tr>
</body>
</html>
・itemBeanにコピーされたItemsのデータをそれぞれの要素で表示する
<!DOCTYPE html>
<html lang="en">
<head>
    <meta charset="UTF-8">
    <meta name="viewport" content="width=device-width, initial-scale=1.0">
    <title>Document</title>
</head>
<body>
    <tr>
        <span>id : </span>
        <td th:text="${Items.id}"></td><br>
        <span>name : </span>
        <td th:text="${Items.name}"></td><br>
        <span>price : </span>
        <td th:text="${Items.price}"></td><br>
    </tr>
</body>
</html>
(3-6) 実行
spring boot実行して、ブラウザで検索
application.propertiesのファイルで指定した<context-path>を変更する
http://localhost:7777/<context-path>/database/dbSelectName

■ 4. 条件検索 カラム
実装内容
カラムに対応するデータを取得する
-- SQLで実装する場合
SELECT * FROM Items
WHERE price = 500;
(4-1) Entity を作成
(1-1) Entity を作成をそのまま使用
(4-2) Repository を作成
import java.util.List;
import org.springframework.data.jpa.repository.JpaRepository;

import jp.co.sss.test_spring.entity.Item;

public interface ItemRepository extends JpaRepository<Item, Integer> {
    //List<Item> findAllByOrderByPriceDesc();

    List<Item> findByPrice(Integer price);
}
(4-3) Controller を作成
リポジトリで用意したfindByPriceを呼び出し、引数で条件検索に使用するデータを渡す
import org.springframework.beans.BeanUtils;
import org.springframework.beans.factory.annotation.Autowired;
import org.springframework.stereotype.Controller;
import org.springframework.ui.Model;
import org.springframework.web.bind.annotation.PathVariable;
import org.springframework.web.bind.annotation.RequestMapping;

import jp.co.sss.test_spring.bean.ItemBean;
import jp.co.sss.test_spring.entity.Item;
import jp.co.sss.test_spring.repository.ItemRepository;

@Controller
public class databaseController {
    @Autowired
    ItemRepository itemRepository;

    //@RequestMapping("/database/dbAllItems")
    //@RequestMapping("/database/dbAllItems/priceDesc")
    //@RequestMapping("/database/dbSelectName")
    //@RequestMapping("/database/dbItemsDetail/{id}")

    @RequestMapping("/database/findByPrice/{price}")
    public String findByPrice(@PathVariable Integer price, Model model) {
        model.addAttribute("Items", itemRepository.findByPrice(price));
        return "database/dbAllItems";
    }
}
(4-4) HTML を作成
(1-4) HTMLを作成をそのまま使用
(4-5) 実行
spring boot実行して、ブラウザで検索
application.propertiesのファイルで指定した<context-path>を変更する
http://localhost:7777/<context-path>/database/findByPrice/500

■ 5. 条件検索 複数のカラム
実装内容
複数のカラムに対応するデータを取得する
-- SQLで実装する場合
SELECT * FROM Items
WHERE name = 'スイカ' AND price = 500;
(5-1) Entity を作成
(1-1) Entity を作成をそのまま使用
(5-2) Repository を作成
複数検索をする場合に、複数の引数を用意する
import java.util.List;
import org.springframework.data.jpa.repository.JpaRepository;

import jp.co.sss.test_spring.entity.Item;

public interface ItemRepository extends JpaRepository<Item, Integer> {
    //List<Item> findAllByOrderByPriceDesc();
    //List<Item> findByPrice(Integer price);

    List<Item> findByNameAndPrice(String name, Integer price);
}
(5-3) Controller を作成
リポジトリで用意したfindByNameAndPriceを呼び出し、引数で条件検索に使用するデータを渡す
import org.springframework.beans.BeanUtils;
import org.springframework.beans.factory.annotation.Autowired;
import org.springframework.stereotype.Controller;
import org.springframework.ui.Model;
import org.springframework.web.bind.annotation.PathVariable;
import org.springframework.web.bind.annotation.RequestMapping;

import jp.co.sss.test_spring.bean.ItemBean;
import jp.co.sss.test_spring.entity.Item;
import jp.co.sss.test_spring.repository.ItemRepository;

@Controller
public class databaseController {
    @Autowired
    ItemRepository itemRepository;

    //@RequestMapping("/database/dbAllItems")
    //@RequestMapping("/database/dbAllItems/priceDesc")
    //@RequestMapping("/database/dbSelectName")
    //@RequestMapping("/database/dbItemsDetail/{id}")
    //@RequestMapping("/database/findByPrice/{price}")

    @RequestMapping("/database/findByPrice/{name}/{price}")
    public String findByNameAndPrice(@PathVariable String name, @PathVariable Integer price, Model model) {
        model.addAttribute("Items", itemRepository.findByNameAndPrice(name, price));
        return "database/dbAllItems";
    }

}
(5-4) HTML を作成
(1-4) HTMLを作成をそのまま使用
(5-5) 実行
spring boot実行して、ブラウザで検索
application.propertiesのファイルで指定した<context-path>を変更する
http://localhost:7777/<context-path>/database/findByPrice/スイカ/500

■ 6. 曖昧検索
実装内容
曖昧なデータで検索を行う
-- SQLで実装する場合
SELECT * FROM Items
WHERE name = '%ベリー%';
(6-1) Entity を作成
(1-1) Entity を作成をそのまま使用
(6-2) Repository を作成
・Containingを最後につけることで曖昧検索を行う
import java.util.List;
import org.springframework.data.jpa.repository.JpaRepository;

import jp.co.sss.test_spring.entity.Item;

public interface ItemRepository extends JpaRepository<Item, Integer> {
    //List<Item> findAllByOrderByPriceDesc();
    //List<Item> findByPrice(Integer price);
    //List<Item> findByNameAndPrice(String name, Integer price);

    List<Item> findByNameContaining(String name);
}
(6-3) Controller を作成
リポジトリで用意したfindByNameContainingを呼び出し、引数で曖昧検索に使用する文字を渡す
import org.springframework.beans.BeanUtils;
import org.springframework.beans.factory.annotation.Autowired;
import org.springframework.stereotype.Controller;
import org.springframework.ui.Model;
import org.springframework.web.bind.annotation.PathVariable;
import org.springframework.web.bind.annotation.RequestMapping;

import jp.co.sss.test_spring.bean.ItemBean;
import jp.co.sss.test_spring.entity.Item;
import jp.co.sss.test_spring.repository.ItemRepository;

@Controller
public class databaseController {
    @Autowired
    ItemRepository itemRepository;

    //@RequestMapping("/database/dbAllItems")
    //@RequestMapping("/database/dbAllItems/priceDesc")
    //@RequestMapping("/database/dbSelectName")
    //@RequestMapping("/database/dbItemsDetail/{id}")
    //@RequestMapping("/database/findByPrice/{price}")
    //@RequestMapping("/database/findByPrice/{name}/{price}")

    @RequestMapping("/database/findByNameLike/{name}")
    public String findByNameLike(@PathVariable String name, Model model) {
        model.addAttribute("Items", itemRepository.findByNameContaining(name));
        return "database/dbAllItems";
    }
}
(6-4) HTML を作成
(1-4) HTMLを作成をそのまま使用
(6-5) 実行
spring boot実行して、ブラウザで検索
application.propertiesのファイルで指定した<context-path>を変更する
http://localhost:7777/<context-path>/database/findByNameLike/ベリー

■ 7. 登録
実装内容
データベースにデータを登録する
-- SQLで実装する場合
INSERT INTO items VALUES (id, name, price);
(7-1) Entity を作成
(1-1) Entity を作成をそのまま使用
(7-2) Repository を作成
(2-2) Repository を作成をそのまま使用
(7-3) Bean を作成
(3-3) Bean を作成をそのまま使用
(7-4) Form を作成
public class ItemForm {
    private Integer id;
    private String name;
    private Integer price;

    public Integer getId() {
        return id;
    }
    public void setId(Integer id) {
        this.id = id;
    }
    public String getName() {
        return name;
    }
    public void setName(String name) {
        this.name = name;
    }
    public Integer getPrice() {
        return price;
    }
    public void setPrice(Integer price) {
        this.price = price;
    }
}
(7-5) Controller を作成
package jp.co.sss.test_spring.controller;

import org.springframework.beans.BeanUtils;
import org.springframework.beans.factory.annotation.Autowired;
import org.springframework.stereotype.Controller;
import org.springframework.ui.Model;
import org.springframework.web.bind.annotation.PathVariable;
import org.springframework.web.bind.annotation.RequestMapping;
import org.springframework.web.bind.annotation.RequestMethod;

import jp.co.sss.test_spring.bean.ItemBean;
import jp.co.sss.test_spring.entity.Item;
import jp.co.sss.test_spring.form.ItemForm;
import jp.co.sss.test_spring.repository.ItemRepository;

@Controller
public class databaseController {
    @Autowired
    ItemRepository itemRepository;

    //@RequestMapping("/database/dbAllItems")
    //@RequestMapping("/database/dbAllItems/priceDesc")
    //@RequestMapping("/database/dbSelectName")
    //@RequestMapping("/database/dbItemsDetail/{id}")
    //@RequestMapping("/database/findByPrice/{price}")
    //@RequestMapping("/database/findByPrice/{name}/{price}")
    //@RequestMapping("/database/findByNameLike/{name}")

    @RequestMapping("/database/create/input")
    public String createInput() {
        return "database/dbCreateInput";
    }

    @RequestMapping(path = "/database/create/complete", method = RequestMethod.POST)
    public String createComplete(ItemForm form, Model model) {
        Item item =new Item();
        BeanUtils.copyProperties(form, item, "id");
        item = itemRepository.save(item);
        ItemBean itemBean = new ItemBean();
        BeanUtils.copyProperties(item, itemBean);
        model.addAttribute("Items", itemBean);
        return "database/dbItemsDetail";
    }
}
(7-6) HTML を作成
<!DOCTYPE html>
<html lang="en">
<head>
    <meta charset="UTF-8">
    <meta name="viewport" content="width=device-width, initial-scale=1.0">
    <title>Document</title>
</head>
<body>
    <form method="post" th:action="@{/database/create/complete}">
        <span>商品名</span><input type="text" name="name" />
        <span>価格</span><input type="number" name="price" />
        <input type="submit" value="submit" />
    </form>
</body>
</html>
(7-7) 実行
spring boot実行して、ブラウザで検索
application.propertiesのファイルで指定した<context-path>を変更する
http://localhost:7777/<context-path>/database/create/input

■ 8. 更新
実装内容
データベースのデータを更新する
-- SQLで実装する場合
UPDATE items SET name = new_name, price = new_price
WHERE id = select_id;
(8-1) Entity を作成
(1-1) Entity を作成をそのまま使用
(8-2) Repository を作成
(2-2) Repository を作成をそのまま使用
(8-3) Bean を作成
(3-3) Bean を作成をそのまま使用
(8-4) Controller を作成
package jp.co.sss.test_spring.controller;

import org.springframework.beans.BeanUtils;
import org.springframework.beans.factory.annotation.Autowired;
import org.springframework.stereotype.Controller;
import org.springframework.ui.Model;
import org.springframework.web.bind.annotation.PathVariable;
import org.springframework.web.bind.annotation.RequestMapping;
import org.springframework.web.bind.annotation.RequestMethod;

import jp.co.sss.test_spring.bean.ItemBean;
import jp.co.sss.test_spring.entity.Item;
import jp.co.sss.test_spring.form.ItemForm;
import jp.co.sss.test_spring.repository.ItemRepository;

@Controller
public class databaseController {
    @Autowired
    ItemRepository itemRepository;

    //@RequestMapping("/database/dbAllItems")
    //@RequestMapping("/database/dbAllItems/priceDesc")
    //@RequestMapping("/database/dbSelectName")
    //@RequestMapping("/database/dbItemsDetail/{id}")
    //@RequestMapping("/database/findByPrice/{price}")
    //@RequestMapping("/database/findByPrice/{name}/{price}")
    //@RequestMapping("/database/findByNameLike/{name}")
    //@RequestMapping("/database/create/input")
    //@RequestMapping(path = "/database/create/complete", method = RequestMethod.POST)

    @RequestMapping("/database/update/input/{id}")
    public String updateInput(@PathVariable Integer id, Model model) {
        Item item = itemRepository.getReferenceById(id);
        ItemBean itemBean = new ItemBean();
        BeanUtils.copyProperties(item, itemBean);
        model.addAttribute("Items", itemBean);
        return "database/dbUpdateInput";
    }

    @RequestMapping(path = "/database/update/complete/{id}", method = RequestMethod.POST)
    public String updateComplete(@PathVariable Integer id, ItemForm form, Model model) {
        Item item = itemRepository.getReferenceById(id);
        BeanUtils.copyProperties(form, item, "id");
        item = itemRepository.save(item);
        ItemBean itemBean = new ItemBean();
        BeanUtils.copyProperties(item, itemBean);
        model.addAttribute("Items", itemBean);
        return "database/dbItemsDetail";
    }
}
(8-5) HTML を作成
<!DOCTYPE html>
<html lang="en">
<head>
    <meta charset="UTF-8">
    <meta name="viewport" content="width=device-width, initial-scale=1.0">
    <title>Document</title>
</head>
<body>
    <form method = "post" th:action="@{/database/update/complete/}+${Items.id}">
        <span>name</span><input type="text" name="name" th:value="${Items.name}" />
        <span>price</span><input type="number" name="price" th:value="${Items.price}" />
        <input type="submit" value="submit" />
    </form>
</body>
</html>
(8-6) 実行
spring boot実行して、ブラウザで検索
application.propertiesのファイルで指定した<context-path>を変更する
http://localhost:7777/<context-path>/database/update/input/1

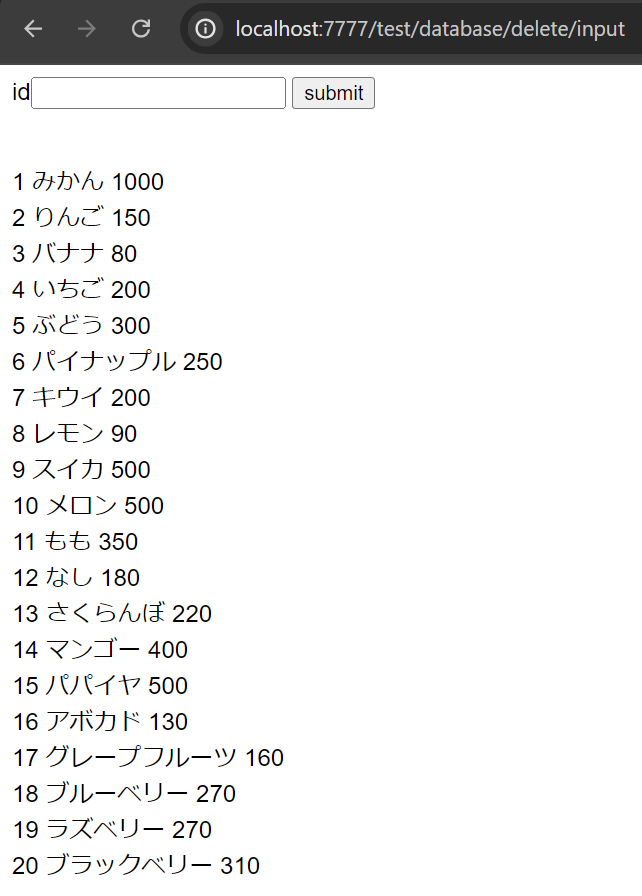
■ 9. 削除
実装内容
データベースのデータを削除する
-- SQLで実装する場合
DELETE FROM items
WHERE id = 7;
(9-1) Entity を作成
(1-1) Entity を作成をそのまま使用
(9-2) Repository を作成
(2-2) Repository を作成をそのまま使用
(9-3) Bean を作成
(3-3) Bean を作成をそのまま使用
(9-4) Controller を作成
package jp.co.sss.test_spring.controller;

import org.springframework.beans.BeanUtils;
import org.springframework.beans.factory.annotation.Autowired;
import org.springframework.stereotype.Controller;
import org.springframework.ui.Model;
import org.springframework.web.bind.annotation.PathVariable;
import org.springframework.web.bind.annotation.RequestMapping;
import org.springframework.web.bind.annotation.RequestMethod;

import jp.co.sss.test_spring.bean.ItemBean;
import jp.co.sss.test_spring.entity.Item;
import jp.co.sss.test_spring.form.ItemForm;
import jp.co.sss.test_spring.repository.ItemRepository;

@Controller
public class databaseController {
    @Autowired
    ItemRepository itemRepository;

    //@RequestMapping("/database/dbAllItems")
    //@RequestMapping("/database/dbAllItems/priceDesc")
    //@RequestMapping("/database/dbSelectName")
    //@RequestMapping("/database/dbItemsDetail/{id}")
    //@RequestMapping("/database/findByPrice/{price}")
    //@RequestMapping("/database/findByPrice/{name}/{price}")
    //@RequestMapping("/database/findByNameLike/{name}")
    //@RequestMapping("/database/create/input")
    //@RequestMapping(path = "/database/create/complete", method = RequestMethod.POST)
    //RequestMapping("/database/update/input/{id}")
    //@RequestMapping(path = "/database/update/complete/{id}", method = RequestMethod.POST)

    @RequestMapping("/database/delete/input")
    public String deleteInput(Model model) {
        model.addAttribute("Items", itemRepository.findAll());
        return "database/dbDeleteInput";
    }

    @RequestMapping(path = "/database/delete/complete", method = RequestMethod.POST)
    public String deleteComplete(ItemForm form) {
        itemRepository.deleteById(form.getId());
        return "redirect:/database/dbAllItems";
    }
}
(9-5) HTML を作成
<!DOCTYPE html>
<html lang="en">
<head>
    <meta charset="UTF-8">
    <meta name="viewport" content="width=device-width, initial-scale=1.0">
    <title>Document</title>
</head>
<body>
    <form method="post" th:action="@{/database/delete/complete}">
        <span>id</span><input type="text" name="id" />
        <input type="submit" value="submit">
    </form><br><br>
    <tr th:each="item: ${Items}">
        <td th:text="${item.id}"></td>
        <td th:text="${item.name}"></td>
        <td th:text="${item.price}"></td><br>
    </tr>
</body>
</html>
(9-6) 実行
spring boot実行して、ブラウザで検索
application.propertiesのファイルで指定した<context-path>を変更する
http://localhost:7777/<context-path>/database/delete/input
