現在作成している自作アプリに、3D方向にviewが回転するアニメーションを取り入れたかったので作成したときの備忘録です。
やりたかったこと
- viewをタップすると、メンコみたいに縦方向に3D回転にする
- 表面と裏面があり、それぞれでレイアウトが違う
- タップするたびに表面⇄裏面で交互に表示される
- RecyclerViewに表示するViewとして扱いたい
やったこと
レイアウト
<FrameLayout
    android:layout_width="match_parent"
    android:layout_height="wrap_content">
    <LinearLayout
        android:id="@+id/card"
        android:layout_width="match_parent"
        android:layout_height="wrap_content"
        android:orientation="vertical"
        android:layout_marginBottom="15dp"
        android:gravity="center_horizontal">

        <com.google.android.material.card.MaterialCardView
            android:id="@+id/front"
            android:layout_width="match_parent"
            android:layout_height="120dp"
            style="@style/Widget.Material3.App.CardView.Outlined"
            app:cardBackgroundColor="#ffc0cb">
            <LinearLayout
                android:layout_width="match_parent"
                android:layout_height="match_parent"
                android:gravity="center">
                <TextView
                    android:layout_width="wrap_content"
                    android:layout_height="wrap_content"
                    android:textSize="32sp"
                    android:text="表面"/>
            </LinearLayout>
        </com.google.android.material.card.MaterialCardView>

        <com.google.android.material.card.MaterialCardView
            android:id="@+id/back"
            android:layout_width="match_parent"
            android:layout_height="120dp"
            style="@style/Widget.Material3.App.CardView.Outlined"
            android:visibility="gone"
            tools:visibility="visible"
            app:cardBackgroundColor="#e6e6fa">
            <LinearLayout
                android:layout_width="match_parent"
                android:layout_height="match_parent"
                android:gravity="center">
                <TextView
                    android:layout_width="wrap_content"
                    android:layout_height="wrap_content"
                    android:textSize="32sp"
                    android:text="裏面"/>
            </LinearLayout>
        </com.google.android.material.card.MaterialCardView>
    </LinearLayout>
</FrameLayout>
cardという親viewの下に子viewとして、表面(front)と裏面(back)のレイアウトを定義しておき、片方(裏面)をデフォルトで非表示としておきます。

ロジック
ObjectAnimatorを利用して、3D回転させるようにしました。
https://developer.android.com/guide/topics/graphics/prop-animation?hl=ja#object-animator
fun reverse(card: View, front: View, back: View) {
    card.apply {
        pivotY = height.toFloat()
    }
    val centerY = card.height / 2.0F

    val yFront = ObjectAnimator.ofFloat(card, "y", 0.0f, -centerY).apply {
        duration = 150L
        interpolator = LinearInterpolator()
    }

    val rotateXFront = ObjectAnimator.ofFloat(card, "rotationX", 0.0f, 90.0f).apply {
        duration = 150L
        interpolator = LinearInterpolator()
    }

    val yBack = ObjectAnimator.ofFloat(card, "y", centerY, 0.0f).apply {
        duration = 150L
        interpolator = LinearInterpolator()
    }

    val rotateXBack = ObjectAnimator.ofFloat(card, "rotationX", 270.0f, 360.0f).apply {
        duration = 150L
        interpolator = LinearInterpolator()
    }

    AnimatorSet().apply {
        playTogether(yFront, rotateXFront)
        doOnEnd {
            // 表面と裏面の表示/非表示をチェンジする
            front.isVisible = false
            back.isVisible = true
            card.pivotY = 0.0f

            AnimatorSet().apply {
                playTogether(yBack, rotateXBack)
                doOnEnd {
                    card.resetPivot()
                }
                start()
            }
        }
        start()
    }
}
共通化とかしていない汚いコードで大変恐縮です🙇♂️ が、流れとしては以下の通りです。
- 表面となるview(front)と裏面となるview(back)、およびそれらを内包しているview(card)を渡します
- cardのY方向のピボット位置をbottomとします。
- cardのY方向の中心位置を取得しておきます
- 表面表示時のアニメーションを定義
- 150msかけてYの中心位置まで移動
- 同時間かけて縦方向に0°->90°転回
- 裏面表示時のアニメーションを定義
- 150msかけてYのtopまで移動
- 同時間かけて縦方向に270°->360°転回
-
AnimatorSet#playTogetherにより、表面の移動処理と回転処理を同時に処理するようにする - 表面の処理が済んだ時点(このとき、View自体は90°転回している状態)で、表面と裏面の表示/非表示をチェンジします。
- 合わせて、cardのY方向のピボット位置をtopに変更します。
最後に、これを呼び出す処理を記載すれば完了です。
binding.front.setOnClickListener(view -> {
    reverse(binding.card, view, binding.back);
});
binding.back.setOnClickListener(view -> {
    reverse(binding.card, view, binding.front);
});
タップできる面が表面になっているので、表面がview, 裏面が対になるview(front/back)として先ほどのメソッドを呼び出します。
実演
こんな感じで動作します。(gifの都合でカクついていますが、実際は滑らかです)

補足
ピボットの設定とy方向の移動が必要な理由
これらを行わない場合、viewが見切れてしまいました。
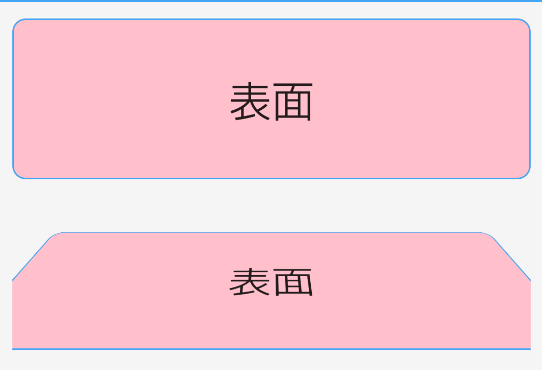
上が元々の状態で下が45°まで回転させたときの様子ですが、横が見切れていることがわかります。
rotationXのデフォルトのピボットはviewの中心であり、そこを中心としてviewが拡縮されるようなので、
Yのピボットをviewのbottomとした上で、y方向の移動を併せて行なっています。これにより、viewの中心で回転しているように見せつつ、viewの横が見切れるのを抑えています。

反転したときはviewのtopをピボットとします

裏面の回転が270°->360°の理由
実際にやってみるとわかりますが、90°->180°にすると上下が反転して表示されてしまいました。

270°->360°にすることで、「元々反転していたものを反転(=元に戻す)」という動作となるため、この問題を解決できます。
今回は以上です。
コメント等お待ちしてます。