以前にさくらVPSにGitの中央リポジトリを置く(for Mac) - Qiitaという記事を書きましたが、タイトルと内容がアレなので書き直します。
目標
開発環境からgit pushするだけでデプロイ完了
環境
- Local : MacOS 10.10.2
- Server: CentOS release 6.6 (さくらVPS)
概要
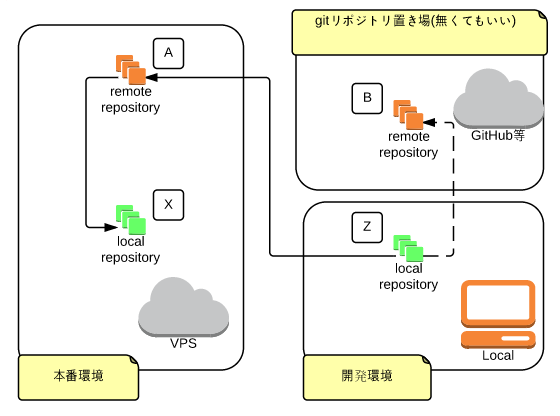
- localで開発してgitで管理。ここにローカルリポジトリがある。(図Z)
- リモートリポジトリをVPSに置く(図A)
- VPSの別の場所に本番実行用のリポジトリをクローンする(図X)
- GitHubやBitbucketを使っている場合はリモートリポジトリを2つにする。(使わなくてもOK)(図B)
- Local(Z)でpushしたら、VPS側のlocal(X)は自動でpull & プロセスの再起動をする
簡単に言うと、ZからXにデプロイするのにAを経由するということです。
下準備
.ssh/configの設定をしておく
Macはもともとターミナルから簡単にSSHでサーバーにログインできますが、以下の設定をするともっと簡単になります。
~/.ssh/config というファイルを作ります。
host sakura
  HostName     ***.***.***.**
  Port         12345
  User         myname
  IdentityFile ~/.ssh/id_rsa
HostName :IPアドレス or ドメイン
Port :接続用のPort番号
User :ログインユーザー名
IdentityFile :ssh鍵の場所
以上の様に設定していると
ssh sakura
だけでログインできるようになります。
そして
sakura:/home/hoge/
という風にパスを指定することができます。
参考: ssh 接続を簡単にする ~/.ssh/config | dogmap.jp
手順
サーバーにリモートリポジトリを作成する
サーバーにssh接続して適当な場所にリモートリポジトリ(A)を作成します。
$ ssh sakura
SAKURA Internet [Virtual Private Server SERVICE]
$ cd /home/user1/gitRemote
$ git init --bare hogeProject.git
ローカル(Z)に戻り、リモートリポジトリを設定します。
$ git remote add origin sakura:/home/user1/gitRemote/hogeProject.git
すでにリモートリポジトリが存在する場合は
もしすでにGitHubやBitbucketを設定している場合にremote addすると弾かれるので以下の設定をします。
これをするとgit pushした時にA,B両方のリモートへ同時にpushできます。
ローカル(Z)の.git/configにAのurlを追加してoriginを2つにします。
/// 変更前
[remote "origin"]
	fetch = +refs/heads/*:refs/remotes/origin/*
	url = git@github:hoge/hogeProject.git
/// 変更後
[remote "origin"]
	fetch = +refs/heads/*:refs/remotes/origin/*
	url = git@github:hoge/hogeProject.git
	url = sakura:/home/user1/gitRemote/hogeProject.git
これでpush originした時にそれぞれのremoteへ同時にpushできます。
pushしてみる
ここまででリモートリポジトリの準備はできているはずなので、試しにpushしてみます。
ローカル(Z)から
$ git push origin master
VPSで確認してみましょう。
$ ssh sakura
SAKURA Internet [Virtual Private Server SERVICE]
$ cd /home/user1/gitRemote/hogeProject.git
$ git log
VPSでcloneする
本番実行ファイルを設置します。
適当な場所(X)に移動してgit cloneします。
もちろん本番環境(VPS側)での作業です。
$ cd ~/myProject
$ git clone /home/user1/gitRemote/hogeProject.git
これで/home/user1/myProject/hogeProjectにファイル設置完了です。
git hookの追加
pushした時にVPS側で自動pullする設定をします。
Localでpushする=remoteでreceiveする(受ける)ということなので、hooks/post-receiveを設定します。
VPS側のremote(A)に書きます。Local(Z,X)ではないので注意。
まずデフォルトでhooks/post-receive.sampleというファイルがあるのでこれをリネームします。
$ cd /home/user1/gitRemote/hogeProject.git
$ mv hooks/post-receive.sample hooks/post-receive
vimでもnanoでもemacsでも好きなエディタで編集します。
$ vim hooks/post-receive
hooks/post-receiveの内容
cd /home/user1/myProject/hogeProject
git --git-dir=.git pull
注意点としては、単にgit pullと書くと「そこリポジトリじゃねぇよ!」と怒られますのでgit --git-dir=.git pullとします。
post-receiveに実行権限が無い場合は設定しておきます。
(post-receive.sampleからリネームした場合は不要)
$ chmod a+x hooks/post-receive
これで設定完了です。適当にlocalでファイルを編集して、commit & pushしてみてください。
自動でXに移動してpullまでしてくれます。
それ以外の操作をしたい場合(例えばPM2でプロセスを再起動させたい時など)は以下の様に書くとOKです。
export PATH=$HOME/.nodebrew/current/bin:/usr/local/bin:$PATH
cd /home/user1/myProject/hogeProject
git --git-dir=.git pull
pm2 startOrRestart /home/user1/myProject/hogeProject/pm2_deploy.json
単にpm2 startOrRestartと書くとパスが通ってない場合があるので「PM2というコマンドはありませんよ」みたいなエラーが出ます。
上記ではnodeのパスをexportしています。
まとめ
- Aで
git init --bare - Zで
git remote add - すでにgitHub等にリモートを設定している場合は
.git/configを編集してoriginに追加 - Zのリポジトリを
git commit & push - Xで
git clone (A) - Aのhooksを編集
ここまで設定しておくと、あとはZでpushするだけでデプロイできるようになります。
おまけテンプレート
hooks/post-receive.sampleの名前変更
mv hooks/post-receive.sample hooks/post-receive
hooks/post-receiveの基本設定
export PATH=$HOME/.nodebrew/current/bin:/usr/local/bin:$PATH
cd /path/to/project
git --git-dir=.git pull