#はじめに
自作の画像データセットから分類モデルをつくり、iOSやAndroidのカメラを用いてリアルタイムで動かす方法を共有します。

##環境
- google colaboratory(ランタイム:GPU)(TensorFlow 1.15)(Google Chrome)
- Android Studio
- android 8.0(NEXUS6P)
- Xcode
- iOS 13(iPhone8)
#1. 自作データセットの作成とモデルの作成
この記事ではretrain.pyを用いて画像分類モデルを作成します1。
retrain.pyさえあればモデル作成できるのでcurlコマンドで環境構築できます。git cloneしなくても構いません。
curl -LO https://github.com/tensorflow/hub/raw/master/examples/image_retraining/retrain.py
##1.1 画像データを集めて自作データセットの作成
スクレイピングや画像収集ツールを活用すれば比較的簡単に画像データを集めることができます。
私はgoogle-images-downloadを使用して画像データを集めました2。
retrain.py
dataset
|--label_A
| └─ aaa.jpg
| └─ bbb.png
| └─ ccc.jpg
| ⋮
|-- label_B
| └─ ddd.png
| └─ eee.jpg
| └─ fff.png
⋮ ⋮
```
##1.2 モデル作成
retrain.pyと画像データの準備を終えたら実際に学習させ、モデルを作成します。
retrain.pyを使ってモデルを作成する際に、データセットを指定する必要があるので`--image_dir`の後に指定します。
```
python retrain.py --image_dir dataset
```
その他にも引数を指定することができ、モデルの出力先や学習回数などを指定できます[^3]。
[^3]: 引数に`--tfhub_module https://tfhub.dev/google/imagenet/mobilenet_v2_100_224/feature_vector/1`を指定するとmobilenetとして出力する。mobilenetとは、機械学習の結果を携帯端末で利用するのを目的として作られた、比較的軽量なモデル。
出力先を指定せずに実行すると**/tmp** に **output_graph.pb**と**output_labels.txt**が出力されます。
##1.3(おまけ)モデルを実際に推論させる
[label_image.py](https://github.com/tensorflow/tensorflow/blob/master/tensorflow/examples/label_image/label_image.py)を使ってモデルの推論結果を確認することができます。
#2.作成したモデルをtflite形式に変換
出力された**output_graph.pb**ファイルをtflite(TensorFlow Lite)形式に変換していきます。
##2.1 iOS用の変換
iOSでは量子化されたモデルを使用するので`--inference_type`と`--inference_input_type`に`QUANTIZED_UINT8`を指定します。
```
tflite_convert \
--graph_def_file=/tmp/output_graph.pb \
--output_file=./quant_graph.tflite \
--input_format=TENSORFLOW_GRAPHDEF \
--output_format=TFLITE \
--input_shape=1,299,299,3 \
--input_array=Placeholder \
--output_array=final_result \
--input_data_type=FLOAT \
--default_ranges_min=0 \
--default_ranges_max=6 \
--inference_type=QUANTIZED_UINT8 \
--inference_input_type=QUANTIZED_UINT8 \
--mean_values=128 \
--std_dev_values=128 \
```
##2.2 Android用の変換
私のAndroidではGPUが量子化されたモデルに対応してなかったので、FLOAT用のモデルを使用します。`--inference_type`と`--inference_input_type`に`FLOAT`を指定します。`--output_file`も`float_graph.tflite`に変えておきます。
```
tflite_convert \
--graph_def_file=/tmp/output_graph.pb \
--output_file=./float_graph.tflite \
⋮
--inference_type=FLOAT \
--inference_input_type=FLOAT \
⋮
```
##2.3 tfliteに変換する時に困ったこと
- TensorFlowのバージョンによってtfliteに変換するコマンドが異なる。
- TensorFlow 1.X系で作成したモデルは2.X系のスクリプトで変換できなかった。
- `--input_array`や`--output_array`に何を指定すればよいか分からなかった。
`--input_array`や`--output_array`に何を指定するか知るために以下のスクリプトを作成。
```.py
import tensorflow as tf
gf = tf.GraphDef()
m_file = open('/tmp/output_graph.pb','rb')
gf.ParseFromString(m_file.read())
with open('somefile.txt', 'a') as the_file:
for n in gf.node:
the_file.write(n.name+'\n')
file = open('somefile.txt','r')
data = file.readlines()
print ("Output name = ")
print (data[len(data)-1])
print ("Input name = ")
file.seek ( 0 )
print (file.readline())
```
実行結果はこんな感じ。
```
Output name =
final_result
Input name =
Placeholder
```
#3. モバイルで動かしてみる
ソースコードは[tensorflow/examples](https://github.com/tensorflow/examples)にあるものを使用します。
```
git clone https://github.com/tensorflow/examples.git
```
##3.1 iOS
1. [README.md](https://github.com/tensorflow/examples/tree/master/lite/examples/image_classification/ios)にそってプロジェクトを開く
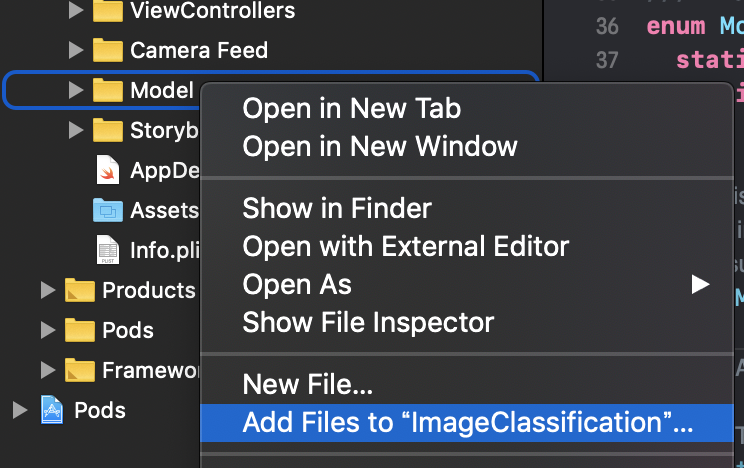
2. ImageClassification/ImageClassification/Modelを cmd⌘ + クリック -> `Add Files to "ImageClassification"...`を選択して、**quant_graph.tflite**と**output_labels.txt**を追加

3. ImageClassification/ImageClassification/ModelDataHandler/ModelDataHandler.swiftを書き変える
4. 37行目の"mobilenet_quant_v1_224"を**"quant_graph"**に変更
5. 38行目の"labels"を**"output_labels"**に変更
6. 58行目のinputWidthの値を**299**に変更
7. 59行目のinputHeightの値を**299**に変更
```.swift
enum MobileNet {
static let modelInfo: FileInfo = (name: "quant_graph", extension: "tflite")
static let labelsInfo: FileInfo = (name: "output_labels", extension: "txt")
}
~略~
// MARK: - Model Parameters
let batchSize = 1
let inputChannels = 3
let inputWidth = 299
let inputHeight = 299
```
##3.2 Android
1. `\examples\lite\examples\image_classification\android`をAndroid Studioで開く
2. **float_graph.tflite**と**output_labels.txt**を`\app\src\main\assets`に配置
3. app\src\main\java\org\tensorflow\lite\examples\classification\tflite\ClassifierFloatMobileNet.javaを書き変える
4. 55行目を"mobilenet_v1_1.0_224.tflite"から**"float_graph.tflite"**に変更
5. 60行目を"labels.txt"から**"output_labels.txt"**に変更
```.java
@Override
protected String getModelPath() {
// you can download this file from
// see build.gradle for where to obtain this file. It should be auto
// downloaded into assets.
return "float_graph.tflite";
}
@Override
protected String getLabelPath() {
return "output_labels.txt";
}
```
-
retrain.pyはmake_image_classifierに移行中。make_image_classifierを使えば学習と一括でtfliteに変換できて、swiftの224から299の書き変え作業がいらなそう。 ↩
-
2020/03/07現在、一部の環境でgoogle-images-downloadが動かない。原因はGoogle検索のアルゴリズムが変わったからだと考えられている。
google-images-downloadの使い方は多くの記事で紹介されているので、ここでは割愛します。
retrain.pyを使ってモデルを作成するには以下のようなディレクトリ構成にしてください。 ↩