動機
高解像度のスクリーンショットを取りたい!
使ってるディスプレイは1920x1080でこれ以上大きくするにはどうしたら・・・
仮想環境ならディスプレイのサイズが自由になるのでは!?
(仮想ディスプレイというのも調べたが、あまり分からなかったので諦めた)
※2018-08-30追記:「ディスプレイエミュレータ」&ミラーリングを使えば実環境でもできそうです
環境
- Windows10
- i7-4770
- Intel® HD Graphics 4400
- VMware Workstation 12
- CentOS-7-x86_64
CentOSでしたこと
-
初期状態
800x600vm、800x600win -
$ xrandrで最初から用意されてる解像度を調べる
[oki@localhost ~]$ xrandr
Screen 0: minimum 1 x 1, current 800 x 600, maximum 4096 x 4096
Virtual1 connected primary 800x600+0+0 (normal left inverted right x axis y axis) 0mm x 0mm
   800x600       60.00*+  60.32
   2560x1600     59.99
   1920x1440     60.00
   1856x1392     60.00
   1792x1344     60.00
   1920x1200     59.88
   1600x1200     60.00
   1680x1050     59.95
   1400x1050     59.98
   1280x1024     60.02
   1440x900      59.89
   1280x960      60.00
   1360x768      60.02
   1280x800      59.81
   1152x864      75.00
   1280x768      59.87
   1024x768      60.00
   640x480       59.94
Virtual2 disconnected (normal left inverted right x axis y axis)
Virtual3 disconnected (normal left inverted right x axis y axis)
Virtual4 disconnected (normal left inverted right x axis y axis)
Virtual5 disconnected (normal left inverted right x axis y axis)
Virtual6 disconnected (normal left inverted right x axis y axis)
Virtual7 disconnected (normal left inverted right x axis y axis)
Virtual8 disconnected (normal left inverted right x axis y axis)
-
とりあえず2560x1600に
$ xrandr --output Virtual1 --mode 2560x1600
2560x1600vm、2560x1600win -
4096x4096を目指して挫折
-
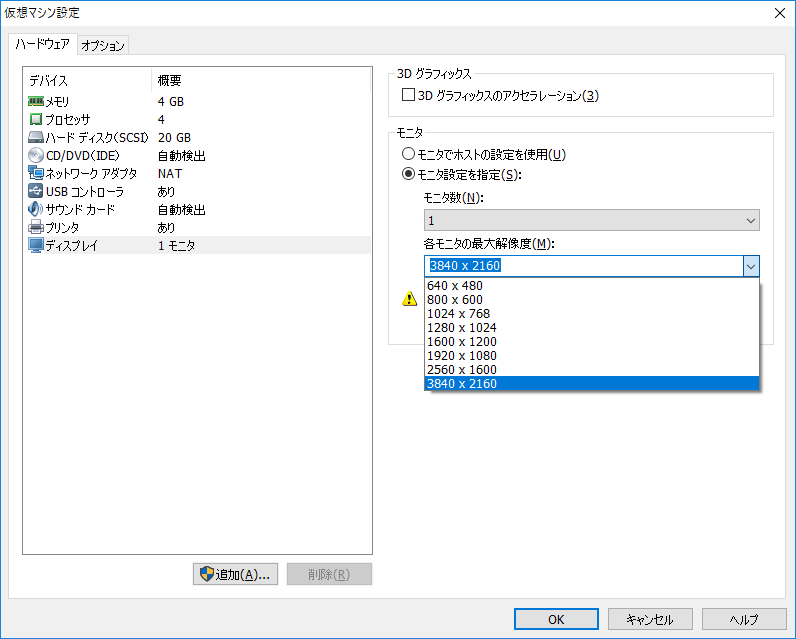
VMware側に何かあったので、これ(3840x2160)を目指す
[oki@localhost ~]$ cvt 3840 2160
# 3840x2160 59.98 Hz (CVT 8.29M9) hsync: 134.18 kHz; pclk: 712.75 MHz
Modeline "3840x2160_60.00"  712.75  3840 4160 4576 5312  2160 2163 2168 2237 -hsync +vsync
[oki@localhost ~]$ xrandr --newmode "3840x2160_60.00"  712.75  3840 4160 4576 5312  2160 2163 2168 2237 -hsync +vsync
[oki@localhost ~]$ xrandr --addmode Virtual1 3840x2160_60.00
[oki@localhost ~]$ xrandr
Screen 0: minimum 1 x 1, current 800 x 600, maximum 4096 x 4096
Virtual1 connected primary 800x600+0+0 (normal left inverted right x axis y axis) 0mm x 0mm
   800x600       60.00*+  60.32
   2560x1600     59.99
   1920x1440     60.00
   1856x1392     60.00
   1792x1344     60.00
   1920x1200     59.88
   1600x1200     60.00
   1680x1050     59.95
   1400x1050     59.98
   1280x1024     60.02
   1440x900      59.89
   1280x960      60.00
   1360x768      60.02
   1280x800      59.81
   1152x864      75.00
   1280x768      59.87
   1024x768      60.00
   640x480       59.94
   3840x2160_60.00  59.98
Virtual2 disconnected (normal left inverted right x axis y axis)
Virtual3 disconnected (normal left inverted right x axis y axis)
Virtual4 disconnected (normal left inverted right x axis y axis)
Virtual5 disconnected (normal left inverted right x axis y axis)
Virtual6 disconnected (normal left inverted right x axis y axis)
Virtual7 disconnected (normal left inverted right x axis y axis)
Virtual8 disconnected (normal left inverted right x axis y axis)
- 追加できたので選択
$ xrandr --output Virtual1 --mode 3840x2160_60.00
1回だと反応しなかったので2回実行した
結果
3840x2160vm.png、3840x2160win.png
参考にしたサイト
追記(2020/05/30)
現在の環境だと少し違う点があったため、メモ。
- Windows
- AMD Ryzen 9 3900X
- GeForce GTX 1660 SUPER
- VMware Workstation 15 Player
- Ubuntu 20.04 LTS 日本語 Remix
# cvt ではない
$ gtf 3840 2160 60

  # 3840x2160 @ 60.00 Hz (GTF) hsync: 134.10 kHz; pclk: 712.34 MHz
  Modeline "3840x2160_60.00"  712.34  3840 4152 4576 5312  2160 2161 2164 2235  -HSync +Vsync
# Modeline から後ろをコピペ
$ xrandr --newmode "3840x2160_60.00"  712.34  3840 4152 4576 5312  2160 2161 2164 2235  -HSync +Vsync
$ xrandr --addmode Virtual1 3840x2160_60.00
$ xrandr --output Virtual1 --mode 3840x2160_60.00
再起動するたびに追加した設定が消えるので、起動時に自動で追加したい場合は$HOME/.xsessinrc(.xinitrcでも.xsessionでも.Xresourcesでもない)を作って追加コマンドを実行すればOK。
~/.xsessinrc
# !/bin/bash

xrandr --newmode "3840x2160_60.00"  712.34  3840 4152 4576 5312  2160 2161 2164 2235  -HSync +Vsync
xrandr --addmode Virtual1 3840x2160_60.00