第14章
いよいよ最後の章だ。
この章での実装
・ユーザーをフォローできる仕組み
・フォローしているユーザーの投稿をステータスフィードに表示する機能
学ぶこと
・ユーザー間の関係性をどうモデリングするか
・その後、モデリング結果に対応するWebインターフェースの実装。Ajaxとか
・最後に、ステータスフィードをやる
動き
・[follow]ボタンを押したら[unfollow]に切り替わる
・[follow]ボタン押すとHomeページの[following]カウントが増えること
Relationshipモデル
ユーザーフォロー機能の第一歩は、データモデルを構成すること。
単純な考えとして、一人のユーザーが複数のユーザーをhas_manyとしてフォローして、一人のユーザーに複数のフォロワーがいることをhas_manyとできなくもないが、これではダメ。
なので、今回はhas_many_throughを使う。
データモデルの問題(および解決策)
AがBをフォローする。逆から見ればBはAからフォローされてる。AはBから見ればフォロワー(follower)で、AがBをフォローした(followed)ことになる。
Rails複数形の慣習だと、フォローしているユーザーの集合はfollowersとなり、ユーザー配列だとuser.followersとなる。
しかし、逆向きだと英語の都合でうまくいかない。逆だとfollowedsとなる。英語の文法的に正しくないので、followingという呼称にする。
なので、フォローしているすべてのユーザーの集合は、followingとなる。
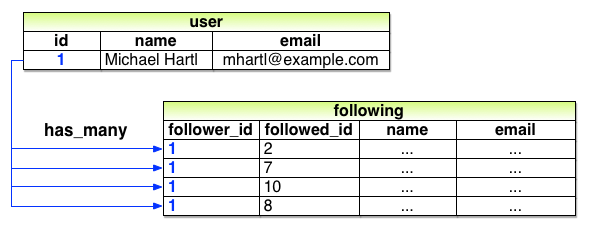
これによって、followingテーブルとhas_many関連付けを使い、フォローしているユーザーのモデリングができる。user.followingはユーザーの集合でなければならないので、followingテーブルのそれぞれの行は、followed_idで識別可能なユーザーでなければならない。また、それぞれの行はユーザーのため、これらユーザーに名前やパスワード等の属性も追加が必要だ。
参照:railsチュートリアル
上の画像の関連付けは非常に無駄が多い。
理由は、各行にフォローしてるユーザーのidだけでなく、名前やメールアドレスまであるから。
これらはusersテーブルに既にある。さらに、followersの方をモデリングする時と同様に、無駄の多いfollowersテーブルを別で作成しなければならない。
結果として、メンテナンスにおいて最悪だ。ユーザー名の変更のたびに、usersテーブルのそのレコードだけでなく、followingテーブルとfollowers`テーブルの両方について、そのユーザーを含むすべての行を更新しなければならない。
2つの疑問点
1.あるユーザーが別のユーザーをフォローするとき、何が作成されるのでしょうか。
2.あるユーザーが別のユーザーをフォロー解除するとき、何が削除されるのでしょうか。
つまるところ、2人のユーザーの「関係(リレーションシップ)」であることがわかる。1人のユーザーは1対多の関係を持つことができ、さらにユーザーはリレーションシップを経由して多くのfollowingまたはfollowersと関係を持つことができる。
他にも解決しなければいけない問題がある。
Facebookのような友好関係(Friendships)は本質的に左右対称だ。
Twitterのようなフォロー関係では左右非対称だ。
このような左右非対称な関係性を見分けるため、それぞれを能動的関係(Active Relationship)と受動的(Passive Relationship)と呼ぶことにする。
まずは、能動的関係から進める。
フォローしているユーザーはfollowed_idがあれば識別できる。
そのため、先ほどの図のfollowingテーブルをactive_relationshipsテーブルと見立てる。ただし、ユーザー情報は無駄なため、ユーザーid以外の情報は削除する。
followed_idを通して、usersテーブルのフォローされているユーザーを見つけるようにする。
データモデルを模式図にしたもの
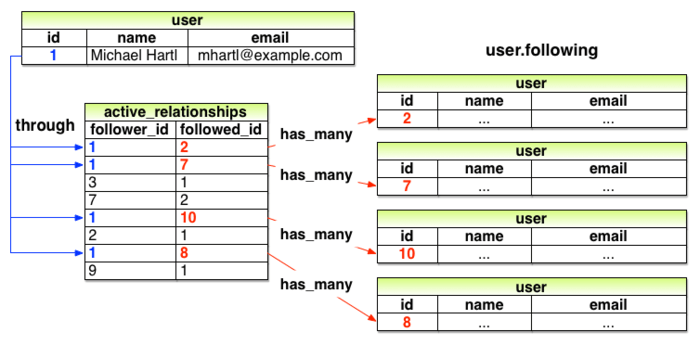
参照:railsチュートリアル
能動的関係も受動的関係も、最終的にはデータベースの同じテーブルを使う。
なので、テーブル名はrelationshipsとする。
Railsの慣習からモデル名はrelationshipとする。
Relationshipデータモデル
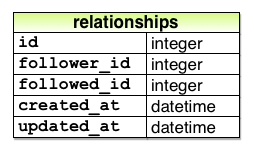
参照:railsチュートリアル
データモデルを実装するため、マイグレーションを生成する。
$ rails generate model Relationship follower_id:integer followed_id:integer
今後follower_idとfollowed_idでは頻繁に検索をかけることになる。
class CreateRelationships < ActiveRecord::Migration[6.0]
  def change
    create_table :relationships do |t|
      t.integer :follower_id
      t.integer :followed_id

      t.timestamps
    end
    add_index :relationships, :follower_id
    add_index :relationships, :followed_id
    add_index :relationships, [:follower_id, :followed_id], unique: true
  end
end
上のコードでは複合キーインデックスを使っている。
これは、follower_idとfollowed_idの組み合わせが必ずユニークであることを保証している。これによって、あるユーザーが同じユーザーを2回以上フォローすることを防ぐ。
このような重複がないように、インターフェース側の実装も気を付ける。
しかし、curlコマンドでRelationshipのデータを操作するような可能性もあるので、一意なインデックスを追加していれば、エラーを発生させ重複を防げる。
いつものマイグレーション
$ rails db:migrate
User/Relationshipの関連付け
UserとRelationshipの関連付けを行う。
1人のユーザーにはhas_manyのリレーションシップがあり、このリレーションシップは2人のユーザーの間の関係なので、フォローしているユーザーとフォロワーの両方に属すbelongs_to。
第13章でやったマイクロポストと同様、以下のようにユーザー関連付けのコードを使って新しいリレーションシップを作成する。
user.active_relationships.build(followed_id: ...)
第13章の時と違う事が2つある。
一つ目は、以前ユーザーとマイクロポストを関連付けした時は、以下のようにした。
class User < ApplicationRecord
  has_many :microposts
  .
  .
  .
end
引数の:micropostsシンボルから、Railsはこれに対応するMicropostモデルを探し出し、見つけてた。
今回のケースで同様に書くと
has_many :active_relationships
となり、Active Relationshipモデルを探してしまって、Relationshipモデルを見つけられない。このため、今回のケースにおいては、Railsに探してほしいモデルのクラス名を明示的に伝える必要がある。
2つ目の違いは、先ほどの逆のケースについてで、以前はMicropostモデルでは
class Micropost < ApplicationRecord
  belongs_to :user
  .
  .
  .
end
だった。micropostsテーブルにはuser_id属性があり、これを辿って対応するユーザーを特定してた。
データベースの2つのモデル同士を繋げるときのこのようなidは外部キーと呼ぶ。
Userモデルに繋げる外部キーが、Micropostモデルのuser_id属性ということになる。
外部キーの名前から、Railsは関連付けの推測をしてる。
Railsはデフォルトでは外部キーの名前を<class>_idというパターンとして認識し、<class>に当たる部分から小文字に変換されたクラス名を推測する。
今回のケースでは、フォローしているユーザーをfollower_idという外部キーを使って特定しなくてはいけない。また、followerというクラス名は存在しないため、ここでもRailsに正しいクラス名を明示する必要がある。
UserとRelationshipの関連付けは下記になる。
userモデル
class User < ApplicationRecord
  has_many :microposts, dependent: :destroy
  has_many :active_relationships, class_name:  "Relationship",
                                  foreign_key: "follower_id",
                                  dependent:   :destroy
  .
  .
  .
end
ユーザーを削除したら、ユーザーのリレーションシップも同時に削除される必要があるため、関連付けにdependent: :destroyを追加してる。
relationshipモデル
class Relationship < ApplicationRecord
  belongs_to :follower, class_name: "User"
  belongs_to :followed, class_name: "User"
end
上の2つのモデルで定義した関連付けによって、下記のメソッドが使えるようになった。
| メソッド | 用途 |
|---|---|
| active_relationship.follower | フォロワーを返します |
| active_relationship.followed | フォローしているユーザーを返します |
| user.active_relationships.create(followed_id: other_user.id) | userと紐付けて能動的関係を作成/登録する |
| user.active_relationships.create!(followed_id: other_user.id) | userを紐付けて能動的関係を作成/登録する(失敗時にエラーを出力) |
| user.active_relationships.build(followed_id: other_user.id) | userと紐付けた新しいRelationshipオブジェクトを返す |
Relationshipのバリデーション
生成されたRelationship用のfixtureでは、マイグレーションで制約させた一意性を満たせない。
なので、今の時点では生成されたRelationship用のfixtureファイルを空にしておく。
Relationshipモデルのバリデーションテスト
require 'test_helper'

class RelationshipTest < ActiveSupport::TestCase

  def setup
    @relationship = Relationship.new(follower_id: users(:michael).id,
                                     followed_id: users(:archer).id)
  end

  test "should be valid" do
    assert @relationship.valid?
  end

  test "should require a follower_id" do
    @relationship.follower_id = nil
    assert_not @relationship.valid?
  end

  test "should require a followed_id" do
    @relationship.followed_id = nil
    assert_not @relationship.valid?
  end
end
Relationshipモデルに対してバリデーションを追加
class Relationship < ApplicationRecord
  belongs_to :follower, class_name: "User"
  belongs_to :followed, class_name: "User"
  validates :follower_id, presence: true
  validates :followed_id, presence: true
end
Relationship用のfixtureを空にする。
フォローしているユーザー
followingとfollowersに取り掛かる。
今回は、has_many throughを使う。
状況として、一人のユーザーにはいくつもの「フォローする」「フォローされる」という関係性がある。このような関係性を「多対多」と呼ぶ。
デフォルトのhas_many throughでは、Railsはモデル名(単数形)に対応する外部キーを探す。
has_many :followeds, through: :active_relationships
Railsは「followeds」というシンボル名から、これを「followed」という単数形に変えて、relationshipテーブルのfollowed_idを使って対象のユーザーを取得する。
だが、user.followedsは英語として不適切。だから、user.followingという名前で使おう。
そのために、Railsのデフォルトを上書きする。
ここで、:sourceパラメータを使い、「following配列の元にはfollowedidの集合である」という事をRailsに明示的に示す。
Userモデルにfollowingの関連付けを追加
class User < ApplicationRecord
  has_many :microposts, dependent: :destroy
  has_many :active_relationships, class_name:  "Relationship",
                                  foreign_key: "follower_id",
                                  dependent:   :destroy
  has_many :following, through: :active_relationships, source: :followed
  .
  .
  .
end
上の定義によって、フォローしているユーザーを配列のように扱えるようになった。
Railsは単純な配列ではなく、賢く集合を扱っている。
following.include?(other_user)
フォローしている全ユーザーをデータベースから取得、その集合に対してinclude?メソッドを実行しているように見える。だが、実際はデータベースの中で直接比較をするようにしてる。
次に、followingで取得した集合をより簡単に取り扱うため、followやunfollowといったメソッドを追加する。
これらのメソッドの使い方はuser.follow(other_user)といった具合に使う。
さらに、following?論理値メソッドも追加して、あるユーザーが誰かをフォローしているかどうかを確認できるようにする。
このようなメソッドのテストから先に書いていく。
テストの手順としては
・following?メソッドであるユーザーをまだフォローしていないことを確認
・followメソッドを使ってそのユーザーをフォロー
・following?メソッドを使ってフォロー中になったことを確認
・unfollowメソッドでフォロー解除できたか確認
上記の手順を下記のテストに示した。
"following"関連のメソッドをテストする。
require 'test_helper'

class UserTest < ActiveSupport::TestCase
  .
  .
  .
  test "should follow and unfollow a user" do
    michael = users(:michael)
    archer  = users(:archer)
    assert_not michael.following?(archer)
    michael.follow(archer)
    assert michael.following?(archer)
    michael.unfollow(archer)
    assert_not michael.following?(archer)
  end
end
followingによる関連つけを使い
・follow
・unfollow
・following?
それぞれのメソッドを実装する。この時、可能な限りself(user自身を表すオブジェクト)を省略してる。
class User < ApplicationRecord
  .
  .
  .
  def feed
    .
    .
    .
  end

  # ユーザーをフォローする
  def follow(other_user)
    following << other_user
  end

  # ユーザーをフォロー解除する
  def unfollow(other_user)
    active_relationships.find_by(followed_id: other_user.id).destroy
  end

  # 現在のユーザーがフォローしてたらtrueを返す
  def following?(other_user)
    following.include?(other_user)
  end

  private
  .
  .
  .
end
フォロワー
user.followersメソッドを追加する。
これはuser.followingメソッドと対になる。フォロワーの配列を展開するために必要な情報は、relationshipテーブルに既にある。
つまり、active_relationshipsのテーブルを再利用できる。実際、follower_idとfollowed_idを入れ替えるだけでOK。
フォロワーについてもフォローする場合と全く同じ方法が活用できる。
Relationshipモデルのカラムを入れ替えて作ったフォロワーのモデル
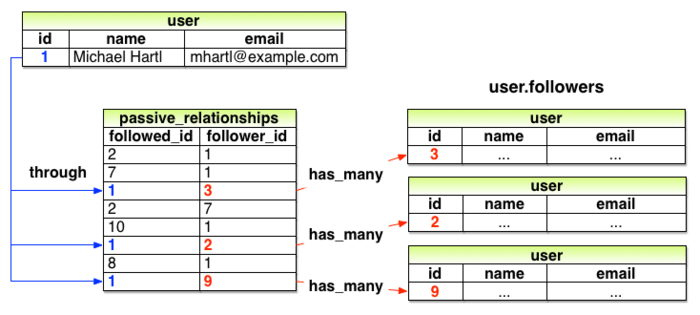
参照:railsチュートリアル
上の図からデータモデルの実装を下記に示す。
先ほどの実装と類似してる。
class User < ApplicationRecord
  has_many :microposts, dependent: :destroy
  has_many :active_relationships,  class_name:  "Relationship",
                                   foreign_key: "follower_id",
                                   dependent:   :destroy
  has_many :passive_relationships, class_name:  "Relationship",
                                   foreign_key: "followed_id",
                                   dependent:   :destroy
  has_many :following, through: :active_relationships,  source: :followed
  has_many :followers, through: :passive_relationships, source: :follower
  .
  .
  .
end
実は
has_many :followers, through: :passive_relationships
という形で:sourceを省略することができる。
これは、:followers属性の場合、Railsが「followers」を単数形にして自動的に外部キーfollower_idを探してくれるから。
:sourceキーを残している理由は、has_many :followingとの類似性を強調させるため。
次に、followers.include?メソッドを使い、先ほどのデータモデルをテストする。
followersに対するテスト
require 'test_helper'

class UserTest < ActiveSupport::TestCase
  .
  .
  .
  test "should follow and unfollow a user" do
    michael  = users(:michael)
    archer   = users(:archer)
    assert_not michael.following?(archer)
    michael.follow(archer)
    assert michael.following?(archer)
    assert archer.followers.include?(michael)
    michael.unfollow(archer)
    assert_not michael.following?(archer)
  end
end
following?と対照的なfollowed_by?メソッドを定義しても良かったが、サンプルアプリケーションでは使う場面がないとのことなので省略。
[Follow]のWebインターフェース
この節では、フォロー/フォロー解除の基本的なインターフェースを実装する。
また、フォローしているユーザーと、フォロワーにそれぞれ表示用のページを作成する。
フォローのサンプルデータ
サンプルデータを自動生成するrails db:seedを使い、データベースにサンプルデータを登録できると便利で、Webページの見た目のデザインから先に取り掛かれ、バックエンド機能の実装を後に回せる。
下記のコードはリレーションシップからデータを生成するためのコード。
サンプルデータにfollowing/followerの関係性を追加する。
# 以下のリレーションシップを作成する
users = User.all
user  = users.first
following = users[2..50]
followers = users[3..40]
following.each { |followed| user.follow(followed) }
followers.each { |follower| follower.follow(user) }
これでサンプルユーザーに、フォローしているユーザーとフォロワーができた。
統計と[Follow]フォーム
やる事
・プロフィールページとHomeページに、フォローしているユーザーとフォロワーの統計情報を表示するためのパーシャルを作成
・次に、フォロー用とフォロー解除用のフォームを作成
・それから、フォーローしているユーザーの一覧("following")とフォロワーの一覧("followers")を表示する専用のページを作成
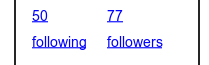
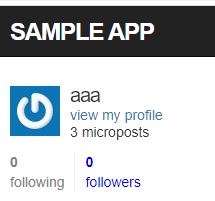
参照:railsチュートリアル
上の図から、followingとfollowersの表示はリンクになっていて、専用の表示ページに移動できる。第5章でリンクをダミーテキストにしていたので、ルーティングを実装する。
Usersコントローラーにfollowingアクションとfollowrsアクションを追加する
Rails.application.routes.draw do
  root   'static_pages#home'
  get    '/help',    to: 'static_pages#help'
  get    '/about',   to: 'static_pages#about'
  get    '/contact', to: 'static_pages#contact'
  get    '/signup',  to: 'users#new'
  get    '/login',   to: 'sessions#new'
  post   '/login',   to: 'sessions#create'
  delete '/logout',  to: 'sessions#destroy'
  resources :users do
    member do
      get :following, :followers
    end
  end
  resources :account_activations, only: [:edit]
  resources :password_resets,     only: [:new, :create, :edit, :update]
  resources :microposts,          only: [:create, :destroy]
end
このコードは、resourcesブロックの内側で:memberメソッドを使っている。
この場合のURLは、/users/1/followingや/users/1/followersのようになる。どちらもデータを表示するページなので、HTTPメソッドはGETリクエストになる。
従って、getメソッドを使っている。因みに、memberメソッドを使うとユーザーidが含まれているURLを扱うようになるが、idを指定せずにすべてのメンバーを表示するには、collectionメソッドを使う。
resources :users do
  collection do
    get :tigers
  end
end
このコードは/users/tigersというURLに応答する。
:memberメソッドで書いたコードによって生成されるルーティングテーブルは下記の通り。
| HTTPリクエスト | URL | アクション | 名前付きルート |
|---|---|---|---|
| GET | /users/1/following | following | following_user_path(1) |
| GET | /users/1/followers | followers | followers_user_path(1) |
ルーティングを定義し、統計情報のパーシャルを実装する。
下記は、フォロワーの統計情報を表示するパーシャル
<% @user ||= current_user %>
<div class="stats">
  <a href="<%= following_user_path(@user) %>">
    <strong id="following" class="stat">
      <%= @user.following.count %>
    </strong>
    following
  </a>
  <a href="<%= followers_user_path(@user) %>">
    <strong id="followers" class="stat">
      <%= @user.followers.count %>
    </strong>
    followers
  </a>
</div>
最初の行では
<% @user ||= current_user %>
で現在のユーザーを取得する。
これは、@userがnilではない場合は何もせず、nilの場合には@userにcurrent_userを代入するコード。
その後
@user.following.count
フォローしているユーザー人数を関連付けを使って計算してる。
フォロワーも同様に
@user.followers.count
マイクロポストの投稿数を表示した方法と同じだ。
@user.microposts.count
Railsは高速化のためにデータベース内で合計を計算している。
一部の要素に、以下のようなCSS idを指定している。
<strong id="following" class="stat">
これは、後々Ajaxを実装する時に便利になる。
統計情報のパーシャルをHomeページに追加する。
<% if logged_in? %>
  <div class="row">
    <aside class="col-md-4">
      <section class="user_info">
        <%= render 'shared/user_info' %>
      </section>
      <section class="stats">
        <%= render 'shared/stats' %>
      </section>
      <section class="micropost_form">
        <%= render 'shared/micropost_form' %>
      </section>
    </aside>
    <div class="col-md-8">
      <h3>Micropost Feed</h3>
      <%= render 'shared/feed' %>
    </div>
  </div>
<% else %>
  .
  .
  .
<% end %>
統計情報にスタイルを与えるため、Homeページのサイドバー用SCSSを追加
.stats {
  overflow: auto;
  margin-top: 0;
  padding: 0;
  a {
    float: left;
    padding: 0 10px;
    border-left: 1px solid $gray-lighter;
    color: gray;
    &:first-child {
      padding-left: 0;
      border: 0;
    }
    &:hover {
      text-decoration: none;
      color: blue;
    }
  }
  strong {
    display: block;
  }
}

.user_avatars {
  overflow: auto;
  margin-top: 10px;
  .gravatar {
    margin: 1px 1px;
  }
  a {
    padding: 0;
  }
}

.users.follow {
  padding: 0;
}
[Follow]/[Unfollow]ボタン用のパーシャルも作成する。
<% unless current_user?(@user) %>
  <div id="follow_form">
  <% if current_user.following?(@user) %>
    <%= render 'unfollow' %>
  <% else %>
    <%= render 'follow' %>
  <% end %>
  </div>
<% end %>
このコードは、followとunfollowのパーシャルに作業を振っているだけ。
パーシャルでは、Relationshipsリソース用の新しいルーティングが必要になる。
Rails.application.routes.draw do
.
.

  resources :relationships,       only: [:create, :destroy]
.
.
end
フォローパーシャル
<%= form_with(model: current_user.active_relationships.build, local: true) do |f| %>
  <div><%= hidden_field_tag :followed_id, @user.id %></div>
  <%= f.submit "Follow", class: "btn btn-primary" %>
<% end %>
フォロー解除パーシャル
<%= form_with(model: current_user.active_relationships.find_by(followed_id: @user.id),
            html: { method: :delete }, local: true) do |f| %>
  <%= f.submit "Unfollow", class: "btn" %>
<% end %>
上2つのパーシャルでは、form_withを使い、Relationshipモデルオブジェクトを操作してる。
これらの2つのフォームの違い
・フォローフォームでは新しいリレーションシップを作成する
・フォロー解除フォームは、既存のリレーションシップを見つけ出す
という点。
前者はPOSTリクエストをRelationshipsコントローラに送信してリレーションシップをcreateする。
後者は、DELETEリクエストを送信してリレーションシップをdestroyする。
このフォームはfollowed_idをコントローラに送信する必要があるため、hidden_field_tagメソッドを使う。
このメソッドでは、以下のフォーム用HTMLを生成する。
<input id="followed_id" name="followed_id" type="hidden" value="3" />
隠しフィールドのinputタグを使うことで、ブラウザ上に表示させずに情報を含ませられる。
このテクニックを使い、フォロー用フォームをパーシャルとしてプロフィール画面に表示した結果が下記になる。
<% provide(:title, @user.name) %>
<div class="row">
  <aside class="col-md-4">
    <section class="user_info">
      <h1>
        <%= gravatar_for @user %>
        <%= @user.name %>
      </h1>
    </section>
    <section class="stats">
      <%= render 'shared/stats' %>
    </section>
  </aside>
  <div class="col-md-8">
    <%= render 'follow_form' if logged_in? %>
    <% if @user.microposts.any? %>
      <h3>Microposts (<%= @user.microposts.count %>)</h3>
      <ol class="microposts">
        <%= render @microposts %>
      </ol>
      <%= will_paginate @microposts %>
    <% end %>
  </div>
</div>
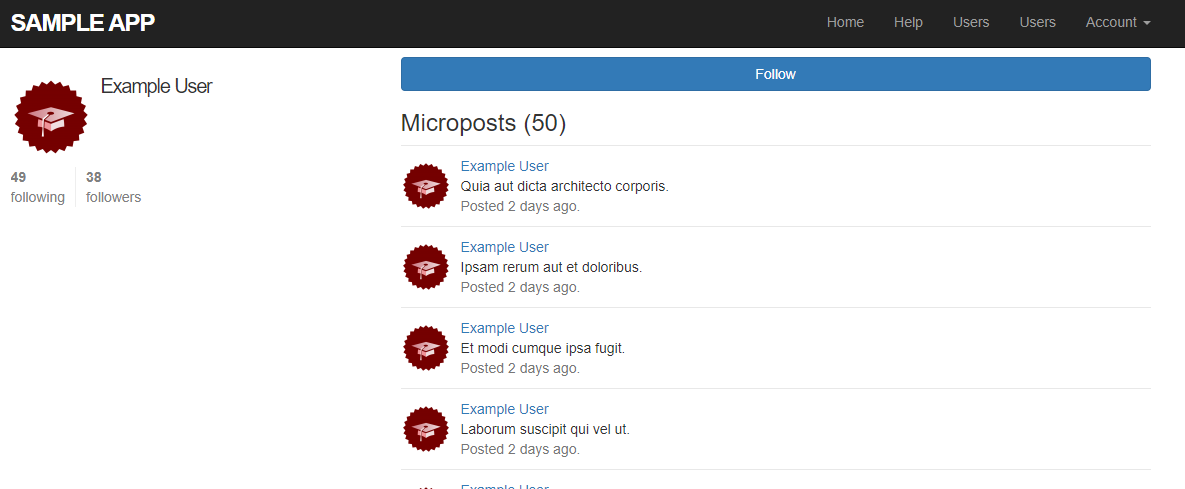
[Follow]ボタン
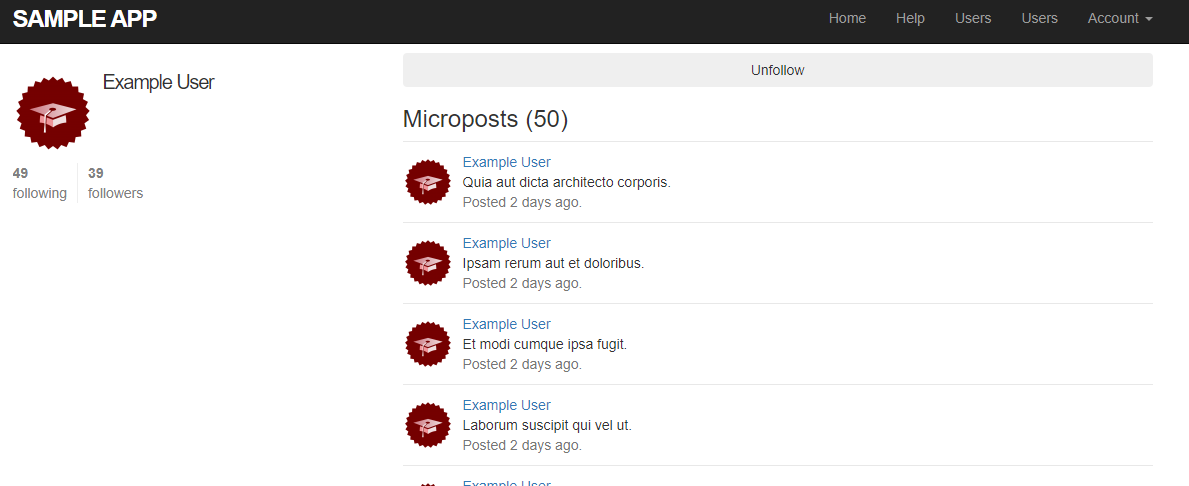
[Unfollow]ボタン
これらのボタンの実装には、2通りの方法がある。
1つ目は、標準的な方法
2つ目は、Ajaxを使う方法
[Following]と[Followers]ページ
フォローしているユーザーを表示するページと、フォロワーを表示するページは、プロフィールページとユーザー一覧ページを合わせた作りになるという点で似ている。
どちらもフォローの統計情報等のユーザー情報を表示するサイドバーと、ユーザーのリストがある。そして、サイドバーには小さめのユーザープロフィール画像のリンクを格子状に並べて表示する予定だ。
フォローしているユーザー用のページのモックアップ
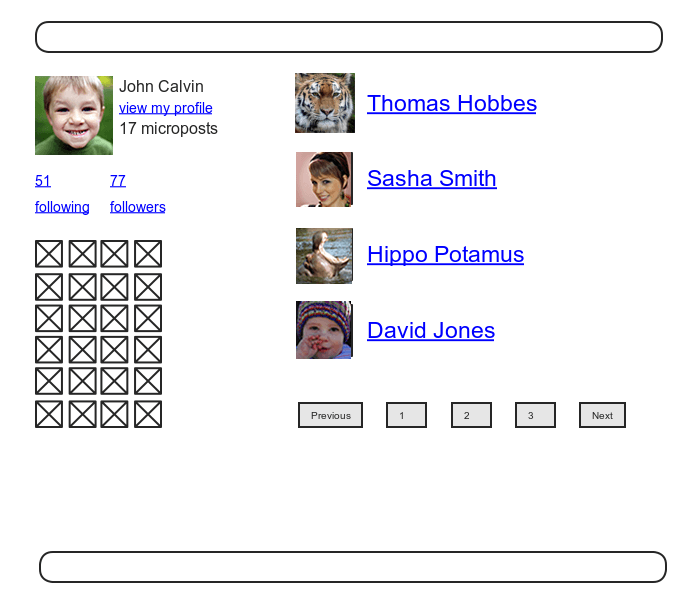
参照:railsチュートリアル
ユーザーのフォロワー用ページのモックアップ
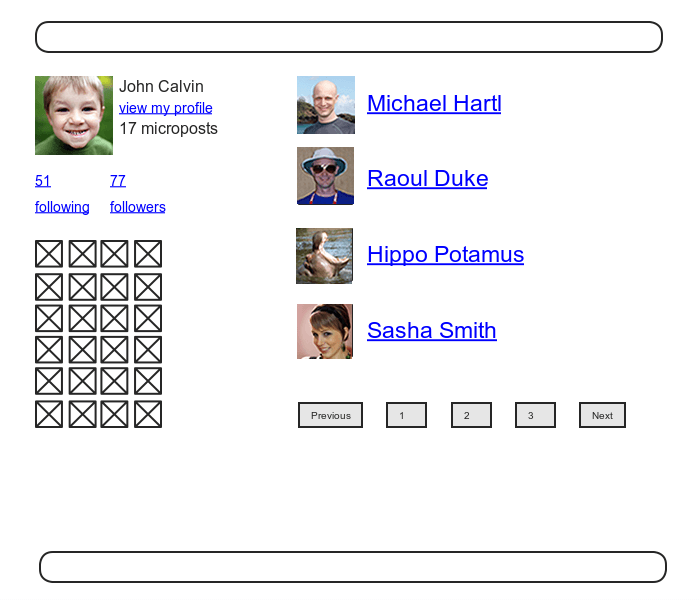
参照:railsチュートリアル
最初の作業
・フォローしているユーザーのリンクとフォロワーのリンクを動くようにすること
Twitterに倣って、どちらのページでもユーザーのログインを要求するようにする。
前回のアクセス制御と同様に、まずはテストから書く。
フォロー/フォロワーページの認可をテストする。
require 'test_helper'

class UsersControllerTest < ActionDispatch::IntegrationTest

  def setup
    @user = users(:michael)
    @other_user = users(:archer)
  end
  .
  .
  .
  test "should redirect following when not logged in" do
    get following_user_path(@user)
    assert_redirected_to login_url
  end

  test "should redirect followers when not logged in" do
    get followers_user_path(@user)
    assert_redirected_to login_url
  end
end
この実装で不思議な部分がある。それはUsersコントローラに2つの新しいアクションを追加する必要があるということ。これは、先ほど定義した2つのルーティングに基づいており、これらはそれぞれfollowingおよびfollowersと呼ぶ必要がある。
それぞれのアクションでは、タイトルを設定しユーザーを検索し、@user.followingまたは@user.followersからデータを取り出し、ページネーションを行い、ページを出力する。
followingアクションとfollowrsアクション
class UsersController < ApplicationController
  before_action :logged_in_user, only: [:index, :edit, :update, :destroy,
                                        :following, :followers]
  .
  .
  .
  def following
    @title = "Following"
    @user  = User.find(params[:id])
    @users = @user.following.paginate(page: params[:page])
    render 'show_follow'
  end

  def followers
    @title = "Followers"
    @user  = User.find(params[:id])
    @users = @user.followers.paginate(page: params[:page])
    render 'show_follow'
  end

  private
  .
  .
  .
end
Railsは慣習に従い、アクションに対応するビューを暗黙的に呼び出す。例えば、showアクションの最後でshow.html.erbを呼び出すみたいな感じ。
一方で上のコードのいずれのアクションも、renderを明示的に呼び出し、show_followという同じビューを出力してる。従って、作成が必要なビューは下の一つでOK。
renderで呼び出しているビューが同じである理由は、このERbはどちらの場合でもほぼ同じであり、両方の場合をカバーできるから。
フォローしているユーザーとフォロワーの両方を表示するshow_followeビュー
<% provide(:title, @title) %>
<div class="row">
  <aside class="col-md-4">
    <section class="user_info">
      <%= gravatar_for @user %>
      <h1><%= @user.name %></h1>
      <span><%= link_to "view my profile", @user %></span>
      <span><b>Microposts:</b> <%= @user.microposts.count %></span>
    </section>
    <section class="stats">
      <%= render 'shared/stats' %>
      <% if @users.any? %>
        <div class="user_avatars">
          <% @users.each do |user| %>
            <%= link_to gravatar_for(user, size: 30), user %>
          <% end %>
        </div>
      <% end %>
    </section>
  </aside>
  <div class="col-md-8">
    <h3><%= @title %></h3>
    <% if @users.any? %>
      <ul class="users follow">
        <%= render @users %>
      </ul>
      <%= will_paginate %>
    <% end %>
  </div>
</div>
followingアクションとfollowersアクションは、2通りの方法で上記のビューを呼び出す。
"following"をとおって描画したビューは下の図
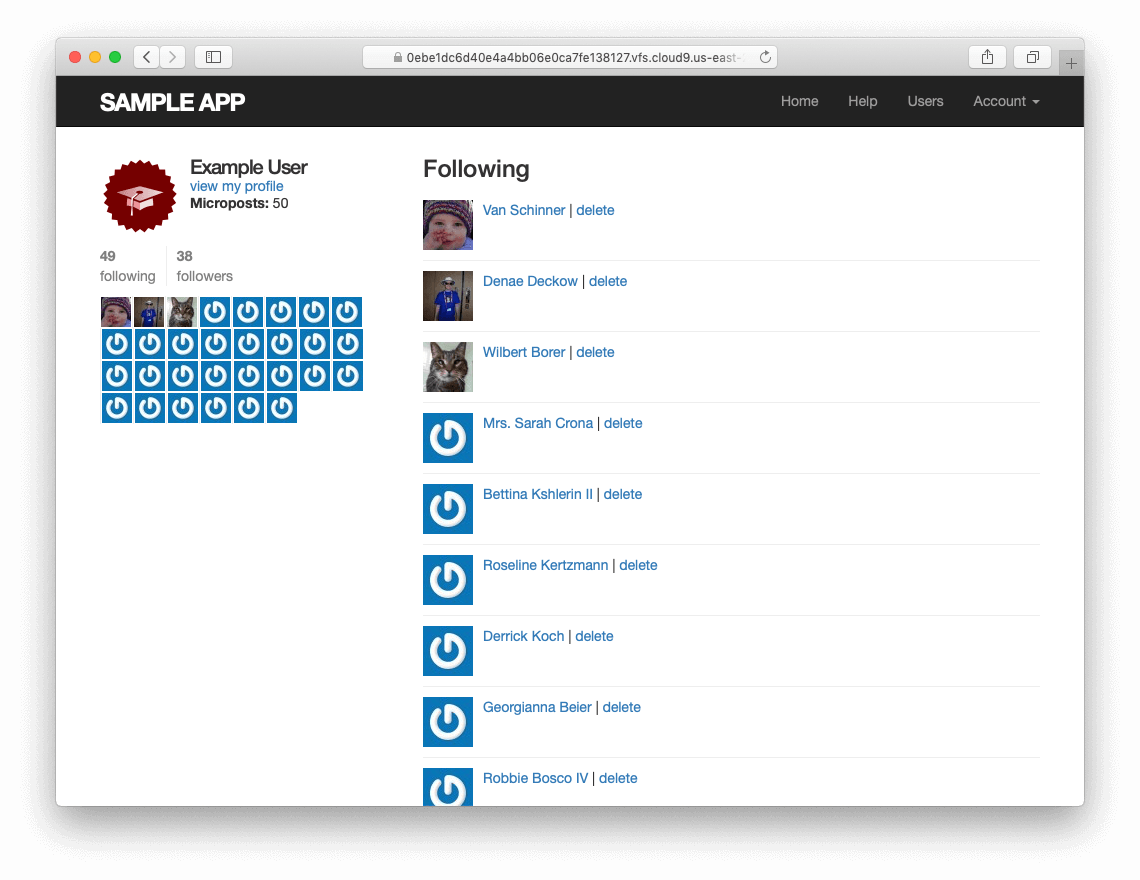
参照:railsチュートリアル
"followers"をとおって描画したビューは下図
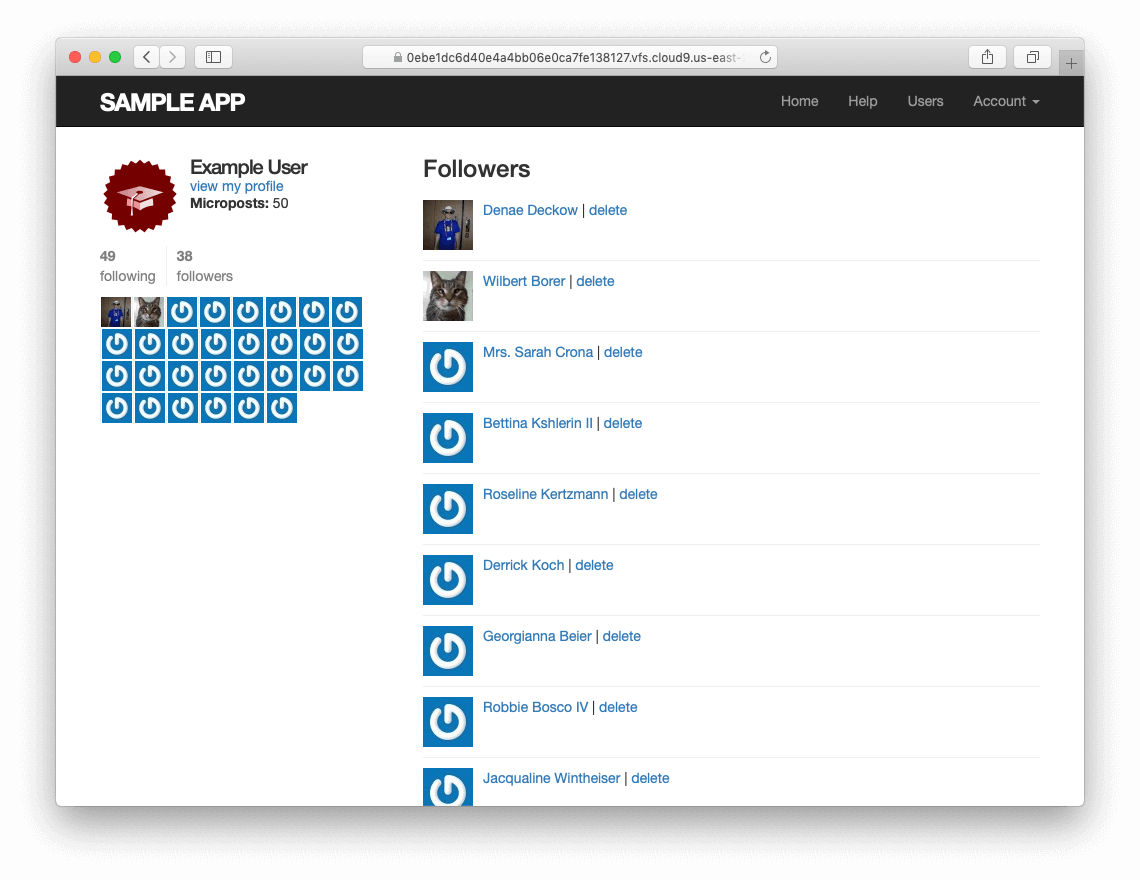
参照:railsチュートリアル
次に、show_followの描画結果を確認するため統合テストを書いていく。
今回の統合テストは現実性のテストとし、網羅的なテストにはしない。
理由として、HTML構造を網羅的にチェックするテストは壊れやすく、生産性を落としかねないから。
なので、今回は正しい数が表示されているかどうかと正しいURLが表示されているかどうかの2つのテストを書く。
統合テスト生成
$ rails generate integration_test following
今度はテストデータをそろえる。
リレーションシップ用のfixtureにデータを追加する。
orange:
  content: "I just ate an orange!"
  created_at: <%= 10.minutes.ago %>
  user: michael
このように書くと、ユーザーとマイクロポストを関連付けられる。
上のコードではユーザー名を
user: michael
と書いているが、これは内部的には以下のようなコードに自動的に変換される。
user_id: 1
この例からRelationship用のfixtureにテストデータを追加するとしたのコードになる。
following/followerをテストするためのリレーションシップ用fixture
one:
  follower: michael
  followed: lana

two:
  follower: michael
  followed: malory

three:
  follower: lana
  followed: michael

four:
  follower: archer
  followed: michael
正しい数かどうか確認するため、assert_matchメソッドを使ってプロフィール画面のマイクロポスト数をテストする。
そして、正しいURLかどうかをテストするコードを加えると下のコードなる。
following/followerページのテスト
require 'test_helper'

class FollowingTest < ActionDispatch::IntegrationTest

  def setup
    @user = users(:michael)
    log_in_as(@user)
  end

  test "following page" do
    get following_user_path(@user)
    assert_not @user.following.empty?
    assert_match @user.following.count.to_s, response.body
    @user.following.each do |user|
      assert_select "a[href=?]", user_path(user)
    end
  end

  test "followers page" do
    get followers_user_path(@user)
    assert_not @user.followers.empty?
    assert_match @user.followers.count.to_s, response.body
    @user.followers.each do |user|
      assert_select "a[href=?]", user_path(user)
    end
  end
end
assert_not @user.following.empty?
このコードは、以下のコードを確かめるテストであって
@user.following.each do |user|
  assert_select "a[href=?]", user_path(user)
end
無意味なテストではない。
もし@user.following.empty?の結果がtrueであれば、assert_select内のブロックが実行されなくなるため、その場合においてテストが適切なセキュリティモデルを確認できなくなることを防げる。
[Follow]ボタン(基本編)
[Follow]/[Unfollow]ボタンを動作させる。フォローとフォロー解除はそれぞれリレーションシップの作成と削除に対応しているため、まずはRelationshipsコントローラが必要。
コントローラ生成
$ rails generate controller Relationships
前回のアクセス制御と同様、最初にテストを書き、それをパスするように実装することでセキュリティモデルを確立させていく。
今回のステップ
・コントローラのアクションにアクセス
・ログイン済みのユーザーであるかどうかをチェック
・もしログインしていなければ、ログインページにリダイレクトされるので、Relationshipのカウントが変わってない事を確認する。
require 'test_helper'

class RelationshipsControllerTest < ActionDispatch::IntegrationTest

  test "create should require logged-in user" do
    assert_no_difference 'Relationship.count' do
      post relationships_path
    end
    assert_redirected_to login_url
  end

  test "destroy should require logged-in user" do
    assert_no_difference 'Relationship.count' do
      delete relationship_path(relationships(:one))
    end
    assert_redirected_to login_url
  end
end
テストをパスさせるため、logged_in_userフィルターをRelationshipsコントローラのアクションに対して追加する。
class RelationshipsController < ApplicationController
  before_action :logged_in_user

  def create
  end

  def destroy
  end
end
[Follow]/[Unfollow]ボタンを動作させるために、フォームから送信されたパラメータを使って、followed_idに対応するユーザーを見つけてくる必要がある。
その後、見つけてきたユーザーに対して適切にfollow/unfollowメソッドを使う。
実装結果は↓
class RelationshipsController < ApplicationController
  before_action :logged_in_user

  def create
    user = User.find(params[:followed_id])
    current_user.follow(user)
    redirect_to user
  end

  def destroy
    user = Relationship.find(params[:id]).followed
    current_user.unfollow(user)
    redirect_to user
  end
end
もしログインしていないユーザーが、これらのアクションに直接アクセスするようなことがあれば、current_userがnilになり、どちらのメソッドにおていも2行目で例外が発生する。
エラーになってもアプリケーションやデータには影響が出ない。
しかし、例外には頼らないほうがいいため、上ではひと手間かけてセキュリティのためのレイヤーを追加した。
これで、フォロー/フォロー解除が完成した。
どのユーザーも、他のユーザーをフォローしたりフォロー解除したりできる。
[Follow]ボタン(Ajax編)
フォロー関連の機能は完成した。
だが、ステータスフィードに取り掛かる前に、もう一つだけ機能を洗練させる。
先ほど、Relationshipsコントローラのcreateアクションとdestroyアクションを単に元のプロフィールページにリダイレクトさせていた。
つまり、流れはこうだ。
・ユーザーはプロフィールページを最初に表示
・その後、ユーザーをフォロー
・そして、元のページにリダイレクトされる
ユーザーフォロー後に、そのページから一旦離れて元のページに戻らねばならないのか。
この問題はAjaxを使うと解決できる。Webページからサーバーに「非同期」で、ページを移動することなくリクエストを送信できる。
例えば、Google MapsとかAjax使ってるよ。
フォロー用とフォロー解除用のパーシャルをこれに沿って更新する。
コードの更新はすごく簡単
form_with(model: ..., local: true)
上のコードを以下に変えればOK!
form_with(model: ..., remote: true)
これだけでRailsは自動的にAjaxを使う。
具体的な更新の結果を下に示す。
Ajaxを使ったフォローフォーム
<%= form_with(model: current_user.active_relationships.build, remote: true) do |f| %>
  <div><%= hidden_field_tag :followed_id, @user.id %></div>
  <%= f.submit "Follow", class: "btn btn-primary" %>
<% end %>
Ajaxを使ったフォロー解除フォーム
<%= form_with(model: current_user.active_relationships.find_by(followed_id: @user.id),
             html: { method: :delete }, remote: true) do |f| %>
  <%= f.submit "Unfollow", class: "btn" %>
<% end %>
上記のERbによって実際生成されるHTMLは以下の通り。
<form action="/relationships/117" class="edit_relationship" data-remote="true"
      id="edit_relationship_117" method="post">
  .
  .
  .
</form>
formタグの内部でdata-remote="true"を設定している。これは、JavaScriptによるフォーム操作を許可することをRailsに知らせるためのもの。現在のRailsではHTMLプロパティを使って簡単にAjaxが扱えるようになった。
次に、これに対応するRelationshipsコントローラを改造して、Ajaxリクエストに応答できるようにする。
こういったリクエストの種類によって応答を場合分けするときは、respond_toメソッドを使う。
respond_to do |format|
  format.html { redirect_to user }
  format.js
end
respond_toは上のブロック内のうち、いずれかの1行が実行される。なので、このメソッドは、上から順に実行する逐次処理というよりは、if文の分岐処理に近い。
RelationshipsコントローラでAjaxに対応させるため、respond_toメソッドをcreateアクションとdestroyアクションにそれぞれ追加する。
この時、ユーザーのローカル変数(user)をインスタンス変数(@user)に変更している。理由は、先ほど追加したフォローおよびフォロー解除フォームを実装したため、必要になった。
class RelationshipsController < ApplicationController
  before_action :logged_in_user

  def create
    @user = User.find(params[:followed_id])
    current_user.follow(@user)
    respond_to do |format|
      format.html { redirect_to @user }
      format.js
    end
  end

  def destroy
    @user = Relationship.find(params[:id]).followed
    current_user.unfollow(@user)
    respond_to do |format|
      format.html { redirect_to @user }
      format.js
    end
  end
end
これでAjaxリクエストに対応したので、ブラウザ側でJavaScriptが無効になっていた場合(Ajaxリクエストが送れない場合)でも動くようにする。
require_relative 'boot'
.
.
.
module SampleApp
  class Application < Rails::Application
    .
    .
    .
    # 認証トークンをremoteフォームに埋め込む
    config.action_view.embed_authenticity_token_in_remote_forms = true
  end
end
しかし、JavaScriptが有効になっていても、まだ十分に対応できない箇所がある。Ajaxリクエストを受信した場合は、Railsが自動的にアクションと同じ名前を持つJavaScript用の埋め込みRuby(.js.erb)ファイル(create.js.erbやdestroy.js.erb等)を呼び出すから。これらのファイルでは、JavaScriptと埋め込みRubyをミックスして現在のページに対するアクションを実行することが可能となる。ユーザーをフォロー、フォロー解除した時に、プロフィールページを更新するため、作成および編集するファイルをこれらになる。
JS-ERbファイルの内部では、DOM(Document Object Model)を使ってページを操作するので、RailsがjQuery JavaScriptヘルパーを自動的に提供してくれる。これによってjQueryライブラリのDOM操作用メソッドが使えるようになる。
今回使うのは2つ。
その前に、まずはドル記号($)とCSS idを使ってDOM要素にアクセスする文法について学ぶ。
例えば、follow_formの要素をjQueryで操作するには以下のようになる。
$("#follow_form")
_follow_form.html.erbでは、これはフォームを囲むdivタグであって、フォームそのものではない。#follow_formは_follow_form.html.erbのパーシャルにおいて、idで指定された名前。
jQueryの文法はCSSの記法から影響を受けており、#シンボルを使ってCSSのidを指定する。なので、jQueryはCSSと同様、ドット.を使ってCSSクラスを操作できる。
次に必要なメソッドはhtmlだ。これは引数の中で指定された要素の内側にあるHTMLを更新する。例えば、フォロー用フォーム全体を"foobar"という文字列を置き換えるな以下のコードだ。
$("#follow_form").html("foobar")
JavaScriptと異なり、JS-ERbファイルでは埋め込みRubyが使える。
create.js.erbファイルでは、フォロー用のフォームをunfollowパーシャルで更新し、フォロワーのカウントを更新するのにERbを使う。
以下のコードは、escape_javascriptメソッドを使っていて、これはJavaScriptファイル内にHTMLを挿入する時、実行結果をエスケープするために必要。
$("#follow_form").html("<%= escape_javascript(render('users/unfollow')) %>");
$("#followers").html('<%= @user.followers.count %>');
因みに各行末尾にセミコロンがあるが、これはプログラミング言語によくある文法で、1950年代中頃に開発されたALGOLまで遡るとのこと。へー、結構古い。
destroy.js.erbファイルの方も同様だ。
$("#follow_form").html("<%= escape_javascript(render('users/follow')) %>");
$("#followers").html('<%= @user.followers.count %>');
これらのコードで、プロフィールページを更新させずにフォローとフォロー解除ができるようになった。
フォローをテストする
フォローボタンが動くようになった。
ここからは、バグを検知するためのテストを書いていく。
ユーザーのフォローに対するテスト
・/relationshipsに対して、POSTリクエスト送信
・フォローされたユーザーが一人増えたかチェック
assert_difference '@user.following.count', 1 do
  post relationships_path, params: { followed_id: @other.id }
end
これは標準的なテストコード。
Ajax版もほぼ同じで、Ajaxのテストでは、xhr :trueオプションを使うようにするだけ。
assert_difference '@user.following.count', 1 do
  post relationships_path, params: { followed_id: @other.id }, xhr: true
end
xhr(XmlHttoRequest)というオプションをtrueに設定すると、Ajaxでリクエストを発行するように変わる。従って、respond_toでJavaScriptに対応した行が実行されるようになる。
そして、ユーザーをフォロー解除するときも構造はほぼ同じで、postメソッドをdeleteメソッドに置き換えてテストする。つまりは、そのユーザーのidとリレーションシップのidを使い、DELETEリクエストを送信し、フォローしている数が一つ減るか確認すればOK。
実際に加えるテストは以下の2点
従来通りのテスト
assert_difference '@user.following.count', -1 do
  delete relationship_path(relationship)
end
Ajax用のテスト
assert_difference '@user.following.count', -1 do
  delete relationship_path(relationship), xhr: true
end
これらのテストをまとめたものが下記のコード
require 'test_helper'

class FollowingTest < ActionDispatch::IntegrationTest

  def setup
    @user  = users(:michael)
    @other = users(:archer)
    log_in_as(@user)
  end
  .
  .
  .
  test "should follow a user the standard way" do
    assert_difference '@user.following.count', 1 do
      post relationships_path, params: { followed_id: @other.id }
    end
  end

  test "should follow a user with Ajax" do
    assert_difference '@user.following.count', 1 do
      post relationships_path, xhr: true, params: { followed_id: @other.id }
    end
  end

  test "should unfollow a user the standard way" do
    @user.follow(@other)
    relationship = @user.active_relationships.find_by(followed_id: @other.id)
    assert_difference '@user.following.count', -1 do
      delete relationship_path(relationship)
    end
  end

  test "should unfollow a user with Ajax" do
    @user.follow(@other)
    relationship = @user.active_relationships.find_by(followed_id: @other.id)
    assert_difference '@user.following.count', -1 do
      delete relationship_path(relationship), xhr: true
    end
  end
end
ステータスフィード
ステータスフィードの実装を行う。
現在のユーザーにフォローされているユーザーのマイクロポストの配列を作成し、現在のユーザー自身のマイクロポストと合わせて表示する。
この実装には、RailsとRubyの機能と、SQLの知識も必要だ。
ステータスフィードの最終形は下記の図
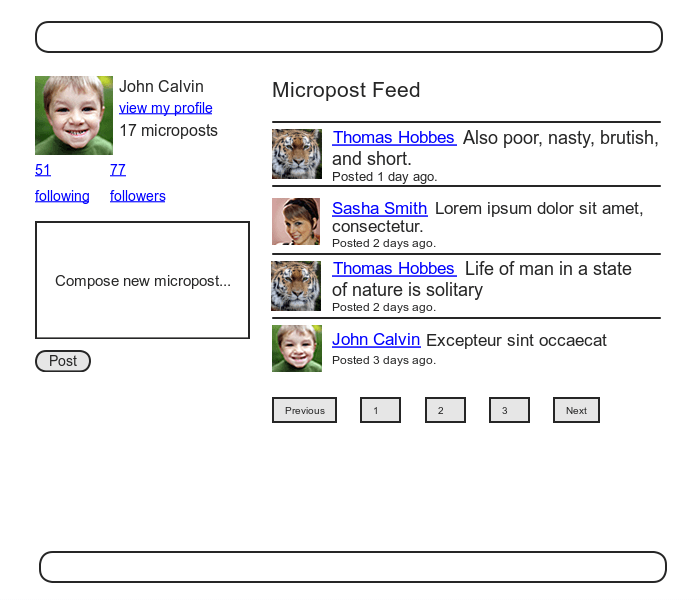
動機と計画
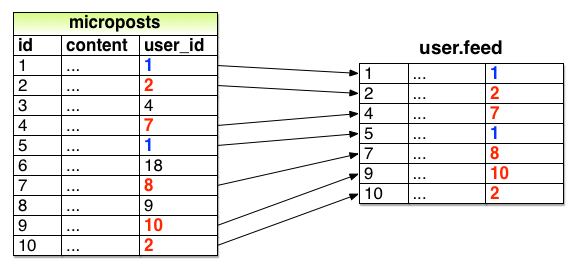
参照:railsチュートリアル
micropostsのサンプルデータ付きのデータモデルとその結果は上の図だ。
図の矢印で示されているように、現在のユーザーによってフォローされているユーザーに対応しているユーザーidを持つマイクロポストを取り出して、同時に現在のユーザー自身のマイクロポストも一緒に取り出せば良い。
まずはテストから書いてく。
今回のテストで重要なことは、フィードに必要な3つの条件を満たすこと。
1.フォローしているユーザーのマイクロポストがフィードに含まれている事
2.自分自身のマイクロポストもフィードに含まれている事
3.フォローしていないユーザーのマイクロポストがフィードに含まれていない事
状況として
・MichaelがLanaをフォローしている
・Archerをフォローしていない
この状況だと、Michaelのフィードでは、Lanaと自分自身の投稿が見えていて、Archerの投稿は見えないことになる。
先ほどの3つの条件をアサーションに取り入れて、Userモデルにfeedがあることに気を付けながら、更新したUserモデルに対するテストを書く。
require 'test_helper'

class UserTest < ActiveSupport::TestCase
  .
  .
  .
  test "feed should have the right posts" do
    michael = users(:michael)
    archer  = users(:archer)
    lana    = users(:lana)
    # フォローしているユーザーの投稿を確認
    lana.microposts.each do |post_following|
      assert michael.feed.include?(post_following)
    end
    # 自分自身の投稿を確認
    michael.microposts.each do |post_self|
      assert michael.feed.include?(post_self)
    end
    # フォローしていないユーザーの投稿を確認
    archer.microposts.each do |post_unfollowed|
      assert_not michael.feed.include?(post_unfollowed)
    end
  end
end
フィードを初めて実装する
ステータスフィードに対する要件定義は、先ほどのテスト内容から明らかになったので、先ほどのテストをパスできる内容を書けば良い。
最初に、このフィードで必要なクエリについてみる。
ここで必要なものは、micropostsテーブルから、あるユーザー(つまり自分自身)がフォローしているユーザーに対応するidを持つマイクロポストをすべて選択(select)すること。
このクエリを模式的に書くと以下のようになる。
SELECT * FROM microposts
WHERE user_id IN (<list of ids>) OR user_id = <user id>
上記のコードで、SQLがINというキーワードをサポートしている。
このキーワードを使うことにより、idの集合の**内包(set inclusion)**に対してテストを行える。
第13章でやったプロトフィードでは、上のような選択をするのにActive Recordのwhereメソッドを使っていた。
Micropost.where("user_id = ?", id)
この時選択すべき対象はシンプルで、現在のユーザーに田泓するユーザーidを持つマイクロポストを選択すればよかった。
今回必要になる選択とは、先ほどのものより複雑で、以下のようになる。
Micropost.where("user_id IN (?) OR user_id = ?", following_ids, id)
上のような条件から、フォローされているユーザーに対応するidの配列が必要であることが分かる。これを行う方法の一つとして、Rubyのmapメソッドを使うというのがある。
このメソッドはすべての「列挙可能(enumerable)」なオブジェクト(配列やハッシュ等、要素の集合で構成されるあらゆるオブジェクト)で使用可能だ。列挙可能(enumerable)オブジェクトの主な条件としては、eachメソッドを実装していること。このメソッドはコレクションを列挙する。
他の例題として、mapメソッドを使って配列を文字列に変換すると、以下のようになる。
$ rails console
>> [1, 2, 3, 4].map { |i| i.to_s }
=> ["1", "2", "3", "4"]
上のような状況では、各要素に対して同じメソッドが実行される。これはよく使われる方法となっており、次の通りアンパサンド(Ampersand)&と、メソッドに対応するシンボルを使った短縮表記が使える。
この短縮表記だと、変数iを使わないで済む。
>> [1, 2, 3, 4].map(&:to_s)
=> ["1", "2", "3", "4"]
この結果に対して、joinメソッドを使えば、idの集合をカンマ区切りの文字列として繋げられる。
>> [1, 2, 3, 4].map(&:to_s).join(', ')
=> "1, 2, 3, 4"
なので、上のコードを使えば、user.followingにある各要素のidを呼び出して、フォローしているユーザーのidを配列として扱える。
例として、データベースの最初のユーザーに対して実行すると下のような結果になる。
>> User.first.following.map(&:id)
=> [3, 4, 5, 6, 7, 8, 9, 10, 11, 12, 13, 14, 15, 16, 17, 18, 19, 20, 21, 22,
23, 24, 25, 26, 27, 28, 29, 30, 31, 32, 33, 34, 35, 36, 37, 38, 39, 40, 41,
42, 43, 44, 45, 46, 47, 48, 49, 50, 51]
この手法は大変便利なため、Active Recordだと次のようなメソッドが用意されている。
>> User.first.following_ids
=> [3, 4, 5, 6, 7, 8, 9, 10, 11, 12, 13, 14, 15, 16, 17, 18, 19, 20, 21, 22,
23, 24, 25, 26, 27, 28, 29, 30, 31, 32, 33, 34, 35, 36, 37, 38, 39, 40, 41,
42, 43, 44, 45, 46, 47, 48, 49, 50, 51]
上にあるfollowing_idsメソッドは、has_many :followingの関連付けをした際に、Active Recordが自動生成したものなのだ。これによって、user.followingコレクションに対応するidを得るためには、関連付けの名前の末尾に_idsと付け足せば良い。結果として、フォローしているユーザーidの文字列は、次のようにして取得できる。
>> User.first.following_ids.join(', ')
=> "3, 4, 5, 6, 7, 8, 9, 10, 11, 12, 13, 14, 15, 16, 17, 18, 19, 20, 21, 22,
23, 24, 25, 26, 27, 28, 29, 30, 31, 32, 33, 34, 35, 36, 37, 38, 39, 40, 41,
42, 43, 44, 45, 46, 47, 48, 49, 50, 51
上記にあげたコードは説明のためのコードであり、実際にSQL文字列に挿入する際には、このような感じで記述する必要はない。
実は、?を内挿すると自動的にこの辺の面倒を見てくれる。加えて、データベースに依存する一部の非互換性まで解消してくれる。ざっくりと言えば、following_idsメソッドをそのまま使えば良い。
結果的に、最初に想像してた
Micropost.where("user_id IN (?) OR user_id = ?", following_ids, id)
というコードが動く。
暫定で動くフィードの実装コード
class User < ApplicationRecord
  .
  .
  .
  # パスワード再設定の期限が切れている場合はtrueを返す
  def password_reset_expired?
    reset_sent_at < 2.hours.ago
  end

  # ユーザーのステータスフィードを返す
  def feed
    Micropost.where("user_id IN (?) OR user_id = ?", following_ids, id)
  end

  # ユーザーをフォローする
  def follow(other_user)
    following << other_user
  end
  .
  .
  .
end
初期実装は十分だが、フォローしているユーザーが沢山いたらどうなるだろうか...?
サブセレクト
先ほどのフィード実装では、投稿されたマイクロポストの数が膨大になったらうまくスケールできない。故に、フォローしているユーザーが数千人単位になってくるとWebサービス全体が遅くなる。
今回は、フォローしているユーザー数に応じてスケールできるようにしていく。
先ほどのコードの問題点は、2つある。
・following_idsでフォローしているすべてのユーザーをデータベースに問い合わせている。
・フォローしているユーザーの完全な配列を作るために再度データベースに問い合わせている。
Micropost.where("user_id IN (?) OR user_id = ?", following_ids, id)
この条件では、集合に内包されているかどうかだけしかチェックされていない。
SQLは本来はこのような集合の操作に最適化されている。
このような問題は、SQLの**サブセレクト(subselect)**を使うと解決できる。
まずはコードを少し修正し、フィードをリファクタリングする。
whereメソッド内の変数に、キーと値のペアを使う。
class User < ApplicationRecord
  .
  .
  .
  # ユーザーのステータスフィードを返す
  def feed
    Micropost.where("user_id IN (:following_ids) OR user_id = :user_id",
     following_ids: following_ids, user_id: id)
  end
  .
  .
  .
end
Micropost.where("user_id IN (?) OR user_id = ?", following_ids, id)
上のコードを下記に置き換えた。
Micropost.where("user_id IN (:following_ids) OR user_id = :user_id",
    following_ids: following_ids, user_id: id)
疑問符を使った方法も便利ではあるが、同じ変数を複数の場所に挿入したい場合は、後者の文法がより便利だ。
これからSQLクエリにもう一つのuser_idを追加する。
次のRubyのコードは
following_ids
下記のようなSQLに置き換えることができる。
following_ids = "SELECT followed_id FROM relationships WHERE follower_id = :user_id"
上記のコードをSQLのサブセレクトとして使う。
つまりは、「ユーザー1がフォローしているユーザーすべてを選択する」というSQLを既存のSQLに内包させる形となり、結果としてSQLは以下のようになる。
SELECT * FROM microposts
WHERE user_id IN (SELECT followed_id FROM relationships
                  WHERE  follower_id = 1)
      OR user_id = 1
このサブセレクトは集合のロジックをRailsではなく、データベース内に保存するため、より効率的にデータを取得できる。
これでさらに効率的なフィードを実装する準備ができた。
フィードの最終的な実装
class User < ApplicationRecord
  .
  .
  .
  # ユーザーのステータスフィードを返す
  def feed
    following_ids = "SELECT followed_id FROM relationships
                     WHERE follower_id = :user_id"
    Micropost.where("user_id IN (#{following_ids})
                     OR user_id = :user_id", user_id: id)
  end
  .
  .
  .
end
上記に記述されているコードは生のSQLを表す文字列で、following_idsという文字列はエスケープされているわけではなく、見やすさのため式展開しているだけだ。
上のようなコードはRailsとRubyとSQLのコードが複雑に絡み合っている。
しかし、サブセレクトを使えばいくらでもスケールできるわけではない。大規模なWebサービスは、バックグラウンド処理を使い、フィードを非同期で生成するなどの改善を行っている。Webサービスをスケールさせる技術はとても高度でデリケートなので、Railsチュートリアルではここまでの改善とのことだ。
フィードが完成したので、masterブランチに変更を取り込みプッシュ、本番環境にデプロイすればOK
$ rails test
$ git add -A
$ git commit -m "Add user following"
$ git checkout master
$ git merge following-users
$ git push
$ git push heroku
$ heroku pg:reset DATABASE
$ heroku run rails db:migrate
$ heroku run rails db:seed
最後に
ここまできてRailsチュートリアルは完走したことになる。
この教材で学んだRailsの主要な機能
・モデル
・ビュー
・コントローラ
・テンプレート
・パーシャル
・beforeフィルター
・バリデーション
・コールバック
・has_many/belongs_to/has_many through関連付け
・セキュリティ
・テスティング
・デプロイ
等々
実にたくさんのことを学んだ。
実はRailsチュートリアルのサンプルアプリケーションの機能を拡張するというミッションが最後に残されているので、時間がある人はやってみると良い。
・Ruby/Railsのバージョンを上げる
・返信機能
・メッセージ機能
・フォロワーの通知
・RSSフィード
・REST API
・検索機能
・他の拡張機能
まだまだあげたらきりがないが、上記の機能はやはりWebアプリケーションにあると良いものだと思う。
以上第14章まで読んでいただき、ありがとうございました!