第11章
現時点のアプリケーションでは、新規登録したユーザーが最初からすべての機能にアクセスできるようになっている。
今回は、アカウント有効化を差し込み、メールアドレスが持ち主かどうかを確認する。
流れ
①有効化トークンやダイジェストに関連付けた状態にする
②有効化トークンを含めたリンクをユーザーにメール送信
③ユーザーがそのリンクをクリックすると有効化できるようにする
アカウント有効化のステップ
1.ユーザーの初期状態は「有効化されていない」(unactivated)にしておく。
2.ユーザー登録が行われたときに、有効化トークンと、それに対応する有効化ダイジェストを生成する。
3.有効化ダイジェストはデータベースに保存しておき、有効化トークンはメールアドレスと一緒に、ユーザーに送信する有効化用メールのリンクに仕込んでおく3 。
4.ユーザーがメールのリンクをクリックしたら、アプリケーションはメールアドレスをキーにしてユーザーを探し、データベース内に保存しておいた有効化ダイジェストと比較することでトークンを認証する。
5.ユーザーを認証できたら、ユーザーのステータスを「有効化されていない」から「有効化済み」(activated)に変更する。
以前やったパスワードや記憶トークンの仕組みと似ている。
| 検索キー | string | digest | authentication |
|---|---|---|---|
| password | password_digest | authenticate(password) | |
| id | remember_token | remember_digest | authenticated?(:remember, token) |
| activation_token | activation_digest | authenticated?(:activation, token) | |
| reset_token | reset_digest | authenticated?(:reset, token) | |
| 参照:railsチュートリアル |
AccountActivationsリソース
第8章でやったセッション機能を使い、アカウントの有効化作業を「リソース」としてモデル化する。(Active Recordのモデルとは関係ないため、両者を関連付けしない。代わりに、必要なデータをUserモデルに追加する)
有効化用のリンクにアクセスし有効化のステータスを変更するなら、RESTに準拠すればPATCHリクエストとupdateアクションになるべき。
しかし、有効化リンクはめーづで送られ、リンクをクリック=
=ブラウザでクリックした時と同じであり、この場合ブラウザから発行されるのはGETリクエストになる。
なので、ユーザーからのGETリクエストを受けるため、updateのところeditアクションに変更する。
AccountActivationsコントローラ
AccountActivationsコントローラーを生成する
$ rails generate controller AccountActivations
editアクションへの名前付きルートを扱うため、ルーティングにアカウント有効化用のresources行を追加する。
resources :account_activations, only: [:edit]
| HTTPリクエスト | URL | Action | 名前付きルート |
|---|---|---|---|
| GET | /account_activation/トークン/edit | edit | edit_account_activation_url(token) |
| 参照:railsチュートリアル |
これで名前付きルートの
edit_account_activation_url(activation_token, ...)
が使えるようになった。
AccountActivationのデータモデル
有効化のメールには一意の有効化トークンが必要。
一瞬、送信メールと同じ文字列をデータベースに保管しておけばよくねと思うが、万が一データベースの内容が漏れた時大変なことになる。
新規登録されたユーザーアカウントのトークンを盗み、不正にそのトークンを使われてしまう危険性がある。
なので、仮想的な属性を使ってハッシュ化した文字列をデータベースに保存し、次のように仮想属性の有効化トークンにアクセス
user.activation_token
下のようなコードでユーザー認証できるようになる。
user.authenticated?(:activation, token)
参照:railsチュートリアル
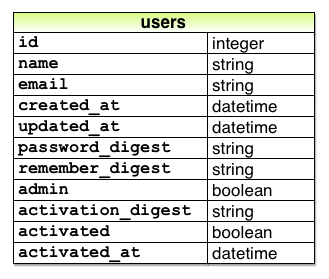
上の画像のようにデータモデルを追加するので、マイグレーションを実行する。
$ rails generate migration add_activation_to_users activation_digest:string activated:boolean activated_at:datetime
admin属性と同様にactivated属性のデフォルト論理値をfalseにする。
add_column :users, :activated, :boolean, default: false
あとはマイグレートする
$ rails db:migrate
Activationトークンのコールバック
以前メールアドレスを保存する前に、メールアドレスを小文字に変換するとかでbefore_saveコールバックを使った。before_saveは、オブジェクトが保存される直前、オブジェクト作成時や更新時にコールバックが呼び出される。
今回は、オブジェクトが生成された時だけ、コールバックを呼び出したいのでbefore_createコールバックが必要になる。
before_create :create_activation_digest
このコードはメソッド参照と呼ばれ、Railsはcreate_activation_digestメソッドを探して、ユーザー作成前に実行する。
create_activation_digestメソッドはUserモデル内でしか使わないので、privateキーワードを指定する。
private

  def create_activation_digest
    # 有効化トークンとダイジェストを作成および代入する
  end
before_createコールバックの目的は、トークンとそれに対応するダイジェストを割り当てるため。割り当ては下のように
self.activation_token  = User.new_token
self.activation_digest = User.digest(activation_token)
記憶トークンや記憶ダイジェストのために作ったメソッドを使いまわしている。
ここでrememberメソッドと見比べる
# 永続セッションのためにユーザーをデータベースに記憶する
def remember
  self.remember_token = User.new_token
  update_attribute(:remember_digest, User.digest(remember_token))
end
update_attributeの使い方に違いがあるが、記憶トークンやダイジェストは既にデータベースにいるユーザーのために作成されるのに対し、before_createコールバックはユーザーが作成される前に呼び出される。
User.newで新しいユーザーが定義されると、activation_token属性やactivation_digest属性が得られる。
後者のactivation_token属性は既にデータベースとの関連付けが出来上がっているため、ユーザーが保存される時に同時に保存される。
Userモデルに実装するとこんな感じ
  attr_accessor :remember_token, :activation_token
  before_save   :downcase_email
  before_create :create_activation_digest

  private

    # メールアドレスをすべて小文字にする
    def downcase_email
      self.email = email.downcase
    end

    # 有効化トークンとダイジェストを作成および代入する
    def create_activation_digest
      self.activation_token  = User.new_token
      self.activation_digest = User.digest(activation_token)
    end
サンプルユーザーの生成とテスト
サンプルデータとfixtureを更新する。
サンプルとユーザーを事前に有効化しておく。
# メインのサンプルユーザーを1人作成する
User.create!(name:  "Example User",
             email: "example@railstutorial.org",
             password:              "foobar",
             password_confirmation: "foobar",
             admin:     true,
             activated: true,
             activated_at: Time.zone.now)

# 追加のユーザーをまとめて生成する
99.times do |n|
  name  = Faker::Name.name
  email = "example-#{n+1}@railstutorial.org"
  password = "password"
  User.create!(name:  name,
              email: email,
              password:              password,
              password_confirmation: password,
              activated: true,
              activated_at: Time.zone.now)
michael:
  name: Michael Example
  email: michael@example.com
  password_digest: <%= User.digest('password') %>
  admin: true
  activated: true
  activated_at: <%= Time.zone.now %>

archer:
  name: Sterling Archer
  email: duchess@example.gov
  password_digest: <%= User.digest('password') %>
  activated: true
  activated_at: <%= Time.zone.now %>

lana:
  name: Lana Kane
  email: hands@example.gov
  password_digest: <%= User.digest('password') %>
  activated: true
  activated_at: <%= Time.zone.now %>

malory:
  name: Malory Archer
  email: boss@example.gov
  password_digest: <%= User.digest('password') %>
  activated: true
  activated_at: <%= Time.zone.now %>

<% 30.times do |n| %>
user_<%= n %>:
  name:  <%= "User #{n}" %>
  email: <%= "user-#{n}@example.com" %>
  password_digest: <%= User.digest('password') %>
  activated: true
  activated_at: <%= Time.zone.now %>
<% end %>
データベースを初期化&サンプルデータを再度生成し、変更を反映する。
$ rails db:migrate:reset
$ rails db:seed
アカウント有効化のメール送信
Action Mailerライブラリを使って、Userのメイラーを追加する。
これをUsersコントローラのcreateアクションで有効化リンクをメール送信するために使う。
メイラー構成は、コントローラのアクションと似てて、メールテンプレートをビューと同じ要領で定義できる。ここに、有効化トークンとメールアドレスのリンクを含める。
送信メールのテンプレート
メイラーは、rails generateで生成する。
$ rails generate mailer UserMailer account_activation password_reset
これで、account_activationメソッドとpassword_resetメソッドの原型ができた。
生成したメイラーごとに、ビューのテンプレートは2つずつ生成され、1つはテキスト用メールのテンプレート、2つ目はHTMLメール用のテンプレートになる。
テキストビュー
UserMailer#account_activation

<%= @greeting %>, find me in app/views/user_mailer/account_activation.text.erb
<h1>UserMailer#account_activation</h1>

<p>
  <%= @greeting %>, find me in app/views/user_mailer/account_activation.html.erb
</p>
生成されたメイラーの動作を解説する。
class ApplicationMailer < ActionMailer::Base
  default from: "from@example.com"
  layout 'mailer'
end
デフォルトのfromアドレスがあり、メールのフォーマットに対応するメイラーレイアウトが使われている。
class UserMailer < ApplicationMailer
  def account_activation
    @greeting = "Hi"

    mail to: "to@example.org"
  end

  def password_reset
    @greeting = "Hi"

    mail to: "to@example.org"
  end
end
@greetingというインスタンス変数があり、ビューでコントローラのインスタンス変数を利用できるのと同じで、メイラービューで利用できる。
fromアドレスのデフォルト値を更新する。
default from: "from@example.com"
から
default from: "noreply@example.com"
にする。
アカウント有効化リンクをメール送信する。
  def account_activation(user)
    @user = user
    mail to: user.email, subject: "Account activation"
  end
この時点でaccount_activationに引数を与えたので、テストはパスしない。
メールには、挨拶文にユーザー名とカスタムの有効化リンクを追加する。
流れとしては、Railsサーバーでユーザーをメールアドレス検索し、有効化トークンを認証できるようにするので、リンクにメールアドレスとトークンを両方含める。
edit_user_url(user)
は
https://www.example.com/users/1/edit
となる。(urlは絶対パス)
これに対応するアカウント有効化リンクのURLはこんな感じになる。
https://www.example.com/account_activations/q5lt38hQDc_959PVoo6b7A/edit
ハッシュの部分はnew_tokenメソッドで生成されたもので、Base64でエンコードされている。
ハッシュの部分は、/users/1/editの「1」のユーザーIDと同じ役割になる。
このトークンは、AccountActivationsコントローラのeditアクションでは、paramsハッシュでparams[:id]として参照可能。
クエリパラメータ
クエリパラメータを使用し、URLにメールアドレスを組み込める。
クエリパラメータは、URLの末尾に疑問符「?」に続けてキーと値のペアを記述する。
account_activations/q5lt38hQDc_959PVoo6b7A/edit?email=foo%40example.com
メールアドレスの「@」記号はURLにおいて「%40」となる。
これはエスケープという手法で、URLで扱えない文字を扱えるようにするためのもの。
クエリパラメータを設定するのに、名前付きルートに対して次のハッシュを追加する。
edit_account_activation_url(@user.activation_token, email: @user.email)
名前付きルートでクエリパラメータを定義すれば、Railsが特殊文字を自動でエスケープする。
コントローラーでparams[:email]とすれば、自動的にエスケープを解除する。
(頭がいい)
アカウント有効化のテキストビューとHTMLビュー
テキストビュー↓
Hi <%= @user.name %>,

Welcome to the Sample App! Click on the link below to activate your account:

<%= edit_account_activation_url(@user.activation_token, email: @user.email) %>
HTMLビュー↓
<h1>Sample App</h1>

<p>Hi <%= @user.name %>,</p>

<p>
Welcome to the Sample App! Click on the link below to activate your account:
</p>

<%= link_to "Activate", edit_account_activation_url(@user.activation_token,
                                                    email: @user.email) %>
送信メールのプレビュー
テンプレートを作ったので、メールプレビューをやってみる。
これは、メールを実際に送信しなくても、その場でプレビューすることができる。
  config.action_mailer.raise_delivery_errors = false

  host = 'example.com' # ここをコピペすると失敗します。自分の環境のホストに変えてください。
  # クラウドIDEの場合は以下をお使いください
  config.action_mailer.default_url_options = { host: host, protocol: 'https' }
  # localhostで開発している場合は以下をお使いください
  # config.action_mailer.default_url_options = { host: host, protocol: 'http' }
今回はcloud9なので、ホスト名は自分のcloud9のURLにすればOK
続いて、Userメイラープレビューファイルの更新が必要。
account_activationの引数に有効なUserオブジェクトを渡すため、user変数が開発用データベースの最初のユーザーになるよう定義する。
それをUserMailer.account_activationの引数として渡す。
class UserMailerPreview < ActionMailer::Preview
  def account_activation
    user = User.first
    user.activation_token = User.new_token
    UserMailer.account_activation(user)
  end
end
このときに、user.activation_tokenの値にも代入している。理由としてテンプレートでは、アカウント有効化のトークンが必要なので、代入している。また、activation_tokenは仮の属性なので、データベースのユーザーはこの値を持っていない。
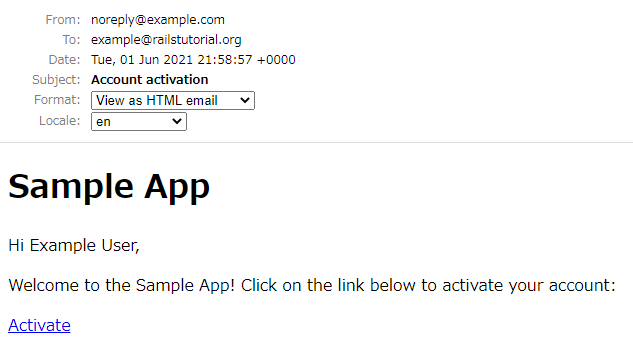
プレビューがみれた。
プレビューを見る際には、URLの末尾に「/rails/mailers/user_mailer/account_activation」を付ければOK
送信メールのテスト
メールプレビューのテストを作成し、プレビューをダブルチェックする。
Rialsによってテスト例が自動生成されてるので、これを利用する。
require 'test_helper'

class UserMailerTest < ActionMailer::TestCase

  test "account_activation" do
    mail = UserMailer.account_activation
    assert_equal "Account activation", mail.subject
    assert_equal ["to@example.org"], mail.to
    assert_equal ["from@example.com"], mail.from
    assert_match "Hi", mail.body.encoded
  end

  test "password_reset" do
    mail = UserMailer.password_reset
    assert_equal "Password reset", mail.subject
    assert_equal ["to@example.org"], mail.to
    assert_equal ["from@example.com"], mail.from
    assert_match "Hi", mail.body.encoded
  end
end
だが、この時点でテストは失敗する。
テストでは、assert_matchという強力なメソッドが使われている。
下の方法だと正規表現で文字列をテストできる。
assert_match 'foo', 'foobar'      # true
assert_match 'baz', 'foobar'      # false
assert_match /\w+/, 'foobar'      # true
assert_match /\w+/, '$#!*+@'      # false
require 'test_helper'

class UserMailerTest < ActionMailer::TestCase

  test "account_activation" do
    user = users(:michael)
    user.activation_token = User.new_token
    mail = UserMailer.account_activation(user)
    assert_equal "Account activation", mail.subject
    assert_equal [user.email], mail.to
    assert_equal ["noreply@example.com"], mail.from
    assert_match user.name,               mail.body.encoded
    assert_match user.activation_token,   mail.body.encoded
    assert_match CGI.escape(user.email),  mail.body.encoded
  end
end
上のテストでは、assert_matchメソッドで、名前、有効化トークン、エスケープ済メールアドレスがメール本文にあるかみている。
CGI.escape(user.email)
というのを使えばテストユーザーのメールアドレスをエスケープできる。
テストをパスさせるため、ドメイン名を正しく設定する。
config.action_mailer.default_url_options = { host: 'example.com' }
これでテストは成功する。
ユーザーのcreateアクションを更新
createアクションにユーザー登録を行うコードを数行追加すれば、メイラーをアプリケーションで使える。
class UsersController < ApplicationController

  def create
    @user = User.new(user_params)
    if @user.save
      UserMailer.account_activation(@user).deliver_now
      flash[:info] = "Please check your email to activate your account."
      redirect_to root_url
    else
      render 'new'
    end
  end

end
変更前は、ユーザーのプロフィールページにリダイレクトしてたが、今はリダイレクト先をルートURLに変更している
redirect_to @userからredirect_to root_urlに変更。
リダイレクト先の変更とユーザーは以前のようにログインしないようになったので
、アプリケーションは正しく動作してもテストは失敗する。
一旦テストはコメントアウトする。
    # assert_template 'users/show'
    # assert is_logged_in?
実際にサインアップでユーザーを登録して、サーバーログを確認すればメールの例が出てくる。

登録後リダイレクトされ、ホームページににアカウント有効化の確認メッセ―ジが出ている。
アカウントを有効化する
やること
・AccountActivationsコントローラのeditアクションを書く。
・アクションへのテストを書く
・テスト確認後、AccountActivationsコントローラからUserモデルにコードを移す(リファクタリング)
authenticated?メソッドの抽象化
有効化トークンとメールはそれぞれ
・params[:id]
・params[:email]
で参照できる。
ユーザーを検索して認証は以下のコードだった。
user = User.find_by(email: params[:email])
if user && user.authenticated?(:activation, params[:id])
authenticated?メソッドは、アカウント有効化のダイジェストと、渡されたトークンが一致するかどうかをチェックしている。
しかし、これは記憶トークン用なので、今は動作しない。
# トークンがダイジェストと一致したらtrueを返す
def authenticated?(remember_token)
  return false if remember_digest.nil?
  BCrypt::Password.new(remember_digest).is_password?(remember_token)
end
Userモデル属性のremember_digestは、self.remember_digestに書き換えられる。
rememberの箇所を変数にして扱いたい。
理由として、状況に応じて呼び出すメソッドを切り替えたいから。
self.FOOBAR_digestのように
これを実装するには、受け取ったパラメータに応じて呼び出すメソッドを切り替える方法を取る。
これは、「メタプログラミング」と呼ばれている。これは、プログラムでプログラムを作成するということ。
ここで重要なことは、sendメソッドの機能。
これは、渡されたオブジェクトに対しメッセージを送ることで、呼び出すメソッドを動的に決めることが可能。
例↓
$ rails console
>> a = [1, 2, 3]
>> a.length
=> 3
>> a.send(:length)
=> 3
>> a.send("length")
=> 3
sendを通して渡したシンボル(:length)や文字列("length)は、どちらもlengthメソッドと同じ結果になった。
どちらもオブジェクトにlengthメソッドを渡しているので、等価になる。
他の例↓
>> user = User.first
>> user.activation_digest
=> "$2a$10$4e6TFzEJAVNyjLv8Q5u22ensMt28qEkx0roaZvtRcp6UZKRM6N9Ae"
>> user.send(:activation_digest)
=> "$2a$10$4e6TFzEJAVNyjLv8Q5u22ensMt28qEkx0roaZvtRcp6UZKRM6N9Ae"
>> user.send("activation_digest")
=> "$2a$10$4e6TFzEJAVNyjLv8Q5u22ensMt28qEkx0roaZvtRcp6UZKRM6N9Ae"
>> attribute = :activation
>> user.send("#{attribute}_digest")
=> "$2a$10$4e6TFzEJAVNyjLv8Q5u22ensMt28qEkx0roaZvtRcp6UZKRM6N9Ae"
①シンボル:activationと等しいattribute変数を定義
②文字列の式展開を使い、引数を組み立ててsendに渡す。
このステップでも同じ。
また、Rubyではシンボルの方が一般的に使われる。
なお、シンボルと文字列どちらでも上のようなコードは文字列に変換される。
"activation_digest"
→シンボルは式展開されると文字列になる。
authenticated?メソッドを書き換える。
def authenticated?(remember_token)
  digest = self.send("remember_digest")
  return false if digest.nil?
  BCrypt::Password.new(digest).is_password?(remember_token)
end
①各引数を一般化
②文字列の式展開も利用
結果↓
def authenticated?(attribute, token)
  digest = self.send("#{attribute}_digest")
  return false if digest.nil?
  BCrypt::Password.new(digest).is_password?(token)
end
2番目の引数tokenの名前を一般化した。
また、このコードはモデル内の為selfは省略可能
結果↓
def authenticated?(attribute, token)
  digest = send("#{attribute}_digest")
  return false if digest.nil?
  BCrypt::Password.new(digest).is_password?(token)
end
これで、呼び出す時は、下のように呼び出せば従来の振る舞いができる。
user.authenticated?(:remember, remember_token)
Userモデルに実装するとこんな感じ
class User < ApplicationRecord
  .
  .
  .
  # トークンがダイジェストと一致したらtrueを返す
  def authenticated?(attribute, token)
    digest = send("#{attribute}_digest")
    return false if digest.nil?
    BCrypt::Password.new(digest).is_password?(token)
  end
  .
  .
  .
end
この時点ではテストが失敗する。
理由は、current_userメソッドとnilダイジェストのテストの両方において、authenticated?が古いまま。
現時点で、引数は2つではなく1つの状態になっている。
current_user内のauthenticated?メソッドを抽象化
  # 現在ログイン中のユーザーを返す(いる場合)
  def current_user
    if (user_id = session[:user_id])
      @current_user ||= User.find_by(id: user_id)
    elsif (user_id = cookies.signed[:user_id])
      user = User.find_by(id: user_id)
      if user && user.authenticated?(:remember, cookies[:remember_token])
        log_in user
        @current_user = user
      end
    end
  end
Userテスト内のauthenticated?メソッドを抽象化
  test "authenticated? should return false for a user with nil digest" do
    assert_not @user.authenticated?(:remember, '')
  end
これでテストは成功する。
editアクションで有効化
authenticated?メソッドを抽象化できたので、これでやっとこさeditアクションを書ける。
editアクションの処理
・paramsハッシュで渡されたメールアドレスに対応するユーザーを認証する。
ユーザーが有効化どうかの確認は↓
if user && !user.activated? && user.authenticated?(:activation, params[:id])
!user.activated?に関して、論理値を追加している。これは、既に有効になっているユーザーを再度有効化しないために必要な物。
もしこのコードがなければ、攻撃者がユーザーの有効化リンクを後から盗み出してクリックするだけで、本当のユーザーとしてログインできてしまう。
上の論理値に基づきユーザー認証を行うには、ユーザー認証後にactivated_atタイムスタンプを更新する。
user.update_attribute(:activated,    true)
user.update_attribute(:activated_at, Time.zone.now)
このコードをeditアクションに入れる。
class AccountActivationsController < ApplicationController

  def edit
    user = User.find_by(email: params[:email])
    if user && !user.activated? && user.authenticated?(:activation, params[:id])
      user.update_attribute(:activated,    true)
      user.update_attribute(:activated_at, Time.zone.now)
      log_in user
      flash[:success] = "Account activated!"
      redirect_to user
    else
      flash[:danger] = "Invalid activation link"
      redirect_to root_url
    end
  end
end
もし仮にトークンが無効だった場合には、ルートURLにリダイレクトされる。
しかしこの時点では、ユーザーのログイン方法を変更してないので、ユーザー有効化には意味がない。
ユーザーが有効である場合にのみログインできるようにする。
これを実装するには、user.activated?がtrueの場合にのみログインを許可、そうでなければルートURLにリダイレクトさせ警告を表示する。
  def create
    user = User.find_by(email: params[:session][:email].downcase)
    if user && user.authenticate(params[:session][:password])
      if user.activated?
        log_in user
        params[:session][:remember_me] == '1' ? remember(user) : forget(user)
        redirect_back_or user
      else
        message  = "Account not activated. "
        message += "Check your email for the activation link."
        flash[:warning] = message
        redirect_to root_url
      end
    else
      flash.now[:danger] = 'Invalid email/password combination'
      render 'new'
    end
  end
登録した際のメール(サーバーログ)に
<a href="https://fc20e7ef873e419a9249c4e46d05a152.vfs.cloud9.us-east-2.amazonaws.com/account_activations/eQyFGNJ9HGuy0Z3GYnNC7g/edit?email=4%40example.com">Activate</a>
URLに有効化トークンがある。
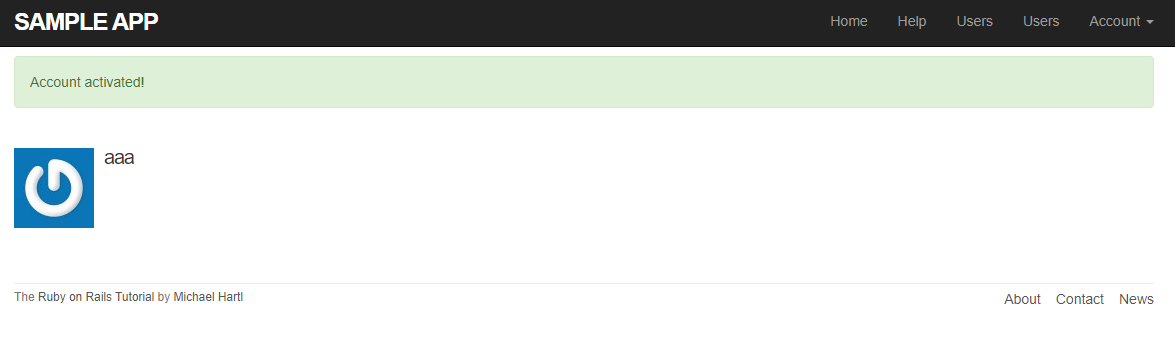
上記のURLを開いた結果
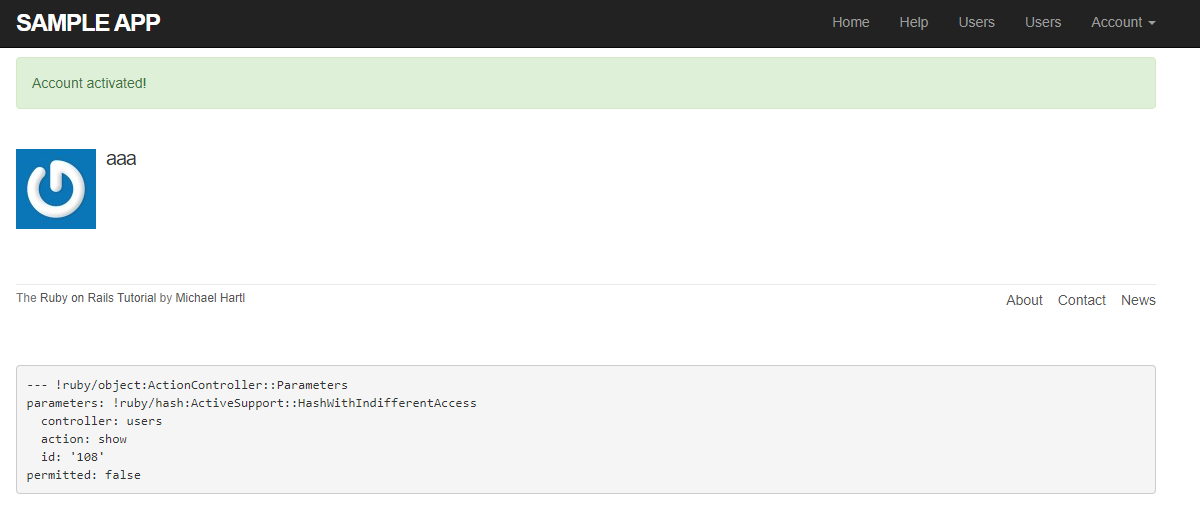
改良点として、有効化されていないユーザーが表示されないようにする必要がある。これは後で行う。
演習
 > user = User.find(108)
  User Load (16.2ms)  SELECT "users".* FROM "users" WHERE "users"."id" = ? LIMIT ?  [["id", 108], ["LIMIT", 1]]
 => #<User id: 108, name: "aaa", email: "4@example.com", created_at: "2021-06-03 13:23:58", updated_at: "2021-06-03 13:24:07", password_digest: [FILTERED], remember_digest: nil, admin: false, activation_digest: "$2a$12$XZt0LzqR3yWf5Ce3OzymFe/dyvKfIdvwAx5qW5BQjRk...", activated: true, activated_at: "2021-06-03 13:24:07">

> user.activated
 => true
有効化のテストとリファクタリング
アカウント有効化の統合テストを追加する。
第7章で書いたテストに若干の手を加える。
require 'test_helper'

class UsersSignupTest < ActionDispatch::IntegrationTest

  def setup
    ActionMailer::Base.deliveries.clear
  end

  test "invalid signup information" do
    get signup_path
    assert_no_difference 'User.count' do
      post users_path, params: { user: { name:  "",
                                         email: "user@invalid",
                                         password:              "foo",
                                         password_confirmation: "bar" } }
    end
    assert_template 'users/new'
    assert_select 'div#error_explanation'
    assert_select 'div.field_with_errors'
  end

  test "valid signup information with account activation" do
    get signup_path
    assert_difference 'User.count', 1 do
      post users_path, params: { user: { name:  "Example User",
                                         email: "user@example.com",
                                         password:              "password",
                                         password_confirmation: "password" } }
    end
    assert_equal 1, ActionMailer::Base.deliveries.size
    user = assigns(:user)
    assert_not user.activated?
    # 有効化していない状態でログインしてみる
    log_in_as(user)
    assert_not is_logged_in?
    # 有効化トークンが不正な場合
    get edit_account_activation_path("invalid token", email: user.email)
    assert_not is_logged_in?
    # トークンは正しいがメールアドレスが無効な場合
    get edit_account_activation_path(user.activation_token, email: 'wrong')
    assert_not is_logged_in?
    # 有効化トークンが正しい場合
    get edit_account_activation_path(user.activation_token, email: user.email)
    assert user.reload.activated?
    follow_redirect!
    assert_template 'users/show'
    assert is_logged_in?
  end
end
テストは長いが今までやってきたことがほとんど。
また、重要な部分は下の一行
assert_equal 1, ActionMailer::Base.deliveries.size
これは配信されたメッセージが1つかどうかを確認している。
配列deliberiesは変数の為、setupメソッドでこれを初期化しておかないと、他でもテストでメール配信された時にエラーが発生する。
assignsメソッドというものがある。
これは、assignsメソッドに対応するアクション内のインスタンス変数にアクセスできるようになる。
例えば、Usersコントローラーのcreateアクションでは@userというインスタンス変数が定義されており、テストでassigns(:user)と書けば、インスタンス変数にアクセスできるようになる。
この時点でテストはパスするので、ユーザー操作の一部をコントローラからモデルに移動するリファクタリングを行う。
手順
・activateメソッドを作成、ユーザーの有効化属性を更新する
・send_activation_emailメソッドを作成、有効化メールを送信する。
Userモデルにユーザー有効化メソッドを追加する。
  # アカウントを有効にする
  def activate
    update_attribute(:activated,    true)
    update_attribute(:activated_at, Time.zone.now)
  end

  # 有効化用のメールを送信する
  def send_activation_email
    UserMailer.account_activation(self).deliver_now
  end
user.という記法を使っていないが、Userモデルにそのような変数はない。これがあるとエラーになる。
また、userをselfに切り替えるという方法もあるが、selfはモデル内では必須ではない。そして、Userメイラー内の呼び出しでは、@userがselfに変更されている。
-user.update_attribute(:activated,    true)
-user.update_attribute(:activated_at, Time.zone.now)
+update_attribute(:activated,    true)
+update_attribute(:activated_at, Time.zone.now)
ユーザーモデルオブジェクトからメールを送信する。
  def create
    @user = User.new(user_params)
    if @user.save
      @user.send_activation_email
      flash[:info] = "Please check your email to activate your account."
      redirect_to root_url
    else
      render 'new'
    end
  end
ユーザーモデルオブジェクト経由でアカウントを有効化する
  def edit
    user = User.find_by(email: params[:email])
    if user && !user.activated? && user.authenticated?(:activation, params[:id])
      user.activate
      log_in user
      flash[:success] = "Account activated!"
      redirect_to user
    else
      flash[:danger] = "Invalid activation link"
      redirect_to root_url
    end
  end
演習
activateメソッドでupdate_attributeを2回呼び出している。これは各行で1回ずつデータベースに問い合わせしているということになる。
これをupdate_columsに変更する。これは呼び出しを1回にできる。
  # アカウントを有効にする
  def activate
    update_columns(activated: true, activated_at: Time.zone.now)
  end
現在/usersのユーザーindexページを開くとすべてのユーザーが表示される。なので、有効でないユーザーは非表示にする。
  def index
    @users = User.where(activated: true).paginate(page: params[:page])
    # 演習で変更
    # @users = User.paginate(page: params[:page])
  end

  def show
    @user = User.find(params[:id])
    redirect_to root_url and return unless @user.activated?
  end
ここまでの演習課題で変更したコードをテストするために、/usersと/users/:idの両方に対する統合テストを作成
non_activated:
 name: Non Activated
 email: non_activated@example.gov
 password_digest: <%= User.digest('password') %>
 activated: false
 activated_at: <%= Time.zone.now %>
  set
   @non_activated_user =users(:non_activated)
  end

  test "should not allow the not activated attribute" do
    log_in_as (@non_activated_user)
    assert_not @non_activated_user.activated?
    get users_path
    assert_select "a[href=?]", user_path(@non_activated_user), count: 0
    get user_path(@non_activated_user)
    assert_redirected_to root_url
  end
本番環境でのメール送信
production環境で実際にメールを送信できるようにする。
手順
・まず、無料のサービスを利用してメール送信の設定を行う
・アプリケーションの設定とデプロイを行う
本番環境からメールを送信するには、「Mailgun」というHerokuアドオンを利用しアカウント検証をする。
(Herokuのstarterというプランだとメール数が最大400通までOKらしい)
Mailgunアドオンを使うには、production環境のSMTPに情報を記入する。
本番Webサイトのアドレスをhost変数に定義する。
Rails.application.configure do
  .
  .
  .
  config.action_mailer.raise_delivery_errors = true
  config.action_mailer.delivery_method = :smtp
  host = '<あなたのHerokuサブドメイン名>.herokuapp.com'
  config.action_mailer.default_url_options = { host: host }
  ActionMailer::Base.smtp_settings = {
    :port           => ENV['MAILGUN_SMTP_PORT'],
    :address        => ENV['MAILGUN_SMTP_SERVER'],
    :user_name      => ENV['MAILGUN_SMTP_LOGIN'],
    :password       => ENV['MAILGUN_SMTP_PASSWORD'],
    :domain         => host,
    :authentication => :plain,
  }
  .
  .
  .
end
Gitのトピックブランチをmasterにマージ
$ rails test
$ git add -A
$ git commit -m "Add account activation"
$ git checkout master
$ git merge account-activation
リモートリポジトリにプッシュ&Herokuにデプロイ
$ rails test
$ git push
$ git push heroku
$ heroku run rails db:migrate
MailgunのHerokuアドオン追加コマンド
$ heroku addons:create mailgun:starter
Herokuの環境変数を表示したい場合には、下のコマンドを実行する。
$ heroku config:get MAILGUN_SMTP_LOGIN
$ heroku config:get MAILGUN_SMTP_PASSWORD
注意事項
user_nameやpasswordといった情報は、絶対にソースコードに直接書かない事!
そのような情報は環境変数「ENV」に設定し、アプリケーションに読み込ませるようにする。
今回は、そのような変数はMailgunのアドオンが自動的に設定しているが、第13章では環境変数を自分で設定することになる。
受信メールの認証コマンド。MailgunダッシュボードのURLが表示されるのでブラウザを開く。
$ heroku addons:open mailgun
サインアップからアカウント作成を押してメール確認したら、、、
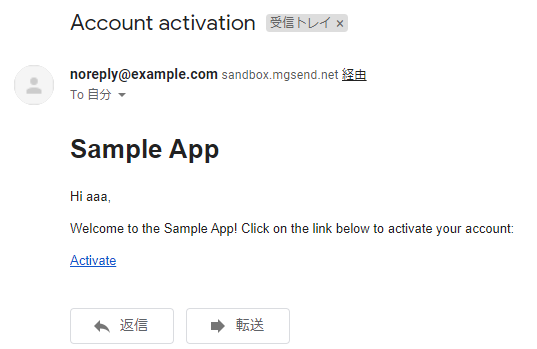
アカウントが有効になった。
最後に
本章はアカウント有効化を実装した。
WEBアプリケーションで大切な機能なので、他でも使えるように覚えていきたい。
第12章ではパスワード再設定機能を追加する。