Symfony3でソーシャルログインの機能を実装してみました。
今回はGoogleのアカウントでログインできるようにしてみます。
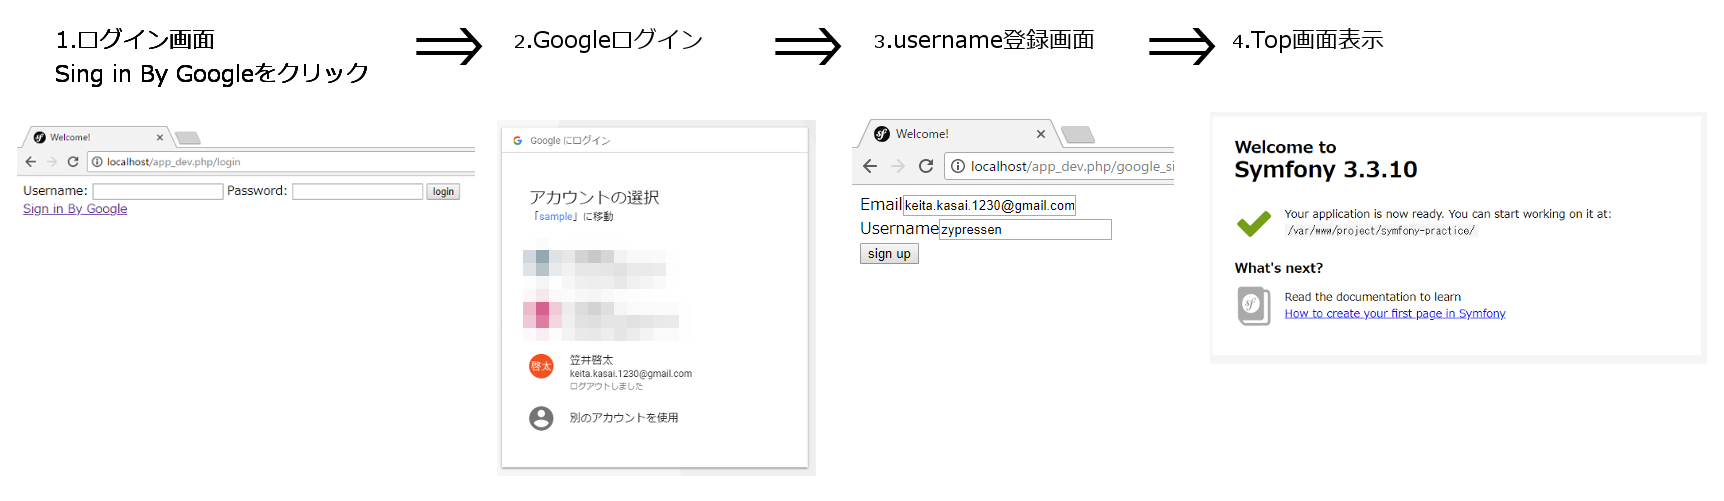
画面上の流れ
環境
- Symfony3.3
- PHP7.1
- MariaDB10.2
OpenID Connectのフロー
OpenID Connectで使われているフローは以下の3つです。
- Authorization Code Flow
- Implicit Flow
- Hybrid Flow
今回はAuthorization Code Flowで実装してきます。
参考: http://openid.net/specs/openid-connect-core-1_0.html#Authentication
事前準備
Googleの設定
以下ページの「Setting up OAuth 2.0」を終わらせている。(認証情報、クライアントID等の取得)
https://developers.google.com/identity/protocols/OpenIDConnect#appsetup
Symfony
プロジェクトの作成
以下ページにしたがってプロジェクトを作成する。
https://symfony.com/doc/3.4/setup.html
ログイン
以下ページを参考にログインを実装する。
https://symfony.com/doc/3.4/security/form_login_setup.html
https://symfony.com/doc/3.4/security/entity_provider.html
サインアップ
以下ページを参考にサインアップを実装する。
https://symfony.com/doc/3.4/doctrine/registration_form.html
サインアップ画面のtwigは以下のようにしておきます。
{% extends 'base.html.twig' %}

{% block body %}
    {{ form_start(form) }}
        {{ form_widget(form) }}
        <button type="submit">sign up</button>
    {{ form_end(form) }}
{% endblock %}
ディレクトリ構成
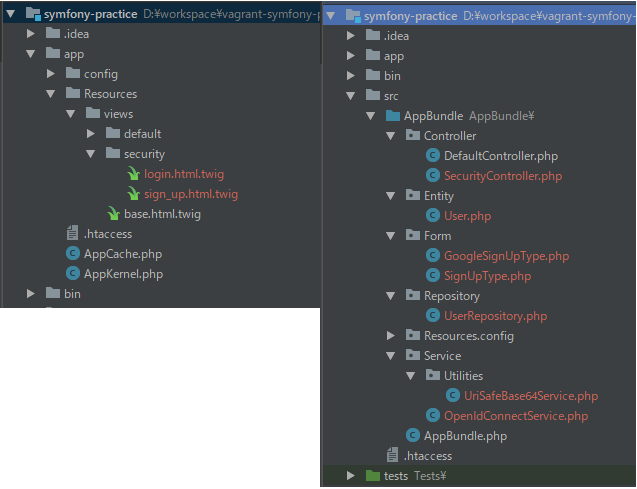
参考: https://symfony.com/doc/3.4/best_practices/creating-the-project.html#structuring-the-application
実装
設定
sessionの保存場所をPHPのsession保存先に変更します。
※以下設定はPHPのデフォルトでsessionが保存される場所を指定しています。
framework:
    session:
        save_path: '/var/lib/php/session/%kernel.environment%'
ルーティング
ルーティングを以下のように定義します。
sign_up:
    path: /sign_up
    defaults: { _controller: AppBundle:Security:signUp }

login:
    path: /login
    defaults: { _controller: AppBundle:Security:login }

logout:
    path: /logout

google:
    path: /auth/google
    defaults: { _controller: AppBundle:Security:googleLogin }

redirect_google:
    path: /google
    defaults: { _controller: AppBundle:Security:redirectGoogleLogin }

google_sign_up:
    path: /google_sign_up
    defaults: { _controller: AppBundle:Security:googleSignUp }
security.yml
security.ymlを以下のように定義します。
security:
    access_control:
        - { path: ^/login, roles: IS_AUTHENTICATED_ANONYMOUSLY }
        - { path: ^/sign_up, roles: IS_AUTHENTICATED_ANONYMOUSLY }
        - { path: ^/auth/*, roles: IS_AUTHENTICATED_ANONYMOUSLY }
        - { path: ^/google, roles: IS_AUTHENTICATED_ANONYMOUSLY }
        - { path: ^/, roles: ROLE_USER }
ログイン画面にリンクを追加
ログイン画面のtwigにGoogleアカウントでログインする用のリンクを追記します。
{% block body %}
    //省略

    <a href="{{ path('google') }}">Sign in By Google</a>
{% endblock %}
Userテーブルにsubjectカラムを追加
OpenID Connectで使用するため、Userテーブルにsubjectカラムを追加します。
EntityのUserクラスに以下を追記します。
class User implements UserInterface, \Serializable
{
    //省略

    /**
     * @ORM\Column(type="string", length=255, unique=true, nullable=true)
     */
    private $subject;

    //省略
}
以下コマンドを実行します。
php bin/console doctrine:generate:entities AppBundle/Entity/User
php bin/console doctrine:schema:update --force
OpenID Connect
ここから以下のサイトを参考にOpenID Connectでログインできるように実装していきます。
https://developers.google.com/identity/protocols/OpenIDConnect#authenticatingtheuser
実装ベースでのAuthorization Code Flowの流れは以下です。
Ⅰ. GoogleのAuthorization Endpointに認証リクエストを送信
Ⅱ. GoogleのToken Endpointにリクエストを送信
Ⅲ. 取得したID Tokenから情報を取得
Ⅰ. GoogoleのAuthorization Endpointに認証リクエストを送信
1. Create an anti-forgery state token
CSRF対策トークンを作成するところですが、今回はSymfonyのメソッドを使ってsessionに保存しています。
class SecurityController extends Controller
{
    public function googleLoginAction(Request $request)
    {
        $session = $request->getSession();

        $uriSafeTokenGenerator = new UriSafeTokenGenerator();
        $state = $uriSafeTokenGenerator->generateToken();
        $session->set('state', $state);
    }
}
2. Send an authentication request to Google
GoogleのAuthorization Endpointに認証リクエストを送ります。
class SecurityController extends Controller
{
    public function googleLoginAction(Request $request)
    {
        //省略

        $url = "https://accounts.google.com/o/oauth2/v2/auth?"
            . "client_id=xxxxxx.apps.googleusercontent.com&" //取得したクライアントID
            . "response_type=code&" //Authorization Code Flowなので
            . "scope=openid%20email&" //取得したい情報を指定する
            . "redirect_uri=http://localhost/google&" //リダイレクトされるURL
            . "state=$state&" //先ほど作ったstate
            . "prompt=select_account&"
            . "nonce=0394852-3190485-2490358&"; //リプレイアタック対策用

        return $this->redirect($url);
    }
}
Ⅱ. GoogleのToken Endpointにリクエストを送信
3. Confirm anti-forgery state token
認証後リダイレクトされるのでstateの検証を行います。
class SecurityController extends Controller
{
    public function redirectGoogleLoginAction(Request $request)
    {
        if ($request->query->get('state') != $request->getSession()->get('state')) {
            return new Response('Invalid state parameter', 401);
        }
    }
}
4. Exchange code for access token and ID token
stateの確認後、取得したAuthorization Codeを使ってToken EndpointにPOSTします。
成功するとレスポンスボディにAccess TokenとID Tokenが含まれたJSONがかえってきます。
class SecurityController extends Controller
{
    private $openIdConnectService;

    public function __construct(OpenIdConnectService $openIdConnectService)
    {
        $this->openIdConnectService = $openIdConnectService;
    }

    public function redirectGoogleLoginAction(Request $request)
    {
        // 省略

        $token = $this->openIdConnectService->getToken($request->query->get('code'));
    }
}
class OpenIdConnectService
{
    public function getToken($code)
    {
        $postData = array(
            'code' => $code, //取得したAuthorization Code
            'client_id' => 'xxxxxx.apps.googleusercontent.com',
            'client_secret' => 'xxxxxx',
            'redirect_uri' => 'http://localhost/google',
            'grant_type' => 'authorization_code'
        );

        $curlOpts = array(
            CURLOPT_URL => "https://www.googleapis.com/oauth2/v4/token",
            CURLOPT_HEADER => array("Content-type: application/x-www-form-urlencoded"),
            CURLOPT_POST => true,
            CURLOPT_POSTFIELDS => http_build_query($postData),
            CURLOPT_RETURNTRANSFER => true
        );

        $ch = curl_init();
        curl_setopt_array($ch, $curlOpts);
        $response = curl_exec($ch);
        $headerSize = curl_getinfo($ch, CURLINFO_HEADER_SIZE);
        $body = substr($response, $headerSize);
        curl_close($ch);

        return json_decode($body, true);
    }
}
Ⅲ. 取得したID Tokenから情報を取得
5. Obtain user information from the ID token
OpenID ConnectではID Tokenの検証は必須ですが、
HTTPSを使って直接Googleと通信をし、自分のclient secretを使っていれば
検証する必要はないらしいです。
ID TokenはJWTという形式で、.が区切り文字になっています。
その区切られた2番目の文字列をPayloadと言い、Googleから送られてきたemailなどの値が入っています。
PayloadはBase64でエンコードされていて、デコードするとJSONが出てきます。
参考: https://tools.ietf.org/html/rfc7519#section-3.1
Payloadの中のSubを使って登録済みかを判定し、
登録済みだった場合、ログイン状態へ、
登録済みではなかった場合、リダイレクトしています。
class SecurityController extends Controller
{
    private $openIdConnectService;
    private $uriSafeBase64Service;

    public function __construct(OpenIdConnectService $openIdConnectService, UriSafeBase64Service $uriSafeBase64Service)
    {
        $this->openIdConnectService = $openIdConnectService;
        $this->uriSafeBase64Service = $uriSafeBase64Service;
    }

    public function redirectGoogleLoginAction(Request $request)
    {
        // 省略

        list($headerBase64, $payloadBase64, $signatureBase64) = explode(".", $token['id_token']);

        $payloadJson = json_decode($this->uriSafeBase64Service->decode($payloadBase64), true);

        $subject = $payloadJson['sub'];
        /** @var User $user */
        $user = $this->getDoctrine()->getRepository('AppBundle:User')->findOneBySubject($subject);
        if ($user != null) {
            $providerKey = "main";
            $loginToken = new UsernamePasswordToken($user, null, $providerKey, $user->getRoles());
            $securityTokenStorage = $this->get('security.token_storage');
            $securityTokenStorage->setToken($loginToken);

            return $this->redirectToRoute('homepage');
        }

        $session = $request->getSession();
        $session->set('subject', $subject);
        $session->set('email', $payloadJson['email']);

        return $this->redirectToRoute('google_sign_up');
    }
}
class UriSafeBase64Service
{
    public function encode($data)
    {
        return rtrim(strtr(base64_encode($data), '+/', '-_'),'=');
    }

    public function decode($data)
    {
        return base64_decode(str_pad(strtr($data, '-_', '+/'), strlen($data) % 4, '=', STR_PAD_RIGHT));
    }
}
登録されていないときの処理
今回は登録されていなかった場合、登録画面に遷移してusernameだけ入力してもらうようにしてみました。
データベースにはID TokenのpayloadのSubを保存するようにしています。
class SecurityController extends Controller
{
    public function googleSignUpAction(Request $request, UserPasswordEncoderInterface $passwordEncoder)
    {
        $session = $request->getSession();
        $user = new User();
        $user->setSubject($session->get('subject'));
        $user->setEmail($session->get('email'));
        $user->setPlainPassword(random_bytes(10));

        $form = $this->createForm(GoogleSignUpType::class, $user);

        $form->handleRequest($request);

        if ($form->isSubmitted() && $form->isValid()) {
            $password = $passwordEncoder->encodePassword($user, $user->getPlainPassword());
            $user->setPassword($password);

            $entityManager = $this->getDoctrine()->getManager();
            $entityManager->persist($user);
            $entityManager->flush();

            return $this->redirectToRoute('homepage');
        }

        return $this->render('security/sign_up.html.twig', array(
            'form' => $form->createView()
        ));
    }
}
class GoogleSignUpType extends AbstractType
{
    public function buildForm(FormBuilderInterface $builder, array $options)
    {
        $builder
            ->add('email', EmailType::class)
            ->add('username', TextType::class);
    }

    public function configureOptions(OptionsResolver $resolver)
    {
        $resolver->setDefaults(array(
            'data_class' => 'AppBundle\Entity\User'
        ));
    }
}
アクセス
http://localhost/login にアクセスして画面上の流れをやってみるとGoogleアカウントで登録、ログインできると思います。
以上で終わりです。
最後に
Githubにソースコードあげておきました。
おまけ
5. Obtain user information from the ID tokenでID Tokenの検証はいらないという話でしたが、少しだけやってみました。
やらなければいけないことは以下のページに書いてあります。
https://developers.google.com/identity/protocols/OpenIDConnect#validatinganidtoken
このページに書いてある署名の検証だけやってみました。
GoogleのOpenID ConnectのID TokenはJWSのJWTです。1 2
JWSはJOSE Header、JWS Payload、JWS Signatureで構成されています。3
JWS SignatureはJOSE HeaderとJWS Payloadを署名し、Base64でエンコードしたものです。4
JOSE Headerには署名に使われたアルゴリズムと鍵についての情報(kid)が入っています。
鍵についてはGoogleが公開していて、署名の検証をするためにJOSE Headerに含まれるkidに該当する鍵を取得します。
平文、署名、取得した鍵、アルゴリズムを使って署名の検証を行います。
class SecurityController extends Controller
{
    public function redirectGoogleLoginAction(Request $request)
    {
        // 省略

        list($headerBase64, $payloadBase64, $signatureBase64) = explode(".", $token['id_token']);

        $header = json_decode($this->uriSafeBase64Service->decode($headerBase64), true);

        $certificates = $this->openIdConnectService->getCerts(); //公開鍵を取得

        $kid = $header['kid'];
        $certificate = $certificates[$kid]; //kidに該当する公開鍵を選択
        $success = openssl_verify("$headerBase64.$payloadBase64", $this->uriSafeBase64Service->decode($signatureBase64), $certificate, OPENSSL_ALGO_SHA256); //検証

        if ($success === 1) {
            $payloadJson = json_decode($this->uriSafeBase64Service->decode($payloadBase64), true);
        } elseif ($success === 0) {
            return new Response('Invalid signature', 401);
        } else {
            echo openssl_error_string();
            return new Response('verify error', 401);
        }
    }
}
class OpenIdConnectService
{
    public function getCerts()
    {
        $curlGetOptions = array(
            CURLOPT_URL => "https://www.googleapis.com/oauth2/v1/certs",
            CURLOPT_HEADER => true,
            CURLOPT_RETURNTRANSFER => true
        );

        $curlCh = curl_init();
        curl_setopt_array($curlCh, $curlGetOptions);
        $keysResponse = curl_exec($curlCh);
        $keysHeaderSize = curl_getinfo($curlCh, CURLINFO_HEADER_SIZE);
        $cBody = substr($keysResponse, $keysHeaderSize);
        curl_close($curlCh);

        return json_decode($cBody, true);
    }
}
おわり。