はじめに
Amazon Cognitoをアプリケーション側のSDKにより認証認可を実現する。
はじめてCognitoもSDKも実装するため不備があるかもしれませんが、少しでも参考になればと思います。
自己紹介
私は、15年間航空自衛隊で働いた後にエンジニア転向した30代あちこち痛い系エンジニアです。SES企業に所属しています。主言語はJavaでバックエンドエンジニアとして働いています。AWSも少し業務で触れることが増えていますのでインフラの技術も習得したいと考えています。将来的にGolangを習得して、マイクロサービスの開発現場に入りたいと思っています。あとは、最近SPAのフロント技術にはまっています。暇さえあれば技術について調べることが趣味になっています。
概要
最近、社内のプロジェクトでAWSを使用したインフラも含めた開発をすることになったため、勉強のために調べた内容等を一方的に共有したい。
Cognitoの技術は今回の投稿では完結できないほど奥が深いものとなっていますので限定的になりますがご容赦ください。
Amazon Cognitoとは
認証情報を登録、承認等々する。Apple、facebook、Google、AmazonなどのソーシャルIDプロバイダー連携、SAML2.0及びOpenID ConnectによるエンタープライズIDプロバイダーを使用したサインインをサポートしている。
- 2つ認証方式
- 外部プロバイダーによる認証
- EmailとPasswordによる認証
まずはCognitoの準備
ユーザープールの作成(基本的に要件によって可変になります!!)

- サインインエクスペリエンスを設定

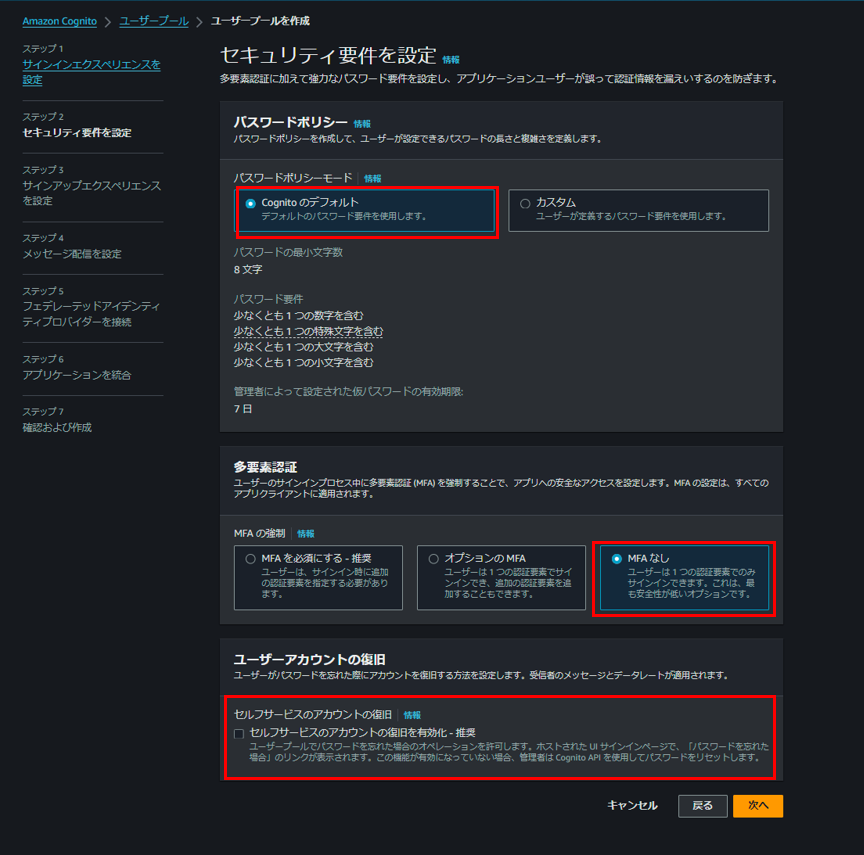
- セキュリティ要件を設定
- パスワードポリシーを設定
- MFA
- ユーザーアカウントの復旧
- ユーザーアカウントの復旧
- セルフサービスのアカウントの復旧のチェックを外す。ホストされたUI(デフォルトの認証画面)を使用する場合、チェックしたら「パスワードを忘れた場合」の表示がでる。
- ユーザーアカウントの復旧
- サインアップエクスペリエンスを設定
- 自己登録はチェックボックスを外す
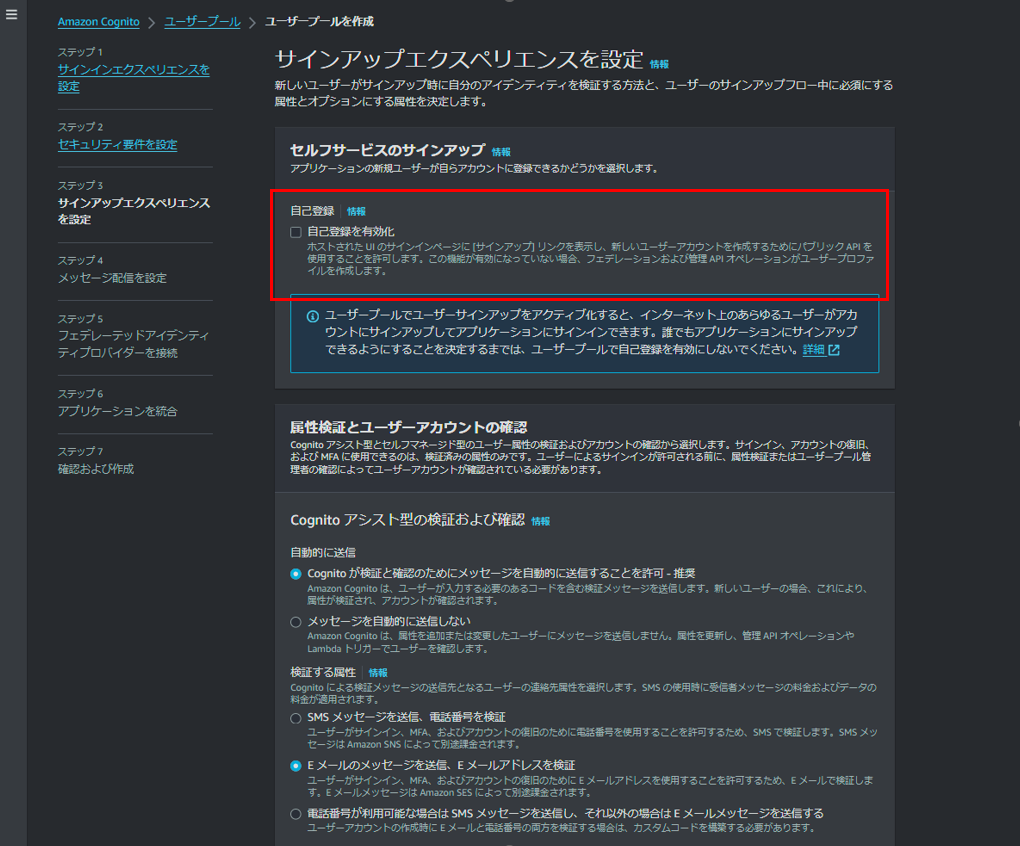
- 自己登録はチェックボックスを外す
- 必須の属性は今回はemailを選択

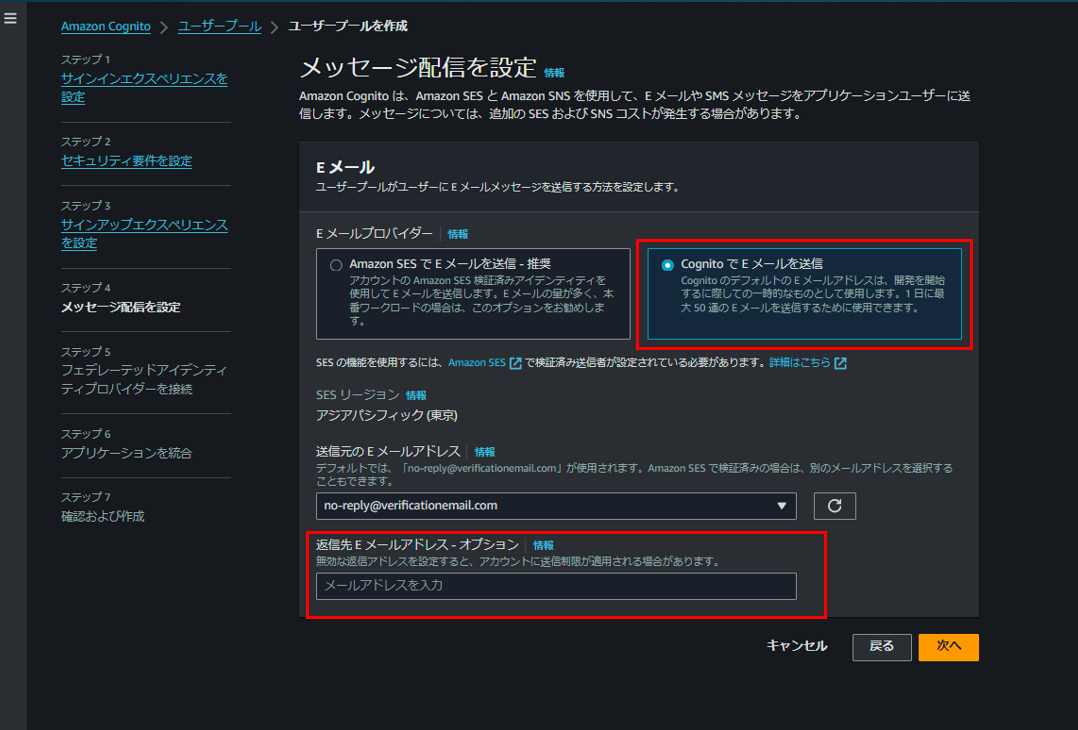
- メッセージ配信を設定
- Eメールプロバイダーは今回はCognitoでEメールを送信
- 返信先Eメールアドレスを設定する。
- Google CloudのAPIとサービスを開く
- 左上のGoogleCloudのアイコンの右をクリック
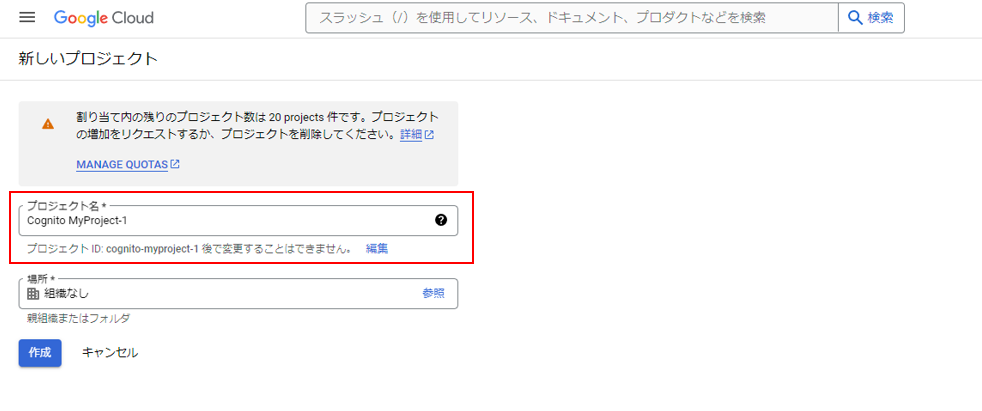
- 新しいプロジェクトを選択
- プロジェクト名を入力

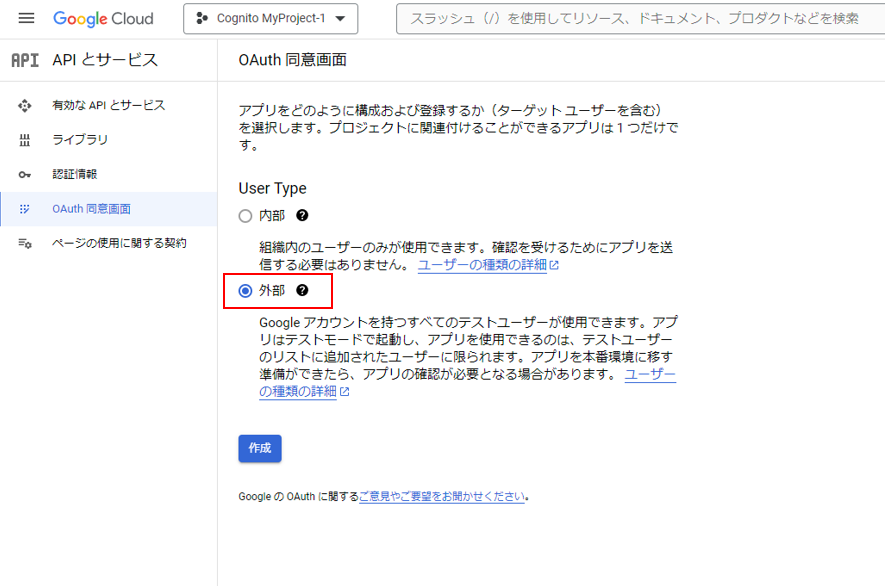
- 左ペインからOAuth 同意画面を選択する
- UserTypeを「外部」を選択する。(こちらはテスト段階などは内部を選択する。)
- 作成をクリック
- アプリ登録の編集
- アプリ名を入力
- ユーザーサポートメールを入力
- 承認済みドメインを入力
amazoncognito.comを承認済みドメインに入力しCognitoを許可する。

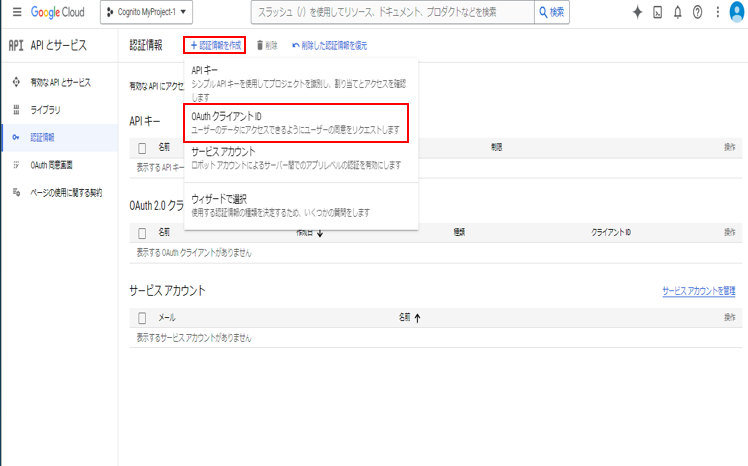
- 認証情報の設定
- 認証情報を作成をクリック
- OAuthクライアントIDをクリック
- OAuthクライアントIDの作成
- アプリケーションの種類はウェブアプリケーションをクリック
- 名前をアプリ名称を入力(任意)
- 承認済みのJavaScript生成元のURIを入力
- ルートの元を設定(今回は、フロントの
http://localhost:3000を設定する。環境に応じて編集必須)
- ルートの元を設定(今回は、フロントの
- 承認済みのリダイレクトURI
- リダイレクト先を設定する(画像は実際は修正しています。)
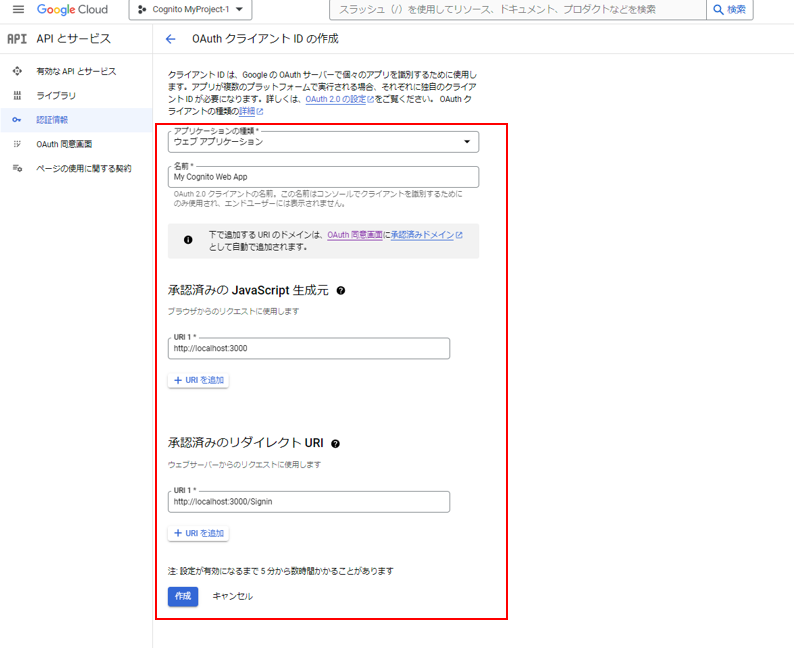
- リダイレクト先を設定する(画像は実際は修正しています。)
- フェデレ―テッドアイデンティティプロバイダーを接続
- Google Cloudで設定後に生成される
クライアントID、クライアントシークレットを設定する。 - 許可されたスコープは今回は、
openid profile emailを設定する。 - 次へ

- Google Cloudで設定後に生成される
- アプリケーションを統合
- ユーザープール名を入力
- Cognitoドメインを入力(任意)

-
最初のアプリケーションクライアント
- アプリケーションクライアント名を入力
- クライアントシークレットは必要に応じて生成
- 許可されているコールバックURLを設定
- 次へ

-
とりあえずCognito側の設定完了
SDKを使用する
ユーザー登録
- Cognitoへの登録2パターン
- シェルスクリプトを使用したawscliによる登録
- SDKを使用した登録
- 登録が成功したら一時パスワードが記載されたメールが届く。
※今回はAmazon CognitoのAPIのadmin-create-userを使用する。
シェルスクリプトを使用したawscliによる登録
user-regist.sh
USER_POOL_ID="ap-northeast-1_L6XTfSNTt"
JSON_FILE="users.json"

for row in $(cat ${JSON_FILE} | jq -c '.Users[]'); do
  USERNAME=$(echo ${row} | jq -r '.Username')
  TEMP_PASSWORD=$(openssl rand -base64 12 | tr -dc 'A-Za-z0-9@#$%')
  USER_ATTRIBUTES=$(echo ${row} | jq -c '.UserAttributes')

  aws cognito-idp admin-create-user \
    --user-pool-id ${USER_POOL_ID} \
    --username ${USERNAME} \
    --temporary-password ${TEMP_PASSWORD} \
    --user-attributes ${USER_ATTRIBUTES} \
users.json
{
    "Users": [
      {
        "Username": "sample@sample.co.jp",
        "UserAttributes": [
          {
            "Name": "email",
            "Value": "sample@sample.co.jp"
          },
          {
            "Name": "email_verified",
            "Value": "true"
          }
        ]
      }
    ]
  }
SDKを使用した登録
Serviceクラス
    public ResponseEntity<Map<String, Object>> registerUserService(AuthRegistForm authRegistForm) {
        try (
            // Cognito クライアントを作成
            CognitoIdentityProviderClient cognitoClient = CognitoIdentityProviderClient.builder().credentialsProvider(DefaultCredentialsProvider.create()).region(Region.AP_NORTHEAST_1).build()) {
            // Aws SsmからClientIdを取得
            AwsSsmUtil ssmUtil = new AwsSsmUtil();
            String userPoolId = ssmUtil.obtainParameter("userPoolId");

            // ユーザーのメールアドレスを使用してユーザーが存在するか確認
            String emailAddress = authRegistForm.getEmail();
            String filterStr = "email = \"" + emailAddress + "\"";
            ListUsersRequest listUsersRequest = ListUsersRequest.builder().userPoolId(userPoolId).filter(filterStr).build();
            ListUsersResponse listUsersResponse = cognitoClient.listUsers(listUsersRequest);

            // 同一メールアドレスを使用しているユーザーがいなければ、ユーザーの新規作成を行う
            if (listUsersResponse.users().isEmpty()) {
                // ユーザー登録リクエストを作成
                AdminCreateUserRequest createUserRequest = AdminCreateUserRequest.builder().userPoolId(userPoolId).username(authRegistForm.getEmail()).userAttributes(AttributeType.builder().name("email").value(authRegistForm.getEmail()).build(), AttributeType.builder().name("email_verified").value("true").build()).build();

                // ユーザー登録リクエストを送信
                AdminCreateUserResponse createUserResponse = cognitoClient.adminCreateUser(createUserRequest);
                UserType user = createUserResponse.user();
                CognitoUserInfoDto userInfo = new CognitoUserInfoDto(user.username(), user.attributes().stream().filter(attr -> attr.name().equals("email")).findFirst().map(AttributeType::value).orElse(null), user.attributes().stream().filter(attr -> attr.name().equals("email_verified")).findFirst().map(attr -> Boolean.parseBoolean(attr.value())).orElse(false));

                return ResponseEntity.ok().contentType(MediaType.APPLICATION_JSON).body(Map.of("status", "SUCCESS", "user", userInfo, "responseType", "ADD_USER"));
            } else {
                // 同一メールアドレスを使用しているユーザーが存在する場合、エラーメッセージを返却
                return ResponseEntity.status(HttpStatus.CONFLICT).contentType(MediaType.APPLICATION_JSON).body(Map.of("status", "ERROR", "message", "ユーザーは既に存在します。"));
            }
        } catch (Exception e) {
            e.printStackTrace();
            return ResponseEntity.status(HttpStatus.INTERNAL_SERVER_ERROR).contentType(MediaType.APPLICATION_JSON).body(Map.of("status", "ERROR", "message", e.getMessage()));
        }
    }
今回AWS System Manager に登録したパラメータをSDKで取得(SSMの設定は省略)
util
public class AwsSsmUtil {

    // SSM クライアント
    private final SsmClient ssmClient;

    public AwsSsmUtil() {
        this.ssmClient = SsmClient.builder()
                .region(Region.AP_NORTHEAST_1)
                .build();
    }

    /**
     * AWS Systems Manager パラメータストアからパラメータを取得する
     *
     * @param parameterName パラメータ名
     * @return パラメータ値
     */
    public String obtainParameter(String parameterName) {
        try {
            // パラメータ取得リクエストを作成
            GetParameterRequest parameterRequest = GetParameterRequest.builder()
                    .name(parameterName)
                    .build();
            // パラメータストアからパラメータを取得
            GetParameterResponse parameterResponse = ssmClient.getParameter(parameterRequest);
            return parameterResponse.parameter().value();

        } catch (SsmException e) {
            System.err.println(e.getMessage());
            System.exit(1);
        }
        return null;
    }
}
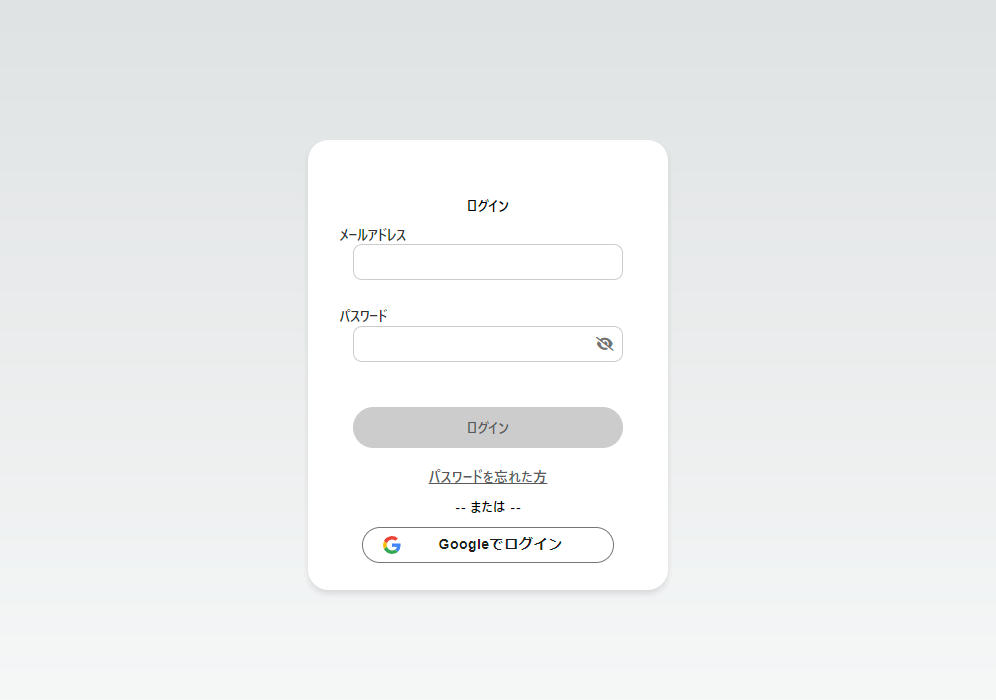
- カスタムログインページを作成
- メールアドレスと一時パスワードを入力してログインを押下する。
- 一時パスワードでの認証を行うとResponseでNEW_PASSWORD_REQUIREDという定数が返却される。
- 認証処理
Serviceクラス
    public ResponseEntity<Map<String, Object>> initiateAuthService(AuthLoginForm authLoginForm) {
        // Cognito クライアントを作成
        try (CognitoIdentityProviderClient cognitoClient = CognitoIdentityProviderClient.builder().credentialsProvider(DefaultCredentialsProvider.create()).region(Region.AP_NORTHEAST_1).build()) {

            // Aws SsmからClientIdを取得
            AwsSsmUtil ssmUtil = new AwsSsmUtil();
            String clientId = ssmUtil.obtainParameter("clientId");

            // 認証リクエストを作成
            Map<String, String> authParameters = Map.of("USERNAME", authLoginForm.getEmail(), "PASSWORD", authLoginForm.getPassword());
            InitiateAuthRequest authRequest = InitiateAuthRequest.builder().clientId(clientId).authFlow(AuthFlowType.USER_PASSWORD_AUTH).authParameters(authParameters).build();
            // 認証リクエストを送信
            InitiateAuthResponse authResponse = cognitoClient.initiateAuth(authRequest);

            // 認証結果に応じてレスポンスを返却
            if (authResponse.authenticationResult() != null) {
                String idToken = authResponse.authenticationResult().idToken();

                return ResponseEntity.ok().contentType(MediaType.APPLICATION_JSON).body(Map.of("status", "SUCCESS", "accessToken", authResponse.authenticationResult().accessToken(),
                        "idToken", idToken
                ));
            } else {
                return ResponseEntity.status(HttpStatus.UNAUTHORIZED).contentType(MediaType.APPLICATION_JSON).body(Map.of("status", "CHALLENGE_REQUIRED", "challengeName", authResponse.challengeName(), "session", authResponse.session()));
            }
        } catch (CognitoIdentityProviderException e) {
            // 認証エラーの場合、エラーメッセージを返却
            String message = "Invalid credentials";
            if (e.awsErrorDetails().errorMessage().contains("Incorrect username or password.")) {
                message = "Invalid credentials";
            }
            return ResponseEntity.status(HttpStatus.UNAUTHORIZED).contentType(MediaType.APPLICATION_JSON).body(Map.of("status", "ERROR", "message", message));
        }
    }
NEW_PASSWORD_REQUIREDの場合、パスワード再設定画面に遷移させる。
page.tsx
  const result = await response.json();
  if (result.challengeName === "NEW_PASSWORD_REQUIRED") {
    // CognitoからのレスポンスがNEW_PASSWORD_REQUIREDの場合、パスワードリセット画面に遷移
    window.location.href = `/password-reset?email=${encodeURIComponent(
      data.email
    )}&session=${encodeURIComponent(
      result.session
    )}&challengeName=${encodeURIComponent(result.challengeName)}`;
  } else if (result.status === "ERROR") {
    if (result.message === "Invalid credentials") {
      // ログイン失敗時のエラーメッセージを表示
      setFlashMessage("メールアドレスまたはパスワードを間違えています。");
      setFlashType("error");
    }
  };
- パスワード再設定画面省略
- メールアドレスと設定したいパスワードを入力して実行
- パスワード変更のSDKを実行する。
Serviceクラス
    public ResponseEntity<Map<String, Object>> handleNewPasswordChallengeService(AuthPasswordForm authPasswordForm) {

        // Cognito クライアントを作成
        try (CognitoIdentityProviderClient cognitoClient = CognitoIdentityProviderClient.builder().region(Region.AP_NORTHEAST_1).credentialsProvider(DefaultCredentialsProvider.create()).build()) {

            // Aws SsmからClientIdを取得
            AwsSsmUtil ssmUtil = new AwsSsmUtil();
            String clientId = ssmUtil.obtainParameter("clientId");

            // パスワード再設定リクエストを作成
            RespondToAuthChallengeRequest request = RespondToAuthChallengeRequest.builder().clientId(clientId).challengeName(ChallengeNameType.NEW_PASSWORD_REQUIRED).session(authPasswordForm.getSession()).challengeResponses(Map.of("USERNAME", authPasswordForm.getEmail(), "NEW_PASSWORD", authPasswordForm.getNewPassword())).build();
            // パスワード再設定リクエストを送信
            RespondToAuthChallengeResponse response = cognitoClient.respondToAuthChallenge(request);

            // パスワード再設定結果に応じてレスポンスを返却
            if (response.authenticationResult() != null) {
                return ResponseEntity.ok(Map.of("status", "SUCCESS", "token", response.authenticationResult().idToken()));
            } else {
                return ResponseEntity.status(400).body(Map.of("status", "FAILED", "message", "No authentication result available."));
            }
        } catch (CognitoIdentityProviderException e) {
            e.printStackTrace();
            return ResponseEntity.status(500).body(Map.of("status", "ERROR", "message", e.awsErrorDetails().errorMessage()));
        }
    }
- ログイン画面で先ほど一時パスワードで認証チャレンジした画面でメールアドレスとパスワードの認証を行う。
ログインが成功するはず
今回参考にした記事等
次回
外部プロバイダーによる認証を実装し、Cognitoとの連携処理をLambda関数で行う。