はじめに
今回はDjango公式チュートリアルをやってみたので学んだことをアウトプットをしていきます。
※私が学んだ部分のみ書いているので公式チュートリアルを網羅したい方は、是非ご自身でやってみたほうが早いかと思います。
クイックインストールガイド
まず、Djangoをインストールしていきます。
まずは仮想環境作成しましょう
$ python -m venv tutorial-env
これでtutorial-envフォルダが作成されます。
その中はさまざまなサポートファイルを含むディレクトリが存在しています。
(実際使う場合はvenvという名前が多いそうですが、今回は公式通りtutorial-envという名前を使います)
次に仮想環境を立ち上げていきます。
$ source tutorial-env/bin/activate
ちなみに仮想環境から抜ける場合は任意の場所で **deactivate**とコマンドを入力すれば抜けられます。
それではDjangoをインストールしていきましょう
$ python -m pip install django
Successfullyとなれば成功です。
公式では開発バージョンのインストールも紹介していますが
今回は通常盤を使用していきます。
はじめての Django アプリ作成、その 1
動作確認
仮想環境を立ち上げた状態で動作確認をしましょう。
エラーが出たりdjangoのバージョンが出力されない場合は
再度Djangoのインストールを試してみましょう。
$ python -m django --version
5.1.4
プロジェクトの作成
$ django-admin startproject mysite
これを実行すると現在のディレクトリにmysiteディレクトリが作成されます。
ファイルの中身はこの様になっています。
mysite/
    manage.py
    mysite/
        __init__.py
        settings.py
        urls.py
        asgi.py
        wsgi.py
Djangoプロジェクト立ち上げた際の各ファイルの詳細
-
manage.py: Django プロジェクトに対する様々な操作を行うためのコマンドラインユーティリティです。 -
mysite/__init__.py: このディレクトリが Python パッケージであることを Python に知らせるための空のファイルです -
mysite/settings.py: Django プロジェクトの設定ファイルです -
mysite/urls.py: Django プロジェクトの URL を管理しているファイルmysite/asgi.py: プロジェクトをサーブするためのASGI互換Webサーバーとのエントリーポイントです -
mysite/wsgi.py: プロジェクトをサーブするためのWSGI互換Webサーバーとのエントリーポイントです
今回のチュートリアルでは以下の2つを多く利用していきます。
settings.pyurls.py
サーバーを立ち上げる
$ python manage.py runserver

Django version 5.1.4, using settings 'mysite.settings'
Starting development server at http://127.0.0.1:8000/
Quit the server with CONTROL-C.
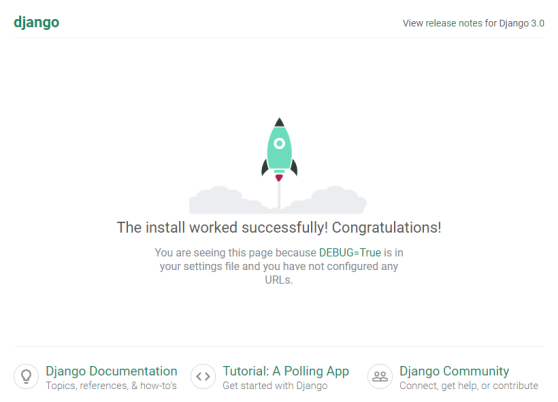
http://127.0.0.1:8000/にアクセスしましょう。
問題なければ以下のような画像が画面に出力されています。

Polls アプリケーションをつくる
アプリケーションを作るにはmanage.pyと同じディレクトリに入って
以下のコマンドを実行
$ python manage.py startapp polls
フォルダ構成は以下の様になっています。
プロジェクト作成時と同じ名前のファイルが多いです。
polls/
    __init__.py
    admin.py
    apps.py
    migrations/
        __init__.py
    models.py
    tests.py
    views.py
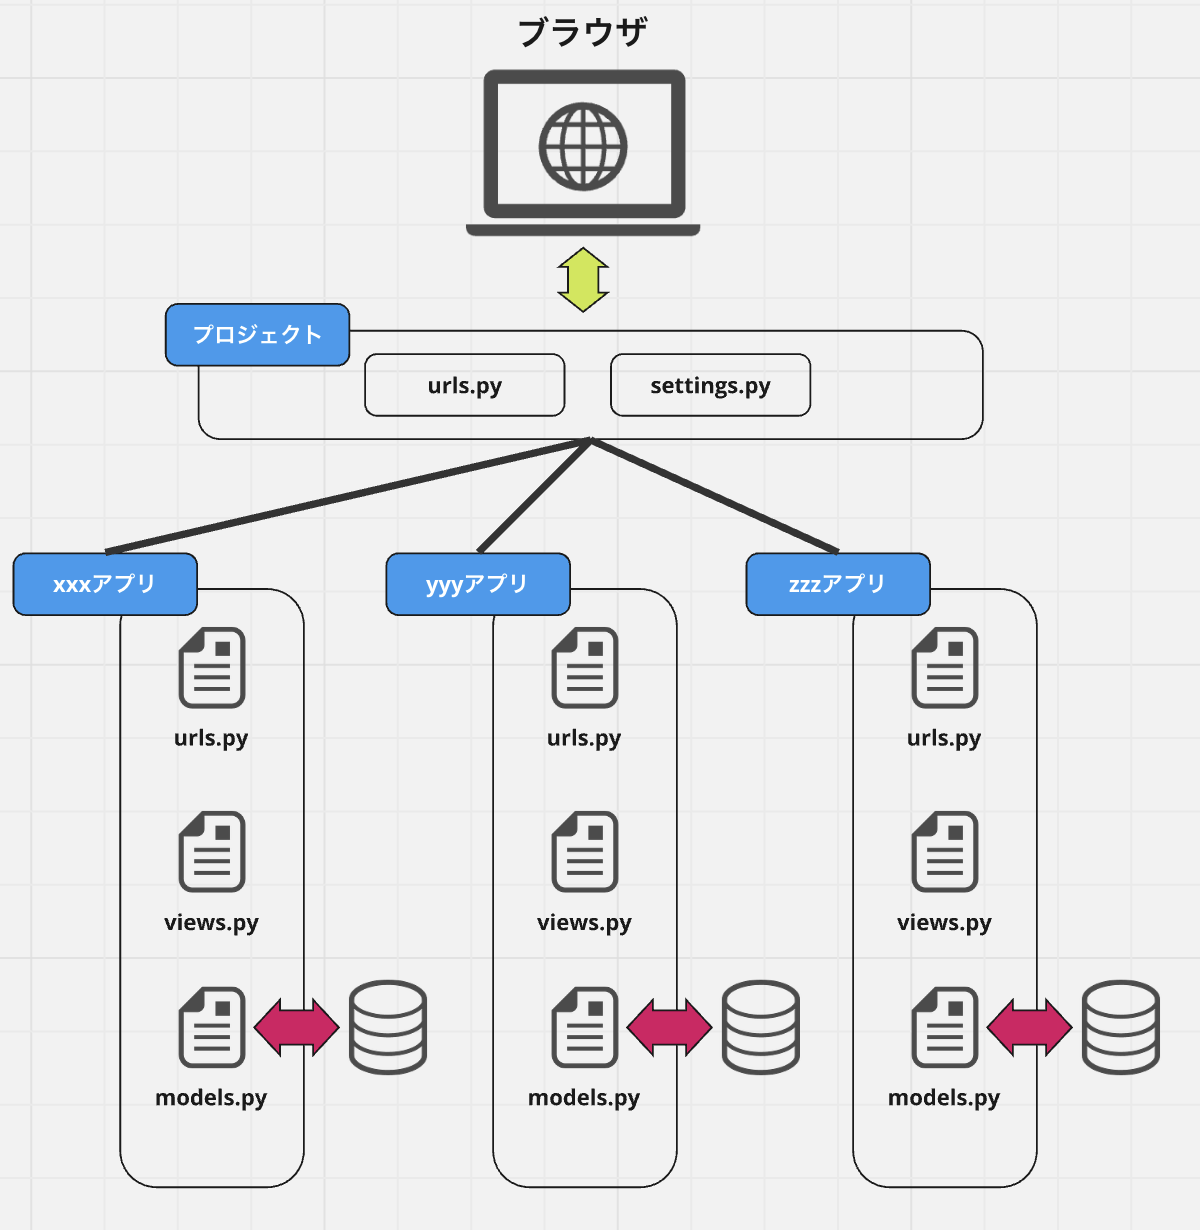
アプリをたくさん作成するとこんなイメージになります。
DjangoはMVTモデルを採用している
DjangoはMVTモデルを採用しています。
Model
端的にいうとデータベースと連携が取れる部分です。
models.pyが該当します。
Template
データをHTML形式で表示するための部分です。
これは初めから用意されているわけではないので、自作する必要があります。
viewから渡されたデータを受け取ってユーザーに返します。
View
ViewはMVTモデルの中核に当たる部分です。views.pyが該当します。
データを取得したり受け取った情報をもとに、どのテンプレートファイルにするか決定する場所です。
図でわかりやすく解説している記事がありましたので参考してください。
ビューを書いてみる
polls/views.pyを以下の様に修正します。
from django.http import HttpResponse


def index(request):
    return HttpResponse("Hello, world. You're at the polls index.")
ただ、viewを呼ぶためにはURLを設計しなければなりません。
pollsディレクトリにurls.pyというファイルを作成しましょう
polls/
    __init__.py
    admin.py
    apps.py
    migrations/
        __init__.py
    models.py
    tests.py
    urls.py   # 追加
    views.py
polls/urls.py ファイルには以下のコードを書いてください
from django.urls import path

from . import views

urlpatterns = [
    path("", views.index, name="index"),
]
polls.urlsはどこに繋がっているのか記載します。
mysite/urls.pyにurlpatternsへ追加しましょう。
from django.contrib import admin
from django.urls import include, path

urlpatterns = [
    path("polls/", include("polls.urls")),
    path("admin/", admin.site.urls),
]
- include() 関数は他の URLconf への参照
はじめての Django アプリ作成、その 2
settings.pyのINSTALLED_APPSで初期に入っているアプリ
- django.contrib.admin - 管理(admin)サイト
- django.contrib.auth - 認証システム
- django.contrib.contenttypes - コンテンツタイプフレームワーク
- django.contrib.sessions - セッションフレームワーク
- django.contrib.messages - メッセージフレームワーク
- django.contrib.staticfiles - 静的ファイルの管理フレームワーク
これらのアプリケーションは最低1つデータベースのテーブルを使います。
使い始まる前にデータベースへテーブルを作るので以下のコマンドを実行
$ python manage.py migrate
migrateコマンドはINSTALL_APPSの設定を参照します。
そしてmysite/setting.pyファイルのデータベース設定に従って
必要なすべてのデータベースのテーブルを作成します.
モデルの作成
モデルの役割は以下の2つです。
- モデルには格納したいデータにとって必要不可欠なフィールドと
そのデータの挙動を収めます - Django のモデルの目的は、ただ一つの場所でデータモデルを定義し
そこから自動的にデータを取り出す
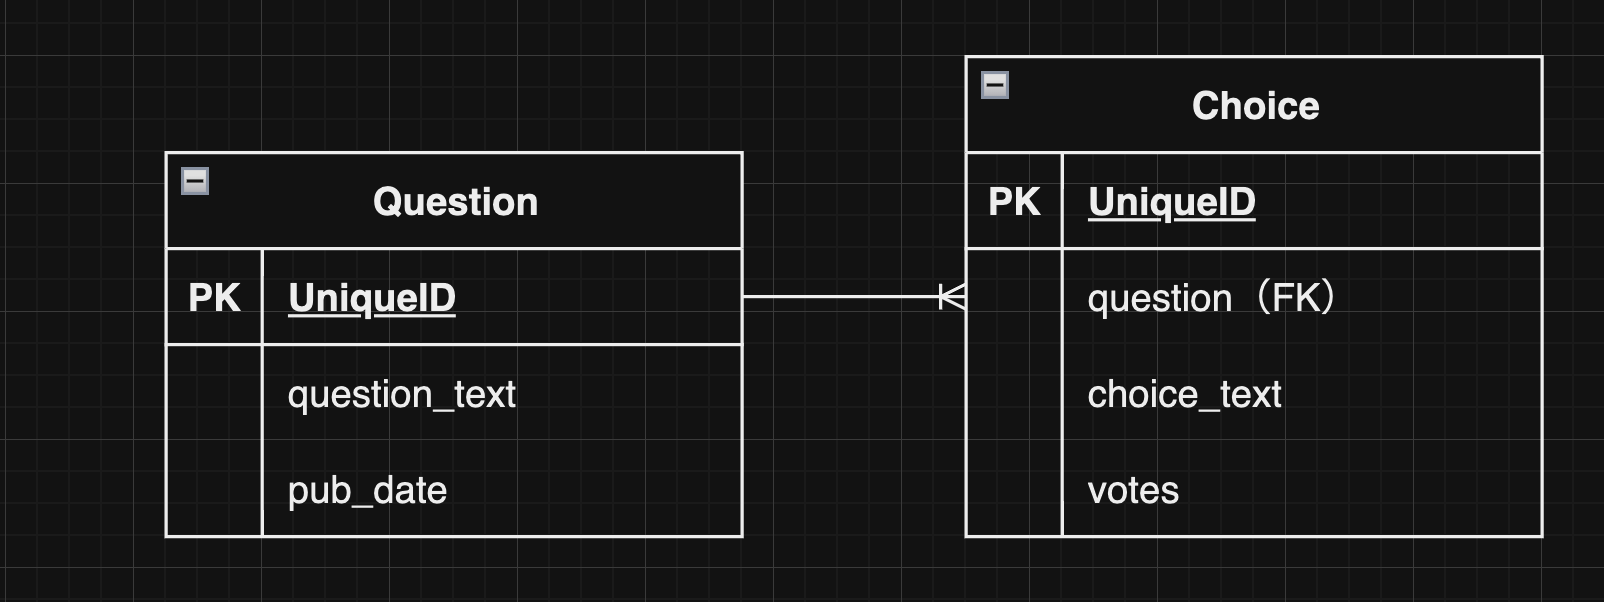
pollsアプリではQuestionとChoiceの二つのモデルを作成します
QuestionとChoiceは1対多の関係性です。
これをmodels.pyで書くとこの様になります。
from django.db import models


class Question(models.Model):
    question_text = models.CharField(max_length=200)
    pub_date = models.DateTimeField("date published")


class Choice(models.Model):
    question = models.ForeignKey(Question, on_delete=models.CASCADE)
    choice_text = models.CharField(max_length=200)
    votes = models.IntegerField(default=0)
Feildクラス
各変数名は機械可読なフィールド名で,データベースの列の名前としても使用します。またFieldの最初の引数にオプションとして人間可読なフィールド名を指定することもできます.上記のコードではpub_dateのFieldに人間可読なフィールド名を設定しています.
Choiceのquestion内のmodels.ForeignKey()の引数であるon_delete=models.CASCADEは
外部キーとして参照している元々のデータが削除された場合、このデータも削除することを表しています.
モデルを有効にする
INSTALLED_APPSにpolls.apps.PollsConfigを追加することで
polls アプリケーションをインストールしたことをプロジェクトに教えている
INSTALLED_APPS = [
    "polls.apps.PollsConfig",
    "django.contrib.admin",
    "django.contrib.auth",
    "django.contrib.contenttypes",
    "django.contrib.sessions",
    "django.contrib.messages",
    "django.contrib.staticfiles",
]
次にマイグレーションを作成します
$ python manage.py makemigrations polls
makemigrationsを実行することで、Djangoのモデルに変更があったことを知らせます。
そして変更を マイグレーション の形で保存することができました。
その後下記コマンドでモデルのテーブルをデータベースに作成します。
$ python manage.py migrate
API で遊んでみる
Python 対話シェルを起動して、 Django が提供する API で遊んでみましょう。
>>> from polls.models import Choice, Question

>>>Question.objects.all()
<QuerySet[]>

>>>from django.utils import timezone
>>>q= Question(question_text="What's new?",pub_date=timezone.now())

>>>q.save()

>>>q.id

>>>q.question_text
"Whats new?"
>>>q.pub_date
datetime.datetime(2012, 2, 26, 13, 0, 0, 775217, tzinfo=<UTC>)

>>>q.question_text = "what's up?"
>>>q.save()

>>>Question.objects.all()
<QuerySet [<Question: Question object (1)>]>
<Question: Question object (1)>ってなんだ?って思いますよね。
これを修正するために__str__()メソッドをQuestionとChoiceの両方に追加します.
from django.db import models


class Question(models.Model):
    # ...
    def __str__(self):
        return self.question_text


class Choice(models.Model):
    # ...
    def __str__(self):
        return self.choice_text
加えてadminで管理する際の利便性が高まる
モデルクラスにクラスメソッドを追加してみます。
import datetime

from django.db import models
from django.utils import timezone


class Question(models.Model):
    # ...
    def was_published_recently(self):
        return self.pub_date >= timezone.now() - datetime.timedelta(days=1)
was_published_recently()は
一日以内に更新されたデータかどうかを判別する関数です。
それでは、もう一度PythonShellを起動します.
>>>from polls.models import Choice,Question

>>>Question.objects.all() #__str__の確認
#<QuerySet [<Question: What's up?>]>

>>> Question.objects.filter(id=1)
#<QuerySet [<Question: What's up?>]>
>>> Question.objects.filter(question_text__startswith='What')
#<QuerySet [<Question: What's up?>]>

>>>from django.utils import timezone
>>>current_year = timezone.now().year
>>>Question.objects.get(pub_date__year=current_year)
#<Question: What's up?>

>>>Question.objects.get(pk=1) #プライマリキーが1のものを検索
#<Question: What's up?>

>>>q.was_published_recently() #1日以内に投稿されたものか確認
True

>>> q = Question.objects.get(pk=1)

>>>q.choice_set.all()

>>>q.choice_set.create(choice_text="Not much", votes=0)
>>>q.choice_set.create(choice_text="The sky", votes=0)
>>> c=q.choice_set.create(choice_text="Just hacking again", votes=0)

>>>c.question
#<Question: What's up?>

>>>q.choice_set.all()
#<QuerySet [<Choice: Not much>, <Choice: The sky>, <Choice: Just hacking again>]>
>>>q.choice_set.count()
3

>>> Choice.objects.filter(question__pub_date__year=current_year)
#<QuerySet [<Choice: Not much>, <Choice: The sky>, <Choice: Just hacking again>]>

>>> c = q.choice_set.filter(choice_text__startswith='Just hacking')
>>> c.delete()
管理ユーザーを作成する
adminサイトにログインできるユーザーを作成しましょう
$ python manage.py createsuperuser
好きなユーザー名を入力しEnterを押してください。
Username: admin
希望するemailアドレスを入力するよう促されます:
# 存在しないメールアドレスでも大丈夫です。
Email address: admin@example.com
最後のステップはパスワードの入力です。2回目のパスワードが1回目と同じことを確認するため、パスワードの入力を2回求められます。
Password: **********
Password (again): *********
Superuser created successfully.
サーバーを立ち上げてhttp://127.0.0.1:8000/admin/にアクセスしましょう。
そうするとUsername、Passwordが求められるので先程作成したものを入力してLog inをクリックしましょう。

この様な画面になっていればOKです。
ちなみにこの画面は
django.contrib.authが使えることによってこのページへ遷移できます。
Poll アプリを admin 上で編集できるようにする
from django.contrib import admin

from .models import Question

admin.site.register(Question)
現在は1つしかアプリケーションはありません。
ただ、大きなプロジェクトになるとアプリケーションの数が増えます。
そんな時にadminを編集する可能性があります。
はじめての Django アプリ作成、その 3
Djangoにおけるviewとは
Django のアプリケーションにおいて特定の機能を提供するウェブペー ジの「型 (type)」であり、各々のテンプレートを持っています
ViewとURLを追記する
少しpolls/views.pyとpolls/urls.pyに追記しましょう。
# polls/view.py
def detail(request, question_id):
    return HttpResponse("You're looking at question %s." % question_id)


def results(request, question_id):
    response = "You're looking at the results of question %s."
    return HttpResponse(response % question_id)


def vote(request, question_id):
    return HttpResponse("You're voting on question %s." % question_id)

# polls/urls.py

from django.urls import path

from . import views

urlpatterns = [
    # ex: /polls/
    path("", views.index, name="index"),
    # ex: /polls/5/
    path("<int:question_id>/", views.detail, name="detail"),
    # ex: /polls/5/results/
    path("<int:question_id>/results/", views.results, name="results"),
    # ex: /polls/5/vote/
    path("<int:question_id>/vote/", views.vote, name="vote"),
]
polls/view.pyで%sが使われていますね。
これは変数の埋め込みで変数の値を文字列中に埋め込む時、使用します。
今回のパターンなら
%s の部分にquestion_id が入ります。
実際に動作するビューを書く
リクエスト→レスポンスの流れでViewの役割は大きく2つあります。
- リクエストされたページのコンテンツを含む
HttpResponseオブジェクトを返す -
Http404のような例外の送出
render(request, テンプレート名, 辞書)
テンプレートがない場合は、HttpResponseを使用。
(renderはテンプレートの読み込みをショートカットできる)
renderの引数にcontextを渡すことで、
index.html側でcontext(latest_question_list)を受け取ることができる。
# polls/views.py
from django.http import HttpResponse
from django.template import loader

from .models import Question


def index(request):
    latest_question_list = Question.objects.order_by("-pub_date")[:5]
    template = loader.get_template("polls/index.html")
    context = {
        "latest_question_list": latest_question_list,
    }
    return HttpResponse(template.render(context, request))

# polls/templates/polls/index.html
{% if latest_question_list %}
    <ul>
    {% for question in latest_question_list %}
        <li><a href="/polls/{{ question.id }}/">{{ question.question_text }}</a></li>
    {% endfor %}
    </ul>
{% else %}
    <p>No polls are available.</p>
{% endif %}
404 エラーの送出
公式チュートリアルではtry-exceptをはじめに紹介していますが、
ショートカット関数を紹介します。detailの部分を修正しましょう。
# polls/views.py
from django.shortcuts import get_object_or_404, render
from .models import Question

# ...
def detail(request, question_id):
    question = get_object_or_404(Question, pk=question_id)
    return render(request, "polls/detail.html", {"question": question})

# polls/templates/polls/detail.html
<h1>{{ question.question_text }}</h1>
<ul>
{% for choice in question.choice_set.all %}
	<li>{{ choice.choice_text }}</li>
{% endfor %}
</ul>
これでリクエストした ID を持つ質問が存在しないときに
Http404 を送出する様になりました。
テンプレート内のハードコードされたURLを削除
<li><a href="/polls/{{ question.id }}/">{{ question.question_text }}</a></li>
# ↓以下に変更
<li><a href="{% url 'detail' question.id %}">{{ question.question_text }}</a></li>
ハードコードの問題点は、プロジェクトにテンプレートが多数ある場合、URLの変更が困難になってしまうことです。
URL 名の名前空間
10個、20個アプリがある場合にはurls.py で名前空間を追加する
# polls/urls.py
from django.urls import path

from . import views

app_name = "polls"
urlpatterns = [
    path("", views.index, name="index"),
    path("<int:question_id>/", views.detail, name="detail"),
    path("<int:question_id>/results/", views.results, name="results"),
    path("<int:question_id>/vote/", views.vote, name="vote"),
]

# polls/index.html
# ↓URL部分を以下に変更
<li><a href="{% url 'polls:detail' question.id %}">{{ question.question_text }}</a></li>
はじめての Django アプリ作成、その 4
簡単なフォームを書く
<form action="{% url 'polls:vote' question.id %}" method="post">
{% csrf_token %}
<fieldset>
    <legend><h1>{{ question.question_text }}</h1></legend>
    {% if error_message %}<p><strong>{{ error_message }}</strong></p>{% endif %}
    {% for choice in question.choice_set.all %}
        <input type="radio" name="choice" id="choice{{ forloop.counter }}" value="{{ choice.id }}">
        <label for="choice{{ forloop.counter }}">{{ choice.choice_text }}</label><br>
    {% endfor %}
</fieldset>
<input type="submit" value="Vote">
</form>
- セキュリティ対策で
{% csrf_token %}を記述 - フォームの action を
{% url 'polls:vote' question.id %}に設定 -
method="post"を設定
送信されたデータを処理するための Django のビューを作成
# polls/urls.py
path("<int:question_id>/vote/", views.vote, name="vote"),

# polls/views.py
class ResultsView(generic.RedirectView):
    model = Question
    template_name = "polls/results.html"

def vote(request, question_id):
    question = get_object_or_404(Question, pk=question_id)
    try:
        selected_choice = question.choice_set.get(pk=request.POST["choice"])
    except(KeyError, Choice.DoesNotExist):
        # 質問投票フォームを再表示する。
        return render(
            request,
            "polls/detail.html",
            {
                "question": question,
                "error_message": "You didn't select a choice.",
            },
        )
    else:
        selected_choice.votes = F("votes") + 1
        selected_choice.save()
        # POSTデータの処理に成功すると、常にHttpResponseRedirectを返します。
        # これにより、ユーザーが戻るボタンを押した場合にデータが二重に投稿されることを防ぎます.
        return HttpResponseRedirect(reverse("polls:results", args=(question.id,)))
-
request.POST
キーを指定すると、送信したデータにアクセスして選択された選択肢の ID を文字列として返します。 - F ()式
https://docs.djangoproject.com/ja/5.1/ref/models/expressions/
HttpResponseRedirect(reverse("polls:results", args=(question.id,)))
-
HttpResponseRedirect(args)
リダイレクト先のパスを返す -
reverse()
https://docs.djangoproject.com/ja/5.1/ref/urlresolvers/#django.urls.reverse
view側からurls.pyを探す
汎用ビューを使う
汎用ビューとは、開発においてよくあるパターンに対応したショートカット関数です。
今現在のpolls/view.pyのdetail,resultsメソッドは非常に似た形をしている
def detail(request, question_id):
    question = get_object_or_404(Question, pk=question_id)
    return render(request, 'polls/detail.html', {'question': question})

def results(request, question_id):
    question = get_object_or_404(Question, pk=question_id)
    return render(request, 'polls/results.html', {'question': question})
以下の様にして冗長なコードを削る
具体的なステップは以下3つ
- URLconf を変換する
- 古い不要なビューを削除する
- 新しいビューに Djangoの汎用ビューを設定する
from django.urls import path

from . import views

app_name = 'polls'
urlpatterns = [
    path('', views.IndexView.as_view(), name='index'),
    path('<int:pk>/', views.DetailView.as_view(), name='detail'),
    path('<int:pk>/results/', views.ResultsView.as_view(), name='results'),
    path('<int:question_id>/vote/', views.vote, name='vote'),
]
# 元のコード
# urlpatterns = [
#     path('', views.index, name='index'),
#     path('<int:question_id>/', views.detail, name='detail'),
#     path('<int:question_id>/results/', views.results, name='results'),
#     path('<int:question_id>/vote/', views.vote, name='vote'),
# ]
変更点は2つ
-
<question_id>が<pk>に変更 - as.view() でクラスをビュー関数化するメソッド使用
urls.pyを変更したら、次にviews.pyを変更する
from django.http import HttpResponseRedirect
from django.shortcuts import get_object_or_404, render
from django.urls import reverse
from django.views import generic

from .models import Choice, Question


class IndexView(generic.ListView):
    template_name = "polls/index.html"
    context_object_name = "latest_question_list"

    def get_queryset(self):
        """Return the last five published questions."""
        return Question.objects.order_by("-pub_date")[:5]


class DetailView(generic.DetailView):
    model = Question
    template_name = "polls/detail.html"


class ResultsView(generic.DetailView):
    model = Question
    template_name = "polls/results.html"


def vote(request, question_id):
    ...
汎用ビューはどのモデルに対して動作するかを認識させる必要があります。
- model 属性を指定する(
DetailViewとResultsViewのmodel = Question) - get_queryset() 関数を定義(
IndexView)
終わりに
かなり長くなってしまったので
後半部分の5~7はこちらから
後半部分では最後に感想も述べてます。


