#プログラミング ROS2< 環境の地図作成 >
はじめに
ROS2(バージョンアップしたROS)を難なく扱えるようになることが目的である.その第8弾として,「環境の地図作成」を扱う.
環境
仮想環境
| ソフト | VMware Workstation 15 |
| 実装RAM | 3 GB |
| OS | Ubuntu 64 ビット |
| isoファイル | ubuntu-20.04.3-desktop-amd64.iso |
コンピュータ
| デバイス | MSI |
| プロセッサ | Intel(R) Core(TM) i5-7300HQ CPU @ 2.50GHz 2.50GHz |
| 実装RAM | 8.00 GB (7.89 GB 使用可能) |
| OS | Windows (Windows 10 Home, バージョン:21H1) |
ROS2
| Distribution | foxy |
launchファイルの作成
前回環境構築したturtlebot3の中のサンプル(以下参照)において地図を作成するために,turtlebot3_house.launch.pyとteleop_keyおよびcartographer.launch.pyをまとめて実行するためのlaunchファイルをつくる.
パッケージの作成
まず,luanchファイルを置くパッケージを作成
cd ~/ros2_ws/src
ros2 pkg create turtlebot3_lesson --build-type ament_python
cd ~/ros2_ws/src/turtlebot3_lesson
mkdir launch
launchファイルにまとめるもの
turtlebot3_gazebo turtlebot3_house.launch.py
turtlebot3とハウスがGazebo上に配置されたサンプルを起動するlaunchファイル
ros2 launch turtlebot3_gazebo turtlebot3_house.launch.py
- パッケージ: turtlebot3_gazebo
- launchファイル: turtlebot3_house.launch.py
turtlebot3_teleop teleop_keyboard
turtlebot3をキー入力で操作するためのプログラム
ros2 run turtlebot3_teleop teleop_keyboard
- パッケージ: turtlebot3_teleop
- 実行ファイル: teleop_keyboard
turtlebot3_cartographer cartographer.launch.py
turtlebot3に搭載されたlidarを用いて,周囲の点群情報から地図を作成するためのノードを立ち上げるlaunchファイル
ros2 launch turtlebot3_cartographer cartographer.launch.py
- パッケージ: turtlebot3_cartographer
- launchファイル: cartographer.launch.py
作成準備①: package.xmlの編集
launchファイルとして認識・実行できるようにpackage.xmlを編集する.
<exec_depend>launch_ros</exec_depend>
**編集例**
<?xml version="1.0"?>
<?xml-model href="http://download.ros.org/schema/package_format3.xsd" schematypens="http://www.w3.org/2001/XMLSchema"?>
<package format="3">
  <name>turtlebot3_lesson</name>
  <version>0.0.0</version>
  <description>a package for practice through turtlebot3</description>
  <maintainer email="yuya@example.com">Yuya Shimizu</maintainer>
  <license>BSD</license>

  <test_depend>ament_copyright</test_depend>
  <test_depend>ament_flake8</test_depend>
  <test_depend>ament_pep257</test_depend>
  <test_depend>python3-pytest</test_depend>
  <exec_depend>launch_ros</exec_depend>

  <export>
    <build_type>ament_python</build_type>
  </export>
</package>
作成準備②: setup.pyの編集
import os
from glob impoer glob

# <省略>

data_files=[
        ('share/ament_index/resource_index/packages',
            ['resource/' + package_name]),
        ('share/' + package_name, ['package.xml']),
        (os.path.join('share', package_name), glob('launch/*.launch.py')),
    ],

# <省略>
**編集例**
from setuptools import setup
import os
from glob import glob

package_name = 'turtlebot3_lesson'

setup(
    name=package_name,
    version='0.0.0',
    packages=[package_name],
    data_files=[
        ('share/ament_index/resource_index/packages',
            ['resource/' + package_name]),
        ('share/' + package_name, ['package.xml']),
        (os.path.join('share', package_name), glob('launch/*.launch.py')),
    ],
    install_requires=['setuptools'],
    zip_safe=True,
    maintainer='Yuya Shimizu',
    maintainer_email='yuya@example.com',
    description='a package for practice through turtlebot3',
    license='BSD',
    tests_require=['pytest'],
    entry_points={
        'console_scripts': [
        ],
    },
)
launchファイル
cd ~/ros2_ws/src/turtle_test
touch launch/myTurtlesim.launch.py
※chmodコマンドでpythonファイルに実行権限を与えなくてもよいようだ.
import launch
from launch import LaunchDescription
from launch_ros.actions import Node
from ament_index_python.packages import get_package_share_directory

def generate_launch_description():
    # include some other launch files
    # launch file for turtlebot3_house
    gazebo_dir = get_package_share_directory('turtlebot3_gazebo')   # package name having a launch file
    included_launch = launch.actions.IncludeLaunchDescription(
            launch.launch_description_sources.PythonLaunchDescriptionSource(
                    gazebo_dir + '/launch/turtlebot3_house.launch.py'))

    # launch file for cartographer
    cartographer_dir = get_package_share_directory('turtlebot3_cartographer')
    included_launch2 = launch.actions.IncludeLaunchDescription(
            launch.launch_description_sources.PythonLaunchDescriptionSource(
                    cartographer_dir + '/launch/cartographer.launch.py'),
                    # some arguments for launch
                    launch_arguments={
                        "use_sim_time": "True"  # "arguments(param) name":"value"
                    }.items())
    return LaunchDescription([

        launch.actions.LogInfo(
            msg="Launch turtlebot3_gazebo node and turtlebot3_teleop_key node."
        ),

        launch.actions.TimerAction(period=3.0, actions=[
            launch.actions.LogInfo(
                msg="It's been three seconds since the launch"
            )
        ]),

        # include launch files set the above
        included_launch,
        included_launch2,

        # Node for teleop_key to control turtlebot3
        Node(
            package         = 'turtlebot3_teleop',         # package name
            namespace       = '',                          # No namespace for launching node in order to keep the original name to communicate with related packages
            executable      = 'teleop_keyboard',           # file name to run
            name            = 'teleop_turtlebot3',         # node name
            prefix          = 'xterm -e',                  # option: run this another terminal here; xterm requires you to install
                                ),
    ])
ROS2におけるinclude
    # launch file for cartographer
    cartographer_dir = get_package_share_directory('turtlebot3_cartographer')

    included_launch2 = launch.actions.IncludeLaunchDescription(
            launch.launch_description_sources.PythonLaunchDescriptionSource(
                    cartographer_dir + '/launch/cartographer.launch.py'),

                    # some arguments for launch
                    launch_arguments={
                        "use_sim_time": "True"  # "arguments(param) name":"value"
                    }.items())
cartographerのlaunchファイルを呼び出す部分を例にその方法を見ていく.
まず,packageのpathを取得する.
get_package_share_directory('package名')
続いて,pathを参考にlaunchファイルを直接呼びにいく.
launch.actions.IncludeLaunchDescription(
            launch.launch_description_sources.PythonLaunchDescriptionSource(
                    cartographer_dir + '/launch/cartographer.launch.py'),
直接呼びにいくところの続きにパラメータ(引数)を設定することもできる.
# some arguments for launch
                    launch_arguments={
                        "use_sim_time": "True"  # "arguments(param) name":"value"
                    }.items())
実際には,これらの設定をlaunch.actions.IncludeLaunchDescription()の戻り値として変数に格納して置き,いつものようにreturn LaunchDescription([])の中で呼び出している.
これにより,launchファイルの統合もできるようになった.
ビルド
cd ~/ros2_ws
colcon build
地図の作成
ここから,地図を作成していく.
ros2 launch turtlebot3_lesson turtle_mapping.launch.py
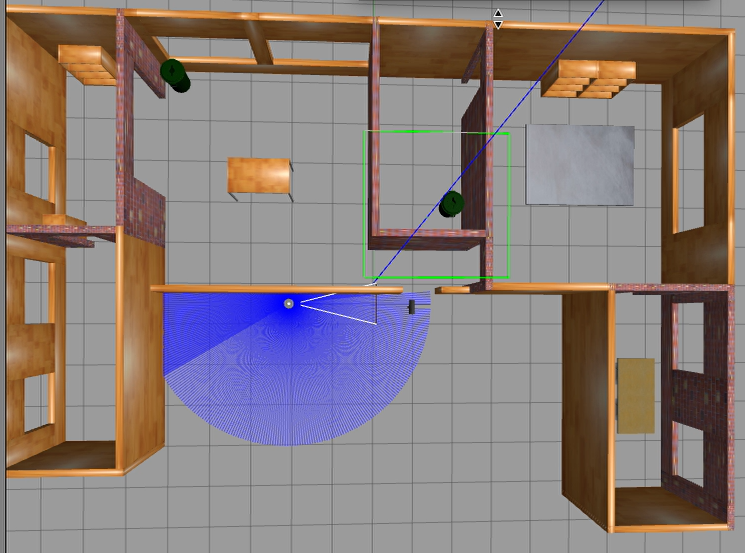
実行の様子
とりあえず,そこそこいい感じの地図を作成することができた.
地図の保存
動画の中でも保存の操作をしているが,コマンド改めて示しておく.
ros2 run nav2_map_server map_saver_cli
※-fオプションで名前を付けられる
参考文献にはros2 run nav2_map_server map_saverとあったが,私の環境下では,以下のようなメッセージが出てきて,保存ができなかった.
No exectable
そのような名前で実行できるようなものがないということだろう.
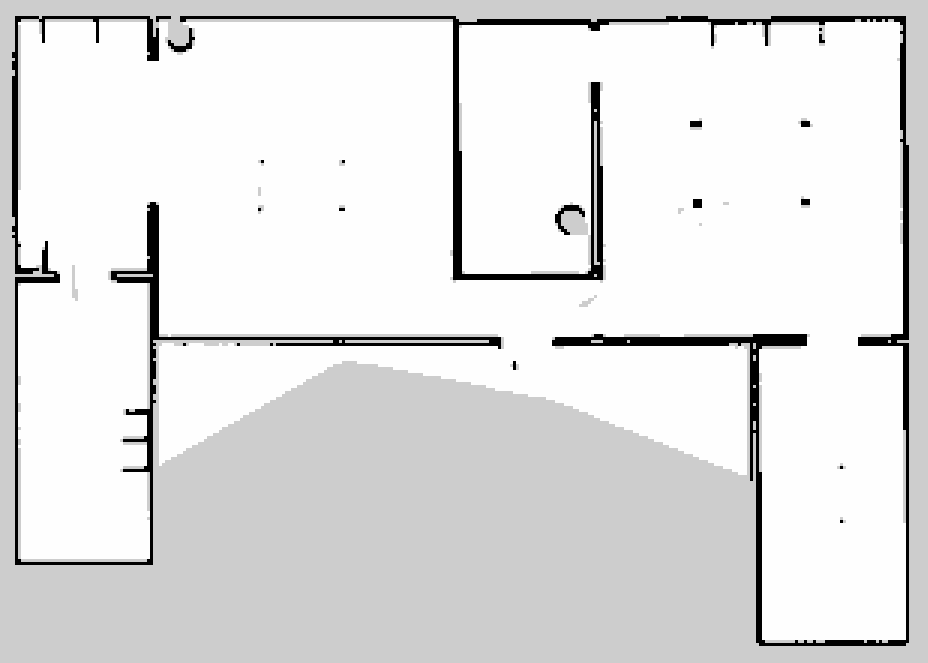
完成した地図
画像
yaml
image: map_1644128215.pgm
mode: trinary
resolution: 0.05
origin: [-5.73, -5.15, 0]
negate: 0
occupied_thresh: 0.65
free_thresh: 0.25
今回は特に名前を付けるようなオプションなしで保存したため,数字の羅列が名前に含まれている.
ちなみに-fオプションで名前を付けることができる.
感想
過去にROS1ではgmappingを用いた地図の作成を学習した.今回はcartographerというものらしい.詳しくは知らないが,自己位置推定のアルゴリズムの1つでSLAMを提供するシステムのようだ.思った以上にいい感じの地図を作成することができたが,地図を作成するのに家の中をロボットで動き回るのには非常に時間がかかった.(およそ1時間)
これで,参考文献としていた教材を終えた.そこまで分厚くない教材であったこともそうだが,思った以上にスムーズに終わった.
次回以降は,もう少し実践的な部分で経験を積めたらと思う.とりあえず,今回せっかく地図を作ったので,次回あたりには,この地図を用いてナビゲーションでもできればと思う.
参考
- ロボットプログラミングROS2入門 玉川大学 岡田浩之 著,科学情報出版株式会社